MEZZZ
Free Member
-
Joined
-
Last visited
Everything posted by MEZZZ
-
 If you have the lower panel that goes underneath the glove box I would like one, black preferably. It covers up the blower motor, mine was cracked and held on by duct tape so I trashed it. PM me if you have one. thanks
 -
I had this link saved for when I got around to doing the diff. I ended up removing it when I bought one of Daves R/T style mounts . Thought it might come in handy for someone else, so here it is, courtesy of Atlantic Z http://atlanticz.ca/zclub/techtips/differentialoilchange/index.html
-
You and I are on the same page there. I did the front first, knowing I had to drop the tank for the rear bumper. I had taken a sawzall to the strut so I could mount it in advance. When it came time to do the rear, I pulled out EVERYTHING. Got under it with a wire wheel and cleaned it up. It too had undercoating on it and it was in very good shape but filthy. I thought, "while I am at it" and I am glad I did it. Messy job to be sure and no one will ever see it unless I put it up on a lift but I know its under there : ) For the wheel wells, I used the same spray on undercoating and they look great. I used these brackets for the conversion, front and rear. http://www.zccjdm.com/catalog.php/azcarbum/dt93256/pd1790406/280Z_TO_240Z_FF__RR__BUMPER_CONVERSION_BRACKETS_
-
What better gift could you hope for? I wasnt so lucky yesterday : ( I did get a cool tie though Oh and my daughters boyfriend did get me a car cover for my Z. I think I would have liked your gift better...there is always tonight though! Are the suns, moon and venus all in alignment by chance?
-
Cozye, thanks for the reply. Yes, I did all the bushings including the rack. I did the ball and socket bushing on the arms and also replaced the coupling (what a pain that was). I cannot remember if I put the long in front or back, I remember reading the ones ending in 1 went up front. I cannot remember if they were the shorter but I do remember not having to use the spring compressor on the front but I did on the back. My rear does sit up higher in the back also. Anyway, I didnt mean to jack your thread, only wanted to congratulate you. The suspension is a big job to do! I took everything out and cleaned off 32 years of grime, painted and reinstalled the entire suspension/brake system using new parts. It might be that the front end is a bit out of line or maybe I need to dial the shocks to a higher number to get the feel I was hoping for. Now that the kitchen is complete (18K later, the things I could have done to my Z with that ), its too damn cold to work much on it. I will figure it out, your car looks nice from the photo, I like the bumper. I went with the fiberglass front bumper from MSA and found a steel one off of a 73 for the rear. I bought mounting brackets for the conversion and they worked well. I love the look of the smaller ones as well. If you havent done the rear, you have to drop the tank to get the strut off the right side, while it was out I closed up the strut holes in the rear valance...good luck
-
congrats, I read your original post with great envy. I too did the suspension last year, poly kit, r/t diff mount, toyota brake upgrade, rebuilt rear brakes, eibachs, tokico illuminas, 15 inch rewinds with toyo tires. New ball joints, outer tie rods, pacesetter monza exhuast, etc. Unlike you taking a couple weekends, mine took me a couple months . After doing the front, it felt better, not great. I was told to do the rear, its old and the front is new. After doing the entire rear (dropping it all out, painting everything, etc including the tank), I anxiuosly got in and took it for a spin. I was figuring the car would feel like yours, tight, new, exciting. It still doesnt feel quite right to me. I havent had the front end aligned yet. I did pay close attention to all torque specs, etc. The Illuminas are all set at the 2 setting. I was hoping for the wow feeling you got but it just wasnt there. It does feel MUCH better than it did, it was creaky, groaning, shaking, etc. Soon after I did it, I had to put the car on the back burner as my wife planned a total (read: expensive) kitchen renovation...damn DYI Network 2 months later and its finished and I am about to embark on the Z again. Only thing I did not replace was the rack itself...it just still feels a little loose to me. Your story has inspired me though, congrats
-
I had the same problem with my 77. I had taken stuff off the motor shortly after purchase to clean it all up and put it back and had the miss and shudder going on. I retraced all my steps (or so I thought) to no avail. Started the expensive resort of it must be this, nope, must be that. Replaced fuel line, filter, plugs, wires, dizzy, thermotine, injectors. Got the fsm and efi bible, bought a fuel pressure guage, injector tester, etc. I finally got around to the afm, found a used one. When taking the old one off(that I had removed to clean) I noticed when I put the ground wire back on, I had grounded the other end back to the afm, not to the frame mount. Duh, put the new one on and it ran great...just a thought, check the ground to the afm
-
To recap, I installed one of the R/T style mounts I purchased from Dave (Zsondabrain) last weekend along with a total teardown of my rearend. When I (finally, after 8 months!) got it back together a week or so ago and took it for a test drive I heard a terrible "chattering" sound from the rearend. Upon inspection, it looked like when I let off the gas, the driveshaft was actually coming down and hitting up against the rear stabilzer bar. I used the GM mount and removed the stock lower diff mount. Dave's advice was to use the poly bump stop method along with the stock lower diff. mount. Being the idiot I am, I had thrown away my stock mount so I ordered and received a new one yesterday along with the poly bump stop. I didnt really look forward to tearing out the bulk of the rearend so I was able to install it like this: Jack up the car, remove the exhaust and rear stabilzer bar, the transverse link inner bolts and the diff. mount front member. I loosened the 2 nuts on the mustache bar holding the diff and lowered it using a jack for support. I was able to remove the R/T mount, take off the GM mount and put on the poly bump stop, trimmed 3/4 inch. I slid the R/T mount back in place, installed the new lower stock diff. mount and raised everything back up into place. It wasnt all that bad, took a couple hours. The diff. is now wedged between the poly bump stop and lower diff. mount and is solid. I have about an inch between the driveshaft and the stabilizer bar. Took it for a test drive and no more noise. For the record, I have a '77 280 and it seems as if the poly bump stop/stock lower mount is the way to go. Hopefully, I save someone the headache(s) I had but now that it is done, it was worth the hassle. My question is on torque settings. The manual claims to lower the car on the weight of its wheels and put 2 people in the car. Then torque the inner transverse link bolts to 115. The rear stabilzer bar is right in front of the (big) bolts, I dont see how I am to accomplish this. I know it is supposed to preload the car before tightening so the bushings dot get twisted. How do I go about doing this? I have ramps to use for this purpose. Also, I am assuming the inner is toward the front of the car and the outer is towards the rear, am I correct? Thanks! Mark
-
Ron, not sure with the Fairlady but I had no issues before. All I know it was a P.I.T.A to get that stabilzer bar back in place. Trying to get everything lined up, squeezed in and held together while tightening it all up was a job for an octopus. Dave, I was afraid you would say that. On the brihgt side, I am already TOO familiar with this part of the rebuild. It took me 3-4 attempts before it lined up last time, thats why I am not looking forward to doing it again. No big deal, whats some more $$ and alot of time thrown into this car. I am sure I will like the R/T mount very much the 5th time I put it in, Im growing kind of fond of it I just wish I had known ahead of time, I dont ever remember anyone bring this issue up before. Regardless, thanks for the advice, might be awhile before I get to it, I just ordered all new cabinets, granite countertops, S/S appliances, travertine tile, etc.. for a kitchen remodel in an attempt to keep Mrs. Mezzz happy for a few hours Of course, I am doing all labor myself, not time after next week to work on the Z. Thanks again guys, I will let you all know the outcome of this.
-
Thanks Ron. I am using the E/S poly on the mustache bar, I dont have the rubber washers any longer. I do agree with you that getting some more clearance would probably solve the problem. I need to move the differential up. I am thinking I could do this by shaving some of the GM poly mount if possible, other than that, I am clueless. If I elongate the holes in the R/T Mount, I could get it to raise up but I would question if it would slip back down over time. I just have to wonder if I am missing something? I havent found any threads of anyone else having an issue with the mount and clearance. Another day, its family fun time Have to keep the peace you know.
-
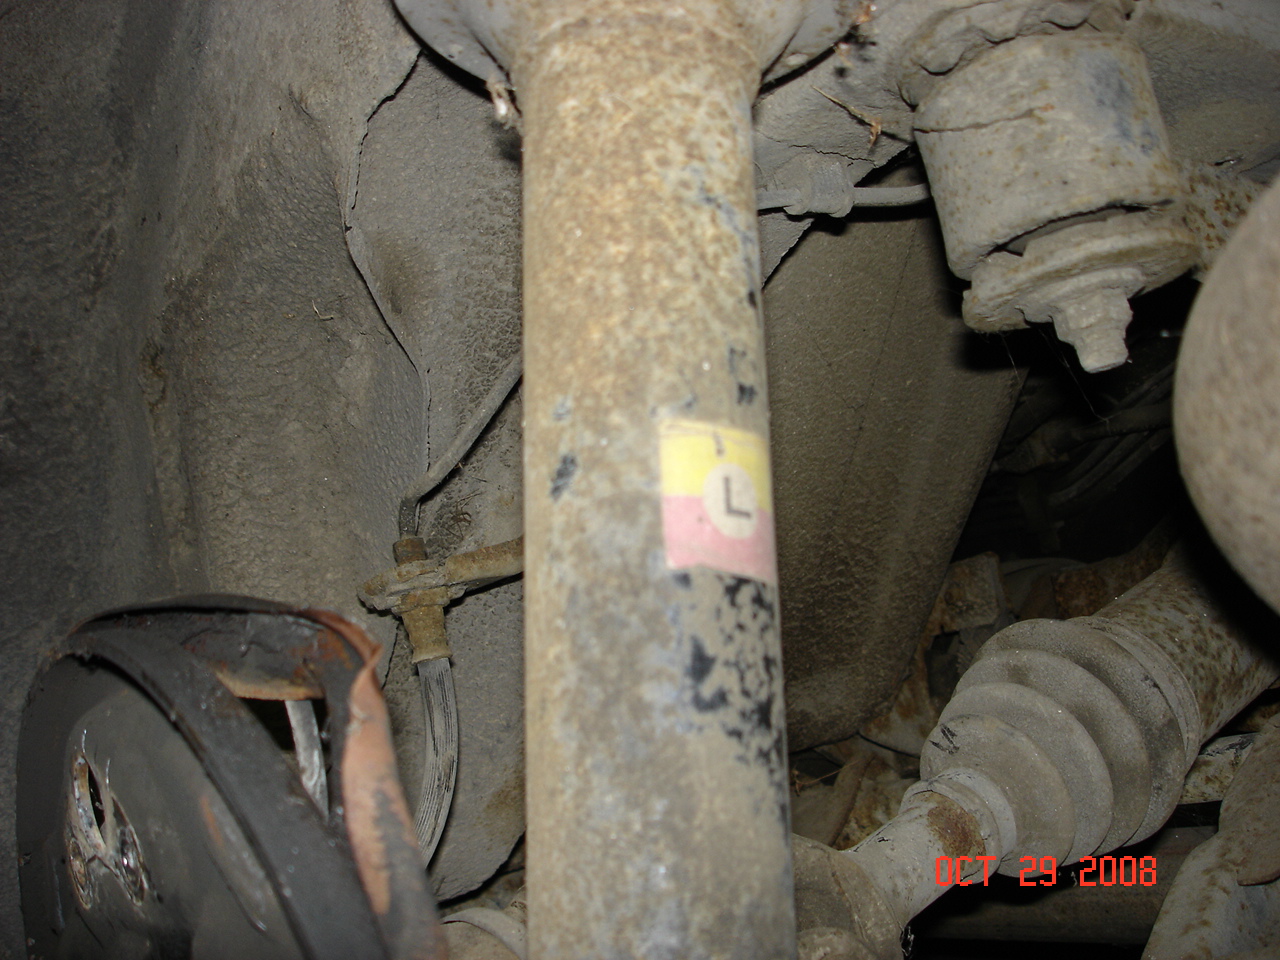
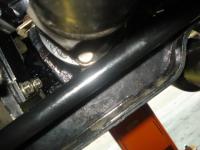
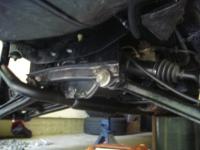
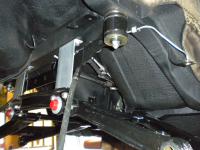
I got the car back up on stands and took a couple photos. I think the problem is the driveshaft is hitting the rear sway bar. I took it for another test drive and it makes the noise when I downshift and apply the brakes at about 30-35 mph. It is hard to describe the noise, a metallic, very fast, chattering. I am thinking it is the driveshaft spinning and hitting up against the sway bar. I took a feeler guage and I have about .025 to .030 clearance between the driveshaft flange and the top of the sway bar. I have E/S poly on everything. I really had to work to get the bushings for the rear sway into place, greasing them up and using a floor jack to get them squeezed into place. As stated before, I am using the GM poly tranny mount method without the stock lower diff mount. I didnt shave anything off the mount. Everything lined right up (the bolt into the GM mount) and I tightened it up and it is touching the top of the diff. case. Any ideas on where to go from here? Dave? Anyone. I am thinking I should have more clearance than I have between the sway bar. Thanks!
-
Thanks Steve, it was just a thought on reducing the noise, I wondered if it might affect things. I am testing the car without any interior as well and should figure that in. Hopefully, once I get in the Dynamat and carpet it will reduce it. thanks
-
Dave, that makes me a feel a little better. When I went to put the diff back in, I had the bar located behind the hangars as in your photo, the manual showed it like that. When I went to put on the crossmember, no go. Backed it out ans reversed the moustache bar, reinstalled (with the stock lower mount), didnt fit. Backed it out again after reading up on it, discovered I couldnt use the stock mount with the GM mount I had. Took it off, reinstalled and everything lined right up. Being the idiot that I am, cleaning up a couple weeks ago, I tossed the stock mount and the "counterweight" looking thing. After everything went back in, the diff felt locked down and I really didnt think I would have to do this a 4th time I bought in on the R.T mount from you early, before the bump stop option was described and bought the G.M. mount. I will get her back up on stands today and see if I see any evidence of it coming down onto the crossmember and if so, I will do the bump stop option and get a new lower mount. I REALLY dont look forward to redoing this job again I jumped in Monday for my test drive for the first time since last October thinking this thing should handle like a go cart. At least it looks good sitting low in my garage thanks!
-
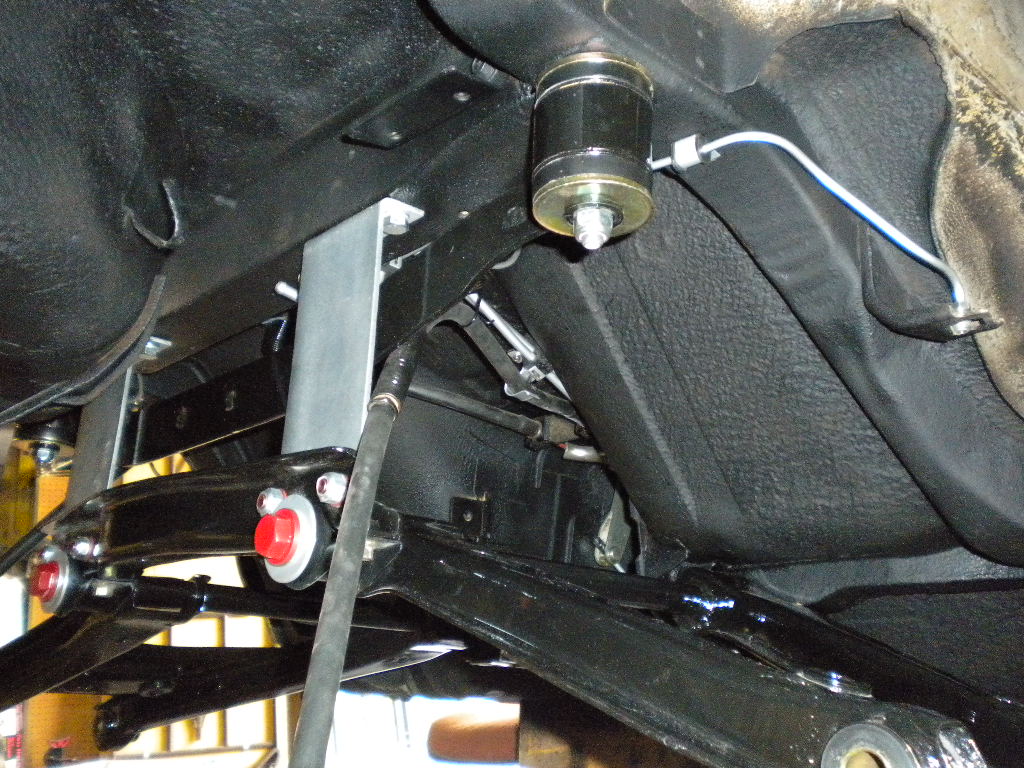
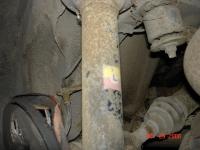
Ok, please look at Daves pic, (the clearer one with red bolt heads) and mine that I snapped last week. Note the position of the moustache bar compared to mine. His is behind the mounts (silver) and mine is mounted in front of them. Is this a difference between a 260 and a 280 or am I screwed up somewhere? I originally installed the mustache bar like Daves photo (it looked to be like that in the Haynes manual also) and my diff did not line up. I swapped it around and everything matched up fine. Am I missing something here? I started this project last fall, it all made sense to be back then but that was back then.
-
Good points, thanks for the advice. Dave, I ddnt think you would mind the pic grab, at least it shows I DO search before starting a new thread Not sure of the difference between your 260 and my 280 if any, I really only used the photos to show the old stock rubber and the new poly mount. Mine looks dead on yours with the exception of the red bolt heads, its almost as clean looking now! Could it be in the R/T type diff mount itself? I went with the E/S GM tranny mount method. Using that method, I could not use the stock lower mount or the stack of steel that were installed in later years. I believe the stack was added on later models (it almost looks like some type of counterweight constructed out of 4 or 5 1/8 inch plates) to help reduce vibration. Is it possible by using the R/T mount, Ive actually added to the problem? Also, does anyone have torque seting on all nuts/bolts associated with the rear end? I cant seem to find them all, see 1st photo in post. thanks guys
-
I didnt replace the half shaft U-joints or the wheel bearings. I pulled on the wheels prior to the start of the project, 12-6 and 3-9 positions and they felt fine. I kick myself for not doing the rear bearings when I had it apart, just because of the "while I am at it" syndrome. The rear exhibited none of the symptoms before the rebuild so I have to assume it is something I did (or did not do). I only drove it around the block and cant remember if the sound came when I applied the brakes or just when I let off the gas. I will attempt a short drive again and see exactly when it makes that chattering noise. On the mustache bar mount, you are correct, the mounts do cover the top and bottom of the actual bar with the metal washer on top (and bottom). I was just wondering what effect it would have if I put a piece of rubber between the body and the top of the mount. With the current setup, the large metal washer is up against the body and in the stock form they had that wavy piece of rubber. I did fail to mention that I drained and re-filled the diff while out but doubt if that had much to do with it. thanks for the reply
-
To start, '77 280. Front end rebuilt last fall and just finished the rear last weekend. I installed, Illumina's, Eibach springs, ES poly bushings (all of them), S/S brake lines, shoes and wheel cylinders. I also have a new set of Konig 15's with Toyo 225/50/15 installed. I also installed one of Zonsdabrain (Dave) R/T style diff. mount. Everything (including gas tank) was removed, cleaned and painted. The front end was completed last fall, I test drove about 5 miles with no issues. Rebuild included Illuminas, Eibachs, poly bushings, Moog ball joints, wheel bearings, ball and socket kit for tension rod, toyota 4x4 brake caliper upgrade with cross drilled rotors and S/S lines. I dropped the car last weekend and eagerly got in it for a short test drive. I still need to get the car up on a ramp and re-tighten a few bolts to torque per the manual's instructions (weight on wheels, 2 people in car). First, I heard alot of gear noise. I am wondering if that is the mustache bar poly bushings and am asking you guys your thoughts. I am thinking of using a 1/8" to 1/4" rubber insulator between the body and the bushing. Any thought? The stock setup had rubber in between ( photos from Zsondabrain and used without prior consent ) Also, I had a terrible sound coming a couple times while deaccelarating, like a gatlin gun noise, chattering, hard to describe on here. I am going to put the car back up on stands and double check everything, torque, etc. I found this diagram awhile ago but it seems to be missing F thru J being marked on it. I need to ensure that all the bolts and nuts are torqued to spec and cant find some of the settings in the manual. Thank you for any help you can provide. Not sure why but when you click on the diagram it is coming up white on black and hard to read. If you click on it while open, it will open correctly.


-
Black seems to be the color, I went black on everything, including the calipers.
-
Rims/tires, stainless steel brake lines to go with your new s12 calipers. Maybe a brake booster from a 280zx as well. Interior, if you dont mind a little extra weight, Dynamat or its equivalent. Carpet kit, new seat foam, and upholstery. LED lights for the guages and dome light, Dave's 3rd brake light. Oh and while you are at it, the R/T style mount for the diff if you are tearing out the rear to do bushings. I have done all this (or at least bought it) and more. The one thing left on my wish list is a 5 spd. swap (another idea for you)
-
I would rather be safe than sorry and spring the extra few bucks for the fuel injection hose. From the line coming in under the hood, to the filter and up to the rail, its all fuel injection line. I also suggest getting the correct fuel injection clamps instead of hose clamps. Dont ask me how I know this
-
I fired mine up for the 1st time since last fall today! In October, I finished up rebuilding the front end. I drove it for a 10 mile test drive and the next weekend, put it up on jackstands to start the rear end rebuild. Between the winter months, (I dont have a heated garage) to working 6 straight weeks this spring, then throw in family obligations, its has been hard to find the time to work on it. I ripped the entire rear end out, scrubbed, wire wheeled and wire brushed the underside from the diff mount area back to the rear valance. What a disgusting job that was. No rust on any of the components, just filth. Repainted the tank, the Lower control arms, mustache bar, diff, etc. Put in one of Daves R/t Mounts. Installed a new e-brake cable, Illuminas, Eibachs, E/S poly bushings, spindle pins, brake shoes and hardware. Yesterday, I installed the left hub assembly, today, the rear sway bar, connected the half shafts, built up the brakes, hooked up the new e-brake cable. Poured 5 gallons in it and fired it up while still on the stands. Another couple hours and I should be road testing it for the first time in 9 months. I wish I could say its been easy, this thing has kicked my a$$ every step of the way! It has been so hot here the past couple days it was almost unbearable in the garage but 2 days with nothing planned is a rarity!
-
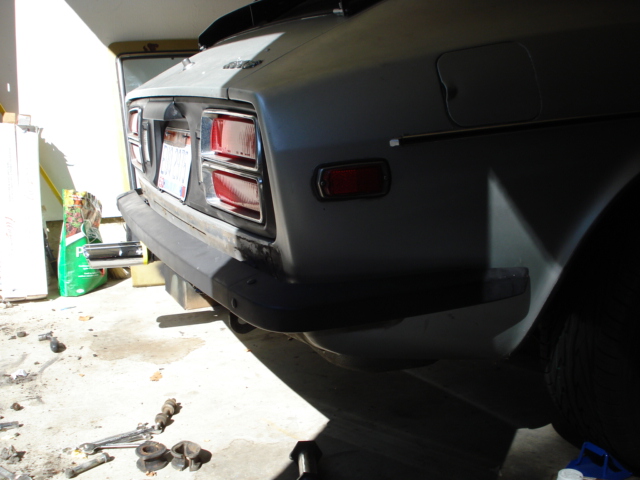
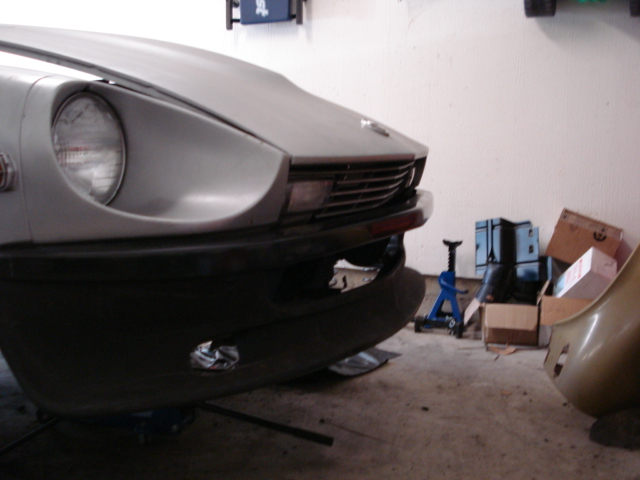
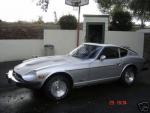
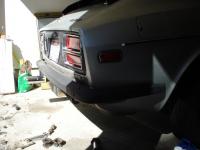
Well, I am glad that I did it,I was never a fan of the taxi cab bumpers. Some think you should leave the car alone, if you wanted small bumpers, get a 240. There were other reasons that factored into my decision on the 280 when I went looking. Anyway, the swap was not without some pain. The front was easy enough, remove the bumper and old mounts, bolt up the new mounts from the link posted above, done. The rear however is more involved. You have to remove the old bumper, then the mounts. The drivers side is easy enough, the passenger side requires the removal of the gas tank to remove the mount. The holes in the body do not line up for the 240 bumper, new holes must be drilled. Once again, driver side requires removing the rear interior panel to access the bolt and nut. The passenger side though, I could not get into by removing the rear panel from the interior panel. The fill tube for the gas tank is in the way. I ended up drilling through to the underside of the body while the gas tank was out and fitting a longer bolt to catch the bumper. Then there is an issue with holes left over. You will have the 2 oblong holes where the struts passed through. You will also have alot of small holes under the tail light finsher from where the trim piece screwed on. I closed off the 2 oblong holes with sheet metal when the tank was out and will fill the small holes during the bodywork/repaint phase. Hope this helps in your decision process.
-
I used these brackets and they worked very well. A little flimsier than I would have thought but basically you are just hanging the bumpers on them as niether the bracket or bumper offers any real protection. http://www.zccjdm.com/store.php?seller=azcarbum&pd=1790406&disp=images#IMAGES I used the MSA fiberglass front and found an OEM rear that someone had reworked, welded the holes shut and primed.

-
front fenders would be great.
-
ditto on the Rustoleum "Self Etching" primer..I get the one that is green in color. BTW, its much cheaper at your local Walmart than it is at your local car parts or hardware store.