TomoHawk
Free Member
-
Joined
-
Last visited
Everything posted by TomoHawk
-
 Thanks. Unfortunately, the cylinder head on something like the L28 is more-or-less perfectly-designed for street use. To make use of a large-bore throttle, you'd need a cylinder head with larger combustion chambers and valves, larger ports, larger intake runners, ad a larger plenum. There is someone on CZCC that has constructed a successful twin-cam cylinder head, but that's all I've heard of it. It's too bad the cylinder head is about the only part that doesn't have a modern substitute, like the 4LN71 or 300ZX transmissions and the Hellfire EFI.
 -
It was the carpet, bunching up in the corner next to the throttle pedal. I took off the little connection rods to find where it was sticking. The plastic bushings were 'gunked up' a little, but didn't 'stick.' I can smooth the carpet out, but it bunches up again after a while from your foot making the carpet move around while you drive. The plastic protector bit next to the throttle pedal just won't lay flat- can you smooth it out with some heat maybe? Maybe I can get some Velcro on the transmission tunnel to keep the carpet in place, or maybe the padding underneath needs some work. Bruce- Can you just tell us the source of your awesome throttle body?
-
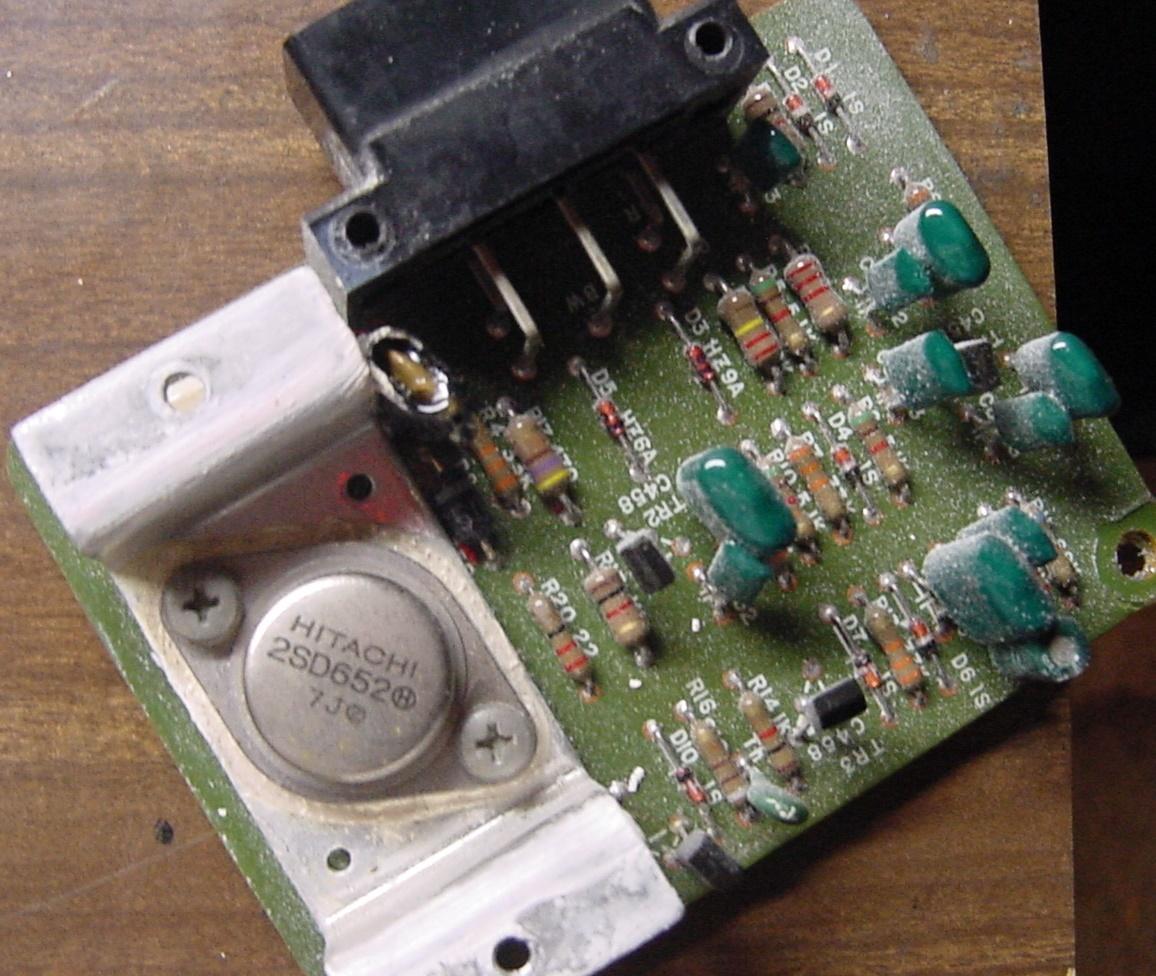
I was unable to find a NEW wiper motor amplifier anywhere, and there were only used ones on eBoo. Supposing your stops working completely, is there a way to bypass the amplifier to get something like the Civic motor to operate? I haven't thought of probing the connector to the amplifier since it's in a tight place. Again, a good alternative would be to rebuild the amplifier or design a new one that directly replaces the old ones.
-
I have asked at several local AP stores, and no one has heard of the resistor caps- even the old guys at NAPA. Obviously, the young people at mainstream AP stores never heard f anything that's not on the computer, or an OE part, or oil...
-
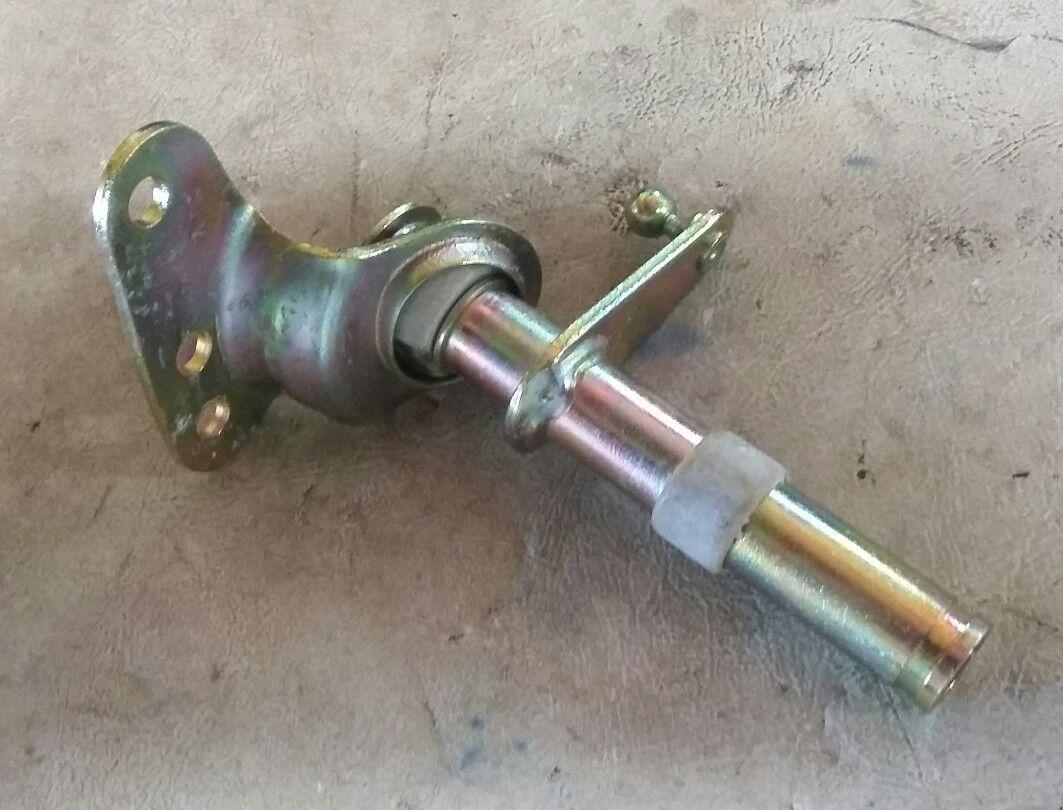
I'm just feeling some concern about the plastic balljoints; plastic ages and gets brittle, and the old Japanese plastic used on the Zed is a good example of that. Fortunately, you only need gentle pressure to operate the throttle, so I would collect the parts as you get the money, and switch them as you go.
-
I don't feel any resistance when pressing on the throttle pedal. In stead, when you press a bit on the throttle, like if you were just trying to get the car to roll forward slowly, the throttle would stay where you had it, like a sort of high-idle. Giving it a little blip will allow it to settle down to the 800 RPM. I looked into the bearing, and it gets cocked in the seat, so I think that's what is happening- you press on the throttle, the looseness on the bearing allows it to get cocked, and it stays where it is. I don't think you can disassemble that part. It should have been designed better, with a sealed bearing instead of a ball-and-socket arrangement.

-
In my case, the sticking is in the large torsion bar bearing on the firewall. I don't think it can be disassembled, polished, or repaired.
-
I starts when the engine starts, and the pitch varies with engine RPM... And you get it ALL the time. The good news is I don't hear the noise in the new car.
-
If I can unscrew the ends, then all I would need is new ends.
-
The current drums are painted with a light-grey caliper paint. I used a scotchbrite wheel to "polish" them first. The finish is fairly smooth, and I think I could have buffed them as well. I read about iron drums in the JTR conversion book. They claimed that Datsun 510 (IIRC) iron drums give better breaking because they don't "deform" when breaking, like the aluminum ones will.
-
Yes, they are the "OEM style" drums. I might get the iron drums one day, if they are available, and keep them for the future.
-
I just got a new set of drums from Arizona Z. I'd like to polish them, as they are visible rough the wheels, to look as nice as the front rotors.
-
That's correct, but I didn't think they would sell for $30-40 on eBay.
-
I took off the link from the torsion rod to the throttle, and I noticed it doesn't have threads! Is that correct? it is just a fixed-length rod that pushes down on the throttle arm, which has its own return spring, so I'd say it doesn't need to be threaded, but I wanted to make it longer to help with the throttle sticking partly open.
-
Can you provide any specific information? Maybe it's this one, Resistor Spark Plug Cap: https://www.amazon.com/NGK-LB05FP-Resistor-Spark-Plug/dp/B0018JXPWM Or this one: https://www.summitracing.com/search/product-line/ngk-spark-plug-resistor-covers/spark-plug-boot-ends-degrees/90-degrees
-
After a 1200 mile trip, and most of it was at 3300 RPM, I can tell you the module worked well. But, I'm getting a lot of RF noise on my CB radio. I have NGK resistor spark plugs, and the NGK wires from MSA. I kept the wires from the module to the coil fairly short, and there is a condensor on the coil. Is there anything else you can do? I was thinking maybe I could disconnect the wires that go to the ignition box connector near the fusebox.
-
Besides a big screwdriver, is there a proper tool for disconnecting those ball-ends? the joing looks like a balljoint, so I suppose the tool looks like a wedged-fork.
-
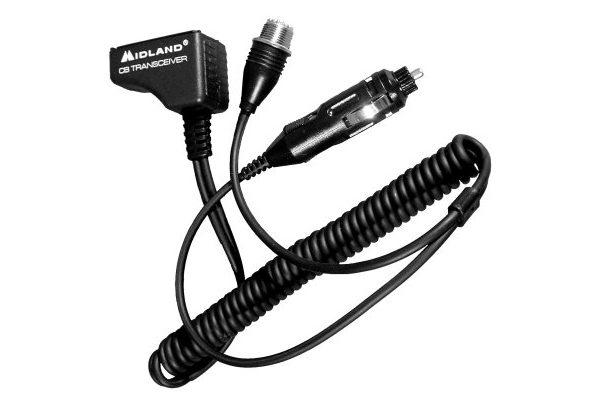
I contacted Midland Radio customer support to see if they had any left for sale, and they sent me one for free. It might be the last one they have. It works fine, but I get so much RFI from the engine that I couldn't use the CB radio to communicate anyway. My friends in the caravan could hear me, but I couldn't hear them.
-
The L28 plastic OE joints look like they might dry out and crack one day, so could you replace them with metal ones? Also, can you get new swivels for the firewall ?
-
That bottle is just a vacum reservoir, which stores some vacuum so you can change the vent function while you are at low revs or low vacuum.
-
How about this... I plugged in my CB radio (a Cobra 75 WX ST, with the little antenna connector box) and now I'm picking up some RF noise and a little whine. Granted, there are about 6 short wires from the distributor junction and from the module to the coil, thee sholdn't be much noise, unless those NGK wires and recommended NGK spark plugs aren't really the best combination? I have a condenser on the coil (-) pole, and one on the alternator. Could there be anything else to check? What's the correct way to add a condenser to the alternator? Does the placement of the CB antenna (on the roof at the back) increase or reduce TF noise? I have a second CB radio, a Midland 75-822, that has a different adapter, so I will try that in the morning. I'll be going to Springfield, IL. next Thursday for a car show.
-
I have a Midland 75-822 CB radio and I would like to get the adapter to use it in the car. The part is #18-821. I know people here have bought them, and maybe there are some surplus adapters. The dry cell battery box is available, and I suppose you could solder some wires into it to plug into a 12V source, but you still need the antenna connection, unless you rely on the stubby antenna which probably won't nave much range, but at least better than an FRS radio. ThxZ
-
That's what I did: cleaned out the old "ungrease" polished off the burrs and reassembled with good grease. It helped some. I mentioned before- that FastWoman got hers to work normally by cleaing out the old grease from inside the motor case, and cleaning the internal electrical contacts.
-
My wiper linkages have been cleaned to death, and I lubricate (with DeOxit and light oil) everything regularly, especially after driving in the rain, so I'm sure that's not why its swiping slowly. Sarah (FastWoman) mentioned to me that she was successfully able to restore the speed of her wiper motor by jut cleaning the internals and the power contacts. It makes sense, but the insides are very complicated, IMO.
-
Mine looks like some water got in the box as well. I should test the power transistor to see if it's still good- I suspect it's degraded or just dead. If that's the case, I'd say the wiper amp suffers from the same problem, which wold explain the slow wipers. Then I'd take a look inside to see if you could build a better one with modern parts. BTW- where can you get a NEW wiper amp unit?