74260ZMan
Free Member
-
Joined
-
Last visited
Everything posted by 74260ZMan
-
 Aziza z in the "like a g6" music video
 -
I know that these sites are for the roundtops, but they might help out with the idea behind it. here and here
-
From what I remember the SU's dont use a gasket underneath the dome, at least mine never had them. The "thumbscrews" that you are referring too are actually the mixture screws, turn them right to go leaner and left to go richer. I think 2.5 half turns out is usually a good place to start, but dont quote me on that. As far as the rubber "seal" I think its just there to dampen vibrations from the carb to the bowl.
-
That tube is for the PCV valve, on the FI models the hose went to the bottom of the intake manifold, and with the SU's the hose will hook up to the PCV valve on the balance tube.
-
Im not looking for high HP I just want to run injection on a stock L26. Im planning on using a 280ZX fuel pump after the surge tank, I just need a pump to fill my surge tank.
-
Does anyone know what the 280ZX fuel pumps flows in terms of LPH or GPH. Im Installing megasquirt on my 260 and need to know how many GPH my lift pump needs to flow for my surge tank. Thanks
-
Z therapy sells adapters to use your flattop air cleaner on the round top carbs, but I dont think the performance is as good since the air horns are squared. You can normally find a 240Z air cleaner on ebay for less than the adapters, thats what I did, or you could just put some airhorns inside of the filters you have now.
-
Im as satisfied as I can be since I have not started the car back up since I finished it, which was yesterday. But I have a feeling that it will make a large improvement. My valves seemed to be sticking to the old seals, so im pretty sure there will be a performance increase as well, even if it is small.
-
I just finished doing my valve stem seals, it took me probably about 5 hours all together, mainly because it was my first time doing it. The old seals I removed where super hard, like hard plastic. I defiantly could feel the valves become easier to move after I replaced the seals. I used this link to help me on the seals http://www.geocities.com/inlinestroker/seals.html. I also bought a valve spring compressor instead of making my own or renting one. The cheapest one I could find was a KD 3087 I got it on ebay for $14 and it worked great. The first one takes the longest, but after that you will get a good idea how it should go.
-
Ive had my Z completely stripped in my garage for about 2 years, and the only thing that gets on it is the dust, but I also live in Arizona, and its always dry here. Like Geezer said I think I bit off a little more than I could chew, if I were to do it again I would have waited until I was ready to prep and paint until I stripped the car
-
Wow you made those, thats pretty impressive. Is that the same wood that they use to make tobacco pipes out of?
-
I was just wondering if anybody was using an aftermarket shifter knob, I have the stock shifter and like Arne said, it just seems a little boring
-
Hey guys im getting ready to get my Z on the road and was looking at some new shifter knobs, and I want to see some of your shifter knobs to get an idea of what some of these will look like on the Z.
-
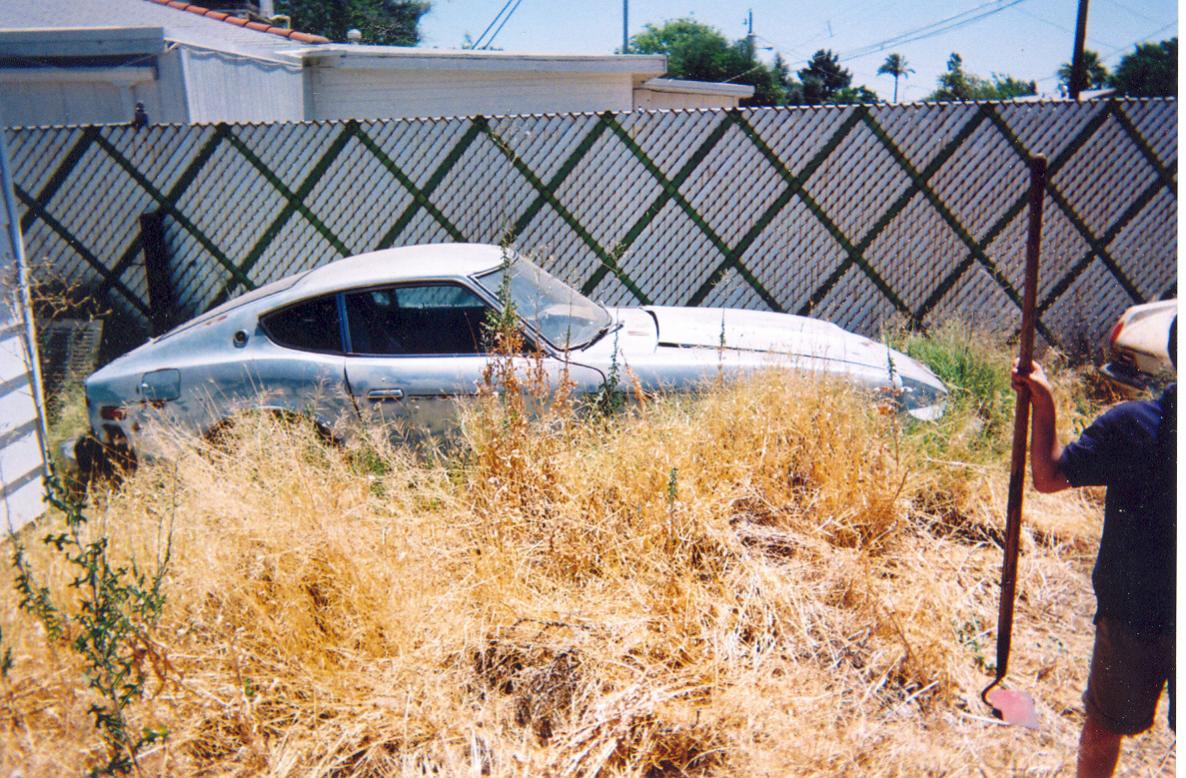
Your Z looks really nice for sitting since for a while, and your dash is great shape too. It looks a lot better than mine did when I started, but mine had been sitting in the AZ sun for 12 years
-
Thats sounds cool, welcome to the site, im in the resto process too, lets see some pics of the Z
-
Heres my Z when I first saw it in my uncles back yard, at least its on the road to restoration now.

-
M Z doesnt even leave the garage to get attention. I had an older man walk into my garage one time at a yard sales to "admire" my paint less Z. He gave me the "I used to have one, wish I still had it" speech
-
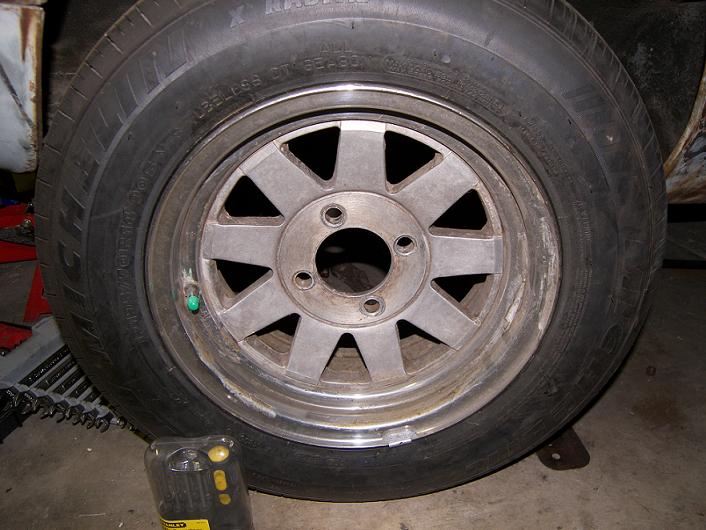
How about the 9 spoke...

-
Haha yay a new friend. If you want to be a tough man, you can hammer out the old spindle pin (like I did) and buy new spindle pins or you can make a puller tool or borrow one from Beandip, I think he was the one who lent them out.
-
Pulling the T/L would actually be easier in my opinion, I just did my back end bushings and pulled EVERYTHING out. Heres a link that will help with the removal process it sure saved my butt. http://www.atlanticz.ca/zclub/techtips/suspension/rearend/index.html
-
Yeah the strut assembly will clear the wheel well, you just have to disconnect the differential half shaft if you haven't already. and as for the spindle pin I can tell you from experience "good luck" I would recommend loaning a spindle pin puller tool from one of the other members
-
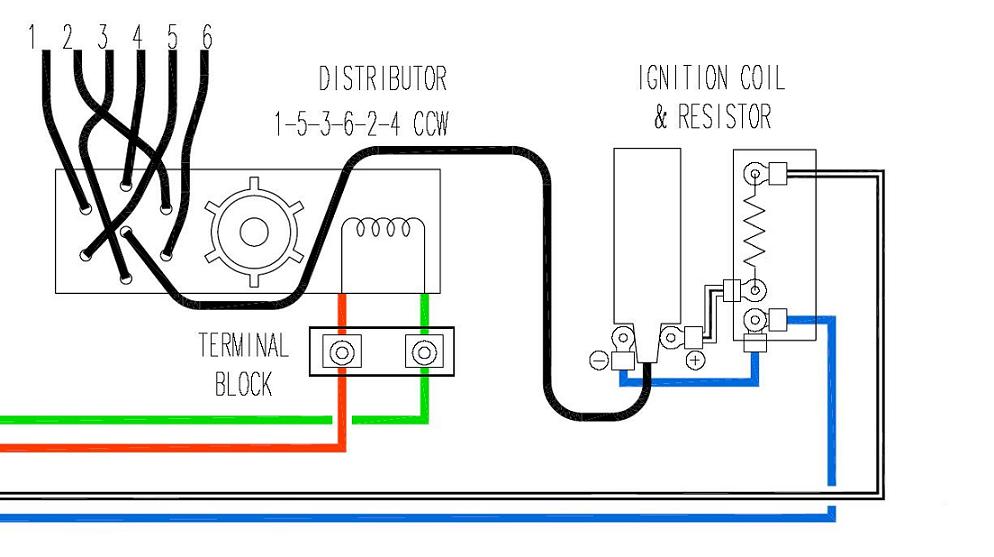
Well the stock 260s (late anyways) had electronic, but the PO decided to convert to points for some reason, so things are a little differemt
-
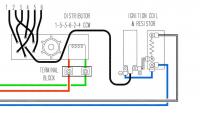
Okay I found this diagram after an extensive search. I had to modify it a little to illustrate a non fuel injected ignition, but this clears up my questions. Hope this helps anybody who need this info in the future
-
Thanks Steve ill give that a try
-
Well im not sure about just moving the left wire to the right wire, first of all the left wire has a positive sign next to it and the right one has a negative sign next to it, and connecting a "+" and a "-" doesn't seem like a good idea and second what do i do with the middle wire?