Oiluj
Free Member
-
Joined
-
Last visited
Everything posted by Oiluj
-
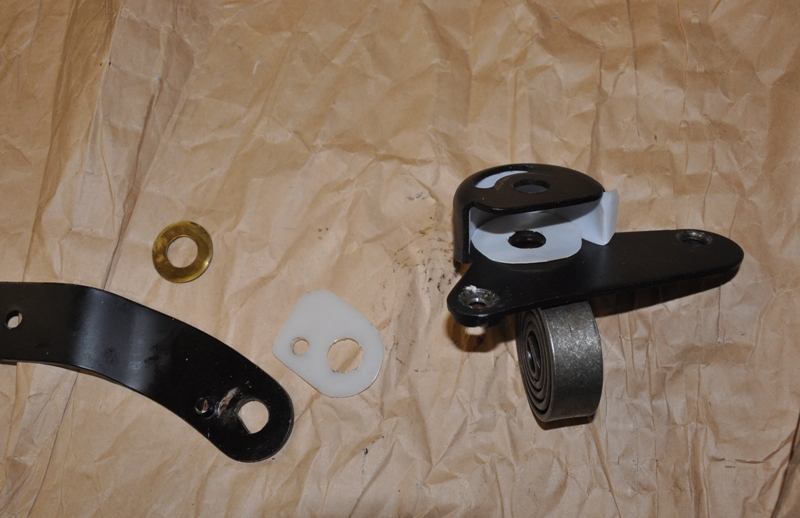
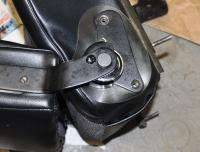
 No more seat squeaks! My seat backs would squeak when driving with each change in road surface. A little detective work showed that under the load of my big posterior, the seat-back spring-arm was just slightly rubbing against the spring case. With normal play in the seat, it would squeak while driving. I took them apart, cleaned and re-lubed them with no success. Then I tried adding a brass shim to move the arm away from the case, while better, this did not completely solve the problem. Attached are pics of the final solution. I used some 0.020" thick teflon sheet to prevent the spring from rubbing on the housing. (Probably not neccesary, but I had it apart anyway, so why not). I made a spacer for the arm out of 1/16" teflon sheet for the spring-arm that prevents metal-to-metal contact. (This is what actually fixed the problem). It's mostly invisible, but now that I know it works, I plan to re-make spring arm piece from 1/16" thick black delrin, that won't show at all.
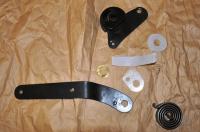


-
Looks like it's on an engine stand. Did you try turning the block upside-down and tapping it with a wooden hammer or rubber dead-blow hammer to let gravity get the tool out?
-
-
I'd question it having a clogged catalytic converter (CAT), as 240z's don't have them, nor are they required for a 1972 vehicle in California.... Still, it doesn't look too bad if it's not a rust bucket. The price is good.
-
On my previous Z, (years ago), I glued thin strips of black felt along the locations where the plastic panels meet. Presto, no squeaks! My new repro panels don't squeak yet, but when they do, I use the same fix.
-
I agree, Z was the best sound, (and looked fast)! The early 911/912 (couldn't tell which) sounded like bolts rattling in a can... The 928 sounde pretty good too.
-
I've owned 3, 240z, MGA & 1953 Jeep. Driven 7 on the list.
-
Very Nice! Sweet Price!
-
Nope, that's to eliminate the exhaust smell in the cabin!
-
I've had both good & bad quality from the MSA interior kits & parts. I used the MSA seat kits and foam in mine, but I replaced the center panels with cloth. Fit is fine, but they don't seem to have quite as much "bucket" and side bolster curve as the originals. Slight difference in look, but still more than acceptable. I'm happy with them. I'm at work, so I don't have any pics to attach.
-
Well, I tried a couple ideas that didn't quite work, but haven'tgiven up yet. 1) using my copressor I was able to force a bit of air passed the shaft seal, but not nearly enough pressure. Ithink if I made a custom fitting that approach is workable. 2) also tried squirting "freeze-off" spray into the bottom hole and re-sealing, hoping the liquid gas would expand. Worked, but again not enough pressure... For the time being, I managed to install the aftermarket strut without enlarging the holes in the brackets. It's a very low priority project, but don't plan on giving-up just yet.
-
Very impressive workmanship, and better than cutting holes in "original" interior panels. (I have no issue with cutting holes in reprodcution panels). Normally I agree with anything Dave says, (he IS the S30 electrics demi-god), but personally, if I want good sound, I'll drive a my wife's older Lexus. This may be a less-than-popular opinion for some, I think big sound systems are better suited to older Honda civics than a classic Z. While I'm not a purist or collector, my perspective is that the Z is a "classic sports car", not a boom-box candidate. Not to mention, big speak box mods will probably hurt the value of the car. If you try to sell the car with that installed, my guess is that only teenagers & college students will be impressed. Even it you remove it, the mounting holes, resulting scuff marks on the interior surfaces, panels and vinyl will lower the value of the car. The rear speaker box sold by MSA provides reasonable sound, without all the problems mentioned, (and is well accepted by the Z community). Personally, I won't even consider buying a car with a boom-box sound system, pimpy wheels, "racer-boy" mods, etc, no matter how nice the car looks... In my experience, this is often evidence that more time & money has been spent on those items than on proper maintenance... For me, the stereo system / sound quality is secondary to the lovely sound of my 240Z's drivetrain. Stepping down off my soap box now... Just one guy's opinion. Feel free to slam me.
-
I agree. It only takes 10 minutes to roll a car outside the garage and take a few pics in sunlight... That he doesn't want to take it outside for photos sounds very fishy to me...
-
Darrell, That would be great! Thanks!
-
BrianL1987, No smog requirements in CA for cars 1975 and older. Who told you that you could not keep your 1972 Z?
-
Bleach won't hurt the HDPE washer tank. HDPE is also good with most solvents, so the brake cleaner, used in moderation should be OK as well. Checked and the throttle linkage ends do appear to be nylon. Don't use bleach on those.
-
That's what I did on the weak spots on mine where the sping clips tore the backing. Some penetrating epoxy and stiff vinyl made them more than strong enough where the clips mount.
-
Very Nice!
-
The tanks are HDPE, so you can safely try bleach, (but take off the pump first !!!), and rinse well later. That said, my guess is that the discoloration is aging / exposure to hydrocarbons and will probably not go away. The throttle linkage ends are some other plastic, probably a nylon, so bleaching is probably not a good idea.
-
Took a while to figure-out, but it was really simple... What was interesting was that when the door panel was off, the lock worked, but with the panel on, it didn't. I finally realized that with the chrome bezel in-place, it held the interior door handle out a bit. This put just a bit of tension on the latch linkage, preventing the lock from engaging. Turns out that when I re-assembled the door and installed the lock and handle mechanisms, I put the inside door latch too far forward. Moving it back about 3/16" inch resolved the problem. Not only that, the inside door handle is positioned a little better than before! One less item on the Datsun "to-do" list.
-
Got an aftermarket strut, but don't want to modify the mounts to make it work. So I drove the roll-pin out of the original strut base and removed the bottom cap. This exposed a gasketed phillips head screw that opens to the gas chamber. The strut piston seems to hold pressure, but how do I re-pressurize it? Any ideas?
-
-
Yep. My info is completely wrong. Not a single field is correct.
-
Mine arrived yesterday. Great packaging BTW! Now comes the hard part. Install the 240Z or Datsun one...
-
OMG! Water injection post combustion. That IS new technology!