Oiluj
Free Member
-
Joined
-
Last visited
Everything posted by Oiluj
-
 Arne, I'm still in for two, "240Z" tints, at up to $75 each.
 -
Check out this document which explains what the terms mean and provides some additional information. http://www.austincc.edu/wkibbe/camterminology.pdf
-
The wikipedia sports car write-up was an interesting read. Thanks for that. I've driven an original Mini Cooper as well as the current incarnation. I consider them "fun" sport sedans that feel like a street legal go-cart.
-
First, I'm in my mid 50's, so my perspective may be a bit skewed... That said, I fully agree with the definition of a "sportscar" as being a two seat convertible or GT. I think the Corvette is certainly a sports car, but agree with the opinion that sport sedans are a different class. Back in the day, BMW 2002's and 510's were not considered sports cars, and I think that definition still applies. I say this with full knowledge that many sport sedans like the WRX and EVO will outperform many contempary "sports cars". Just my 2 cents... They don'r need a lot of HP, but they do need to handle well
-
Thanks for the input. The calipers are all oriented correctly, parallel to the dics with bleeders on top. I'm hoping that going back to the old master vac solves the problem. I'll keep you updated.
-
I can't get my brakes to work propery. I upgraded from stock 1972 brakes to maxima rear calipers, 1973 (larger) master vac, toyota 12S-8 front calipers. No other changes. Here's the problem, pedal goes to the floor with virtually no force. Observations: 1) Pumping brakes has no effect on pedal force. . 2) Get a "squishy" sound when pedal is pushed 3/4 travel to the floor. . 3) Rear pads are fully contacting discs. . 4) Front rotors turn easily, with maybe 0.010" clearance on both pads to rotor. . 5) No visible leakage anywhere. No decrease of fluid in master cylinder. . 6) There is no pedal force, but brakes do work when pedal is about 1/2 way down. . 7) Emergency brake works fine. What I've done: . 1) Bench bled M/C 3 times. No air present. . 2) Bled all four corners multiple times. No air present. . 3) Adjusted vac rod and pedal clevis length. (no effect). ' 4) Replaced master cylinder. (same symptoms). . 5) R & R'd master vac. Reaction disc out of place. Fixed that. (no effect). Tomorrow I may try switching back to the stock master vac to see if that has any effect. Other ideas?
-
Looks like it has rust on the door and quarters. I'd arrange to look at it first. Probably needs body repairs and a re-paint. Figure another $5,000 to $8,000 for professional repair. Interior looks pretty nice. Could pull the engine prior to paint and clean it up while the rest of the car is at the body shop.
-
Attached is a crude bitmap file I used in my signature avatar for just that purpose. Have Fun! zcar_bmp.bmp
-
"Datsunville" in San Mateo (general mechanical repairs) "Rebello Racing" in Antioch (engine specialists) "Z Car Garage" in San Jose
-
Thanks! It's a great read... Also, the last section on aligning the pad pins with the caliper piston may solve the problem I'm having with setting-up my brakes!
-
OK, I serarched previous treads but am still not clear… Will a larger bore 280ZX brake master cylinder bolt-up to a 1973 vacuum master vac unit without modification? Do I need to re-route brake lines? Thanks!
-
The cars are all metric, with exception of the seat belt bolts. There is a rear transmission mount on a bolt-in crossmember at the rear of the transmission. Best of luck with the restoration!
-
Nice! I thought of trying to keep the OEM air valve, but didn't think of switching-out the fan the way you did. Good idea!
-
Yep. They had to get the 5/8" and 3/4" for the fill neck to evaporation tank.from another store. Took all of 2 hours for them to get it to my local store. They also had 7/16" ID fuel hose, which was easier to install than 3/8" ID to replace the 10-11 mm hose.
-
Today I replaced all the vapor hoses. What a PITA! Though difficult, it's now complete and that's one more part of the project complete. I used all stock fuel/vapor hose from NAPA, and used aluminum tubing inside the hose to form the required curves and bends. I used some stock rubber pieces from McMaster-Carr I had laying around the garage as boots to seal two of the lines to the body. It would have been much easier if I had removed the fuel tank, but I just lowered it. Getting the hose on the fitting at the back of the tank was difficult. My arms are scraped and bruised from reaching between the rear valence lip and the lip on the tank. Next I need to figure out why the brakes don't seem to be working...
-
Wow! That looks Great! More pics please...
-
They are transparent, but reduce the amount of light. If you want to see how much, go to a local window tint place and look through the silvered mylar tint. I've been looking for one of these since the first day I bought my current Z. If it helps, get us to the 100 unit minimum order, I'll buy three.
-
Started my engine for the first time since the rebuild! It sounds really good and throttle response is much better! The valves are a bit noisy, but I’m told that’s a function of the performance cam. Still, I expect it will quiet down a little bit after break-in. Prior to start-up, I lubricated the cam area and “spun†the engine with the spark plugs out to distribute oil. It’s not yet all roses and rainbows though… It seems to have a pre-ignition problem and wants to keep running after turning-offf the ignition. When time permits, I need to check the timing, set the idle lower and may need to change-out the old mid-grade gas for premium. For the moment I can’t run her for extended periods of time to tune the engine. The exhaust system is installed by the PO is minimal and very loud. In fact, she sounds like a track car. Soon as she’s ready to drive, I need to get it to the muffler shop…
-
I'll have $24 K invested in mine when I'm done. As long as I'm employed, it would take more than that to get me to sell her. Guess it's probably "safe" for at least a few more years...
-
I'm in for 2 of them. One to install and one to set aside for a windshield replacement.
-
"Golf is a waste of a good walk"
-
I'd like the following: 1) Datsun Front / Bob Sharp Racing Back - White
-
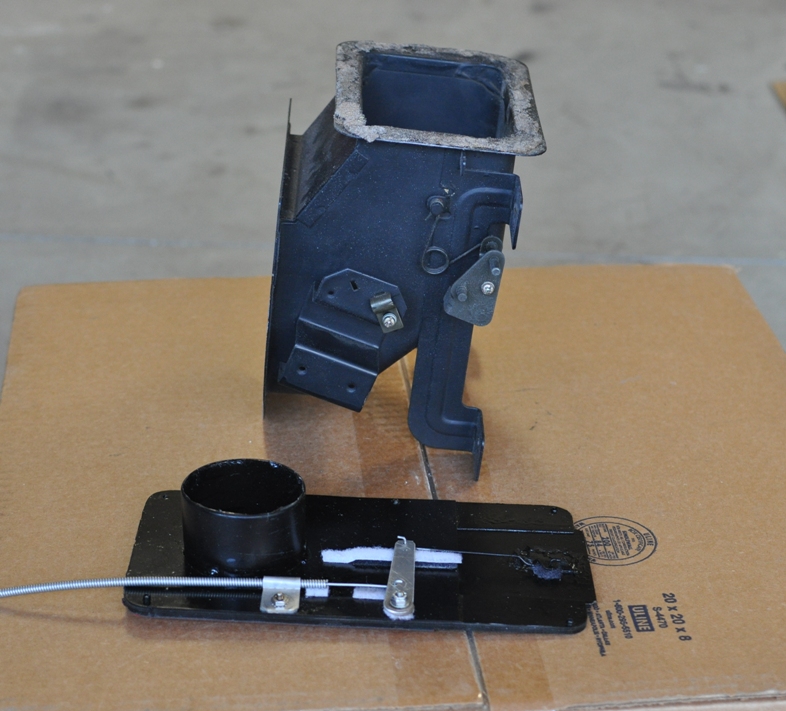
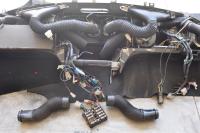
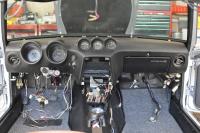
Next are the dash & ducts. The original heater ducts would not mate easily with the vintage air unit. Happlily, the heater ducts are a two-piece assemblies. I simply removed the end that attaches to the heater and the 2-1/2 ducting for supplied by Vintage Air happened to be a good slip-fit over the existing hoses. A little duct tape to assure an air-tight seal and those were good-to-go. The defroster connections and hoses are the same size as the stock Z parts, so no problem there. Attached is a pic of the ducting installed in the dash. I still need to fabricate an adaptor for the center vent, but that should be very easy. I’ll post a pich of that and the controls set-up in a couple weeks.
-
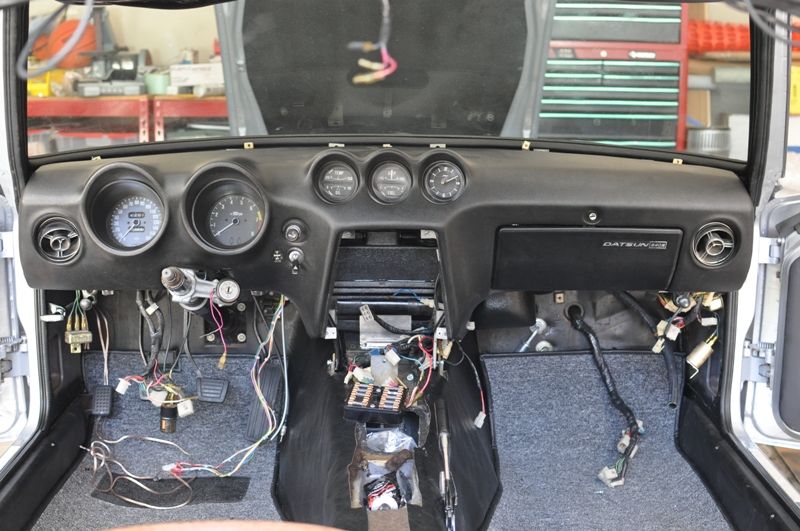
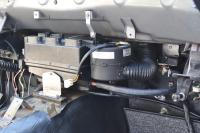
The vintage air unit was too long to fit the stock fresh air valve. As a result, I needed to make a “low profile†assembly to replace it. Attached is a pic of both old & new valves. I cobbled-together a sliding gate valve using stuff already in my garage and with a few items from the local Ace Hardware. It’s constructed from 1/8†acrylic sheet, 1/16†fiberglass sheet, 1/16†aluminum, epoxy, rivets and some self-adhesive, fuzzy pad material. The aluminum bellcrank allows the 2-1/2†diameter valve to open/close fully with only a 1†push/pull of the cable. It operates smoothly, doesn’t rattle and is actually more air-tight than the original flapper valve assembly. I admit it's not "pretty", but since it’s hidden up above and behind the glove box, it’s not visible. Attached is a picture of the new valve installed in the car, along with the Vintage Air remote heater valve. I used 3M exterior mounting tape to attach the unit under the dash. It’s rated for exterior automotive use and more than strong enough for this application. Also, you can see that I have installed elbows at the firewall on the heater hoses to allow a tight 90 degree turn without crimping the hose.


-
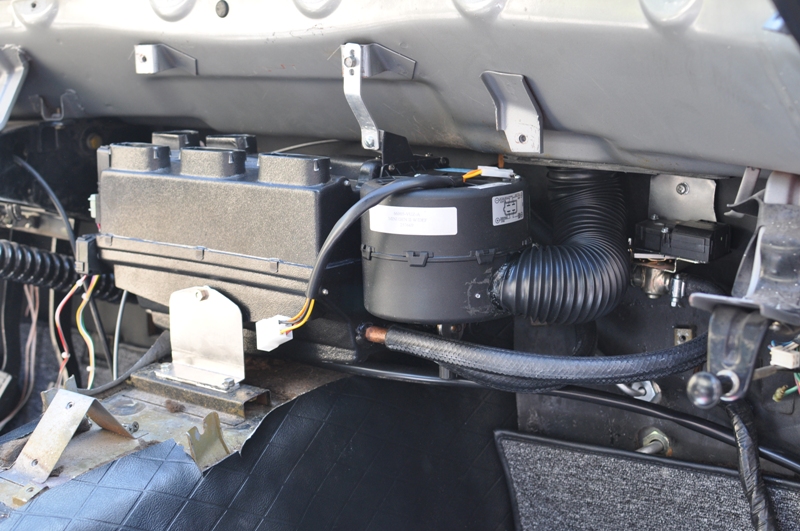
Vintage Air's Gen II Mini does not have a fresh air intake. I like the option for fresh air to be pumped through the fan into the cabin, so I did a bit of fabrication. * No original Datsun parts were damaged in this installation. First thing I needed was a fresh-air inlet into the squirrel cage fan. That was easy, just cut a hole and invalidate the warrantee on my evaporator. (see pic) I started by making a plenum to attach the hose, but found it worked just as well to insert the hose in the hole. (2nd pic).