7277
Free Member
-
Joined
-
Last visited
Everything posted by 7277
-
...i really would like to dump a 911 turbo motor into a Fiat 500 like this one....OK OK OK, I know, this is a Z site!! i'll stop now http://cgi.ebay.com/ebaymotors/Cars-Trucks___500R-Super-clean-ready-to-drive_W0QQitemZ270307498409QQddnZCarsQ20Q26Q20TrucksQQddiZ2282QQcmdZViewItemQQptZUS_Cars_Trucks?hash=item270307498409&_trksid=p4506.c0.m245&_trkparms=65%3A7%7C39%3A1%7C240%3A1318
-
http://cgi.ebay.com/ebaymotors/Cars-Trucks___1959-Fiat-Multipla-Van-like-500-600-Isetta_W0QQitemZ200283278923QQddnZCarsQ20Q26Q20TrucksQQddiZ2282QQcmdZViewItemQQptZUS_Cars_Trucks?hash=item200283278923&_trksid=p4506.c0.m245&_trkparms=65%3A7%7C39%3A1%7C240%3A1318 funny how the guy says it the most complete one of 3 he has LOLLOL
-
check out a few threads down from this one on 'body and paint' called 'engine bay repaint..on a budget' took me...i dunno...20 -30 hrs for all the disassembly and prep 2hrs to actually spray the cans. add another 50-60 hrs for all the polished parts... hey wait a minute..... you've posted on that thread YOURSELF about two up from the bottom...???? and you're still asking LOLLOL?? JUST GET IN THERE AND DO IT LOLLOLLOL!!!
-
couldn't have said it better myself. we think alike Dave!
-
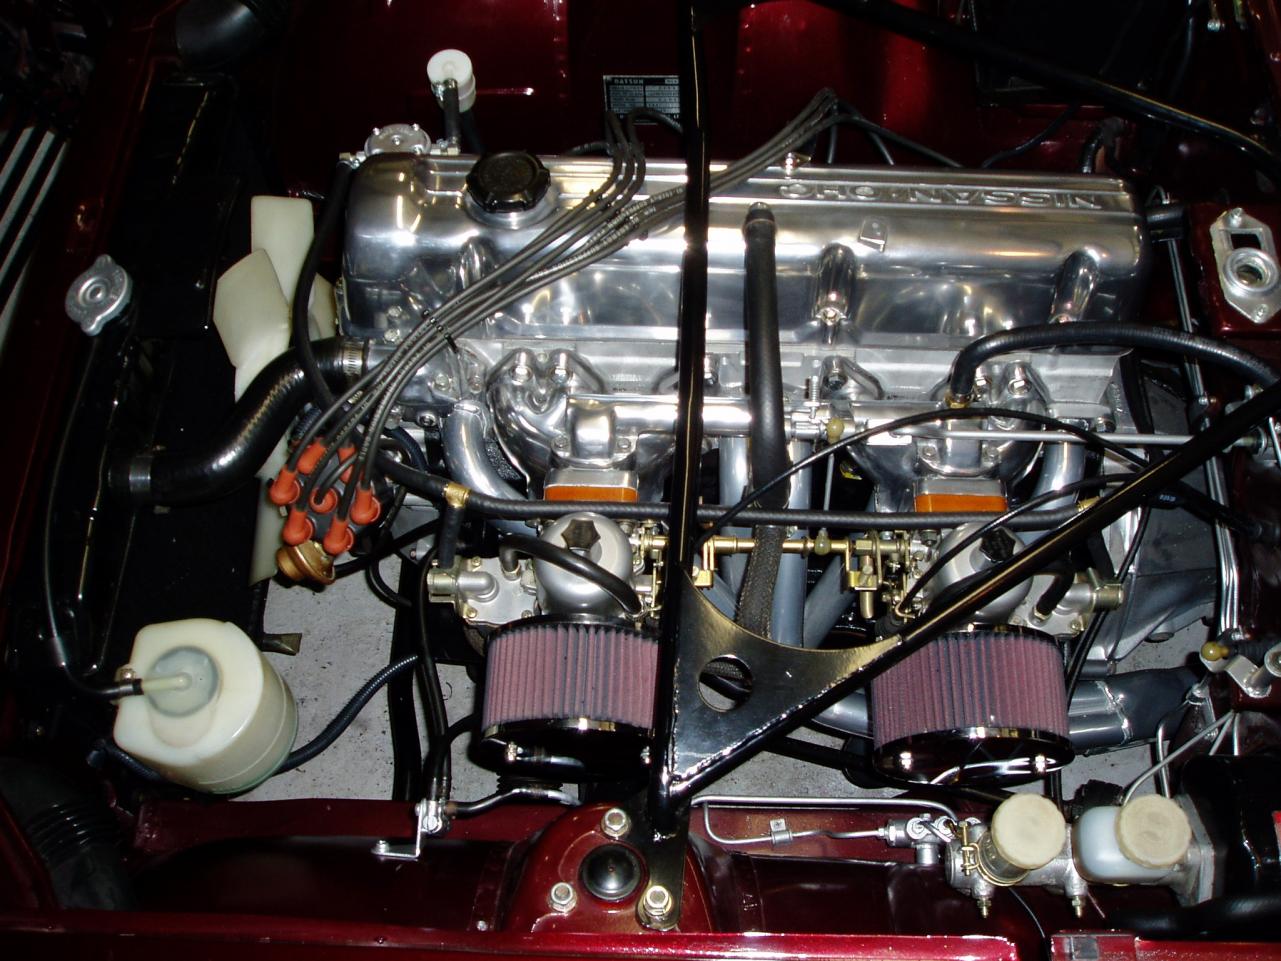
dave..nice motor, rad and eng bay! as for the header heat...heat floats up, and the galvanized heat hield would block most anyway i was more concerned with vibration being on the block, but i hard-rubber mounted it. after about 1500miles and ALL kinds of driving conditions, no problems tough call for your ig syst. lots of stuff. i guess if you really wanted to hide it you could custom some LLOOONNNGGGG wires and mount them under the dash in passenger footwell or somewhere...
-
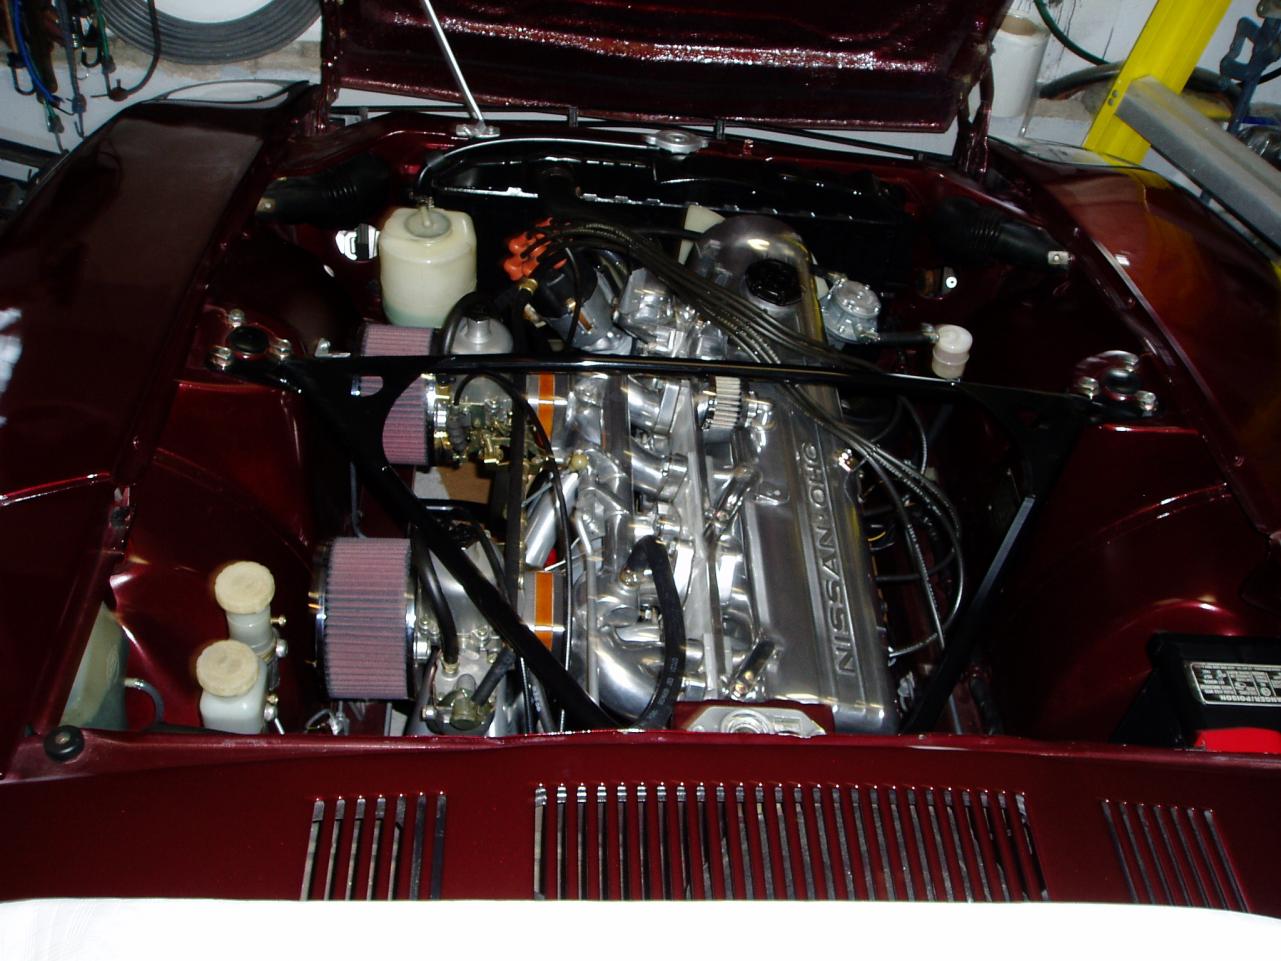
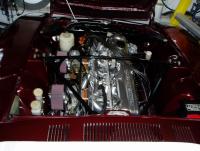
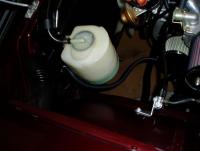
attached to the block, where the smog pump went. wrapped and routed the wires aside the radiator, then across, to the coil, then up under the thermostat....also added an overflow tank from a '77Z. sorry for the dark images. had the garage overhead lights on and used a flash...i guess the light reflects off and away, rather than back straight into the camera...pita.. i have to give credit to Al Leary (convertable yellow 'roadzster') for the coil idea.
-
thanks fellas, i used rattle cans from the local Autozone/Advanced Auto Part stores. i used the primers, paints and clear coats all in the same brand name (Dupli-color)for compatability. i used a two-part epoxy body filler from FibreGlast-#1100 www.fibreglast.com -1800-838-8979. once the stuff cured i feathered it out and final sanded everythiing in 400g paper, then a heavy wash with wax and grease removing solvent (local body shop supply house). in the end it paid off. it won a local Z-show for custompaint (!) and street mod, and a second place in Cleveland for street-mod beandip: thanks i know..., but no plans on reshooting in the future. as for a heads up for future owners, i don't think there will be any as the car will be my coffin!! i posted the motor in other threads, but here's the final outcome:

-
sad but true be careful Rob, carl makes a good point. over the past year i've met FOUR local 'Z guys' who have (had) the BEST INTENTIONS of doing full nut and bolt restorations..... after meeting EACH one in person, they ALL got in over thier heads, spending THOUSANDS of dollars on new parts which are STILL sitting in boxes, and a rusted Z STILL rotting in thier yard....it's very easy to start the project and it get sidelined after a few months...one guy i met is going on 10years, and it still looks as if he bought the car a month ago and just disassembled it...(seriously!) good luck again, but be careful.
-
funny how we all differ i on the other hand, locate new or very good condition replacement parts THEN THROW OUT THE OLD immediately. it always keeps my garage clutter free and organized. i also NEVER missed any of the stuff i threw out, and had ZERO regrets. come to think of it,... after i upgraded to an L28, i took the original (blown) 2.4L block to the steel yard that weekend.....anything that was in 'good shape' during my restoration...i sold on eBay. my car is heavily modified from stock and determined from the get-go that i was never going 'revert' back to original.... good luck!
-
you have spark-yes, you have gas-yes. how about air? check air flow meter too. i'm not big on F.I. (like sblake, et al) but i had an AFM crap out on me once.
-
-
CK1: just curious as to your price point since the silver 73 on eBay, with only 5700 original miles sold for ~$21,000.... also, i live about 40mins south of you in Toms River.....if you'd like to meet up and "talk Z sh*t", let me know )... i've been a Z guy for 20yrs
-
adam (CK1), no offense, and with all due respect...after eleven months, a downturn in the economy, and debate throughout the previous threads...... you're asking 12.5% MORE than your original ($20,000-Jan '08) price? ...($22,499 as advertised in the classifieds on this site)
-
basically,.... it's the FIRST thing to rip out and throw in the garbage
-
-
you might have better luck if you posted this in the CLASSIFIED SECTION
-
Ah yes. you're right. otherwise there would only be one (+) wire to the socket.... forgot there were two wires there. thanks. and come to think of it, i did have them lit with the tach out of the car when testing. my lights flickered upon 1st attempt at installation and during the first covert-night-operations-test-drive . i then wadded the bulbs and copper tab with tin foil for a tighter fit. problem solved. at that time i thought it wouuld enhance the 'redundant' ground. you-da-man!
-
sblake: donesn't the teeny copper tab on the plastic-snaps (bulb harness socket) ground to the tach housing metal? the + energizes the bulb at the tip (obviously) and isn't the grounding perfomed on the bulbs' socket, touching the copper tab, then touching the tach housing...
-
i just wad the new bulbs and socket copper tab with a layer of Reynolds Wrap tin foil to encourage grounding....
-
i know..i know...i know... it's a tough call. i got the 300 5yrs ago for 2000bux. it had 77,000 CLEAN miles, original owner, all accessories work. it runs and drives !! i brought it up to 104,000miles without one single problem. great DD is an UNDERSTATEMENT. it doesn't owe me one red cent!! if i get the 71, i KNOW i'll want to start restoring it and dumping major $$$$$$$... i would love an early Z DD, but i'm a diehard 'take it easy and be gentle to early cars' type of guy. driving it in the rain would be a shame on me... the 300Z...quite frankly, i could care less about it...
-
..i'm 6'7" (yes, i do fit in my Z very well) BUT have VERY LONG skinny hands. biggest challenge was doing a windshield wiper motor WITHOUT taking the armatures out. anyone who's tried this one knows how far you have to reach under the motor to get the retaining nut off/on. long hands/fingers are bonus for doing door handles too! LOL
-
i had one car like that. i WAS able to get a regular pair of pliers up there for the tach wing nuts. for the upper speedo wing nut, i fit a size 14-16mm socket over it and truned it out on a Rube Goldberg inspired-ratchet-extension-u-joint-plier setup...or something... the 73FSM even says 'use pliers' to crack the wing nuts off......(jerks)
-
hmm.. gets me thinkin'...85 300ZX out, 71 Z in
-
sBlake01: Oops...
-
i don't know about the rest of you guys but i had no problem at all replacing the tach and speedo bulbs...i even did the tach bulbs in a 7-Eleven parking lot, at night, without any tools at all....fun as i drew a bunch of onlookers make your hand real small, undo the upper and lower wingnuts on the tach, pull tach through front of dash (Escanlon: yes it can be removed with the steering wheel on), while disconnecting wire harness and bulbs from tach. once tach is out, undo the speedo cable, and trip reset cable (with a really small phillips screwdriver) through the tach dash-hole, undo wingnuts from speedo, pull speedo forward while disconnecting wire harness and bulbs and out. replace bulbs. install in reverse order. personally, i didn't RE-install the upper wing nuts and cross bar that connect the speedo and tach together. the lower wing nuts hold 'em in good enough...