Zedyone_kenobi
Free Member
-
Joined
-
Last visited
Everything posted by Zedyone_kenobi
-
Well I am finally done back tracking after my tranny hiccup. So here we are with the engine back in. I am pleased with the radiator fit now. I also hookedup the lower hose, the alternator, and I am redoing some wire looms now to make it look new. I hate shoddy wiring bundles. Tonight is going to be a long night, as I want to get most of the interior and accessories installed. I will be dropping off my exhaust to get the O2 fitting welded in today at lunch. Progress marches on.
-
My hell super tones have a relay that came with them. I would probably need to replace the OEM one for the Hella one, but I am not sure. Better to be safe than sorry. THE FSM says the relay is located "on the left side dash side panel" Is that near the hood release handle? Also has anybody else hooked these up? Did you use the Hella relay or the OEM one.
-
engine and tranny back in, alternator hooked up, lower radiator hose hooked up. Fan hooked up. Rubber grommets in between the radiator and the the frame of the car. Tomorrow night, driveshaft, starter, slave cylinder and new Hella Horns.
-
I found a place to rot out my old radiator to ensure it is in good working condition. I am keeping that in my back pocket. I already paid money for this new shiny radiator. I sort of want to use it. Tonight I have to get the engine and transmission back in the car. That is the plan anyway. Then I can get the starter and alternator wired up. After that it is on to the exhaust and intake side. That should be a good time. Pics to follow.
-
And there was much swearing... followed by much condemnation of peoples mothers I had never met... But I finally got the transmission out. I removed the cover with 5 bolts. There were three visible pushrod ends visible. One was sticking out. Before I moved any of rods, I moved the transmission into first and second and one of the rods that was flush with the bell housing was moving back and forth. AHA. They all must have to do that. I pushed the rod that was sticking out back in to flush, and the one in the middle in a notch. Low and behold, the tail shaft spins, the car shifts into 1,2,3,4, and reverse. The Lord said let there be gears...and there were 4, and they were good. Well I took a victory lap, but that proved to be too early and premature. I tried to get the transmission back in the car with the engine still in it. Let me be perfectly clear on this. trying to align that transmission back onto the splines of the clutch disk is nothing short of a bitch with that engine still in the car. Could be the car was not jacked up enough, could be I had the engine at just the wrong angle, but it could be that it is just a B$##H. I finally gave up even after trying the head bolts to line things up. I pulled the freaking engine again. Once I had the engine on the stand and the transmission on the trans dolly, it was again a piece of cake. I must admit I lost my cool trying to get this thing back together. I cussed more than a New Jersey Italian Prisoner. Finally I had just stop and take a break before tools started to get airborne! HAHA, but it is together.
-
noted Steve, Scott at z car source said I should just push them all in as far as they will go.
-
yes, I am using a stock 240Z clutch with the stock 240Z fork, stock 240Z collar and throwout bearing, with the stock 240Z slave (adjustable rod and all). The clutch actuates beautifully with no binding and seems to be disengaging fine as when I decouple the transmission from the engine while in what I think is neutral the driveshaft spins freely. How well it works with the car running will have to wait. I talked with MSA over the phone and read many posts on this board to make sure matched up all the clutch hardware.
-
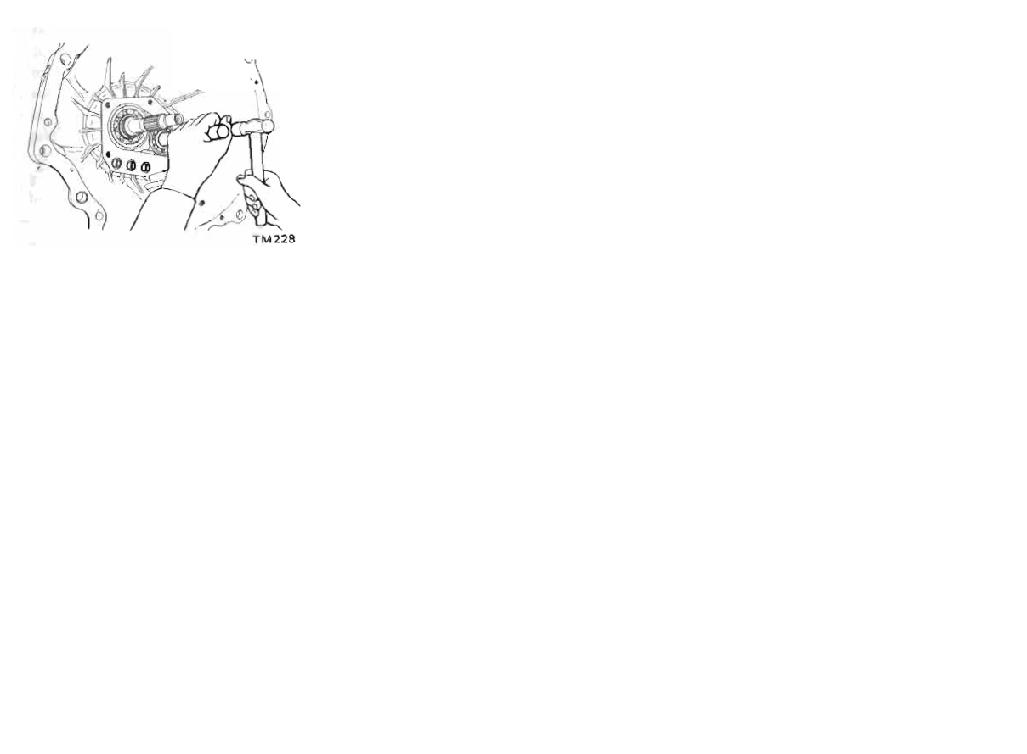
UPDATE: I called Z car source and talked to Scott. VERY nice guy, as always. They had a pow wow and decided that they would honor their warranty no questions asked, BUT they do not think they will have to. In fact all my symptoms seem to indicate some rods shifted during shipping (sort of like Steve said previously) He said all I have to do is remove the black cover shown below in the transmission to the right (the B type) and push the rods in by hand and it should free everything up. I am assuming the rods are behind that plate shown here I will drop the transmission by itself tonight and try this, AND report back. Madkaw, taking your suggetion to heart, I also asked them to assemble a complete OEM linkage for this transmission so I can ensure it is not MSA's short shifter kit mucking up the works.

-
As far as the slave cylinder not working....Yeah, I made a video of that to make sure it was.
-
I certainly hope I can get the original console to fit. I may have to get creative with a blow torch and do some bending to the shifter, but I am not there yet. I have to conquer this transmission demon. I am not looking forward to my phone conversation with Zcarsource. I hope they surprise me.
-
Here is the shifter hole... nice and tight at first. Enter the tin snips! And whala.... the new shifter opening is nice and roomy, plant of room for the shifter to move around. UPDATE: Called Zcarsource.com left a message, we will see what they do when they call me back. Stay Tuned!
-
Well, um, no, but I do not have a stock shifter to put on it. It is the short shift kit that MSA sells for Type B 4 speed transmissions. I do not think that would explain why in neutral it is locked in gear do you? I wonder if during shipping things moved around in there. I could spin the input shaft by hand before I put it in, but could never spin the output shaft. Just figured it was in neutral. It is looking like I am going to have to pull the damn thing. Not much can be trouble shot with it in the car that is NOT running.
-
Okay fellow Z heads, the smooth running train that was my engine/tranny install hit an iceberg, and I am stumped badly! This is my formal cry for help! I installed my slave cylinder tonight and adjusted it per the manual with adjustment nut. All is well. Then I go cut my hole in the transmission tunnel, with some metal sheers ( the only way to do this by the way, took 3 minutes tops). Then I installed my new shifter mechanism. All is well so far. As usual smooth sailing. Then I go to install my driveshaft while and it mates up with the splines on the transmission, no real surprise there, no worries. I get the first nut on and go to turn the driveshaft and it will not budge. Well I figure I have it in gear. Keep in mind this is a brand-new 700 dollar rebuilt transmission from Zcarsource.com. The transmission is empty at this point, so I do not get carried away with moving the shifter around, but I move it to the left and it notches up with some force into what I think is first, then there is a detent straight down, should be neutral, and one more detent down. I am thinking it is second. The transmission WILL NOT shift into 3rd, 4th, or Reverse at all no matter if I push the clutch or not. I can reach down and touch the drive shaft through the shifter hole. It will NOT spin ever unless I put the transmission in neutral AND pushing the clutch. If I put it in neutral and let the clutch out the drive shaft immediately stops moving. It is like it is stuck in a gear of sorts, I am really not sure what to do. I put a socket on the crank and even when the car is supposively in neutral, the wheels turn when I turn the crank pulley by hand (I still have not hooked up the starter) What the heck do I do now. I will call Z car source in the morning first thing you can bet, but I have no idea where this is going. If I have to drop that damn transmission after it went in so beautifully, I am going to cuss in every language I know, which is one, but I will make up for the lack of diversity with volume.
-
I second the notion to check the rack bushings, steering coupling, and ball joints. Also, did they have to add an extreme amount of weight to the rim when they mounted the new tires? Tires are the one component you should never skimp on in my opinion. They are without a doubt the most important part of your entire car. Everything else sends or receives input to and from the tires. I recommend if all is tight, paying for some better tires. Buy some Hankooks, or even some Falkens, they are very reasonably priced. But off brand tires are never a good choice.
-
Thanks guys for the good advice. I picked up some nylon and rubber washers from the hardware store during my lunch break, I am going to try to cut the hole tonight before it gets too late and the family goes to sleep.
-
I am really hoping to use my OEM console. I bought a short shifter kit that closely resembles the comp shifter that may help it work with my stock console, but I will learn the hard way. As far as the radiator goes, it is too early to tell exaclty what I will do. The radiator seems to stick up too far, but tonight I am going to put more eyes on it and perhaps reinstall my old radiator just to get some measurements. The old one never leaked. So we will see.
-
Bite your tongue Arne. You have been here through thick and thin. You have contributed more useful information than most of us ever have. I always admired you for your dedication but also your realistic approach and views. I also considered your car a cousin to my grey one as they were both 71's and VERY close in number to each other. You opinion is valued and respected. I hope to keep getting it. And when I buy my mid 80's 911, I can look forward to bugging you more to get up to speed on that!
-
last night I was up fitting the new radiator. The support holes are not in the same place as the other radiator I had. So some drilling may be necessary. Also, this is one of those pesky aluminum ones, which upon some research here I found out that I will need to isolate from the metal due to electro corrosion issues. Which makes perfect sense. So I am looking for some isolators that will work. I ordered some vibration isolators form mcmaster carr to get the search on the way, but I will also stop by my hardware store and look at the fun isle with all the cool trinkets. That was problem 1. Problem 2 is the 2-3 fan belts I have accumulated over the past 2 months are all too short. Not sure why this is, as the only thing that change is the harmonic damper pulley, so I have to assume that it is larger than the one for the L24. So I picked up the new belt and we will see if I guessed big enough on the size. I got the interior transmission tunnel ready to cut, but I am going to take pictures of this extensively, as many questions have been asked about how much you need to cut the transmission tunnel for a Type B vs a Type A.
-
I am just here for the avatar. carry on
-
I like how you mounted the spring on the triples. I used the other bracket, but I may try to duplicate the way you have it done
-
I ordered from crutchfield and I will check my records for the part number.
-
nope, and I really wanted to see this video, as I was thinking of getting another Hero camera. I have the original hero and the audio is just rubbish while you drive... As you can see here. I had the sensitivity turned down for this run, it was worse when it was turned up. I also had tried this with the case fully closed AND with the case drilled with some sound holes.
-
I just did the same modification Arne. I put in two speakers and I think I used kenwoods as well. You are right, there is not much out there in that size that shallow.
-
You know what Guy, I keep finding threads with pic of your herd of Z's in it, and it keeps making me want to take off my VTO LeMans Rims I just got and put my Panasports back on! DRAT!!!
-
IF I get a vote, I think the scarab idea is brilliant. If you have to modify a 240Z hood, why not go something the old school datsun guys did. Popping at high RPM is an issue that is near and dear to my heart. Lets just say that it could be a GREAT many things. Fix the easy ones first. Then after you go freaking nuts, buy webers. HAHAHA