Zedyone_kenobi
Free Member
-
Joined
-
Last visited
Everything posted by Zedyone_kenobi
-
I only ask people do that when I mop it first.! HAHAHAHA Oh and Congrats. Yes, the second time is far more relaxing!
-
Yes it does. It slots neatly in between the cradle.
-
Well if I can get my Z done by then, I would love to know what the new engine does on a initial tune.
-
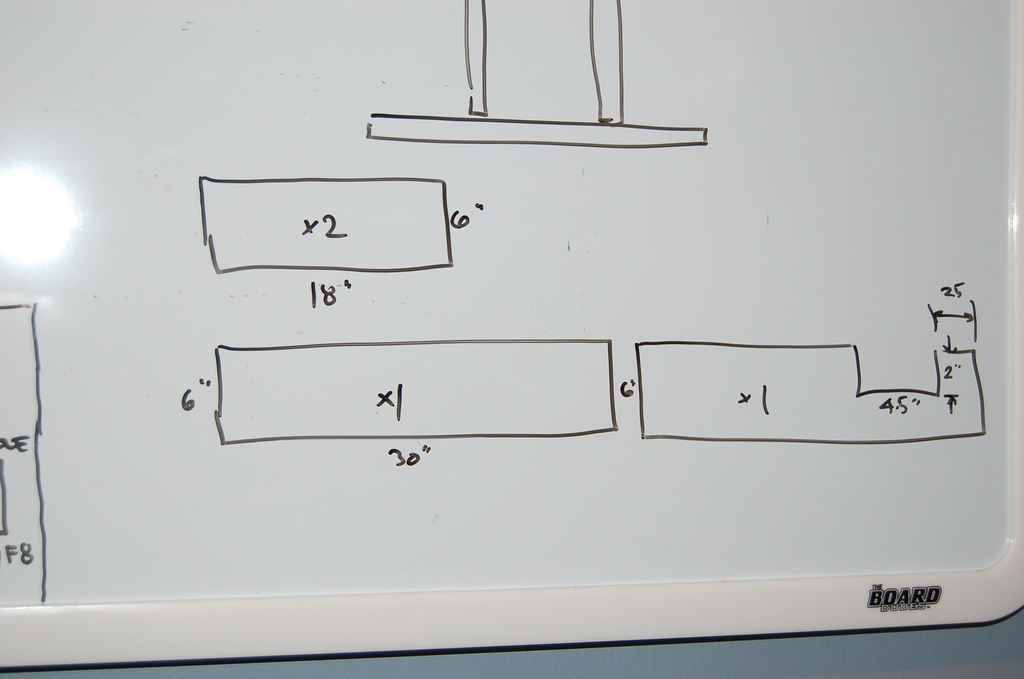
Thanks Frank. Everything is poised for the 'big pull' this weekend. I painted the front of the radiator support with POR chassis black. May need another coat. Not sure yet. I built another engine cradle out of wood and gave it some Z speed rated castors (that was a joke) Pulled the center console, removed the speedo cable, disconnected the reverse indicator (question about that in a few) and broke lose all the bolts to the transmission cross member. Nothing left to do but move the lift over and crank out the engine/tranny! New engine cradle: Plans dimensions for engine cradle.. You need a 2x6 8 feet long. You should cut it up into 2-18" boards, and 2-30" boards. One 30" board needs to have a notch cut in it 2.5" from one side. The notch should be 2.0" deep by 4.5" wide. Nail or screw the boards together with the 30" boards running length wise alongside the engine spaced 8.5" apart. This will sit on the oil pan flange nicely. crude drawings of plans for cradle... Before and after pictures of my painted front radiator support: Before: After:
-
Elbow grease is the most valuable kind. Keep it up. My advice is also to always take your time. When you work on it, keep the projects manageable, and always repair/replace/clean/refurbish anything you unscrew, remove, or loosen. When it goes back together, you will know with great confidence that is right and set to go for another 30 years. The car was designed right from day one. You just have to slowly turn the clock back. Project by project those hands tick backwards
-
Well I know the radiator is not original as it is a three core. The PO told me he upgraded the radiator when the dealer put in the AC
-
Well I managed to get most of the work done. The entire engine is unhooked. Motormount bolts removed, and exhaust taken out. I think I will use this opportunity to replace my old header. It has always had a bad height difference compared to my manifold. And I have thoroughly HATED my smog ports since day one. So my next set will NOT have a set of smog ports. So far the list of parts to be replaced is growing. And the to be cleaned table is also getting filled.
-
Well had to take a brake from car stuff for a couple of days, just found out that my wife and I are expecting for the second time! :laugh: We are 7.5 weeks in and we have an ultrasound of a lima bean! HA HA So I am thrilled. Back to the less important topic of Datsun Z cars! Made some headway last night. I disconnected the starter and all the water lines from the passenger side of the engine, after making diagrams of where the wires go and bagging and tagging all the bolts. Then I removed the slave cylinder and just left it dangling. Next up was the distributor wiring, and then the carb fuel rail and the three webers. I managed to lose one of the springs for the carbs so I am going to order some replacements today. Next up is the O2 sensor and the driveshaft, and intake manifold. After that, just mounts and pull that bad boy. THIS IS CRAZY FUN! And now for the mystery. I found this on the floor after working on the passenger side of the engine. I am not sure what it is. It looks like a shim of some kind. Possibly from the slave cylinder? I do not really remember seeing it. Any ideas? IF you have any ideas that would be great. So the pull continues. I need to order some anciliaries today. New cap and rotor, new spark plugs, etc. After I get the engine out, I will have to start sanding and painting the engine bay. I mean you sort of have to do that when you have the engine out. I think it is a Datsun Law or something.

-
This is just freaking nuts. You sir are my new hero. Your attention to detail is epic. And your patience is being rewarded with every single part you assemble.
-
Okay we got down to business last night. I got the car up on jack stands and drained all the fluids. Then I drained the radiator, followed immediately by cussing and mopping up all the fluid that I completely overshot my bucket. 20 minutes of sweet smelling mopping later, I took pulled the radiator, and removed the alternator. Prior to doing all of this I took detailed photos and made drawings on the white board in the garage of where everything went. Naturally many sandwich baggies were used to collect parts, and a new bolt purchase list has been started to replace worn and tired looking nuts and bolts. But on to the pics! Before I removed anything: As she sits now: Old radiator. Debating if I should get it fixed or just source a new shiny aluminum one from MSA. The "to be cleaned" parts counter:
-
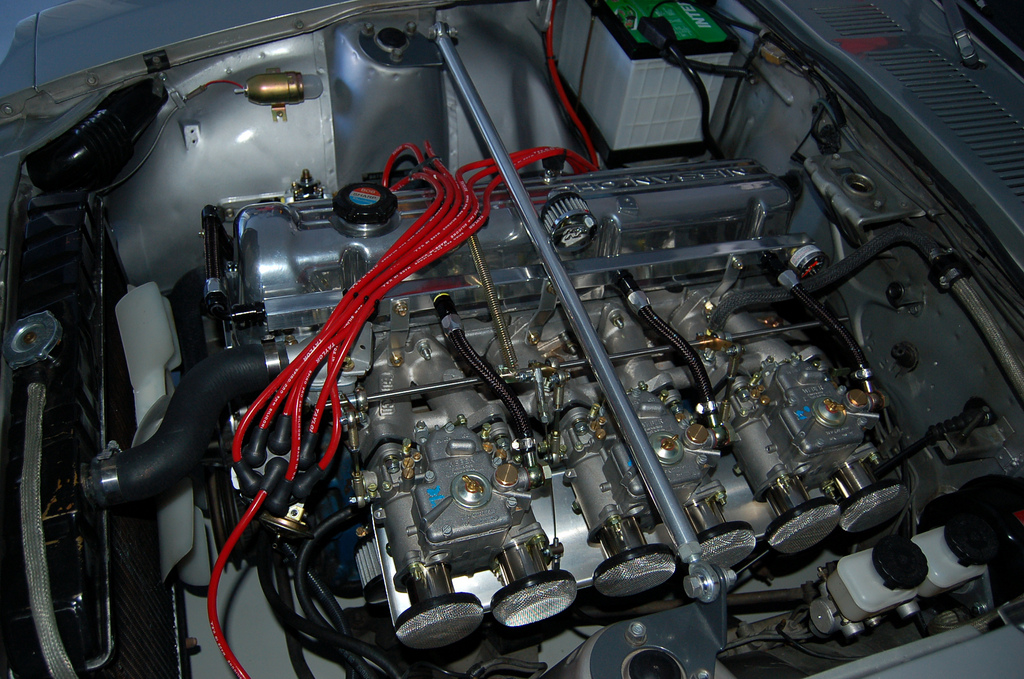
Well increasing the choke size will also decrease your throttle response. While the volume of air is unchanged, with a larger choke the air is moving slower through the intake. This effects fuel atomization and I would think transition from progression to main circuit. I currently run 30mm chokes in my webers, and plan to use those when I bolt them up to my L28 N42 head. If I start running out of juice at the high end, I will make appropriate corrections. I have a wide band, so if I start richening up at the top end, I know I have reached a flow limit. I personally think it will be fine. I would rather have throttle response over max HP.
-
You know blue, it is just scary how you knew I was fighting with this just 2 hours ago. I was going to go get some spacers at the hardware store to do just this. Update. Hood is off today and I am getting ready to get her up on jack stands. WAAAY up on jackstands. Pics to follow. I will get those pics of the wooden block and I will take some measurements for you Captain.
-
Well do not go by what I said verbatim. What he actually said was Datsun racing colors. I may have mistyped BRE in there to the fact that I am a BRE fanboy. HAHA But I love that magazine cover!
-
That is how Eiji does all his motors. He tells me that it is his tribute to the BRE racing colors for DATSUN. red/white/blue I am debating on if I will leave it on or put on my polished valve cover.
-
The engine has landed. Now the real fun begins. But before I do, I have many pictures to take and vids to make. I would really like to document this and dedicate it all to my dad who passed away this year. Pics for posterity:
-
Good luck keep us posted buddy
-
well that is a great picture, since I will be painting mine when I pull the engine soon. now I know exactly what to paint!
-
What is that key looking thing on the nose on the drivers side? Is that an arming switch for an alarm?
-
It looks just like yours buddy. Same exact part. You chose the more adult OEM finish with the blasting and it looks spot on perfect. I was far more lazy and just hit it with some aluminum polish and called it a day... You should be very proud of your work, it looks great!!! But like you, now that I have built one, think I could do it much better this time around. We always learn on our first attempt.
-
I will check that out, I have that issue sitting on my desk at home. I have not read that part yet. Curious to know Brocks take on it.
-
You know I love that car! Just amazing. But looking at the front end, I though the front of the radiator bracket was painted black from the factory. So when you look into the front grill, it was all black? Did that start with a later model year maybe, or was this car painted before.
-
That is a brilliant idea Jeff!
-
That is getting drained my friend. With the engine oil and radiator as well. Plan to keep the whole system empty. the only thing I am not sure of is how high off the ground does the car need to be to pull the engine/tranny as a unit.
-
Here is the same fuel rail used on my car. From the same manufacturer. I had to hook up one of those cheap holley fuel pressure regulators on the passenger firewall. Mine is dead headed, but both ends of the fuel rail are tapped just in case I want to run a return line. I have the rail drilled and tapped for a pressure regulator at the back.
-
The next chapter in this saga continues, as the engine is on a pallet set to arrive tomorrow! I went to northern tools and picked up a 2 ton hydraulic hoist which has a large reach. I will assemble that tonight after everybody goes to sleep. I think it is time to get the car up on jack stands and start unbolting things. The OEM L24 has been a great engine, does not smoke, and has run strong for 71000 miles. IT will be pulled and stored in a climate controlled storage unit until its services are needed again. I have decided to pull the engine/transmission together. I will remove the radiator and engine accessories first. Then look into getting it boiled out and cleaned. OR just replace it with a new 3 core aluminum one. NOt sure which I will do. I have time to decide I guess. Definitely do not want my new engine running hot.