Jehannum
Free Member
-
Joined
-
Last visited
Everything posted by Jehannum
-
So, I guess I'll just set up the antenna to a more modern one with a signal and constant +12 using the existing wires, bypass the up/down switch, and get it that way. Thanks!
-
When that happened to me, the ammeter turned into a make-shift fusible link. It burned up, but the harness remained intact.
-
Question for those with relatively intact radio setups in their 240Zs: is there a radio-switched power connection to the rear? I'm adding a small amplifier with a bluetooth receiver (as well as a couple of modern speakers), while retaining the function of the stock AM radio in my '71, and should the radio switch power somewhere in the back already (maybe the antenna?), it would be fairly convenient to use that to turn the new setup off, when the stock radio turns on. If not, is there a switched output somewhere on the radio itself that I could run back to the rear?
-
I dropped my E31 off at the machine shop. They called me today (I was having them vat my spare head before putting it on), and told me that the head is 4.227" high, 0.008" below the minimum height of 4.235", and that the previous mill job I had done (which took off 0.003") was done badly (their fly cutter picked up a repaired weld and grooved the head around #6). Finally, they told me that the intake seats need replacement as well as the guides (all the seats but #6 are brass). I'm not sure where to go from here. Is the head scrap? Is there a possibility of shimming the head (thicker gasket)? Will I have to shim the cam bearings when I get it back?
-
The E31 on the engine, with the intake attached Without the intake L24 minus head: Stripping the head (cam towers are gone, I've started pulling the rockers and adjusters) As soon as I swap the greaseball E88 head onto the motor, I'm going to drop the E31 down at the machine shop. The #3 intake valve was sticking badly enough to introduce itself to a piston. While there was no damage to the piston beyond a small scar, I'm sure the valve is bent. Plans: MSA stage 2 cam new rockers new valve springs new keepers new guides valve seats cut valves lapped #3 intake valve (and any others beyond serviceability) replaced
-
Oh, I'm going over to a friend with a barn full of Zs tomorrow morning. Thanks for the offer, though! It's purely a short-term thing, I intend to put the original E-31 back on as soon as it's better.
-
Bastard bucked and threw a lash pad again today. I'm going to swap a different head on for a few weeks and rebuild this one.
-
I had my sunshine yellow redone in a Glasurit single stage, and they matched the color pretty well.
-
I don't believe there's any varnish aboard. I re-ringed, bearing-ed, and gasketed the motor in '09, and I think I did a pretty good job cleaning at that point (I soaked the valvetrain in B-12 chemtool, and knocked all the crap off of the valves). I will consider moving to a higher detergent oil, since this issue seemed to start right after changing the oil. I didn't swap to any different oil, though, which puzzles me (it's always seen Mobil1 10W30).
-
I've been chasing down valvetrain noise for the last month or two on my 240Z (stock block, E31 head), and I think I've found the culprit: #3 intake valve is sticking. I noticed it this way: I was (again) checking valve clearances, because of clacking, and once I had everything set, I cranked the motor over, and it sounded like a box of rocks. I pulled the valve cover again, and saw that #3 intake valve was stuck at about half-mast, the rocker arm quite askew. I was able to free the valve with a quick tap with a soft-faced hammer (it popped right back up). There is definitely some damage to the cam lobe at the edges (it threw a lash pad once before). There is no damage to the retainer, the lash pad, the valve spring, or the rocker. The valve still seats fine, too (good compression, so no bend and no piston lovin'). What's my way forward from here? On the "I wish I may, I wish I might" front, I could probably swing new guides, rockers, seals, lash pads, and the 274/274 Schneider cam plus whatever machining costs I incur to get the bare head built up with the new stuff. On the "my wife won't divorce me" front, I could probably swing a new stock cam, and a new rocker, but if the guide or the valve is damaged, I'm still in the "I've gotta pull the head and take it to the machine shop anyway" pickle, and I could possibly have damaged the new cam. On a related note, how are the Beck Arnley replacement rockers? They're about all I can find, but if they're not adequate, what's going to be my best option?
-
So, when I did my hot valve adjustment, I adjusted things in firing order, rather than when the lobes were facing straight up. I re-did the valve adjustment that way (lobes facing straight up), and suddenly the tappety noises are gone. Guess I should pay attention to all of the procedure, rather than assuming I know anything.
-
It's driven by the eccentric on the front end of the cam (bolted to the cam gear). I guess I'll check and see if the eccentric is bolted as tightly as it could be. Thanks for the suggestions, I'll be looking into them tomorrow afternoon.
-
I've got what sounds like a click in sync with the cam. It developed a few weeks ago on a cruise. I figured that I just had an issue I could tune out with a quick valve adjustment, so I did the "fit no-fit" method for lash adjustment (hot, .010" intake, .012" exhaust). I reassembled everything, kicked it over, and... The click is still there. What am I doing wrong? Edit: forgot to mention that it's a stock L24 with an E31 head.
-
This is how the tokico setup looks when properly installed:
-
I got new ones from my local dealership (for about $6 apiece, if memory serves). For my 240Z at least, they're part number 46020-10621. If you don't have a Z club discount with the dealership, you can type that part number in at nissanparts.cc and get about the same pricing as I did.
-
Too little too late, I know, but wouldn't it have been easier to do a 7 cavity plug? You only need one +12V source for the injectors. For waterproof connectors, I usually just head up to Napa and get some GM-style weather pack plugs.
-
Anything attached to the air cleaner will not be part of the vacuum system. On my '71, you have the filtered source for the PCV (runs to the valve cover), the fuel bowl vents (run to the carb fuel bowls), and the filtered source for the air pump (though that's now been replaced by a cork). On my car, the PCV source has been replaced by a 3/4" hose, looks like some reddish garden hose. The fuel bowl vents look to be 4mm fuel hose. If it ran "great" before putting the filter and cleaner box on, I'd try resetting the fuel mixture. You could be lean, as the backplate of the air cleaner has stacks on it over the carb inlets that greatly increase air velocity.
-
I got the rear bumper on (needed to fab my own brackets), so the only thing I'm really missing is a new grille. It's been a long road, but I'm very, very happy with the results.
-
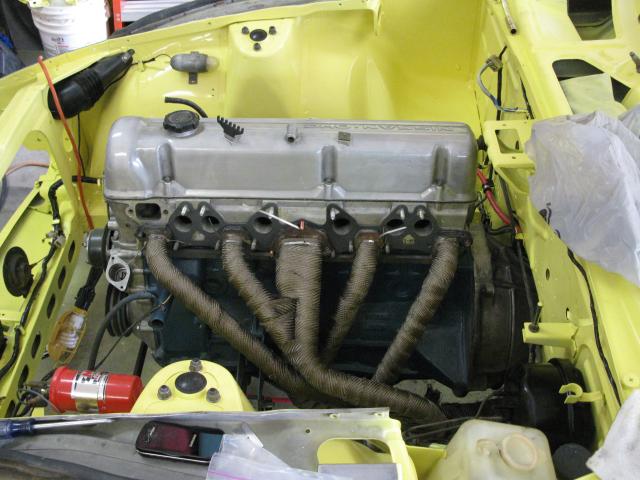
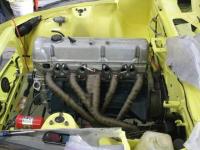
I have the headers on my '67 GTO wrapped, and have for years with no ill effects. I also wrapped the header on my '71 a few weeks ago. The key is in prep. I knocked all the rust down with emery cloth, and coated the header with the duplicolor ceramic paint, and then wrapped everything. The final step after securing the wrap everywhere is to soak it down in silicone spray. The stuff I used came with the kit (DEI, ordered from summit). I'm not going for any serious performance enhancements (call me a ricer, if you will), just for the heat control, as it's pretty warm around here in the summer. Plus, it looks pretty cool.
-
Not that it matters overly much owing to different locations, driving records, credit histories, and whatever else they factor into premium calculations now, but I pay ~700/yr for full coverage on my '71 through Liberty Mutual. I did have to sign an agreement that says I drive the car < 7500 miles/yr, though (easy, since I average a couple thousand a year on the outside).
-
No such issues on my end, and I'm also in Albuquerque. I did have a fairly massive vacuum leak from a crumbling vac cap, but that's about the extent of my fuel/air issues.
-
I've started to resolve the coolant leaks - seems like every time I fix one, another develops. Today, it was leaking out the radiator cap (?!). Reseated and resealed, and it was fine. I found the piece of the filler neck for the gas cap, and got that (and the rubber flap) reinstalled. The LH tie rod end has decided it's a good time to give up the ghost (excessive play in the ball joint), so alignment is on hold until the new one shows up (ordered a Moog from rockauto). Went to the "Burrito Bandits" meet this morning. The real bosses:
-
Fixed the misfire - turns out that if you don't start the car for a year, the points can get a little crusty. I haven't been able to take it out to see if I fixed the backfire too. The carbs were fine - float levels were appropriate, the pistons may have been a touch low, but I fixed it up with some 3-in-1.
-
Ran it out to lunch to get an alignment done, and it ran just great - no backfires, no sputters, didn't even have to choke it. 20° swings really shouldn't make that much difference? The last time I did a float adjustment, I flipped the bowl covers upside down and adjusted the armature until I could slip a 1/2" drill bit between the float and the top of the bowl. I'll go ahead and check it that way, as I don't have any clear tube that small. What I meant (but didn't convey) was "do I check the float height by forcing it down on the valve, or just let spring pressure hold it?" Yes, I understand what the choke does - it pulls the jet down away from the needle (hell, I don't even understand why it's called a choke - might as well just call it a mixture control). That's why I said that it makes sense that it runs better in the morning when its cold out, with the choke on (if the temperature swing is, indeed, what's causing the issue).
-
Backfiring under decel, misfire under load. I assumed that the float heights were fine, because I had Art Singer rehab them after I pulled the motor last year (new floats, new gaskets, new hoses). How do I adjust float height?