SSuspect
Free Member
-
Joined
-
Last visited
Everything posted by SSuspect
-
Hi Michael, You can get these on eBay or Rockauto OR order them through your local auto parts store. The Prothane part # is U-60512R (for Red) and U-60512B (for Black) The Energy suspension # is 9.13103 Hope this helps... Tim Ebay - Red: http://cgi.ebay.com/ebaymotors/DATSUN-240Z-260Z-280Z-Polyurethane-Tie-Rod-End-Boots-_W0QQcmdZViewItemQQhashZitem53e36711c7QQitemZ360297468359QQptZMotorsQ5fCarQ5fTruckQ5fPartsQ5fAccessories Ebay - Black: http://cgi.ebay.com/ebaymotors/DATSUN-240Z-260Z-280Z-Polyurethane-Tie-Rod-End-Boots-_W0QQcmdZViewItemQQhashZitem53e367129fQQitemZ360297468575QQptZMotorsQ5fCarQ5fTruckQ5fPartsQ5fAccessories http://cgi.ebay.com/ebaymotors/Tie-Rod-End-Dust-Boots-Nissan-240Z-1970-1973-_W0QQcmdZViewItemQQhashZitem19b6d48bb2QQitemZ110441565106QQptZMotorsQ5fCarQ5fTruckQ5fPartsQ5fAccessories
-
Thanks Bruce! I will do that tonight! I love working on these! Everything is SO easy to get to! I will run it with the current filter in place and then after the replacement. Nothing like a little bit of "before and after" benchmarking... Yes - I also think that the short delay is due to the bowls filling back up. I do not have any history on the 2.8. It was never run once it was installed. My friend and I got the car CHEAP and it had the new engine and a lot of other goodies. Thanks Leon - good eye! That is an older pic. That line is now hooked up to the dizzy.
-
Thanks Gary! I do have an in-line gauge (visible in pic above reply to Bruce). I also have a fuel pressure regulator mounted and in place. Shows about 4PSI until the car starts and then drops down to nearly nothing! This issue happens with and without the FPR in place. I will try the fuel cap test tonight when I get home. Good input! I will mess with the float level after I am done with the fuel cap test. Thanks again! Tim
-
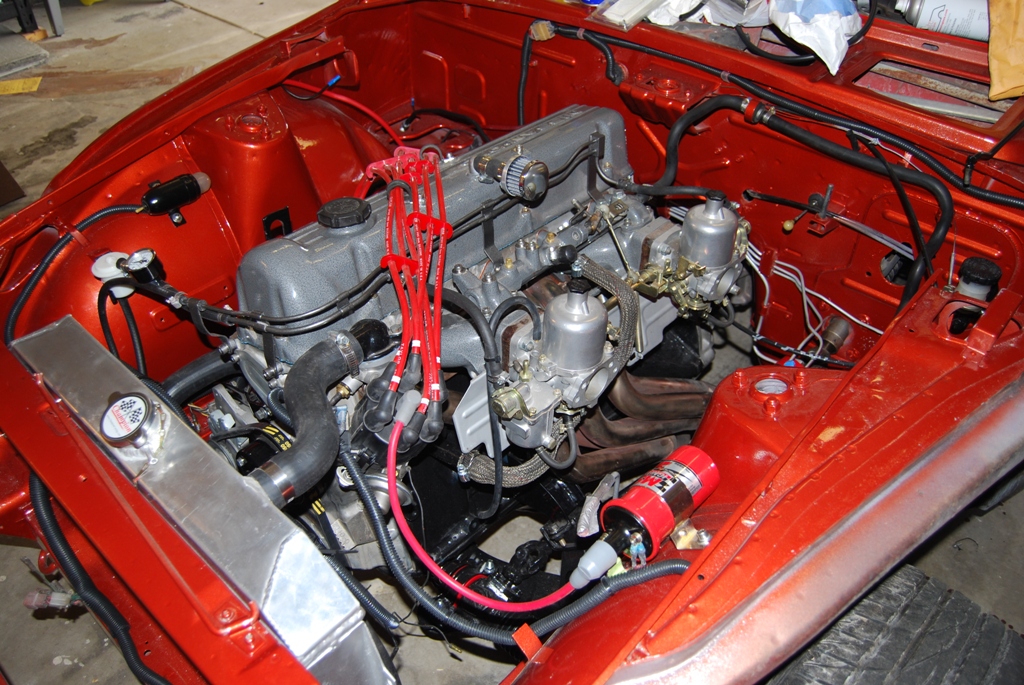
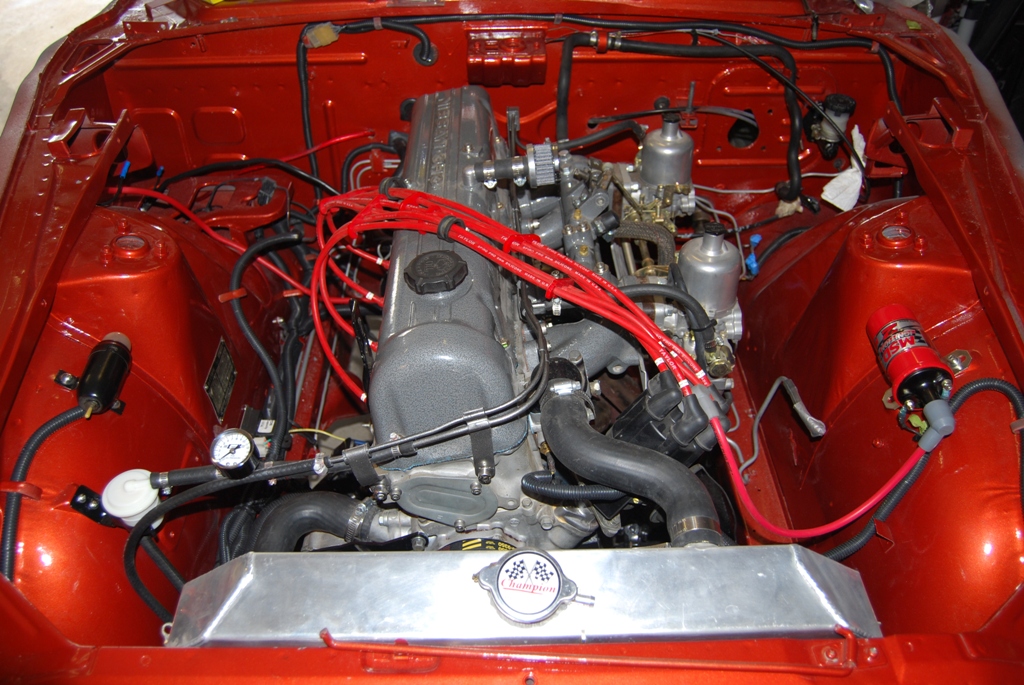
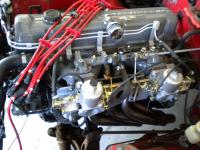
Hi Bruce... Thanks for the reply! I am confused (and pretty old) too! When? - 45-60 seconds after car fires up. Choke on. Seems to run the bowls dry and sputters/dies. Yes - Pump is still running after engine stops. Can start car back up after a few seconds and it does the same thing again! Old engine - 2.8 from ZX. Was a smoking pig, but ran OK (and had the same fuel issue). I have never driven the car. Was only installed and run for a short period until I got the new engine. Engine fires right up and runs GREAT until the fuel runs out... It is almost like the pump is not keeping up with the needs of the engine, but it is strange. Should be plenty of pressure! I am going to replace the rear "in line" filter - cheap insurance. Maybe some sort of blockage at the tank outlet... Hope that helps a little. Thanks again Bruce! Tim FYI - Here is how your carbs look in my setup...
-
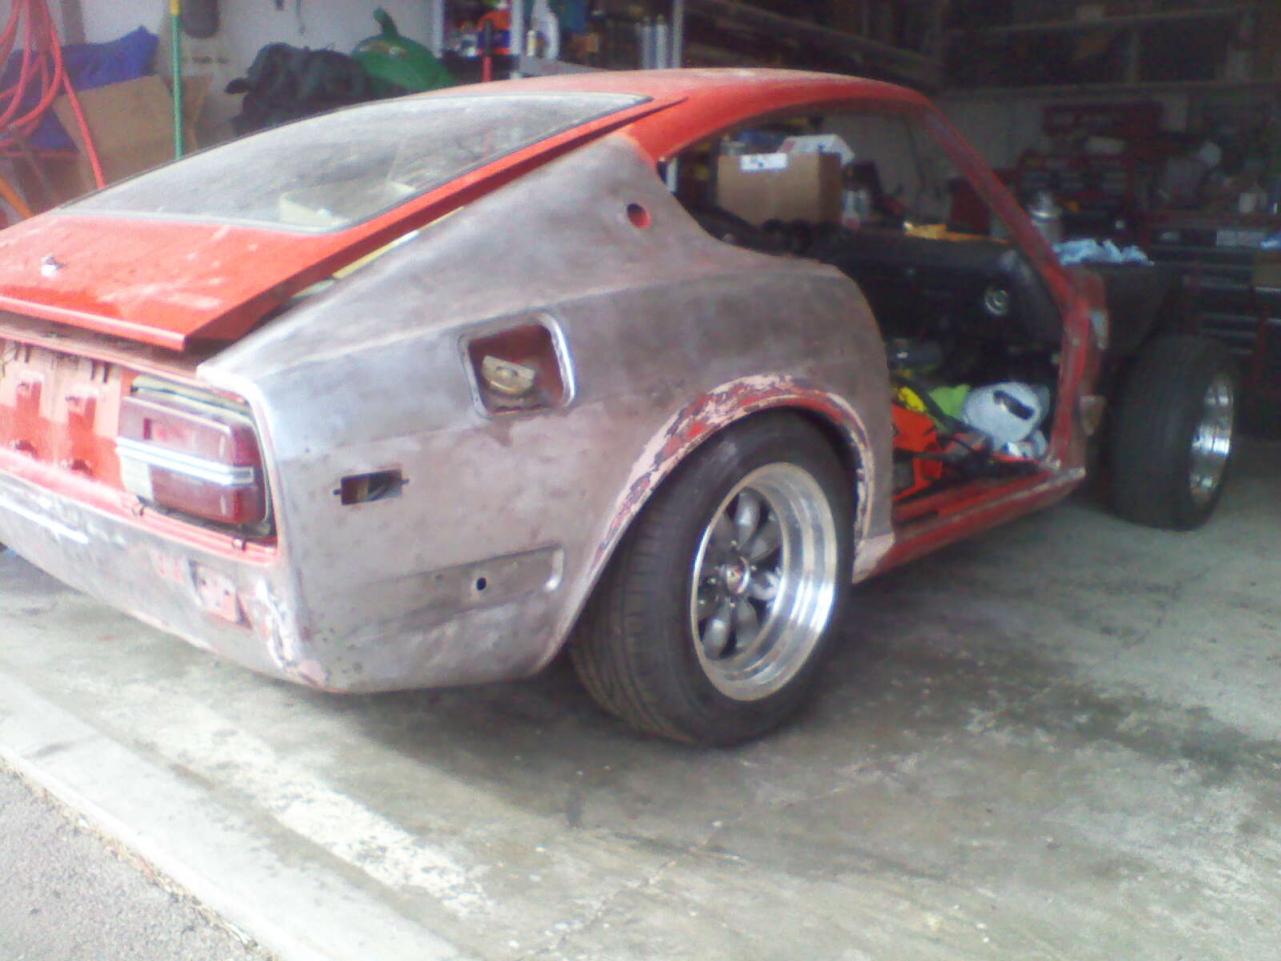
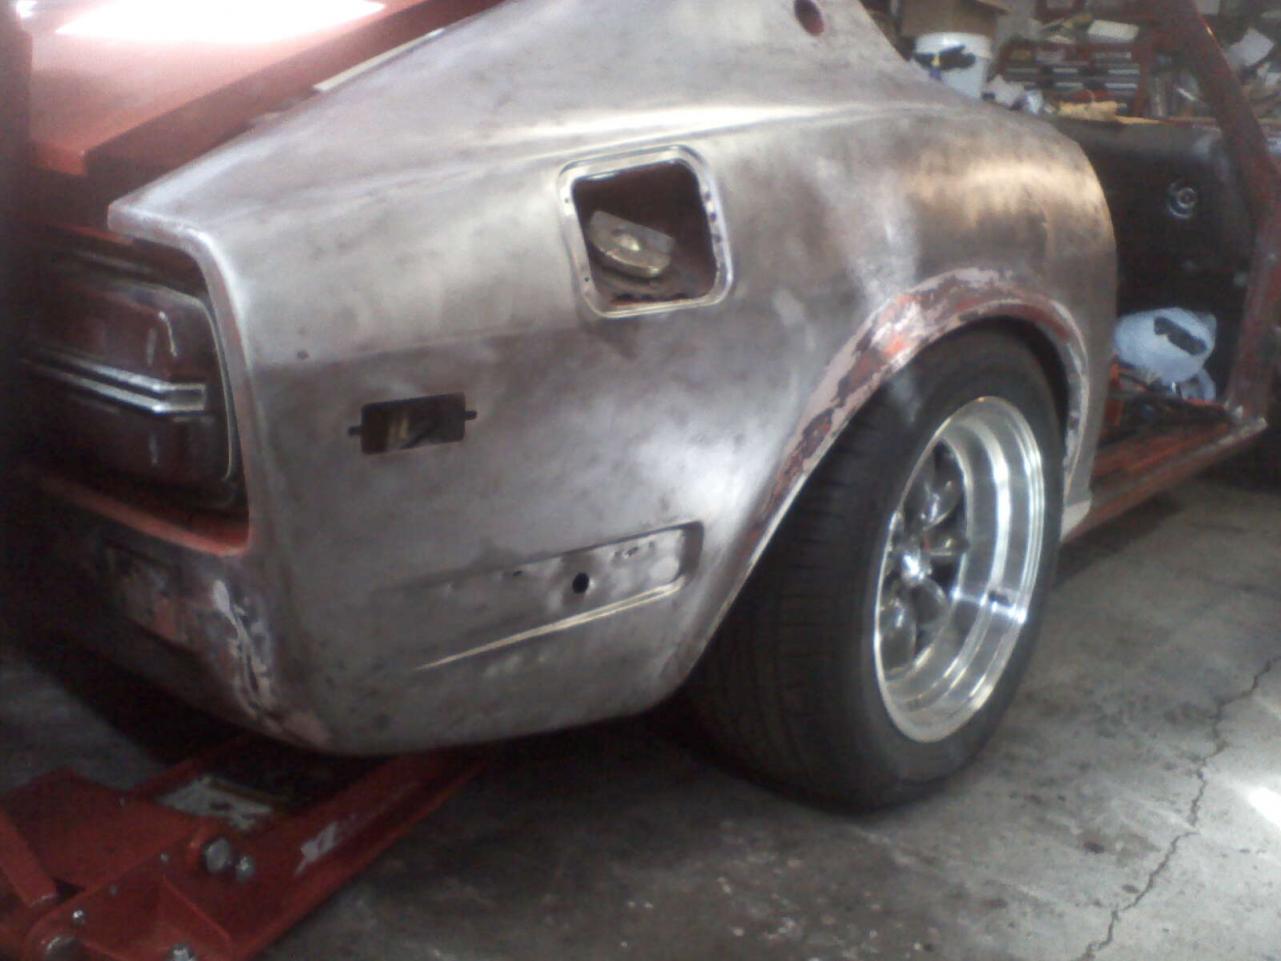
Good eye! Yes they are! 15" x 8". Due to the cancer around the wheel wells and the associated chopping that I would need to do to fix it all, I have decided to go ahead and run ZG’s. I will be taking the cutoff wheel or a friend’s plasma cutter to this within the next 3-4 weeks! Once done, I will either run rear spacers initially (to push the wheels out to the flares) or will begin looking for new wheels/tires immediately. These are 15x8 XXR's with 225/50/15 Falken Ziex tires - They are BRAND NEW! Hate to sell them, but... I will most likely run 16's once the car is ready. Good call! Thanks for the info. I only have the open header for now. I will be taking the car to the exhaust shop just before or just after I paint the car. Should be interesting!
-
Hi all, First, I will say that I still need to do all of the base tuning on the carbs, but I think that I have another issue. I am hoping (and assuming) that this is something simple. I am just not very good with the "dual carb" thing yet... Quick Summary - 1971 240Z - Mechanical pump removed - Electric pump installed on frame rail near tank - Brand new L28 - Brand new Z-Therapy SU's - Maybe 1 hour of run time total - E12-80 Electronic disti with MSD Coil - Current Fuel Pump = New Carter P4070 - 6PSI - Routing = Tank --> In-Line Fuel Filter --> Fuel Pump --> Lines --> Front Fuel Filter --> In Line FP Gauge --> Carb Feeded Line --> Carbs --> Return Line Issue - Key on and great fuel pressure - Start car and runs great for a minute or so and then stumbles and dies - Not maintaining strong fuel pressure once car starts. I have tried 2 pumps so far. NEW RX7 pump and the NEW Carter. Have tried with and without a regulator (Holley). Same result. Fuel tank was boiled out and is very clean. - Fuel lines blown out with compressed air. ALL NEW LINES INSTALLED FOR EVAP SYSTEM. Would carburetor adjustment (float level?) cause this problem? Maybe something in the evap system causing issues? I am thinking of tearing it all out anyway. This problem was in place with the last engine (smoker) and the NEW one. I have never driven this car yet. Any input would be greatly appreciated! Thanks all. Tim
-
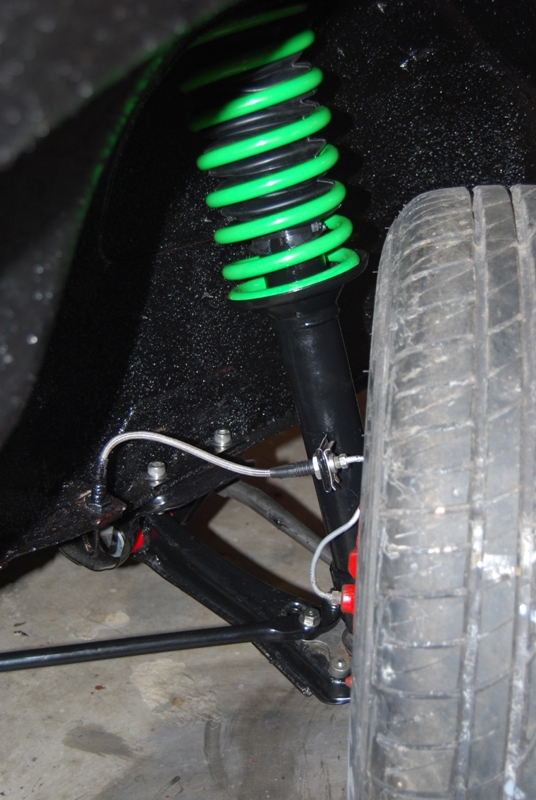
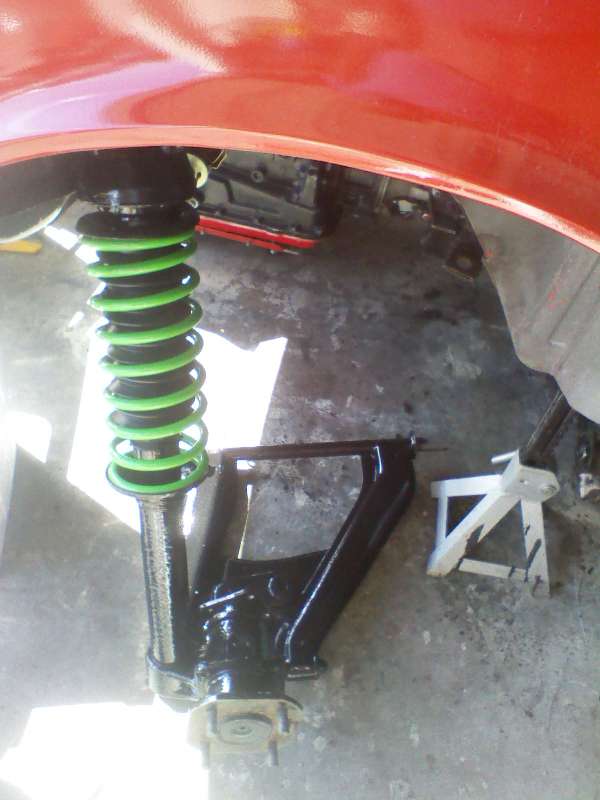
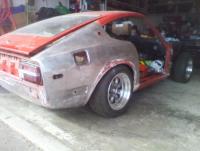
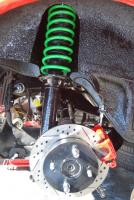
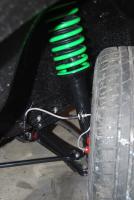
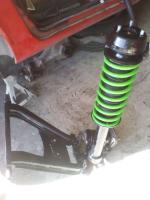
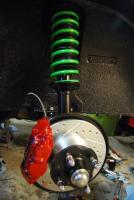
Just got the 240Z on the ground (Saturday) after the complete F/R suspension rebuild. Suspension Technique springs and Tokico blues. The rear is LOW. Looks great! I still need to get all front sheet metal and doors back onto the car to get a "real" look at the stance. Couple of bad cell phone pics below, but you get the idea. Can't wait to get this car on the road! Now I can finish the body work! Tim

-
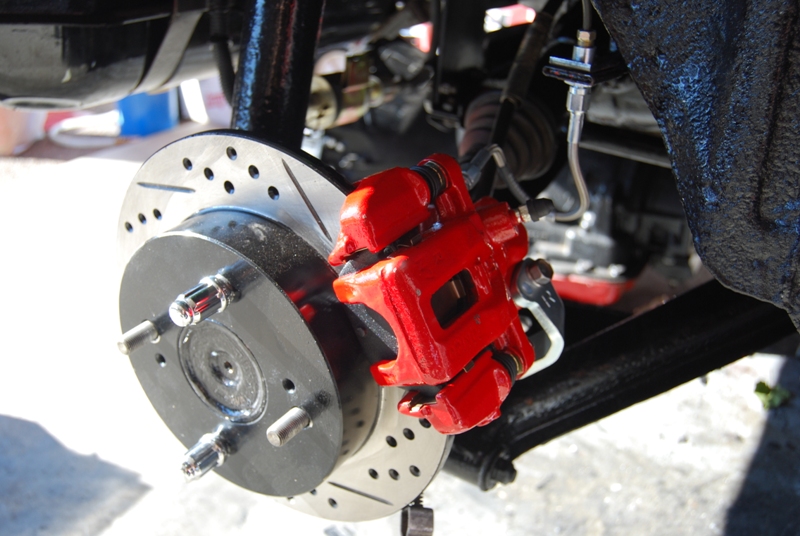
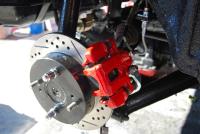
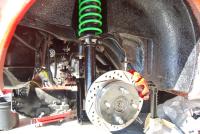
There are a TON of articles about these swaps. The front Toyota 4Runner caliper swap is SIMPLE! The rears are a bit tougher and a lotf people think it is overkill. I was going to just rebuild my rear drums, but the cost to rebuild rear drums to "new" condition would have been nearly as much as the disc conversion! Here is a simple one for the front Toyota swaps. http://zhome.com/ZCMnL/tech/Calipers/toyotaCalipers.html Here is the "overall" thread about brake swaps over on HybridZ. Covers a LOT! http://forums.hybridz.org/index.php/topic/39435-help-what-brake-options-are-available-for-s30-z-cars/ Another decent thread... http://reocities.com/MotorCity/Boulevard/6117/zbrakeupgrade.html Hope this helps. You can search the brake sections of the forums and find a TON of info... IMPORTANT! If you do these swaps, you will also need to upgrade your master cylinder to a 15/16" unit from a ZX. Tim
-
Don't sweat it Darrel - just a little nick in the armor! If anybody needs a cover, I have 3 or 4 of them in the shed (and a lot of other engine parts!).
-
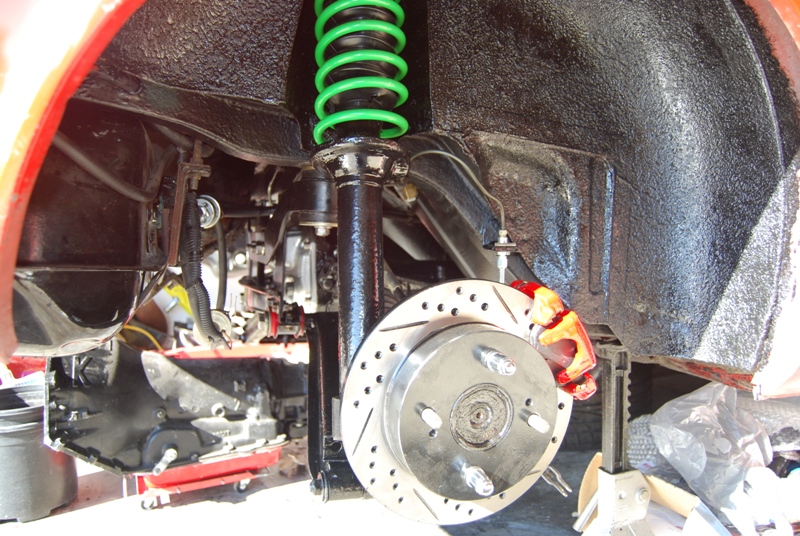
Just finished doing the rear disc conversion on mine. Fronts were already upgraded to the Toyota 4Runner calipers. - Aluminum caliper brackets and e-brake cable bracket from Tinmonk on eBay - $155 (Only e-brake brackets available now - send seller a message) - 1986 Rebuilt Maxima Calipers (w/pads) from Rockauto - $50 each (closeout sale). MUST order left and right! - Vented/Slotted 280ZX rotors from R1 Concepts on Ebay - $110 - Russell braided lines (all 4) - $90 I am into this for about $400, but it came out great and is ready to go. Just bled the system last weekend. Just need to get one more brake cable clip and adjust the e-brake. EDIT: I also purchased a new ZX Master Cylinder and did the updrade to the bigger unit. Add another $115 for this... Tim
-
Like the other folks said, powdercoating is a great way to go. I powdercoated most of my parts (ALL front end parts are powdercoated), but I painted the rear diff, rear strut tubes, rear control arms and rear driveshafts with POR 15 Rust Encapsulant. Came out very nice. This would be another option! You can definitely tell the difference though (look at front strut tubes vs. rear). The POR15 is not as smooth as the powder-coated surfaces, but is very durable and easily touched up. A few pics are attached. Tim

-
Hey Kenny! Panels look great! FYI- I have several sets of panels including a set of fiberglass ones. not sure what years they are from though. Let me know if you need any more and we can take a look at the ones I have. I am just going to take the panels from my doors to the shop and have them re-upholstered. Tim
-
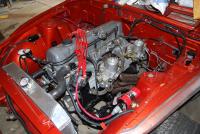
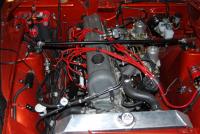
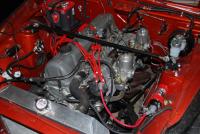
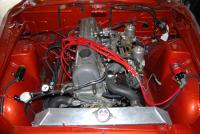
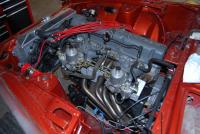
Thanks Dave! Yours looks amazing too! Note: Your combo switches and HLH, PLH harnesses and Diff Mount are installed. Can't wait to actually put them to use! Here are a couple of additional "current" pics with nearly everything in place. Still need to tune everything up, but need to put in a better fuel pump first. The "replacement" RX7 pump is a POS! I just finished the R200 and rear disc conversion and just need to tighten everything up and bleed the brakes. In the process of stripping the body now. Dash is out and gauge install is in the works. Not sure what I will use for an overflow yet. I'll check the hot rod shops around here. Should be easy enough to find. I have most of the "bolt on" parts for the engine and engine compartment assembled with stainless allen head bolts. Looks very clean. I am looking at finally having this on the road in mid-late spring. I do have the LT1 and 4L60e ready to go... Decisions, decisions...
-
Can't remember exactly, but there was an exhaust hanger on my front x-member. This may be your broken piece that you are talking about. You can see it on the left side near the jack head on the attached picture. Not sure what else might have been mounted in the area. FYI - I have one of these R180 brackets (dirty, but straight - pic attached) that I just pulled from my car. I may have a set of good bushings too. Let me know if you are interested. Thanks, Tim
-
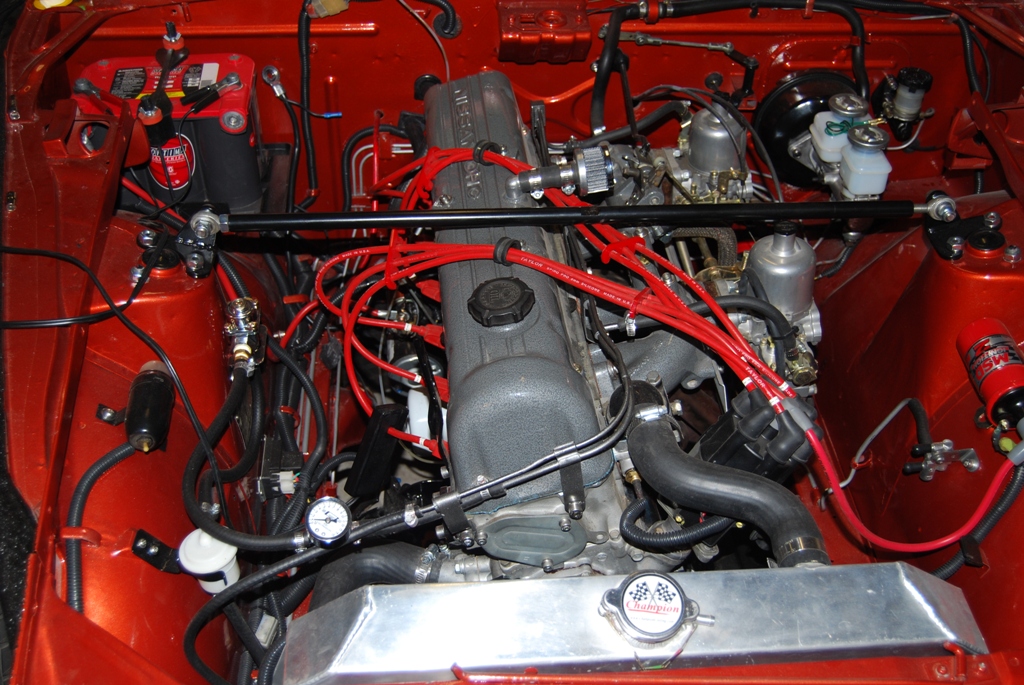
I've got a little bit different eBay setup... It is an aluminum 3 core with dual 12" fans from Monster Cooling. Each fan pulls 6 amps. I can't find the same one anymore, but here are links to a couple of similar units: eBay 3 core Radiator Link Another eBay Link The one I purchased fit PERFECTLY! I mounted it similar to Dave using rubber blocks and grommets. Fans are mounted with the plastic zip ties also. I bought a thermostat control unit from Summit and it comes on at about 185 degrees. I have not had the car on the road yet, but after running in the driveway for 30 mins, the fans kick on for a minute or so and it is right back down to 175-180. Seems to work great! No clearance issues with the pulley at all. We'll see how it does on the road, but there is no reason to assume that it will have any issues. I need to take a few more pics, but here are a few (old engine compartment and new)... Tim
-
Interesting thread... Brought back to life from 2007. When I bought my 240, it came with a bunch of parts. Interestingly enough, it came with a stainless header! I have not seen another one of these and I am assuming that it is some sort of a "one off" prototype or something. It has square ports and is a 6 into 2 type design. 1-3 cylinders into one and 4-6 into the other. There are no markings on it at all. It is bare stainless - no coatings on it at all. The flange is a little over 3/8" thick. It is slightly thinner than the intake manifold flanges. To combat this, I machined off a little bit of each of the concave washers so that the washers catch the intake and exhaust flanges evenly. The tubes are thick and solid. The header seems to seal very well. It also has great clearance. Has anybody seen another one of these? Any info would be appreciated! Not great pics. I will try to take a couple of better ones tonight. Thanks, Tim

-
Thanks for the reply! Yup. All is (now) good. I just put everything back in and I am good to go! I even have YOUR RT diff mount (with the ES bumpstop) up in there now. I just need to get back under there and touch up a few of the scratches that I put into the rust encapsulant. It is NICE to have everything cleaned up and painted/powder coated. Front and rear areas are clean. Rest of the underside will be done as I go along. Rear disc brake conversion will go in later this week or next weekend. Once it is back on the ground, then the paint prep starts! WooHoo! Progress is good! Thanks again, Tim
-
Nevermind everybody! I just had that "brilliant" moment and decided to search the gallery section. Plenty of pictures showing that I was right THE FIRST TIME! Sometimes I just "over engineer" things... :stupid: Now - Back to the garage to tear it apart AGAIN! Thanks, Tim
-
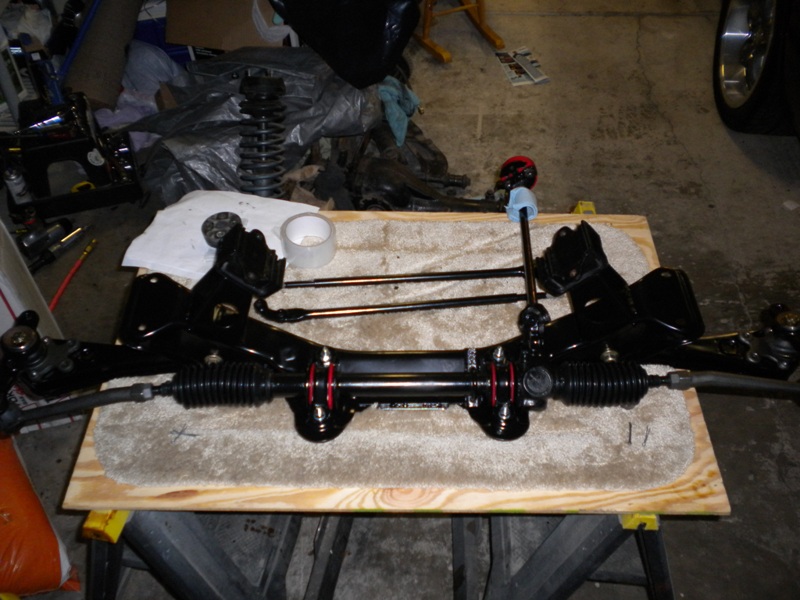
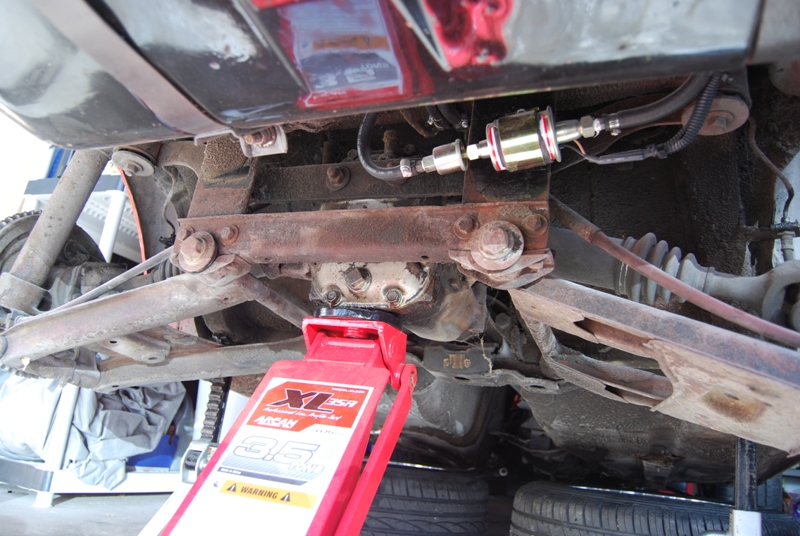
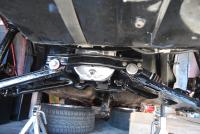
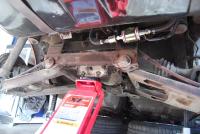
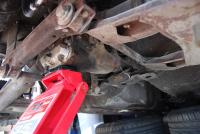
Hi all, I am sure that I am just missing something simple here, but I want to ask before I get very frustrated. Finally getting the rear suspension together and am having an issue here. I have searched all over and I "think" that I know the issue, but want to make sure. The front diff mount is about an inch and a half forward (to front of car) of the actual bolt holes. I "think" that the M-Bar is on backwards, but want to make sure. The diff mount is reversed on the x-member, but still not close. Here is the pictures: I assembled everything yesterday with the M-Bar in the opposite direction. Everything lined up fine, but the M-Bar was BEHIND the rear traverse link mounts (the L shaped ones that drop from above) and it did not look right. Here are the pics: Is the M-Bar on the wrong way? Did I have it right the first time? Do I have the wrong front diff mount x-member? You can see it in the pic above. Any help is appreciated! I will get the rear calipers and rotors later this week and I would like to get ecerything underneath wrapped up ASAP. Thank you! Tim
-
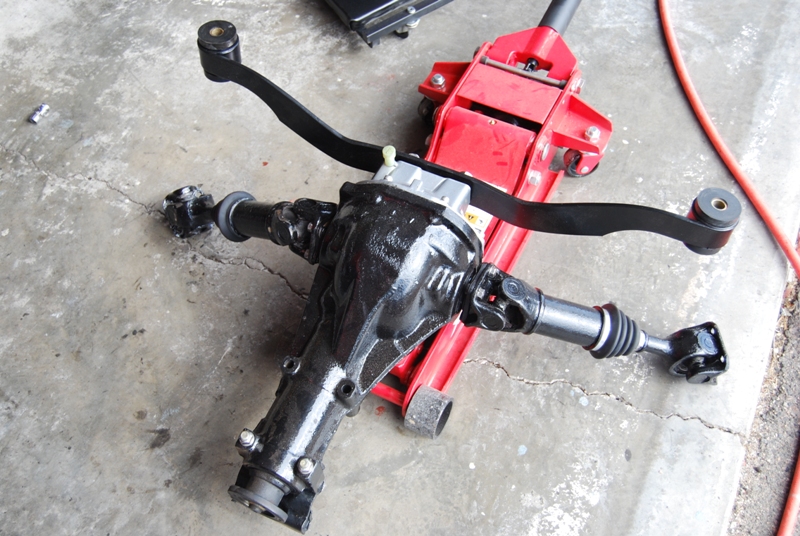
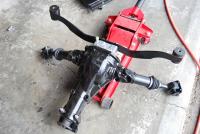
Well - Rear control arms are cleaned up (blasted) and coated with rust encapsulant. New Tokicos, ST springs and urethane bumpstops are installed. Rear diff is painted. Rear diff cover is at the powder-coater and should be done tomorrow or Tuesday. Everything else is powder coated and ready to install. The issue now is that I have to lay under the rear of the car and scrape, wire brush, clean and degrease everything. :tapemouth Then I will get everything painted up all nice and clean. Will be ordering the rear disc conversion kit in a couple of weeks (once I sell off some more stuff)... Couple of bad cell phone pictures (but you get the idea)...


-
Well Darrel - You will (possibly) be happy to know that I have decided to NOT tear everything apart. I got out my soda blaster last night and cleaned up the control arms and strut housings. They are very clean and the bushings seem to be in great shape. I will be painting them (and the drive shafts) with rust encapsulant and re-installing this weekend. Everything else (except the actual differential) is powdercoated. The only delay is that I have decided to do the rear disc brake conversion. It will be 2-3 weeks before I have the $$ to get the kit. I HATE TO WAIT! I'll post a couple of pics when done.
-
Thanks for the comments and information! The car is running now, but I need to dial in the carbs and final tune. It will be great to get it onto the ground and get moving on the paint. The car will be the same color as the engine compartment. Great information about the heat shield - thank you! I am not sure of the origin of this header (it came with the car). It appears to be a custom stainless unit and fits well. I can easily fab up another shield at work. I will look into it! My plan is to do a complete LT1/4L60E swap in the springtime (I already have everything to do it). I will drive it for a while with the 2.8 and see how ambitious I get. Thanks again! Tim
-
I hear you John. The main issue here is that I have a couple of other projects going too (my Impala and a 1982 K10 pickup). I am not complaining about what I have put into the car. I am just impatient and my PayPal "play money" account is low. The front end is done and I want tp get everything finished up in the rear. My wife usually let's me do what I want, but I have been getting the "take a break from the car" evil eye lately. I would like to have the car on the road by the end of the year, but we'll see... Here are a couple of "progress pics". Still have a lot to do. EDIT!!!: Needless to say, I am not doing a proper "Original Restoration" on this car, but it should be very nice when I am done...

-
Yeah - I thought about that. Either way, even using the 260 stuff, I would have had to rip everything apart anyway. I may surprise you on this one. I REALLY do not want to rip all of this apart... BUT, once the rear suspension is done, then I can paint the car! That is the next step! Once that is done, the interior install will go quickly.
-
Thanks Darrel! I will look over everything again tonight and see how I want to manage this. This "little project" is turning into a "BIG" project. You know how I am though... All of the remining small pieces for the R200 swap are at the powder-coater now. I will be doing the rear disc conversion, but I need to sell more "stuff" to absorb some of the cost.