palosfv3
Free Member
-
Joined
-
Last visited
-
-
Colors can vary that much from the factory over the time the color is in production . A darker sealer would have brought the color closer . Not the end of the world.Looks great I would put it together .
-
Areas ( under dash , floorpans , ect ) that have untouched original paint may not have the same mil thickness of color as exterior panels which can result in a lighter or different shade compared to other areas of the car . This can be even more evident on reds as the current mixing toners tend to be transparent. So much so that the sealer color can affect the appearance of the overall color. As an example if you took a test panel and masked it off in quarters, sprayed each quadrant in as different color of sealer ( tan , light gray, dark gray and red oxide ) and then sprayed the test panel with your red color of choice you would get 4 different shades of red on the test panel . This is due to the transparency of the color film. Solid yellows are even more sensitve to the base color. The color transparency can vary dependent on the brand you are using . How much does the color vary from a large unfaded color sample of the original color ? Does the color have an orange or blueish cast overall?
-
Unfortunately I don't have any detailed pics of the bumpers or the brackets . I also forgot to mention that the rear bumper on this 260 has been moved upward about 1 to 1 1/2 inches .
-
The amount of work and parts needed will depend on how close in you move the bumper to the body. A couple of years ago I tucked and modified the front and rear bumpers on this 260Z . These are about a 1/4" (8mm) from the body. This was quite more than just new brackets since the point of the front bumper was radiused and the rear shaved and seams welded . The amount of work involved is really dependent on what look you want to have . The 260Z bumpers have some heavy brackets bolted to the face bar . The easiest way to do the front is to just remove these as well as the bumper shocks w/ brackets and fabricate new mounting brackets. If memory serves me correctly 240Z brackets will not bolt right up to the 260Z because of some small changes made to the isolator mounting area on the front of the rail. On the rear you are in a similar situation but will have to contend with the fuel tank (will need to drop the tank to remove r/side bracket and absorber) and the bumper cut outs in the quarter panels . You will have to either shorten the rear bumper ends , extend the bumper cutout in the quarter or like we did fill the cut out to fit the side of the rear bumper . There are captured nuts that are at the end of both rear rails that can be used for attaching a new bracket to the body. On both bumpers you will need to fabricate side mounting brackets. On the minimal side of things you could remove the fillers and remove the side mounting insulators and drill the absorber to release the oil , push the bumper in as far as it will go and the weld the end of the absorber to keep it in place. I dont believe this will pull the bumpers all the way in to the body but will move them back a couple of inches.. Build pics of this car are at https://picasaweb.google.com/wgmauto/WgmautoGregScar I don't think there are pics of the actual fab of the brackets and such in this folder . I may have some pics of this saved on disc somewhere and will post if they exist .

-
I'm curious about the repair cost vs car value issue . To complete a rear body section on a Z with the transfer of mechanicals and such I would guess the repair cost to be somewhere in the low to mid teens ( $11k to $14k )at the least and value upper teens to low twenties . I surprised the insurance didnt try to just pay out on the value .
-
E your correct that there are midcoats that are tinted with pearl . Getting old you know and sometimes it takes a little longer to remember. Pearl tinted midcoats are only done with white , light gray or light tan hued colors as the large volume of white tends to absorb the reflectiveness of the mica based pearl . Production tricoats , custom tricoats from HOK , or other specialty vendors all have three distinct steps to replicating the color and effect. A base color , a tinted midcoat and a clearcoat. After painting cars professionally for over 40 years I cant remember ever having metallic tints mixed into a clear based midcoat other than if your using a heavy flake over a silver base but this process would actually entail 4 steps to complete and is strictly a custom paint process .
-
Three stage , tri coat or candy colors all refer to the application of a tinted clear midcoat over a base of high metallic or reflective color which is then cleared over . Tricoats do not use any metallics or pearls in the midcoat . A tricoat color can be altered by many different methods . Changing the base color from gold to silver , the size of the metallic flakes . Lately on many of the late model cars they are using a colored base with metallic flakes that is quite different than what was used decades ago to create the same affect. The darkness of the color can also be altered by the number of coats of tinted midcoat applied over the base . Hope this clears up the definition for all .
-
Its not a bad idea to replace the fuel inlet valve assembly . They can wear out and hang up as described. We had one here that just drove us crazy with intermittent fuel problems until we replaced the assembly. Make sure your rebuild kit has the valve assembly.
-
It would not be practicle or cost effective to attempt to repair this damage . The left wheel is driven back into the cowl. This is an indication of the severity of the impact. If you remove the carpet on the drivers side you should see significant damage to firewall with a good possibility of the floor below the brake pedal being buckled.
-
Just for what its worth . I have seen several early Zs that had a hole rusted through the base of the air inlet on the r/s cowl near the r/s wiper transmission. You may not be able to see this without removing the cowl vent grill and drilling out the spot welds that hold the deflector into the upper cowl panel above the air inlet. The original factory seam sealer dries out and splits and the moisture sits there and just slowly eats away at the flange.
-
The hideous side trim was usually a dealer installed add on . Get rid of them . They ruin the good looks of a Z .
-
You may not have to reset the hood. Oil the hood hinge pivots and open and close the hood several times . I think you might get lucky .
-
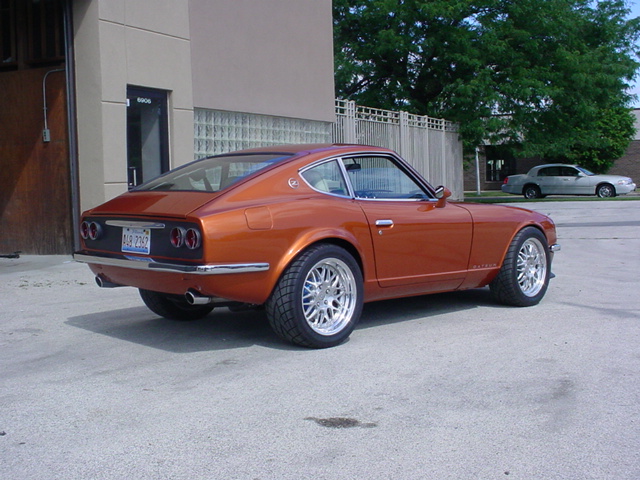
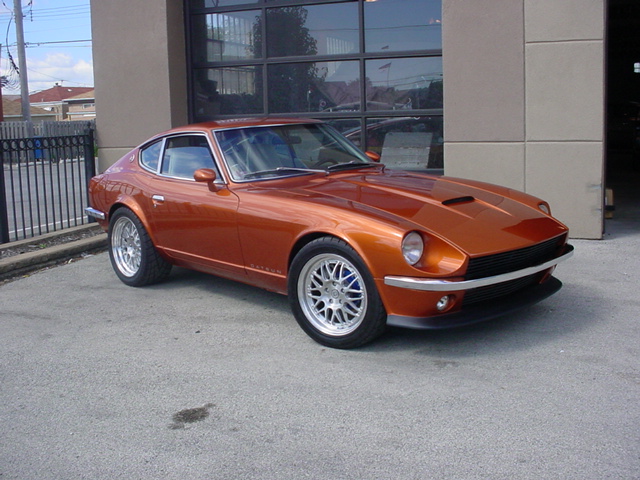
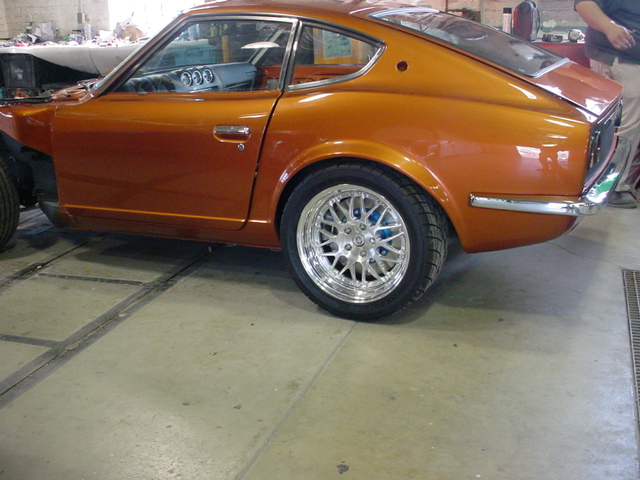
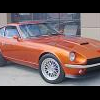
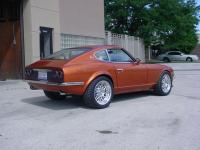
This pic is of a 260z I built for a customer a couple of years ago. The rear openings are flaired in metal. They required minimal welding and the opening edge is rolled . The tire size is 275-40 zr 17. You can check the Picasa link at the bottom of my signature and go to Gregs Car for the build folder . I'm unsure if there are detailed in progress pics of the process.

-
Some single stage enamel can be soft when compared to urethane . Change your pad and switch to a less aggressive compound . McGuires #2 as an example. If your referring to a long type of scratch that looks like a missed primer scratch, you will need to lightly and carefully resand that area and repolish hoping you dont go through the top coat. This type of scratch is usually caused from a small piece of dirt getting in between the polishing paper and the topcoat. You can hear it when sanding if there is one stuck in between. Rinse often to minimize this problem.