trykflyr
Free Member
-
Joined
-
Last visited
Everything posted by trykflyr
-
 Yep, the cowl between the hood and the windshield. I remember swapping hoods between a 240 and a 260, but I also remember a support rod holding the bottom of the fender on my 260 that I'm not seeing on the 280.....
 -
From the threads I'm skimming thru, it appears I can yard the fenders and vent intake off a 71 240 for my 76 280. I have a source up here in the frozen freakin north and that would save me a ton in shipping costs. Any recommendations?
-
Dude, I have garage envy. Track lighting???? What ever happened to a bare bulb on the end of an extension cord wrapped in duct tape? My driveline and rear end are down to individual molecules. I'll be following along as well from the frozen freakin north!
-
I've used the rattle can stuff from NAPA before. Put it on the rig I drove up here to Alaska from Vegas before I left there. When I traded it in after 180K miles and 6 Alaskan winters it still looked fine. Make sure the underside is clean and oil/grease free. Cover EVERYTHING you don't want coated (including you) and have at it. Go heavy in the corners and the along the seams.
-
that's a thought.....I was scraping ice off the windshield this morning. I'll give the heat gun a shot first. Got the required carbonated malt beverages lined up and ready...... thanks ya'll
-
dammit, I HATE it when I have to buy new tools!!!! You got me thinking a blast cabinet will fit really nice next to my toolbox.....now I just gotta find a way to pay for it. Let's see, 100 gallons of heating oil or a bead blaster? such hard decisions........ Great job on the parts, DeesZ! I may have a handful of stuff to send your way as well, if you're interested.
-
There isn't one within 150 miles of here. I've dropped a note on the website, but don't expect an answer anytime soon......
-
One of the PO's of my project Ziebarted the thing. I could shake his hand coz it hasn't rusted and kick his butt coz I can't get the stuff off where I want to. Anyone have any tricks for removing this stuff? I've tried adhesive remover, actetone, gas, grinding, sanding, scotchbrite disks, and scraping. About the only thing I haven't tried is MEK. This stuff is laughing at me.....
-
Mezzz, when you're checking TDC you gotta make sure you're on the compression stroke and not the exhaust stroke. You'll be 180 degrees out if you're on the exhaust stroke. Sounds like that's where you were. Stick your thumb over the spark plug hole as you turn the crank in the proper direction of travel. As the piston comes up on compression, it'll push your thumb off the hole. That way you know you have both valves closed and you're coming up on the ignition spark. Get to TDC using an indicator like you did and see where the rotor's pointing. I'm betting you're gonna be a lot closer. Were you at 3 o clock in the picture or as oriented towards the front of the car?
-
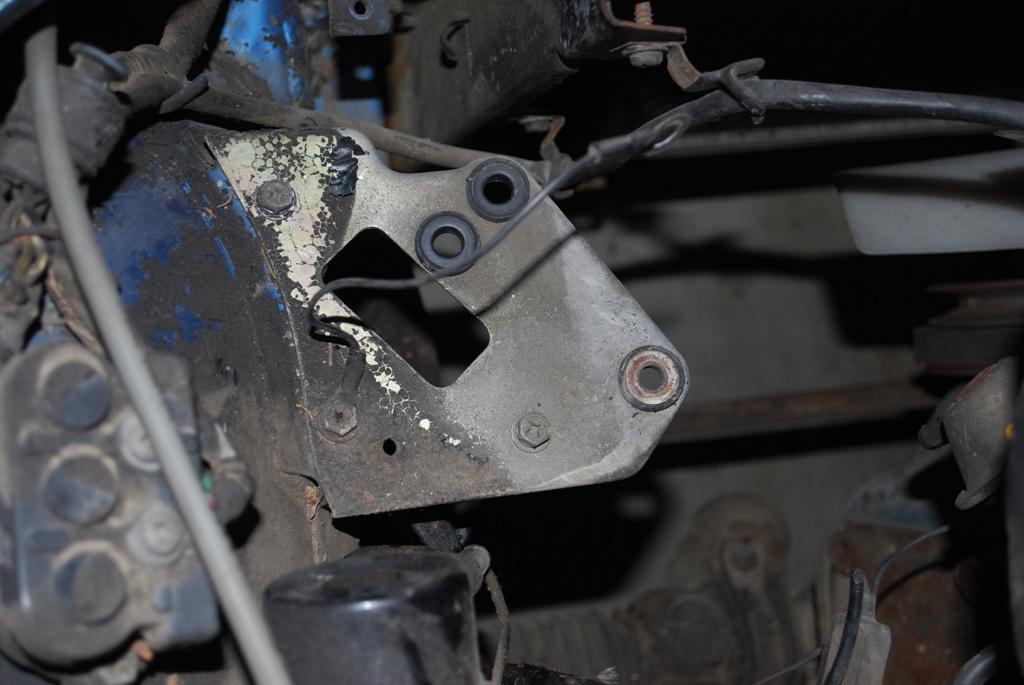
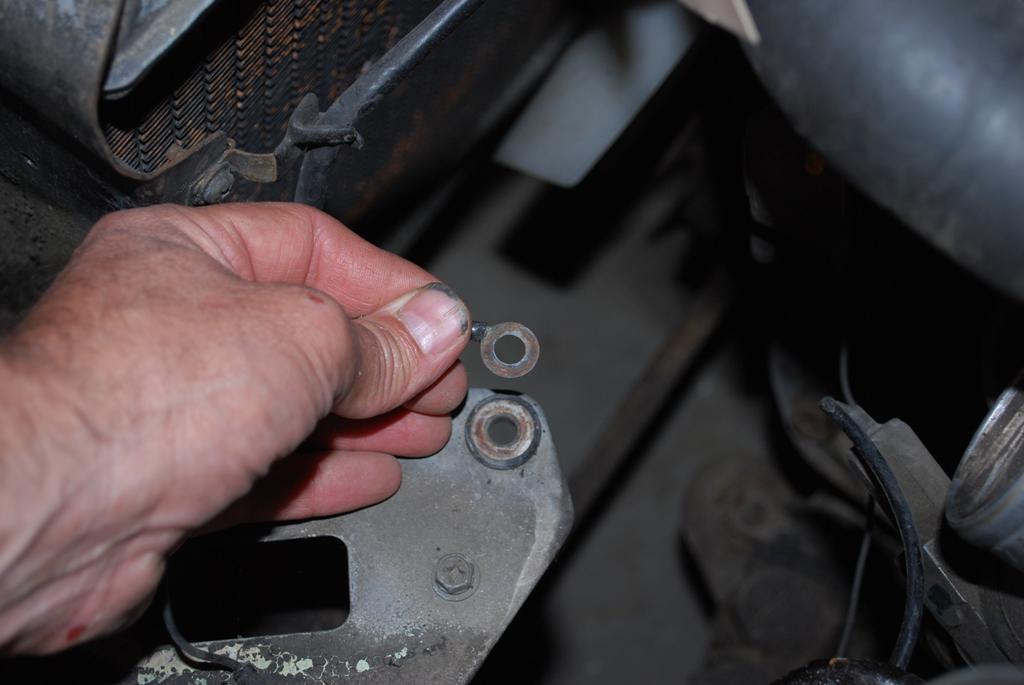
Steve's right as usual. That wire gets sandwiched between the inboard mount bolt shock bushing and the AFM case.


-
If I follow you, there isn't a wire that connects to it. It's a frame ground. It should run from the AFM to the inboard rear bolt on the AFM mount bracket. There should be a full loop terminal end on the wire. Make sure the wire terminal end and the area around the bolt are clean. The bolts are installed from underneath the AFM mount bracket.
-
Mezzz, you've saved me a buttload of troubleshooting. I'm having the same problems with my 76. Steve's been a great help. You've covered about all the checks I've made and your numbers match up pretty close to mine. Haven't pulled the cap and checked the timing yet, but that's the next step.
-
not by a long shot it doesn't. up here, you usually see one off color fender from dumping it into a ditch to avoid the moose and one off color. usually clashing, door from when the moose beats your ride up coz you scared it. Add liberal amount of duct tape to keep the rear window in and you've got an Alaskan Classic
-
I want some of what this guy was on when he picked those paint jobs!!!!!!
-
Here ya go. The 10 mm hex heads are m6-1.0 the 12mm heads are m10-1.50. That should cover all the hardware for the fenders. Fastenal has the internal wrenching cap screws you're looking for in stainless. Make sure you clean the area around the boltholes and the weldnuts real well. Dissimilar metals, a little dirt, add some water and you basically have a battery. It'll corrode on you. Use a thread lube on the satinless bolts too. A little beeswax on the threads before you start the bolt works well. You can get it at any sewing or hobby shop. Boeing puts out this stuff called BoLube for drill bits. That works great too. The parts/pilot shop at the airport will carry it. A little goes a long way on these.
-
Try this link http://www.atlanticz.ca/zclub/techtips/suspension/rearend/index.html I have the same question under the suspension and steering threads.
-
The majority of your body bolts are the 10 mm hex heads. That equates to a 6mm shank on the bolt. Thread pitch is usually a 1.0. I have a tap & die set and all the bolts you're asking about sitting in the garage. I'll do a quick check for you and get the data. The FAstenal store here in Fairbanks has a Z fanatic as the General Manager. I met him yesterday. He's not on here for some reason, but probably will be soon. Let me see what I can dig up for ya.
-
Important safety tip! thanks! I never got it much above idle to get it onto the trailer and haul it back to the garage. It had oil in it and it flowed OK when I drained it, so that may be the issue. I'll plumb a direct gage into it the first time i run it up again.
-
I'll pull the whole thing and take it to a bud with a front end shop. he can do the hard stuff, i'll just write the check. Besides, it's a helluva long way from where he is to the frozen freakin north... thanks for the info!! great link by the way. whoever did the photos has a great sense of humor!
-
dude, you're my new best friend! Gotta go find a bigger hammer........
-
hmmm. how big a headache is it to pull the whole damn thing, T/L and all as one big piece? That would at least give me room to play. I can get to the shaft bolts and get them out.
-
Anyone have any tricks to getting the spindle out of the transverse link at the rear strut? I have the lock bolt out after much penetrating oil and a lot of cussin'. The sway bar's disco'd and all the brake lines are off. The upper strut bolts are still in and tight, holding the weight of the assy. The book sez to leave those till last and drop the assy as a whole unit. Will the strut clear the wheel well if I pull the top nuts and drop it down? I could straighten the joint at the transverse link and take any binding off there.
-
thanx. I figured I could ground the gage somewhere, just wasn't sure if that would drive the needle the wrong way, i.e. low resistance reads less pressure, hi resistance reads higher pressure. I have a direct reading gage that I'll hook up and get good readings from before I get the car back on the road. As long as the needle's off the low peg and in the middle somewhere steady, I figure I'm good.
-
Is there a way to check the oil press gage from the sender connector to the gage? Looking at the schematic, the path to ground is thru the sender. Does anyone know if the gage climbs as resistance is increased or decreased? I have a rheostat I can use to check, just don't want to have the polarity backwards and drive the needle downward past 0.
-
You want to shoot an etching primer onto new or bare metal. The etch basically creates a foothold for the primer to attach itself to the metal. If you don't have a somewhat rough surface (we're talking really small irregularities here) the primer will detach and come off in sheets. Think trying to paint a highly polished supersized ball bearing. The paint wouldn't stick very long.