Jetaway
Free Member
-
Joined
-
Last visited
Everything posted by Jetaway
-
 Thanks for the input, all. Quite a bit more complicated than I had contemplated. For now, I'll stick with the single strut setup and resign myself to frequent replacement. If and when I go ahead with a two strut solution, at least now I know what to expect going in. Chris
 -
Just the kind of complication I was hoping for. Well, not hoping, but am glad to find out about. Makes sense, a single strut would need to have a much higher pressure to lift the lid than dual struts. Put two high pressure struts together and you could launch small children from the back. (Not recommended by the NHTSA.) Okay, this is possibly the stupidest idea ever posted on this forum, but what about using two worn-out single struts? I've got a pair that were removed fairly quickly after failing, so they shouldn't have lost a great deal of pressure, just enough to not counter-balance the weight of the lid. Or, possibly a somewhat saner idea. Use a pair of 280Z struts. I'm assuming that the body side mounts for the struts differ between the 240Z and 280Z, but it might be worth the effort to remove the old strut mount and weld in a new pair positioned for the 280Z struts. Chris
-
The recent thread about a torn away hatch hinge piece got me thinking. The same thing happened to my 1972. Not many data points, but from the thread I got the impression that the driver's side is more likely to fail. I suspect that a driver's side fail may cause the passenger side to fail quickly as well because it probably is creating unusual stresses on the other hinge, and thus accounting for the dual weld reports. The only difference between the sides that I can determine is that the single hatch strut is on the driver's side. Wouldn't seem that such a relatively small pressure could cause a break, but metal does fatigue and given enough time and flexing, any metal will eventually break apart. I've neither done much with metal nor welded a thing in my life, but it wouldn't seem to be a big project to add a second strut to the hatch. Weld a piece of metal shaped to hold one end of the strut to the body and drill a couple of holes in the hatch to receive the struct plate seems to be all that is needed. Is there some complication that I'm overlooking in my ignorance of metal and welding? A second strut would also do wonders for the lifespan of the struct cartridge, I would think. Chris
-
Yeah, the torn away sheet metal and a thicker piece (two maybe) underneath is exactly what happened to mine. Your comment about the strut got me thinking. I feel a new thread approaching. Chris
-
If you mean this (see photo), yes. A buddy Mig welded it for me, I didn't think it looked very good and sure enough, it failed within a month. Later I met a friend of the same buddy's who knew something about welding. He didn't spot weld it, I think he used an arc welder and it has held for a couple of months now. Paint got burned, so he must not have kept it cool enough, or maybe its not easy to do, which would explain the reluctance of commercial body shops to tackle the job. The photo is of spare hatch from a 260Z I picked up while figuring out what to do about the broken bracket. The paint is in abysmal condition, but if you can't get yours fixed or find a replacement and are willing to wait a couple of months (let's say the end of March), I'll let you have it for a reasonable price. I do want to hold on to it for awhile longer as am backup in case the weld fails, but holding on to it much beyond 4 / 5 months starts the move from prudence to hoarding. Chris
-
OK, so as far as you know, the heater has never worked properly since you got the car. That's ... good, I think. At least closer to good than bad because a sudden change for the worse is never a good thing and is usually quite bad. Walter asked if hot air is supposed to come out the "vent." I'm curious myself, because as he wrote, the three dash vents on the 240Zs (at least through 1972) were fresh air (i.e. not heated) only. Maybe you shouldn't expect hot air from the dash vents. Or by "vent" did you mean the defrost or floor vents? If the 180 thermostat has solved the engine temperature problem but still no heat, I would: 1) Check for clogged hoses. 2) I get the suggestion from your post that your dad had an ... ingenious mind, let's say. While my dad wasn't the P.O. a P.O. had rerouted the coolant hoses so that the flow from the heater core went back to a hose that led directly from the water pump. (Don't ask.) I reasoned that this may well slow down the flow through the heater core because the return from the core was trying to merge into a high pressure stream. I rerouted the hoses and got more heat inside the car. Manuals aren't of much use in this type of thing, but you should have one to make sure that "in" and "out" connections of the heater core are correct. Then trace the coolant flow in and out of the heater core and its return to the engine. Maybe your dad did something as equally creative as my P.O. did with the hoses. 3) Marry Fastwoman. 4) If #3 proves not possible, and you've followed all mine, and Walter's and Ozconnections, I'd bet money that Fastwoman's stopcock diagnosis is either right on the money or very damned close to where your problem lies. And I'd also bet that if it isn't the stopcock, Fastwoman will have a couple more excellent diagnostic suggestions. 5) I'm ignorant of how the venting is arranged in a 280Z, but even after rerouting the coolant hoses (going from cold to lukewarm) my Zs heater was none too impressive. And I could never get the fresh air vents fully off. The problem (Did I mention the misrouted control cables? No? They were, but #5 has nothing to do with control cables) was that the foam that sealed off the fresh air vent duct when the control flap was in the "heat" position was but sad little crusts. Using one of those "grab small items when they fall behind something" tools and cursing freely I managed to place one sided adhesive household foam door seal pretty much all around the duct. Still leaks a bit, but until I gin up the courage to dissemble the console, it'll do. My foam hack was enough to change a couple hour drive at 45 degrees from, uh, I think I'll take the other car, to being able to turn the fan down to one and have the window cracked a bit. I have to admit I chuckled (with you, not at you) when you reported "screwing up" the radiator drain plug. Ain't that the truth, brother. I don't think there is one first time repair that I've done on the Z that didn't result in my breaking, jamming, misadjusting, or losing some other damn part whose only crime was being physically close to or tangentially related to the problem I was attempting to fix in the first place. Now that my experience level has risen to, oh, novice, I offer a piece of generic advice. Penetrant. Drip it on, spray it on if gravity won't cooperate, but use, use, use penetrant. If you can plan work a day in advance, put penetrant on the day before, then again when it comes time to twist the nut. And don't forget to rap (gently) the parts a couple of times with a hammer after putting the penetrant on. Chris
-
I'm thinking two problems. The first is engine temp. and the second is heating system. Yes, the reading on the gauge seems low to me also. Thermostats are cheap and easy to replace, so I'd just go ahead and replace the old one. And check for leaks. When it cooled down here, my 1972 began running a needle width cooler than normal (which has been dead center), so I swapped out the 180 for a 195. Now it runs one and a half / two widths above. "Cool" being relative, of course. We've had a cold winter, which means it does get below freezing on clear nights-- not much but a little. Hazarding a driving time outisde temp average guess, let's say 50 this winter. The 195 does keep the cabin toastier, but I probably won't run the 195 next winter. You're probably warmer than we are, so I'd stick with a 180. You wrote that this is the first winter that you've driven the Z to work. A couple of questions: Have you ever used the heater before? By "no hot air" do you mean no warming, no heat, nada? Or a lukewarmish kind of heat? If yes, and lukewarmish, replacing the thermostat will (hopefully) solve both the engine temp and cabin heating problem. If either no or yes and nada, sounds like you've caught a clog in the heat exchanger or one of the hoses going to and fro. Hopefully a clog, because another possibility is the heat exchanger is getting ready to drench your feet and carpeting in coolant. Best of luck figuring it out. Chris
-
The picture was pre-covering. Staying with the reuse motif, the main driver panel is covered in ... Fabric from 1970s speaker grills! If you look very closely at the rear you can see a red line of something at the top of the boxes. Its a piece of shiny (shiny? shimmery?) fabric that a friend of mine's mom sewed around a piece of PVC pipe for me. In use it drapes over the rear firing drivers. They are just there for a bit of a bass boost, so I wasn't concerned about losing some high frequencies. Which would have been largely lost bouncing into the carpet anyway. Chris
-
Different issues. Four and five speeds (and different five speeds, apparently) came with different rear end ratios and different speedo pinion gears keyed or matched to the rear end ratio. If you are going from a 4 spd. to a 5 spd. you'll need to remove the speedo pinion gear from the 4 spd. and put it in the 5 spd. to keep the speedometer accurate (assuming it physically fits, otherwise the same color gear for a 5 spd.) Maybe just semantics, but in this case, from the perspective of the the 5 spd., it would have a new / different speedo pinion gear, but from the perspective of the car body (or rear end) it would be the old / original speedo pinion gear. You've brought up the issue of overall multiplication ratios. I have a 1972 with the original (4 spd.) differential but a 5 spd. from a 280 ZX (don't know for sure which version of the 5 spd., but suspect the earlier version based on Idahokids description of the 2nd to 3rd gap and relatively small rpm drop going from 4th to 5th). It still makes for a very long legged car, pulling barely 3000 at 70 mph. Yes, it is a bit sluggish off the line, but somewhere during the previous 30 years dropping a drive line went from an amusing story to share with friends to a flat-out PIA, so it doesn't bother me much. OTOH, Smiling Jack is out there hammer and tong on my 75 mile (one way) work commute and I suspect that some of his strong punch when launching from 50 mph to 70 mph is due to the tall gearing. And, I've got to admit, I love ramping up and then maintaining a closing rate of 2-3 mph on the speedy boys (especially pickup trucks) who passed me on the flats while cranking over the Altamont. I know, its semi-evil and somewhat immature, but I get a kick watching them try to rebrake and go with me, but quickly run out of revs on the downshift and simply don't have the power to keep up in a higher gear. Yeeeaaahhh buddy, I'm doing 80 and at 3400 revs, I'm just getting into the power curve. So ... you may want to swap in a higher numerical rear end. Or not. It depends on your driving style and usage. With my long commute, I'll take the better gas mileage, lower engine wear, and high speed kick that comes with a tall geared car. OTOH, if I could walk to work, I'd probably be looking for limited slip 4.XX+ differential. Chris
-
I hope I haven't cursed you. Chris
-
(Above edited) I used the term pinion gear because that's what my 1971 240Z Autobook manual used and it had been referred to as such in earlier posts. Perhaps I should have used "speedo pinion gear" to eliminate confusion. The original question was about swapping a transmission, not a differential. While you are correct in that the "plastic, toothed cog" (aka speedo pinion gear) is paired with the differential, that pairing refers to the factory installed transmission and differential (or otherwise correctly paired tranny / differential). However, when the transmission is changed, it is no longer the same pair and a speedo pinion gear of the correct ratio will need to be installed in the transmission. I'm sure you know this. But approaching this as someone with relatively little experience (which I am) and assuming the same of the original poster. I can easily see how the your first two sentences after "Keeping the speedometer correct" could lead one to conclude that no change in the speedo pinion gear is needed after a tranny swap. After all, the differential didn't change. I may well have been incorrect when I said to take the pinion gear from the 4 spd and put it in the 5 spd. For all I know, the fit is different, so that wouldn't work. The color (# of teeth) put in the 5 spd. should be the same as that of the color currently in the 4 spd., however. Chris
-
I think all manual 280ZXs were five speeds. My '72 came with a 280ZX tranny installed but with, I presume, the original (manual transmission equipped) differential and the speedo indicates aprox. 15% too low with P215/60-14s. (For example: An indicated 52 mph is an actual 60 mph.) After playing with the numbers I concluded that when the 5-spd was installed they used the speedo pinion gear from the 5-spd. I bring this up because another post in this thread says that you only need to change the pinion gear if you change the differential. I think that was based on a rather oddly worded statement in the first post of the thread you were directed to begin (thread id# 1957). It said, basically, that to be accurate the pinion gear has to match the differential ratio. Which is absolutely true, but the pinion gear isn't driven off the differential output but the output shaft of the transmission. At the factory the pinion gear in the transmission is chosen to match the installed differential. While I was playing with the numbers to track down my speedo error it became pretty clear that Datsun aimed to have the same number of engine revolutions per mile in top gear regardless of whether the 4 or 5 spd. was installed which meant a higher (numerical) differential ratio with the 5 spd than the 4 spd. Which also meant a different pinion gear was installed with the 5 spd. than the 4 spd to keep the speedo accurate. So, if you want to avoid doing some experiments and then math in your head to convert your indicated to true speeds, you'll need to match the pinion gear to the differential installed in your car. And that pinion gear, my friend, you will find in the 4 spd that you are pulling, not in the 5 spd you are installing. Assuming, of course, the speedo is currently accurate. I've not done the work myself, but based on repair manuals, the pinion gear swap seems to be a pretty simple and straight forward procedure. Chris
-
When I read this I thought "Huh? Brake boosters as a wear and tear item? Must be writing about something else." Nope. The 1972 FSM has a two and four year maintenance schedule for the booster (Master-Vac). I replaced mine about, oh just about two years ago with a remanufactured one from Black Dragon. I have no idea if it is an OEM or aftermarket. Since they somehow figured out how to build a booster that didn't require maintenance within the decade, would aftermarket (or later OEM) boosters incorporate that knowledge and thus now, some 30 years later, not require maintenance? Chris
-
Mine has carbs, so I'm guessing a bit here. A hole in an air duct between the Air Flow Meter and Throttle Body? Too much air would lean it out, same as not enough gas. That might well be your problem. If nothing else, having a hole there would certainly complicate troubleshooting so it has to be fixed anyway. Just a thought: If the new boots solves most of the problem, but not all, could a PO, unaware of the air leak -- which was also probably smaller at some time, have adjusted the FI to compensate? And with the leak fixed, end up too rich? I leave the answer up to the FI people. Chris
-
I contacted David (aka Zs-ondabrain) last Thursday about a replacement for my dimmer switch. He said he had one, I posted a picture to confirm, told me that I'd have to supply the horn ring wire to the harness; to which I replied, not a problem. It arrived the following Thursday despite: a) my general lackadaisical attitude towards the internet and: Monday being a Federal holiday. Took me about one and a half minutes to pull and install the horn ring wire and overall, took me four times as much time to get the danged plastic steering column cover back on as it did to do the mechano-electro repairs. The price was reasonable as well. Not just reasonable in comparison with the minimum triple digit prices for a used switch assembly of absolutely unknown quality or the mind-boggling cost of a new unit, but just a flat-out reasonable price for a specialized electrical switch for a nearly 40 year old car. Put me down as another satisfied customer. Chris
-
According to the Black Dragon catalog, the 1973 through 1978 coupe boosters interchange and the 1974 (first year of the 260Z) through 1978 2+2 boosters interchange. But apparently the coupe and 2+2 boosters do not interchange, even within the same year. So it looks like that at the very least have Pepboys look for one for a 280Z and if you have the coupe model, a 1973 240Z. Chris
-
Maybe a bit late but ... Will it rev up without a load? If yes, then I'd want to completely rule out a fuel supply problem before messing with the fuel injection system. If no, then I'd suspect the ignition process, broadly defined. Timing, air leaks, ignition module, sensor malfunctions, or the electro-brain itself. Best of luck. Chris
-
Ah. The blue threw me off. Thanks. Chris
-
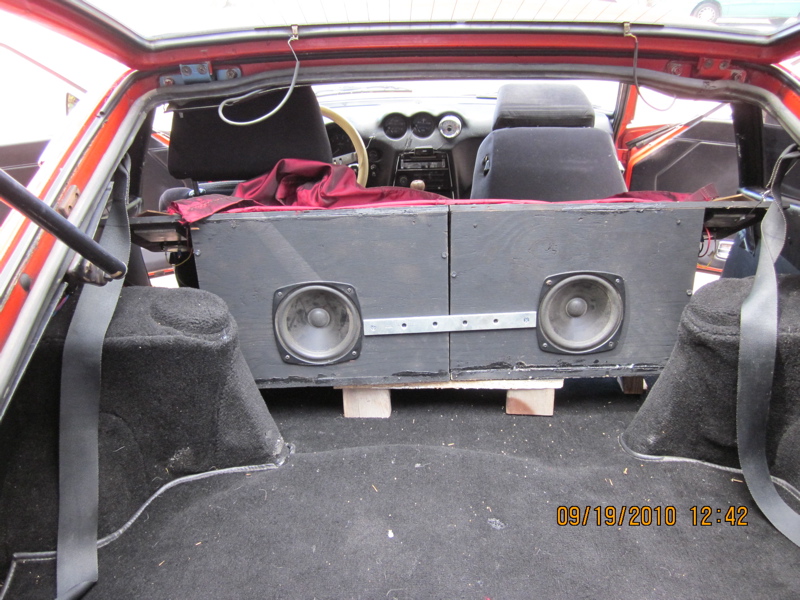
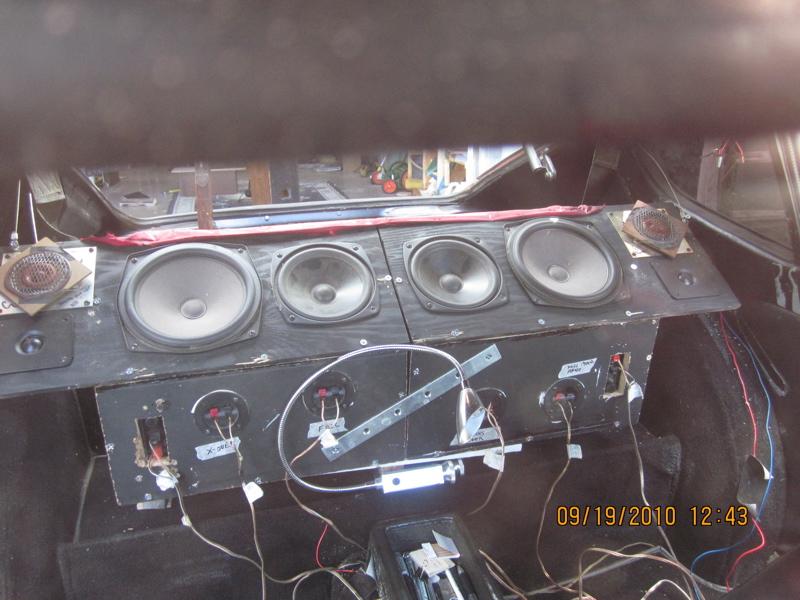
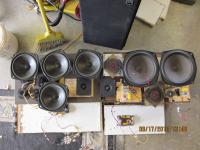
This I know something about. I cobbled it together using parts I had around the garage. One of the pictures shows the drivers used for the speakers. Actually there are two more not shown -- one inch, maybe 1 and 1/2 inch tweeters picked up from a friend. I don't recall the brand, but I know a little about drivers and they are good ones. The drivers in the boxes are 1970s home stereo components. I built the boxes out of 5/8" particle board and each speaker has: The active drivers (woofer (6") and tweeter) from a Boston Acoustic HD-9s. The woofer from a Boston Acoustic HD-9. The woofer (8") from an ADS L-510. Tweeters (orange "fried egg") from Large Advents. The pictures Speakers Front and Rear show the placement of the drivers. When it was all wired up I stuffed the box with fiberglass, increasing the effective size of the enclosure. No, I don't know why it does, but if AR's founder and designer sez it does, it does. The unknown brand 1 and 1/2" tweeters have been glued (using polyurethane glue) on the interior frame above the upper rear corner of each door. The electronics are: The head unit is a Phase Linear UMP301 (13 watts X 4). This came new with the car. Nothing special. A Harman Kardon CA 215 amp (12 watts X 2). I bought this little baby twenty years ago from Magnolia Stereo in Seattle. It's no more than 8" by 6" by 1 and 1/2" in size and plays more like a 50 watt unit. I've attached the specs. Shames a lot of the newer stuff, don't it? A Proton 271 active equalizer (2nd hand store find @$3.00). The head unit is powered from the fuse box while the amp and equalizer have their own dedicated 8 gauge fused supply wire from the battery. The Hook Up: The line-level output from the Phase Linear runs to the Proton equalizer mounted on the side of one of the boxes then to HK amp mounted underneath the driver's seat. The power output from the HK runs to the crossover network from the ADS L-510 and on to the ADS woofer and Advent tweeter. One pair of outputs from the Phase Linear runs to a crossover network from the Boston Acoustic HD-9s and then to one of the BA woofers and BA tweeter. The other pair of outputs from the Phase Linear runs straight to the other BA woofer, which is mounted to fire towards the rear of the car. This output also is also ran, in parallel, to the tweeters mounted above the door with a 10 mf cap rolling off the lower frequencies. My seats are after market, bulky, and foamy. This was my second run at a speaker set up in the Z and the first, while meeting my sonic requirements blocked too much of my vision to the right rear and since I never could get to fully trust the tiny outside mirror, I needed to make some changes. So I built these speaker to sit lower and, with the non OEM seats ended up with too much of the highs being swallowed up. I remounted the Advent tweeters (see Advent Tweeter Mod) to fire at and bounce off the quarter windows. Once I had the basic setup down, I made a CD of white noise and with a Heath Kit real-time frequency analyzer adjusted the equalizer to make the response as flat as possible measured at where my head would usually be. The end result? Reasonably good separation and staging along with 105 dbs continuous from a moderately strong FM station. All from a total of 76 rated watts! Chris harman:kardon.pdf


-
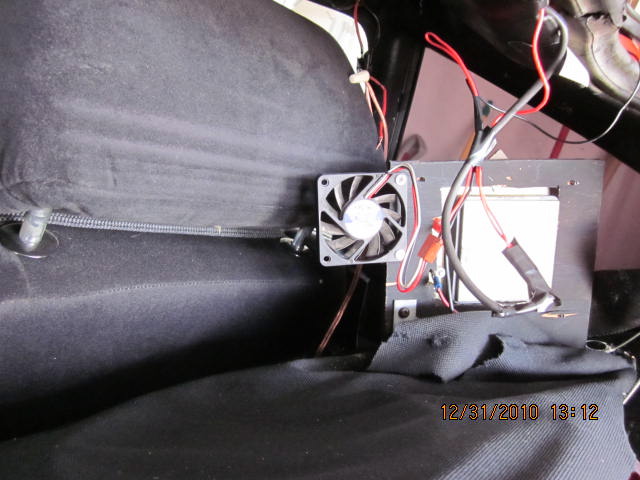
Just a follow up on my computer fan defogger set up. The addition of the larger fan makes it quite practical and useful for defogging. As a mild bonus, when the fans are running they produce a pleasant gentle wafting of cooler air at head level. Bi-level ventilation on the cheap! Chris
-
Couldn't figure out how to do an attachment with a PM. Probably not of much interest to anyone other than Dave. Chris
-
Steve, Thanks for the link set. The parts manual was and certainly will be of great use in the future. Alas, it appears that the electrical component isn't considered a separate part from the whole assembly. I'd like to avoid buying the whole assembly, partially because of the cost, but mainly because there are only so many of them out there. Its incremental, to be sure, but one less available puts upward price pressure on the remaining units. And finally, it seems like a waste to toss aside a perfectly useable assembly, except for the dimmer switch, when the switch can be easily replaced, assuming a switch can be found. Eventually, if I must, I'll buy an assembly, but I can get by with low beams (i sussed out a by-pass) for the time being. Rebuilding the switch would be a task on the order of changing water into wine; the circuit board is broken into two parts and the plastic housing and spring/contact holder burned and twisted. Not to mention that the contact itself has become one with housing. I'll drop Dave a line, though, maybe he has an assembly that is trashed except for the dimmer switch. Thanks. Chris
-
The events described in the first paragraph occurred in about a 30 second span Monday night. I was tooling along a county road and upon encountering an oncoming vehicle, hit the dimmer switch (maybe seemed a little "crunchy?") to go to the low beams. Headlights went completely out. I hit the dimmer, lights back on, presumably on high beam. Hit the dimmer, lights out again. I figure better to be annoying than dead, hit the dimmer to turn the headlights on until we pass. Begin to smell a faint odor of burning plastic. Turn off the headlights with the main switch, turn back on, they come on not very bright rapidly fading to nothing. Say some bad words, slow down in near total darkness, am glad it is a dead straight road, hope I'm not pulling over at one of the few spots without a remnant of a shoulder and stop. Fiddle with the switches -- nothing. Check the fuses, they seem OK. Engine seems to run fine, all other exterior lights work, but no headlights. No tools, no clue, not much light. I lock up Jack, tell him to jump off the shoulder if anyone is going to hit him, then take out the cell and see "No service." More bad words and I take off walking, eventually coming into range and having a friend come out and pick me up. Retrieved Smilin' Jack Tuesday before sunset. Checked exposed wiring for damage, verified that the fuses were in fact good, figured the dimmer switch was the most likely culprit and went to work. In a word, choose any of the following words: Yes; Fried; Toasted; Gonesville. I've attached a sketch I made of the dimmer switch and harness. The lump labeled "Solder blob" on the side of the switch is or was, I suspect, a contact mounted at the end of a spring which melted its way through the side of the switch. Not much left inside, what didn't crumble when poked at was burned and deformed. Called the local Nissan dealership this morning and asked about a dimmer switch. Certainly gave the parts guy a story to share -- it sounds like he damn near fell over when he quoted me a price of $666. (Ok, maybe not exactly 666, but damn close). I'm assuming that is for the entire assembly, not just for the 27 cents worth of plastic, wire, and metal of the business end that can be obtained from other sources for a more reasonable, haha, $250 -- $300. That's still pretty steep, and I'm thinking, hoping, that there are some magic words to describe just the part I need to replace, not the whole metal frame, turn signal handle and its switch, etc., but just what is basically a push button switch with a few wires and a connector. The black wire went under the steering column to another wire, the red and white and red and yellow wires go from the switch to a 3-prong male connector and the 3rd prong goes to the horn contact. Does this part have a name? Dimmer sub-assembly? Anything? If it is a part with no name / part number or is made of unobtanium, how do I hack it so I at least have low beams until I can find a used switch at a junkyard? My best guess at it is that the black wire was connected to a, well a little teeter-totter is my best description, which shunted the current from the main light switch to one or the other (or maybe both of in the case of high beams) of the RW or RY wires on the connector. My thought is that I could temporarily connect the black wire to the RW or RY wire on the connector to turn the low beams on or off using the main light switch. I couldn't find any likely RW RY pairs on electrical diagrams or harness diagrams and need to know which of the two: Red / Yellow or Red / White leads to the low beams? Much appreciation. Chris P.S. I think it would be fair to say that if one is considering installing a headlight relay setup, the lesson here is that sooner is better than later.
-
Yet another question, if you don't mind: What did you use to mask off the grid? Some type of tape, I assume, but that's not regular masking tape. Chris
-
Well, I'll be a monkey's uncle. Could you field a couple of questions for me? 1) How many coats did you use? 2) If you have an ohmmeter, what is the total resistance of the grid? Thanks. Chris