Richard McDonel
-
Posts
362 -
Joined
-
Last visited
-
Days Won
3
Content Type
Profiles
Knowledge Base
Zcar Wiki
Forums
Gallery
Events
Downloads
Store
Blogs
Collections
Classifieds
Everything posted by Richard McDonel
-
This not a suspension specific question, but but applies to all parts. Can anyone tell me what colour of finish is correct for nuts, bolts and washers on a 71 240z? Thanks
-
Much thanks for this gents! Not entirely sure which way I'll go, but I think I'll take a copy of the drawing Chas provided, along with a shift lever to my friendly local machinist and see if he can doe something like that. Restoration? No way. We're going to be hot rodders! Cheers, Richard McDonel
-
After 10 years off and on with the restoration of my 240Z, I have discarded two bodies, and am left with HLS30 28726, which is now totally rust free and painted the proper shade of orange. I have three transmissions, all of which are of the second generation pattern, that is to say the shift lever rises about 2 - 3 inches forward of the earlier ones, and the lever has an S bend. Problem is, the hole in the tunnel is too far back. So, I have to decide whether to cut a larger hole in the tunnel sheet metal and do everything necessary with the interior attachments, or find an old-style transmission. I'm interested in hearing your thoughts. Should I try to find an early transmission? And of course that begs the question why did Datsun switch -- were there problems with the ratios, the shifting, or the durability of the older model? Or do I just cut an inch or so off the tunnel sheet metal and worry about the interior when I get to that point? Here's a curious thing; two of the transmissions have part or serial numbers on the top of the bell housing (710380 and 7226602), but third is blank. That last one has possibly had a number filed off, but with age it's hard to tell. I appreciate any advice you can offer.
-
Transmission thoughts and questions
Richard McDonel replied to Richard McDonel's topic in Engine & Drivetrain
Zed, Thanks for this. Glad I'm not the only one this has happened to! With respect to the durability of the mounting assembly, I'm still a little nervous about sudden acceleration or downshifting, particularly with those 40+ year-old captive nuts. Motor mounts are rubber, and when the engine rotates in either direction, the transmission has to move with it. I'm wondering if anyone has ever cut open the tunnel, de-captivated the nuts, and installed new - perhaps larger - nuts and washers? I have no plans of racing the car (it's a total frame-up restoration), but would like to be confident taking it out for vigorous drives. -
Just installed the transmission in my '71. Very lightweight crosspiece I thought, and with only two vertical bolts holding it to 43-year old captive nuts, how much torque would it take to strip one out? I have some parts laying around from a '73 and notice that the transmission mount assembly is much more robust. I have to assume the factory was motivated to make this substantial change. Has anyone had some bad experience with the early mount coming loose? Installing this transmission reminded of something a wise old mechanic told me many years ago. He said "Only a bad mechanic blames new parts for this problems." I've found that to be 100% true - until now. On my first try, with the cross piece secured to the centre cushion mount, I could not get the end bolts to line up with the captive nuts. Out of line by about one and one-half bolt width. The chassis had earlier been measured as straight, and the engine was secure, so now what? Took the whole thing apart, then lined the brand-new, right out of the package cushion mount on the work bench, alongside two old mounts I had. On each, the centre stud came out at a different angle. Further, if you looked closely, you could see that the metal stamping differed slightly, and finally, the new one was made of a heavier guage metal. Checked the Black Dragon catalogue, and it shows the same piece fitting all 240-280 models. So I took the better looking the two used mounts, installed everything, and it fits just fine. If anyone is interested in a brand new transmission mount, I have one for sale. Half price. Cheers All
-
I have a '71 240. It has the earlier, stamped-metal cross piece supporting the transmission. On the top surface of this piece there are two thumb-sized indentations, one on each side of the centre mounting bolt-hole. They cover about half the width of the cross piece. So my questions is, does it matter whether these are to be at the front or the back of the cross piece once installed? Makes sense I hope. Thanks
-
Thanks to the fellows who replied to my earlier post on this topic. I'm probably getting a bit paranoid, but I'm still concerned about the movement on the cam gear. I just don't see how the single bolt properly centres the gear on the end of the camshaft. I found another camshaft bolt that is perhaps 2-3 thou. greater in shaft diameter than the first one, but there is still some side-to-side wiggle room. Perhaps only a mm. but nevertheless does having the gear turning in what is effectively an elliptical orbit present any increased wear to the chain and the guides? As for the oil-bar seal, we'll go with majority rules. I'll make gaskets. Curious though as to why they wouldn't be included in either of two gasket sets.
-
Two concerns regarding the 240Z head. First is the camshaft oil delivery bar. When I took it apart, there were gaskets between the bar and the mounting / oil-feed points. I have two engine gasket sets, and there are no gaskets for this in either set. I don't need them? Liquid gasket material is of course an option, but it's easy to see how a drop of the stuff could get into the passage. Suggestions? Second is the cam drive gear. I've set the dowel on on the right hole, and snugged up the bolt, but there is rotational play around the axis of the dowel pin. I would have thought the bolt would center the gear. I'm sure that once I torque the bolt, I won't be able to shift the gear around by hand, but will things be different at 5,000 rpm? Am I missing a part here? Many thanks.
-
Early in the restoration of my 71 240, I took the head and block to a reputable engine machine shop and they milled enough off both to true them up. Now the body's done and I'm back to the motor, I am hearing that there is very little margin for milling on these engines. By the fit of the front timing cover, I figure 12 thou. was taken off the block, but I have no idea on the head. Can anyone advise me how to tell if the head is too thin? I know I can get spacers for the cam towers, but have no idea how to determine the number and thickness I should use, if any at all. And finally, assuming it all goes together, does anyone see any reason to employ the old hot-rodder / racer trick of laying play-do or plasticine on top of the pistons, then torquing the head down, and with cam engaged turn the engine over, as a safe way of determining any possible piston-to-valve clearance issue? Many thanks.
-
Back in March I posted a question about how to get the rear strut into the lower control arm.. I was tearing up bushings trying to force it in. Zed Head wrote on March 1 suggesting I put a greased scraper at each end of the strut assembly and shove it in that way. I thought it sounded crazy, but gave it a try anyway. And it worked! Thank you zed head!
-
One of my rear 240Z control arms (A-arms) appeared to be be bent, so a friend kindly gave me a spare he had in his shop - thanks Dan. Anyway, when I removed the old inner bushings on the new arrival, I found the housings to be different than the others, in that the bushing housing has a smaller i.d. My other control arms have a housing i.d. of 30 mm. and my after-market urethene bushings are a perfect fit. This new arm has openings of only 27 mm. Closer examination reveals that this is due in part to the steel used the in the housings being heavier - roughly 3.5 mm wall thickness vs 2.5 on the others. Catalogues I've looked at show the same bushings fit everything from 240 through 280. I'm wondering if what I've got is some specially built, heavy-duty racing or rallying part. And if so, is anyone making bushings to fit? Thanks folks.
-
Thanks folks, I guess that answers it. I use the bolts I've got, torque them up properly and I should be OK. It just seemed inappropriate to have that much slack. If we hear a clunking noise up front under braking, then it's still a question - otherwise we're sailing. Cheers All,
-
I'm all set to reinstall the tension-compression rods, and it appears I'm either missing a piece, or I have the wrong size front bolts. The bolts, which I carefull labelled and stored at the time of disassembly, are 9 mm. The holes are 10 mm. In the parts catalogues there are what appear to be bushings, but Black Dragon calls them "washers," and they're only for 260-280 models - I've got a 240. It's been several years since it all came apart, and I have no recollection of any bushings or washers. Can anyone describe for me the proper attachment of tension-compression rod to front control arm? Thanks
-
ksechler, Re-flaring probably wouldn't hurt my lines either, but with the ground-up resto I'm doing, I'll probably have to make new ones. I have the old ones off, and I tried to clean them up with paint stripper, solvent, and SOS pads, but they still look grubby. They really stand out against the backdrop of a freshly painted orange engine bay. If anyone knows of a sure-fire clean-up for 42-year old brake lines that have probably had everything from brake fluid to rattle-can spray paint on them, please let me know. Many thanks
-
Front solution and problem; rear problem
Richard McDonel replied to Richard McDonel's topic in Suspension & Steering
Thanks Zed, I'm going to try the greased putty-knife trick, but I think I'll wait until I have a spare set of hands. Two bulky, snug-fitting parts, and two greased putty knives sounds like a bit of challenge for just one! Cheers -
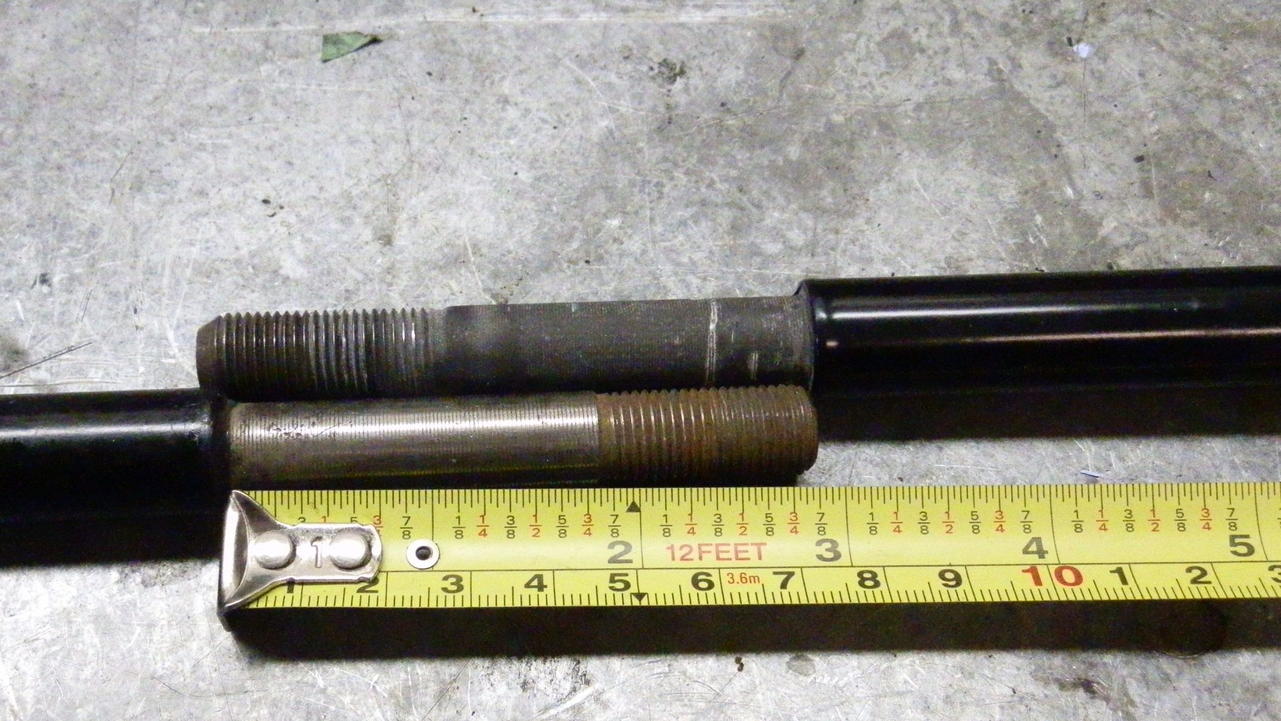
A friend and I are independently rebuilding 240s. We both started several years ago, so bits, pieces, and memories sometime go missing. We had great difficulty installing the front tension - compression rods, and I was wondering if there are different lengths. Mulching through some old parts, I came across another pair, and YES, there are some that are better endowed than others! I'll try to attach a photo, but the important thing is that the machined and theaded ends on one set are some 3/16" longer than the other. The remaining problem on the front is that both of us carefully saved our front mounting bolts for the t-c rods - they are 9 mm dia, and that is now too small. The exploded parts diagrams show what looks to be bushings that would take up the slack, but neither of us has, or can remember, any such parts. The Black Dragon catalogue shows these bushings to be "washers" but only for later models - not the 240. Can anyone tell us where we went wrong? Now to the back: My son and I have just mangled a perfectly good pair of bushings trying to get the lower strut assembly into the control arm. Now that everything is apart again, I did some measuring, and I just don't see how there's room for everything. Total clearance is 2 - 3 mm, and the bushings take up more room that that. If everything was set in place then torqued down, it would be dandy, but to force the strut bottom laterally into the control are - while as I said, it tore up the bushing. So, ny bright idea was to get the smallest jack I can find, and use it to gently widen the control-arm gap a millimetre or two, slip the strut bottom in place, shove the spindle in, take out the jack and tighten up everything. Any thoughts? Would I risk screwing up the control arm permanently?
-
brake and fuel line support brackets
Richard McDonel replied to Richard McDonel's topic in Wheels & Brakes
Thanks Mike - I'll do that. Cheers -
I'm (still) restoring a '71 240. There is a series of clips supporting the fuel and rear brake line, mounted to the driver's side of the transmission tunnel. My metal clips are still OK, but the rubber insulators are either missing or rotted. Any idea where I might find new ones, or am I better off just taking a sharp knife, a drill, an old hockey puck (or softer rubber if you can think of a source), and making new pieces? Thanks
-
I have a '71 240Z that spent the first 40 years of its life in the Arizona desert. Generally a good thing, but in this case when I removed the rear hatch, the rubber spacers/gaskets on the hinges had all the maleable texture of peanut brittle, and of course broke off in bits and pieces. Replacements aren't available at Black Dragon or through the Nissan dealer. I could use new rubber gasket material, but there appears to be more to these pieces than just flat gaskets. The formerly-rubber material formed a cover over the hinges. Was that standard? If I simply use gasket material, will water not get into the roof cavity? Any of your thoughts would be appreciated.
-
A lot depends on how much you can do yourself. Certainly, if you're just going to hand ithe job over to a bodyshop, then get pros to do the upholstery, etc., $15K won't cut it. Talk to your body guy and see what his cost would be if you delivered it stripped and clean both in an out, with all body bolts loose, then reassembled it all yourself. On this site a few weeks ago, I questioned whether to replace or repair the wiring harness, and the consensus seemed to be that I should repair what I have. So fine, the car is all apart, I'm just setting the dash upside down on the workbench and going over every wire, one by one. Time consuming, but a lot cheaper than having someone crawl under the dash for lord-knows how many billable hours trying to find out why the XXXX doesn't work. All that being said, it had best be a labour of love, because 95% of the time restoration is a lousy investment! And yes I heard all about the '37 Benz that went at auction for $9.8 mill and the '57 Testa Rossa for $16 mill, but they are the rare exceptions. Best of luck.
-
Just getting ready to paint my ground-up (I know, it sounds like what you do to cheap cuts of meat or the gears on very old Ford trucks, but then a 240Z can't be a "frame-up" resto, given it has no frame; can it?) restoration. I have the original orange paint code, but I'm getting conflicting signals on the rear finisher, that is to say the exterior metal panel that covers the rear vertical surface and frames the tail lights. I've been told that it's just flat black, but others have said it should have a silver tinge to it. Also the grille - I've got two and they both look flat black to me, but then 40 years does funny things to paint. Are they supposed to have any shading at all? Many thanks.
-
Arne, Ken, Thanks for sharing your thoughts. It sounds like the idea of a new harness is not a good one. As for the six-prong connectors, yeah, that might be a good place to do some updating. Your question is build date. Actually, I have bits and pieces of two cars; one 12/70, and the other 4/71. Under-dash looks the same so far, but I haven't really got into them yet. Both are four-speeds. The dash harness is what I am really concerned about - the others appear relatively simply and visible.
-
I'm beginning to reassemble my 240Z ground-up restoration. I have two dashes, and both have the amount of dead-end wires, taped-together fixtures, splices, etc. you might expect on a 40 year old car. With visions of spending hours at a time on my back under the dash once the car looks otherewise ready to run, trying to figure why things don't work, I am weighing the benefits of buying a whole new harness. I've found two suppliers: www.keepitcleanwiring.com, and www.new-datsun-parts.com/240Z I'd be very interested in hearing the thoughts of others who have been where I am right now, and also learning of experiences with the two suppliers mentione above. Many thanks.
-
I recently cleaned my 240Z gas tank and sealed it with POR. I was a little concerned that with all the small dia. fuel and vent lines, the sealant might clog something. So I took a piece of mechanics` wire and ran it through the various pipe fittings. When I got to the main pick-up line (immediately adjacent to the fuel-gauge sensor opening), the wire kept sticking and binding. Once I worked it past the first two obstructions, it ran well for a few inches, then stuck again. At that point I had no idea whether the wire had got caught up in another bend in the pipe, or had reached the bottom of the tank. Fortunately, I had a spares-only wreck with a rusted tank. I cut open the old tank, and was able to view and measure the fuel pick-up pipe. What you have in the pick-up pipe are two roughly 90-degree bends near the top that will snag your feeler wire. Past that, it`s pretty straight. Measure the mechanic`s wire, and once you are 14 inches (35.6 mm) in, you have reached bottom. The things they don`t tell you in Haynes!
-
Thanks guys. If your MSA parts are only a bit loose, perhaps I can make them work. I'll give them a call and see if they can spare the time to measure them before I buy. If that doesn't work, I guess I'll take JohnnyO's suuggestion. Perhaps from four old boots, I can salvage two.