xs10shl
Free Member
-
Joined
Everything posted by xs10shl
-
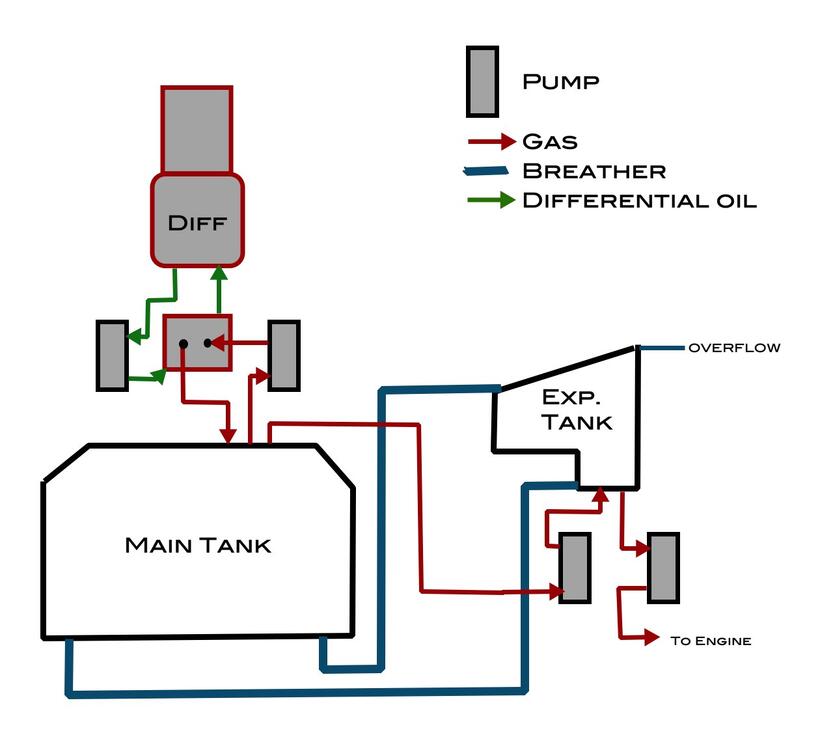
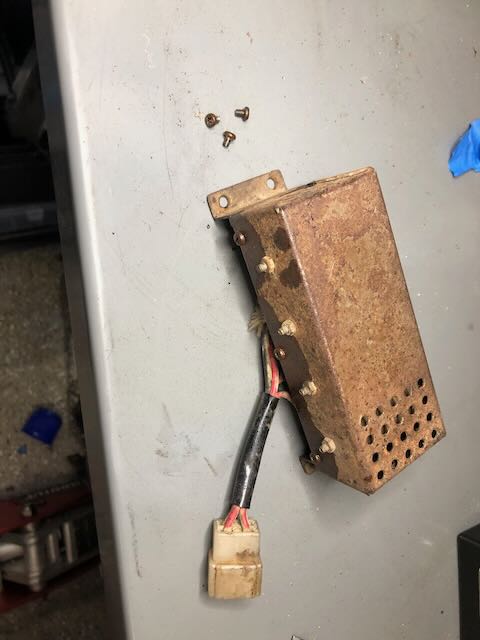
Correct- it is a heat exchanger, which cools the differential fluid with gas. I've yet to get it working, so I can't speak to how well it works, unfortunately. Worth noting, this diff cooler is not a new "discovery" by me, as it's been previously well documented many years ago, via a 1992 article in Race & Rally, which told the story of the early days of the 240Z Works rally program through the lens of the mechanics at Old Woking Station.
-
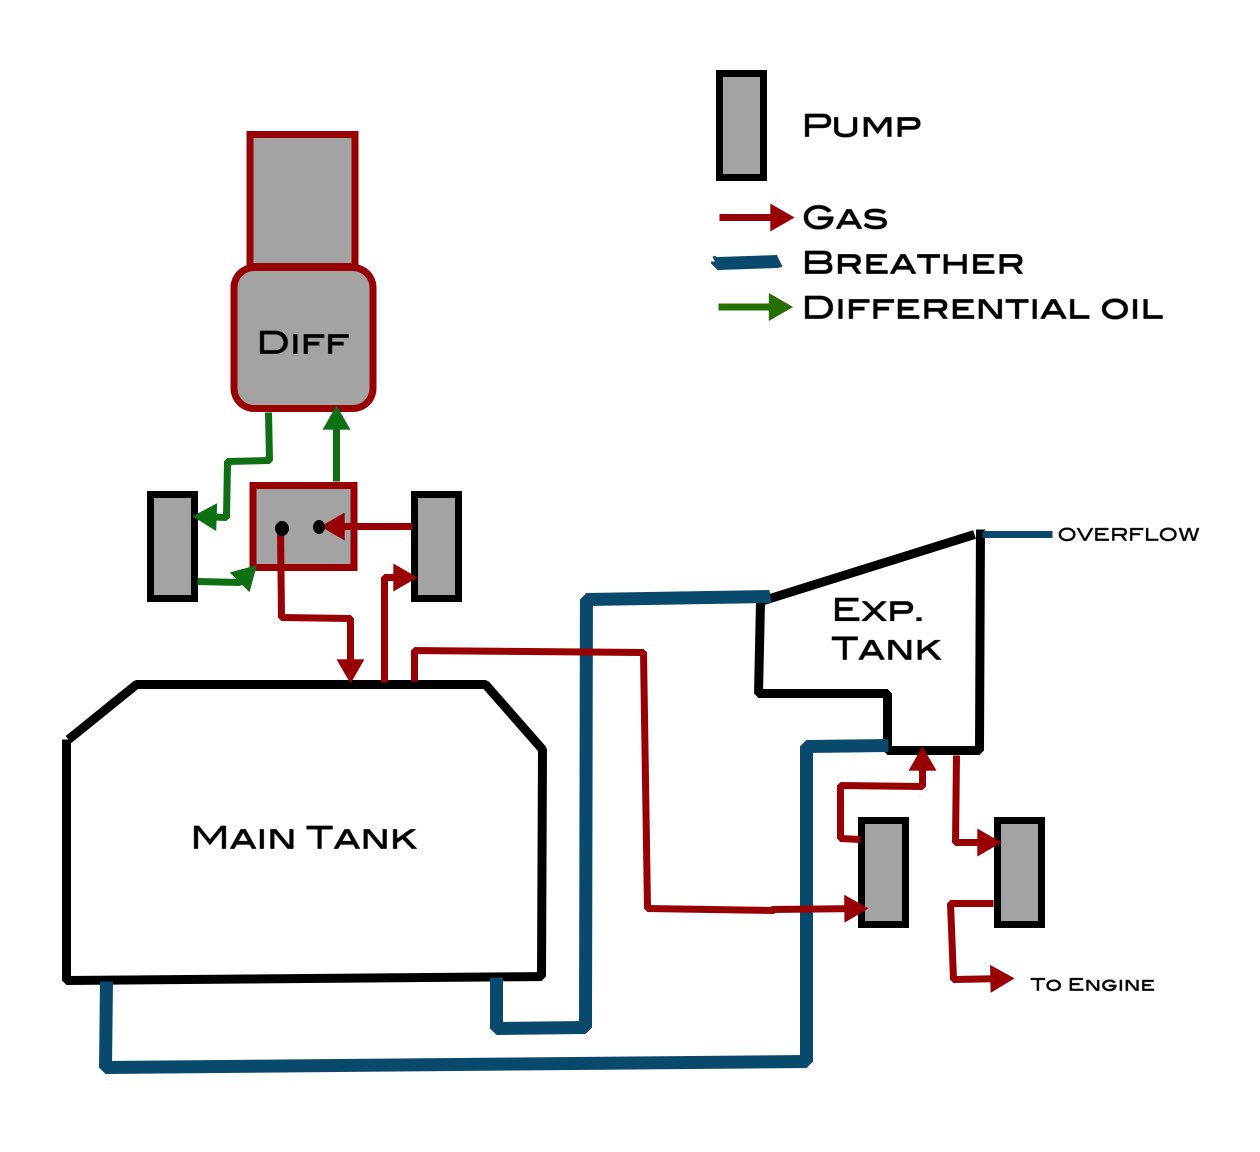
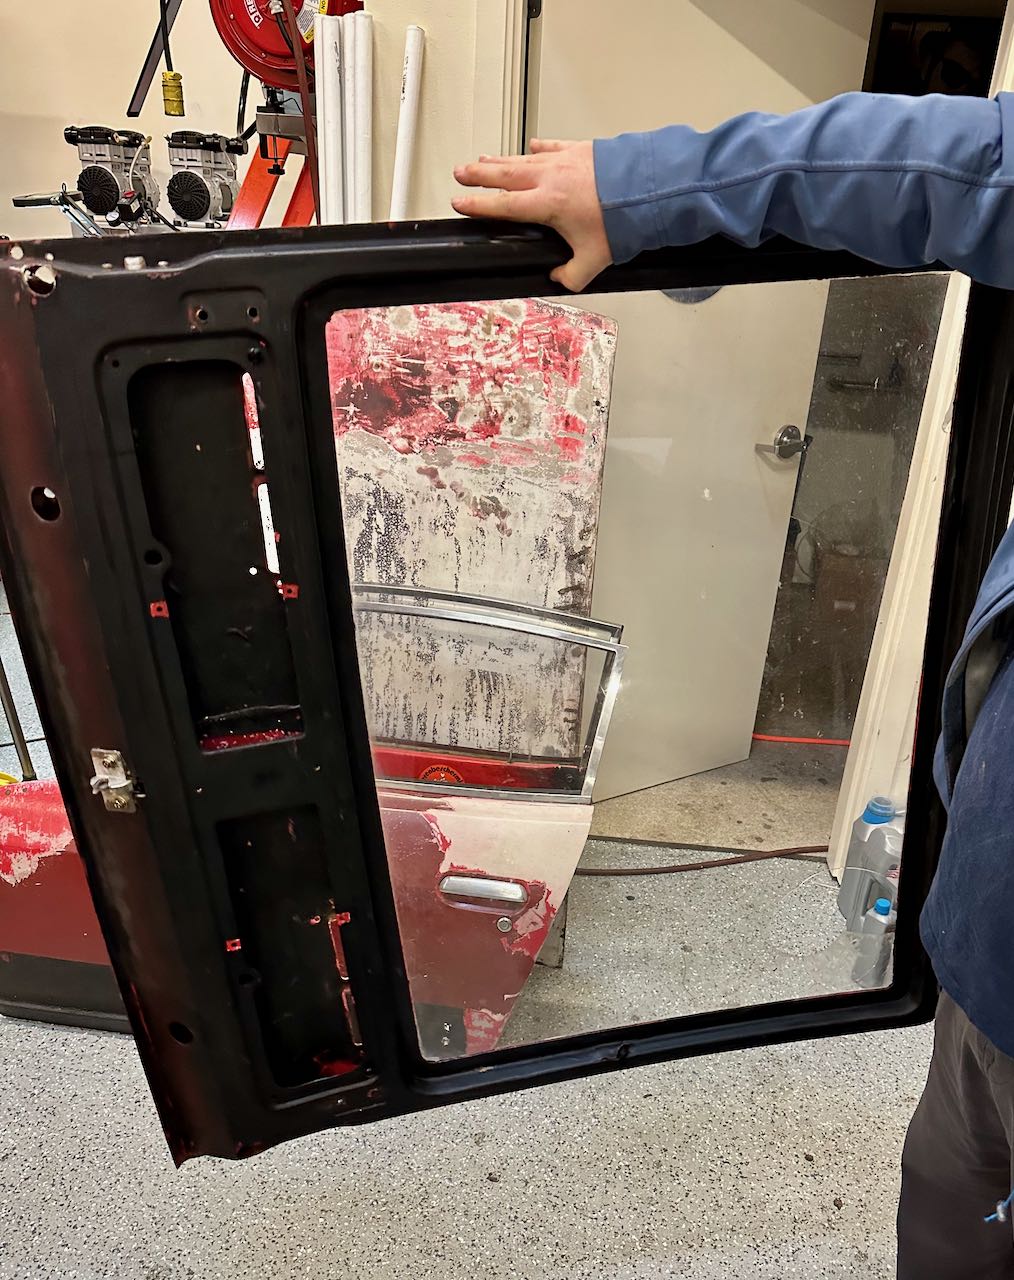
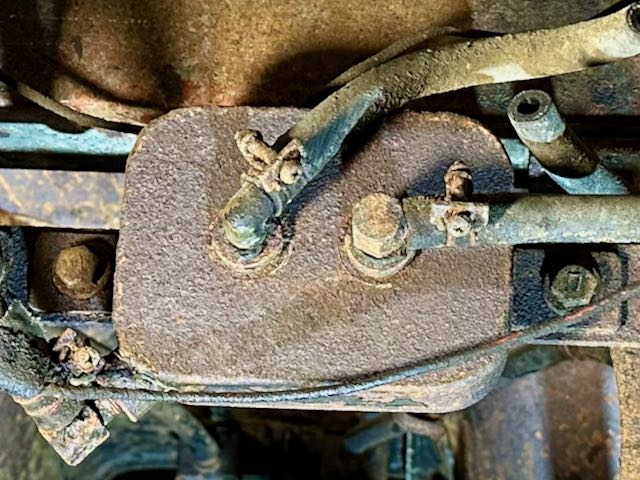
Fuel systems on the Works S30 rally cars were bespoke, and bore little resemblance to their standard production counterparts. Further, the Works fuel systems themselves underwent several evolutionary changes over the life of the program, and early system designs appeared to vary greatly from those in later cars. As such, items which appeared on one batch of cars may not have been used on others, or been upgraded as rules and needs evolved. Accurately cataloging the evolutionary details of Works S30 fuel systems is well outside my expertise and pay grade, so for now I'll stick to providing an overview of the specific system on my car, starting with the extended range gas tank (picture 1). Although it looks similar to the 100L tank found on the Z432-R, there are a few subtle differences. Firstly, the tank front corners are cut at several degrees. This was presumably done to provide extra clearance, at the probable expense of reducing the overall tank capacity to something a bit less than 100L. Second, there are three pipes exiting the front of the tank, in addition to the 2 large-diameter breathers in the back, one of which is used as a fuel return line. Third, the fuel level sender is mounted on the top of the tank, instead of adjacent to the filler neck. Of the three small pipes, one is used to draw fuel into a custom surge tank made from a stock expansion tank, and the other two are used to pump gas to and from a differential cooling system (picture 2). All of these fluids are moved around utilizing four electric pumps - two for the diff cooler, and two for the engine fuel feed. For a little clarity on how all the inter-connected systems work together, I've attached a drawing of the system and it's sub-components (picture 3). I've seen variants of this type of system documented in other Works S30s (notably via information courtesy @HS30-H, as well as references to some of the various sub-components in period articles), so I'd venture to say at least a good part of the system as I've documented and described on my car is true to as-built. There are plenty of areas and topics to expand on from this basic fuel system overview, as I've only scratched the surface in the most general of terms. I'm also learning as I go- I've been working on documenting the finer details this system for months, but only recently as we've been dismantling the car have some of the important characteristics of the system been observable in detail.
-
@kats As you pointed out, the Works cars I've got period photos for came with gas struts instead of the rods (pictured). In the Lightweight Spec cars, the deck was way to light for a fully charged gas strut, and I recall seeing a picture of the deck askew under the pressure. @HS30-H, have you seen a deck setup using the rod in your photo collection? For show, we ended up using a semi-old strut, which was too weak to keep a standard deck open, but had no problems with the lightweight deck. Maybe they used the same trick in period?
-
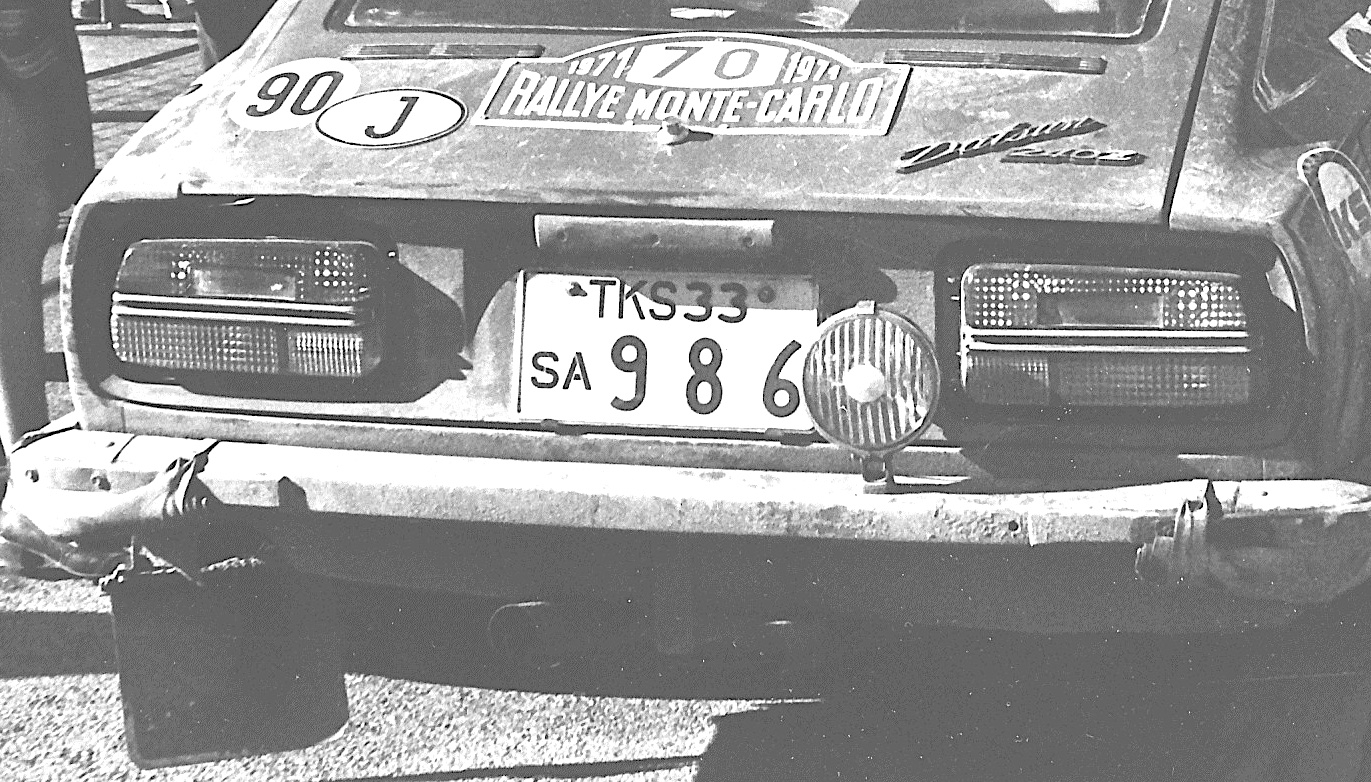
Yes, I think that's SA-986. Is that from your 3/71 issue of Auto Sport?
-
If the factory is willing to sell me a Y9821-22101 CDI distributor, and a Y9821-22102 Ignitor for $12, I'd take 3 of each as well!
-
Kats, we got the dashboard out a few days ago, which gave us access to the duct opening. Attached is a picture showing no brackets. As to the CDI, there appears to be no physical evidence that one was ever installed in this car - no mounting bracket, and no welds where one would expect a bracket to be installed. Crucially, there appear to be no provisions in the wiring harness for a CDI, or even a power point for an igniter. I'm not ruling out that a CDI may have been installed at one point (perhaps using a separate harness currently not on the car). To that point, one might be tempted to argue that the front harness may have been switched out. However, as we were removing the dashboard, we discovered that there was no separate dashboard sub-harness: it was all one giant Works-numbered engine/dashboard harness, reaching from the coil, around the front and right side of the car to the fusebox plugs, and then all the way back across the dashboard to the ignition key. So in order to change just the engine harness, one would need to replace all the dashboard wiring, which IMHO is an extremely unlikely scenario, given how original and unmolested everything appeared to be. Of note, I'm still evaluating how the tach works, so there may be a few more surprises in store there which may revise my opinion about the ease/likelihood of adding a CDI option in-period.
-
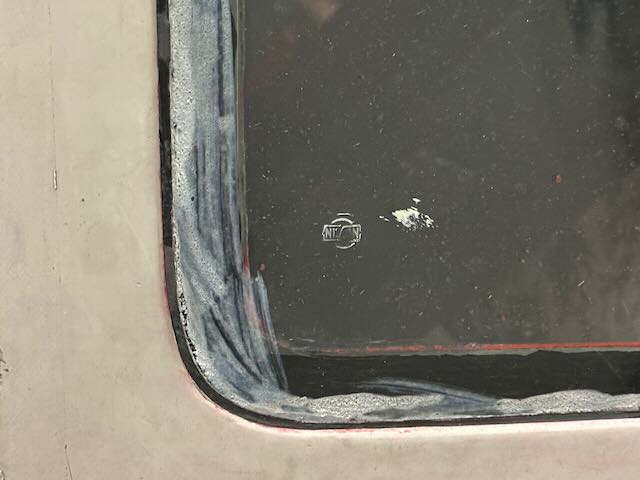
Yes, pictured - not very well stamped, I'm afraid. Tailgate permutations for Z432-Rs over the production life of the S30 are a slight mystery to me, so I'll invite others to chime in with info. From the parts manual, a Z432-R with lightweight decklid would have a fiberglass frame, an acrylic window a little thinner than a stock piece of glass, and a standard rubber gasket to affix it into the frame. The Lightweight Spec Works cars did it differently - they used an even thinner piece of acrylic (perhaps half as thick, by my estimates), bonded directly onto a lip on the decklid frame, without using a gasket (refer to picture)- essentially making the frame/acrylic a single piece. This feature is visible on pretty much all the 1970-71 period photographs I have of the Works cars, so I have come to believe it's the likely procedure the Works team used on all the Lightweight Spec cars. The acrylic is so thin, that there's really no way it would be rigid enough to stay in place using just a gasket. In addition, I'm not sure that this exaggerated mounting lip on the frame was a part of the standard PZR frame - it's possible that this batch of decklid frames were modified specifically to allow for the two pieces to be bonded together. I just don't know the answers yet - more research is required. The above is all a bit geeky, so I apologize for deep-diving into the minutia. Unfortunately, my acrylic was ruined by a former owner, who cut a 6" hole for what appears to be a fresh-air venting system. Thankfully, I have a "very used" standard PZR acrylic window. So, in order to fix my existing decklid, I'm going to have to cut off the old acrylic, and bond on the new, thicker one, or bite the bullet and replicate the existing acrylic piece using thinner material. Right now, I'm leaning towards the latter, for consistency.
-
Works Lightweight cars made extensive use of fiberglass panels and acrylic windows to reduce curb weight. As an example, the rear deck is made of fiberglass, with an ultra-thin acrylic window bonded to the frame. It's quite light - I can hold it with my thumb.
-
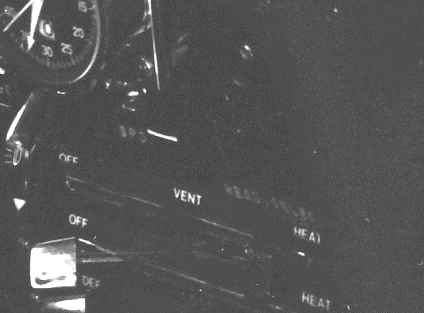
@HS30-H Thx for the info. Part of my confusion is that I mis-remembered the labelling on the console, and when I re-examined my pictures, the dial was labelled "HEAD.SELECT", and not "HEAD RHEO". My confusion lay in the fact that the internals of the box appeared to contain resistive wiring, making me think of it as being some sort of rheostat. In sort, the stalk is as you described, and works as expected when the "Head Select" switch is off. It's also possible that there is a jumper cable I'm missing that somehow wires combinations of the 6 lights together in one easy-to-us switch - and that how I've got it wired now is incomplete. I've included a closeup of the console dial here for others to look at, with the "HEAD.SELECT", so folks know what is being discussed. Sorry for the dark picture, it wasn't very bright to begin with.
-
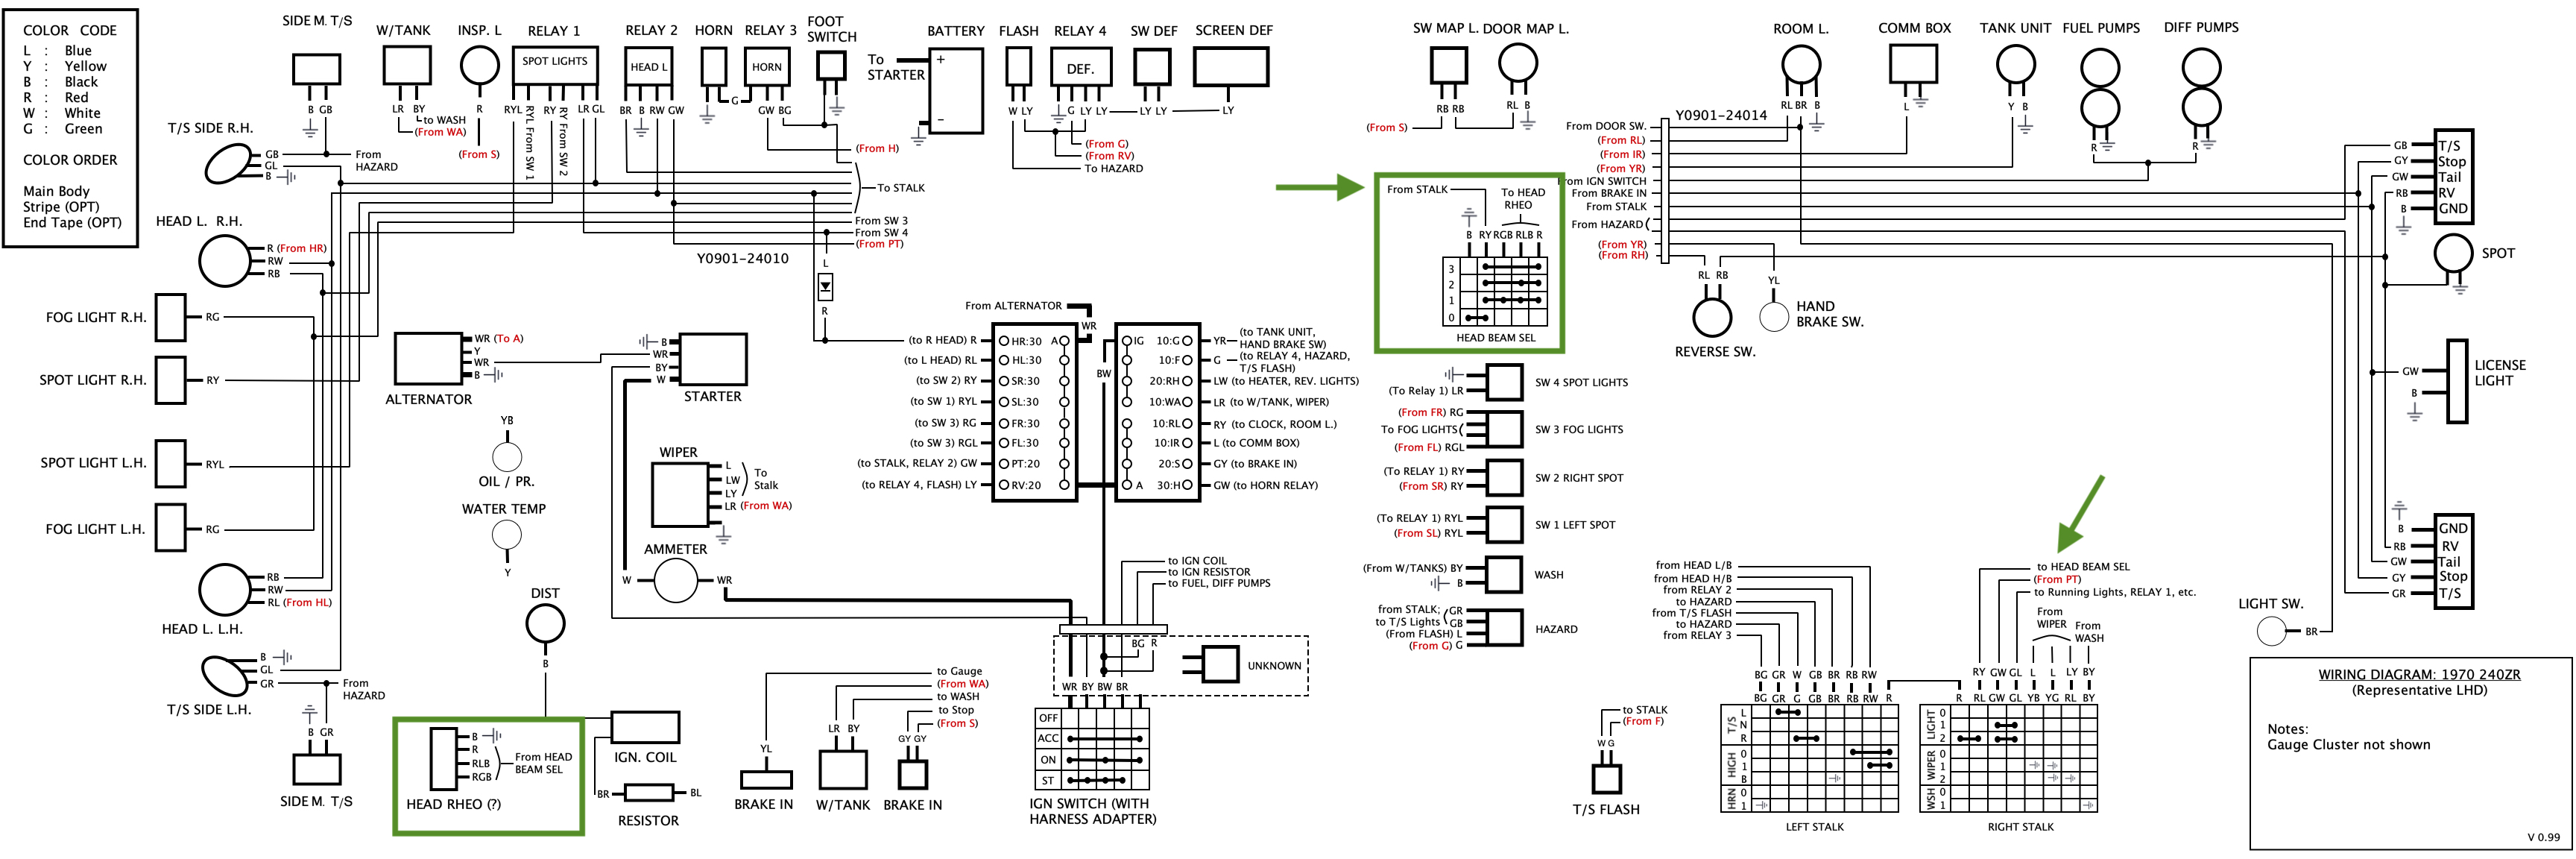
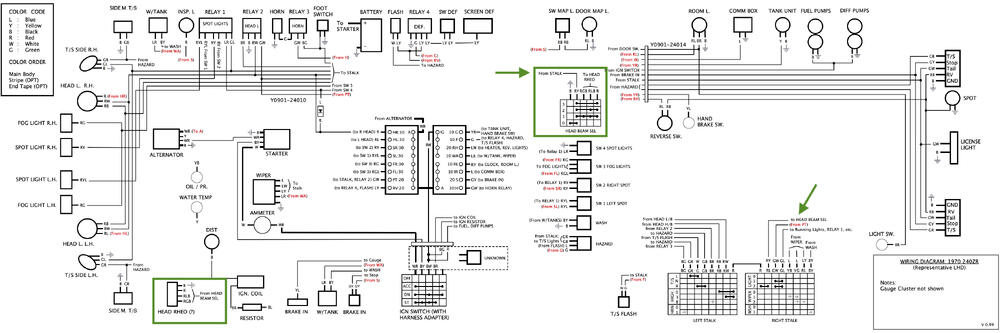
Today's upload shows a view from the front of the car. On the right side of the car is the FIAMM air horn assembly. To my eye, this (plus the accompanying compressor) appears to be a basic unit, most frequently seen on a period Ferrari. Just based on pictures I've seen of other Works cars, there doesn't appear to be a standard compressor unit that Nissan incorporated, and the horn location appeared to vary from car to car. It's actuated via the standard horn pad on the steering wheel, and alternatively through a foot button on the passenger-side floor, akin to how a windscreen washer fluid button would be placed on an old car. Also shown are the oil cooler, fog light electrics, and hot air tubing, which runs from the headlight buckets to the heater box in the cabin. Of particular curiosity is a nondescript 1"x5" vented box located on the left side of the car, which is a part of the main headlight circuit. This box contains what appears to be four resistive wires wound around 4 insulators, and is controlled via a large 4-position dial on the center console, which is labelled "HEAD RHEO" in period photos (which I take to mean "Headlight Rheostat"). [EDIT: On examination, this label is an example of me mis-remembering. The console label actually reads "HEAD SELECT". But I have always assumed the design of the wire in the box resembles the feature-set of a 3-position rheostat, so I have been operating on the assumption the dial was a rheostat control.] This same dial is visible on several of the early Works cars, but appears to be implemented differently (and potentially not-at-all) on some of the later cars. Here's how it's wired: when the console dial is "Off", the headlight circuit is completed via ground: the headlights operate normally using the settings on the stalk, and the dial/box is not part of the circuit. When the dial is placed in one of the three "on" selections, the headlight circuit is routed from the stalk through this box in one of several different settings, introducing what appears to be an "in-line" load of various resistances on the headlight circuit. Just to be clear, the stalk continues it's role as the master headlight setting, but this dial serves as a way to further adjust headlight settings after it's been turned on by the driver, presumably by adding resistance to the headlight circuit. As of now, my box is not working properly, and the lights don't come on when it's in one of the three "on" positions (perhaps due to an open circuit?) so I cant yet determine exactly how it's intended to work. This box is one of several head-scratchers that I have yet to fully understand the true nature and function of. Any ideas? If anyone is curious to see how this box is wired, I've attached the wiring diagram for you to look at, with the relevant sections highlighted.

-
@HS30-H Your comments made me revisit some old PZR pictures. I had not payed too much attention before, but all my photos also show only the Z432-R driver-side mounting holes. Unclear to me whether it was possible to spec out a Z432-R with L+R harness mounts, or whether it was only the Works cars.
-
@kats I'll be on the lookout for the brackets when we get the dashboard off - might be a little while yet before we get to it. Curious about the Z432-R without the passenger shoulder harness mounts. Did you happen to notice if the braces under the hole location were installed?
-
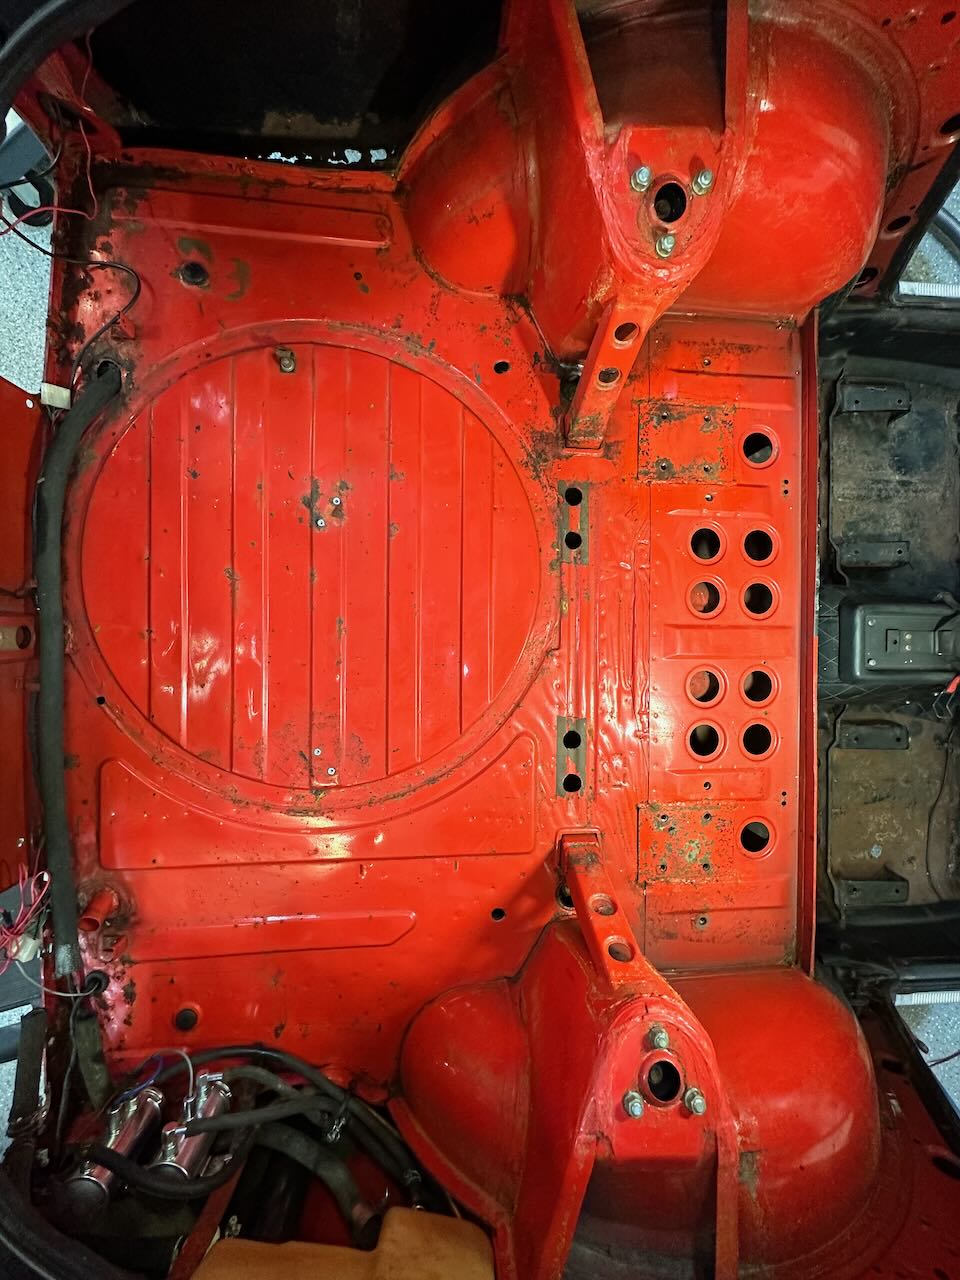
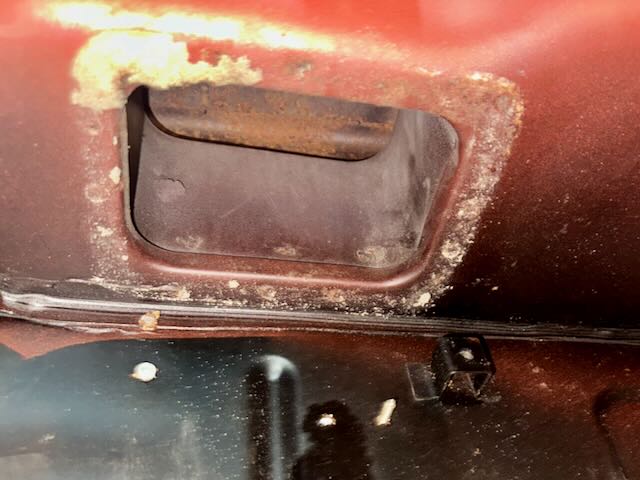
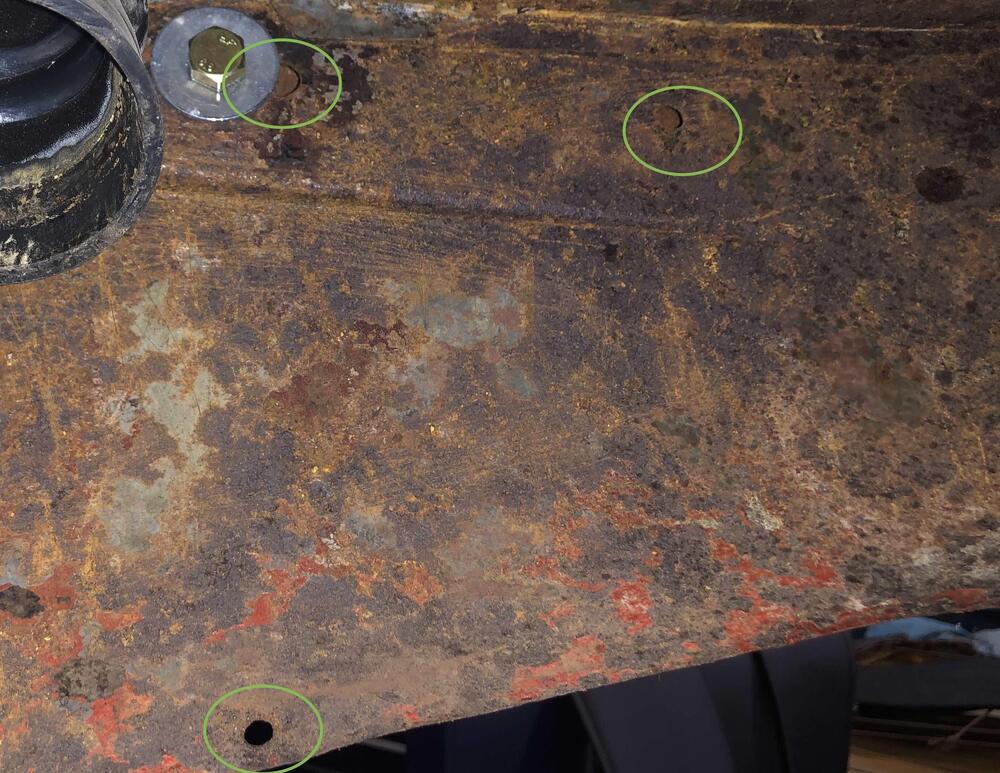
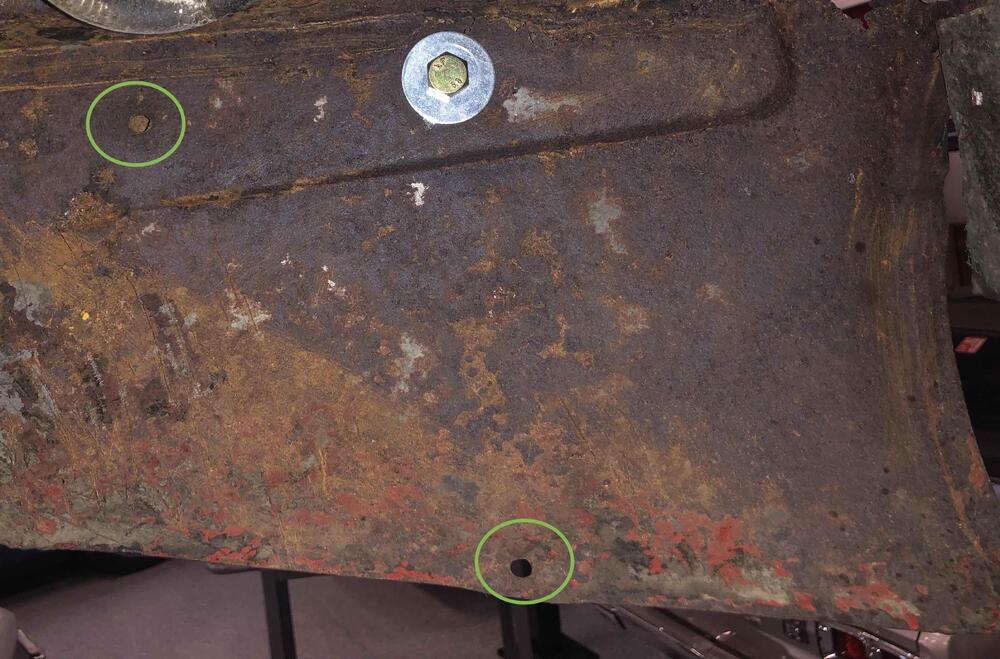
A view of the rear interior of the car. There's a few things to see here that are not frequently seen- I won't go into all the minutiae, other than to point out a few obvious features: a few of the features which I'd label "stock PZR" from the parts manual (for lack of a better description) include the spare tire cap and 4-point seat belt shoulder strap mounts. Then there are a few obvious Works features, such as the roll bar mounts, some drilled access holes, and a Works fuel delivery system. There are several more details that enthusiasts can spend the weekend spotting! Also visible is a rusted rear quarter panel, which helps make this Lightweight Spec even lighter today than when new. Most of the trunk area appears quite servicable, but that rusted area will need to be fixed, with new metal. Of note, the 4 silver rivet nuts now occupying the existing spare-tire hold-down mounting holes on the spare tire cap are my "quickee" addition to the car- that's unlikely to be how it was done in period. I had a show deadline, and I needed to affix the spare tire bungee brackets using the same existing holes. The only options that I could see were to either remove the gas tank to access that area, or add a few rivet nuts - a 2 hour job vs 5 minutes. Done and done! Also, the fuel pumps are obviously brand new - a prior owner had installed later pumps of a non-original make and type, probably decades ago, so I put these on the original brackets, so the car could be displayed.

-
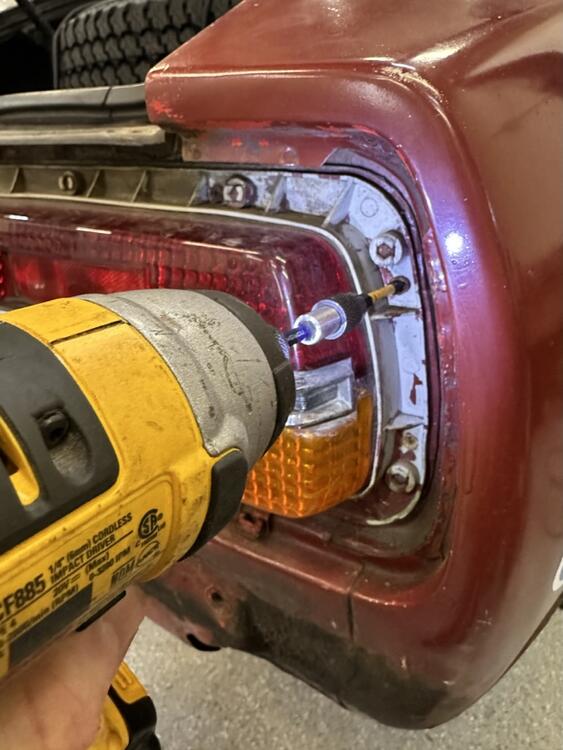
Yep, an enlarged tail light opening in the rear exterior panel, thru some time in 1971, I believe. (I referred to it as a "valance" in my post, but I edited the post for consistency.) Works rally interiors that I've seen were almost fully trimmed out, perhaps to keep with the illusion that these were production cars. The interior panels themselves of course don't weigh much, and the Works team used rubber mats in place of carpeting/sound insulation. The panels also served as protection for the wiring harness, fuel lines, etc., and to keep miscellaneous spares and tools from falling into the wrong places. Period photos of trunks that I've seen were crammed with all kinds of supplies needed for field repairs - oddly enough, not so different from the strategy I employ when I go on a road trip! Here's a picture of my car during MC '71, showing the same rear tail panel, featuring enlarged holes for the tail light assembly. (credit: Nissan Global Media)

-
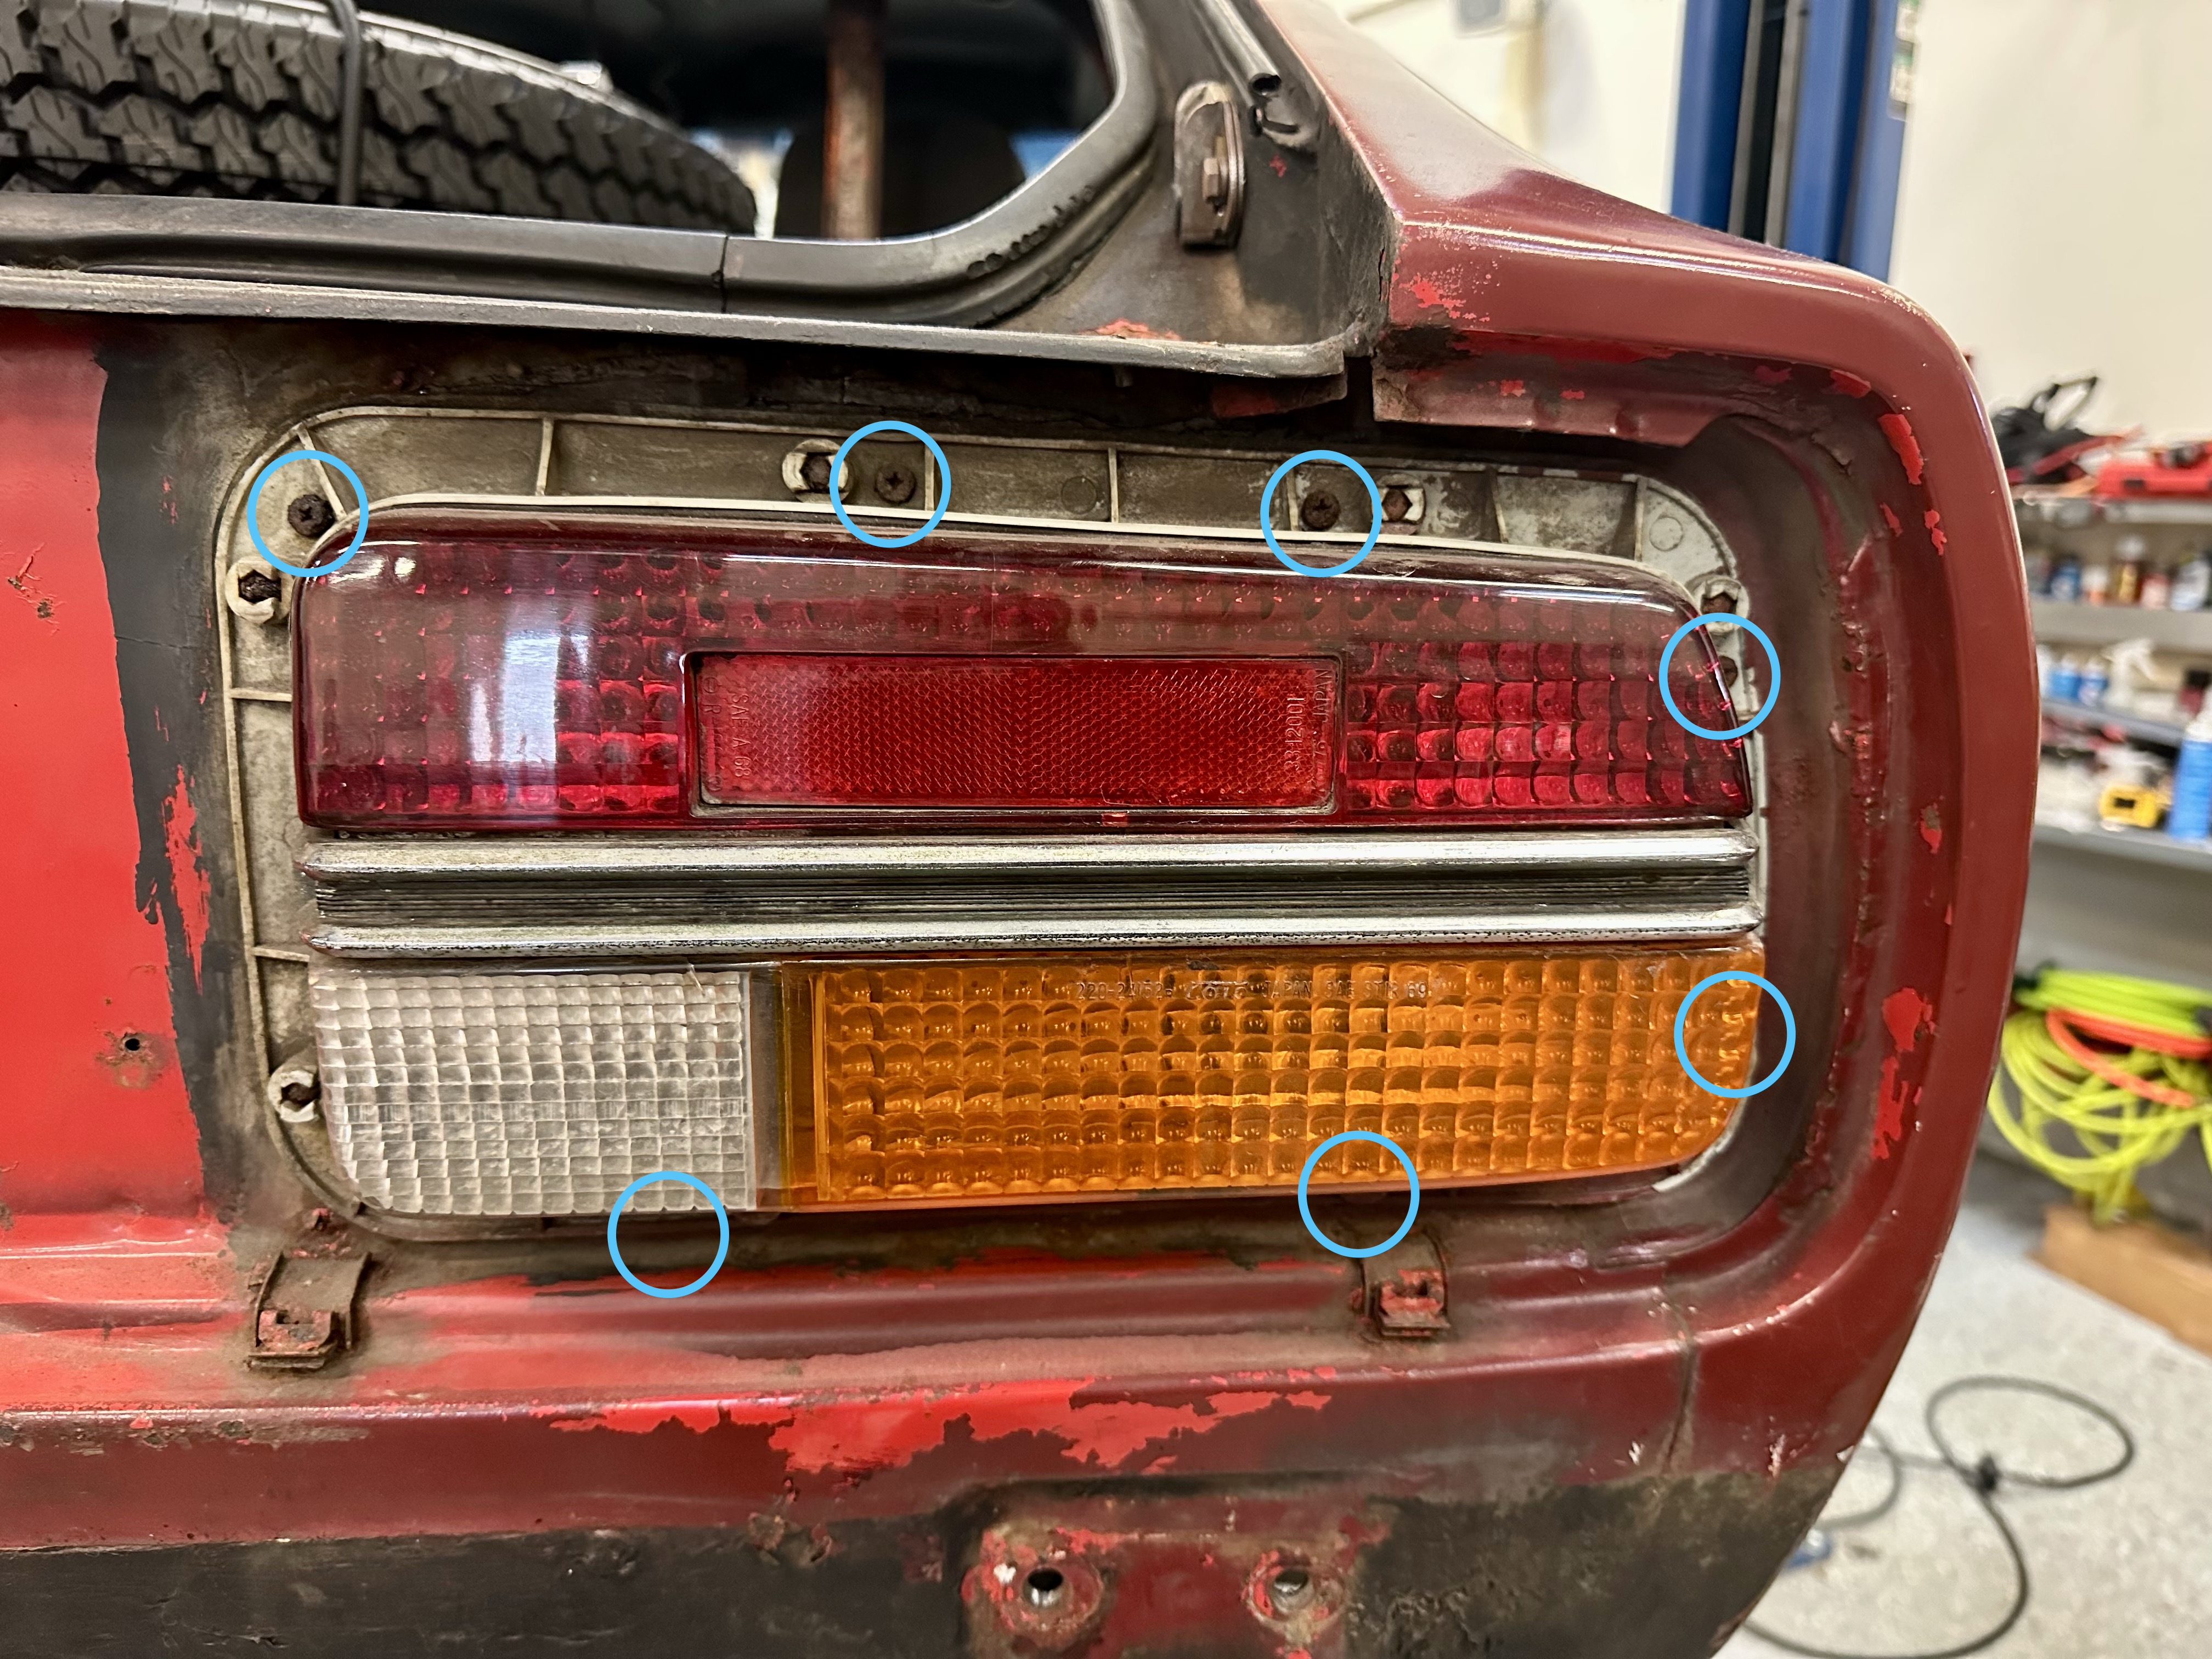
Here's a fun little detail seen on the early cars. The rear light pods were affixed from the rear of the car (sometimes using sheet metal screws?), so they could be removed from behind and outside. I imagine there were several reasons for this: surely, to facilitate the changing of a bulb without having to open and unload the trunk. Perhaps also: to provide an easy way to swap out the entire assembly, should it be damaged during the rally. I'm not entirely confident that the lights were always affixed with screws, as I have not seen them affixed this way on another car. For example, the included picture of an earlier car does not appear to have screws, but it does have the quick-change rear panel installed. From what I can see with my car: they appear to be original to the car, or at least installed in-period. That said, it's possible that the lights were held in place using other means, such as being just loosely glued in place, and could therefore be pulled off by hand, without tools. But this is just a guess. From what I can tell, all the rally cars campaigned in 1970 and 1971 had this feature. I don't exactly know with what car the practice ceased, but around late 1971, Nissan stopped fitting a rear panel which could accommodate this feature. I assume they also eliminated the "external-change" feature along with it, but perhaps they just eliminated the custom rear panel. Another possibility is that the feature remained, but that Nissan perhaps altered the lenses to be removable from the housing. Again, this is just speculation. If someone is willing to go tug on the rear lenses of Nissan's cars and see what happens, perhaps we can get a few answers!

-
Two weeks? That's plenty of time to crank out a few more prototypes. It would be fun to think that a few of these were possibly completed after the show had already started.
-
Imagine just for a moment what it would be like to be a Nissan floor salesman November 1969. A youngish lad in his mid 20s walks into the showroom, flush with cash from somewhere- a bonus or inheritance, perhaps- it doesn’t really matter to you when it comes down to it. He asks for an allocation for a new Z, but will need something in the interim to get him through the Christmas season. What to offer him? A Bluebird 1600 coupe, perhaps? Or a P510 1600 2-door, and the number to a local shop that can trick it out to rally specifications? Something more pragmatic, like a Skyline GTX? Or do you go for the throat, and hint that GTR buyers might get preferential build slots? Must’ve been the absolute best-of-times. From your perspective, the next 2 years are guaranteed to be busy ones.
-
Just for kicks, I made an effort to count. Assuming all the pictures shown on this page are from the same year, I counted four - A Fairlady Z (B&W photo), a blue LHD Z, and two orangish Z432-badged cars, both of which may be the same color, but definitely have different tires, and one has a headlight cover installed. (is the one on the turntable an "R"?) Of course, I wouldn't assume that folks in the marketing department were opposed the age-old trick of swapping tires, or adding badges and accessories after hours, all to help sell the illusion that there was more than a handful of cars built. So perhaps that was part of the drill as well.
-
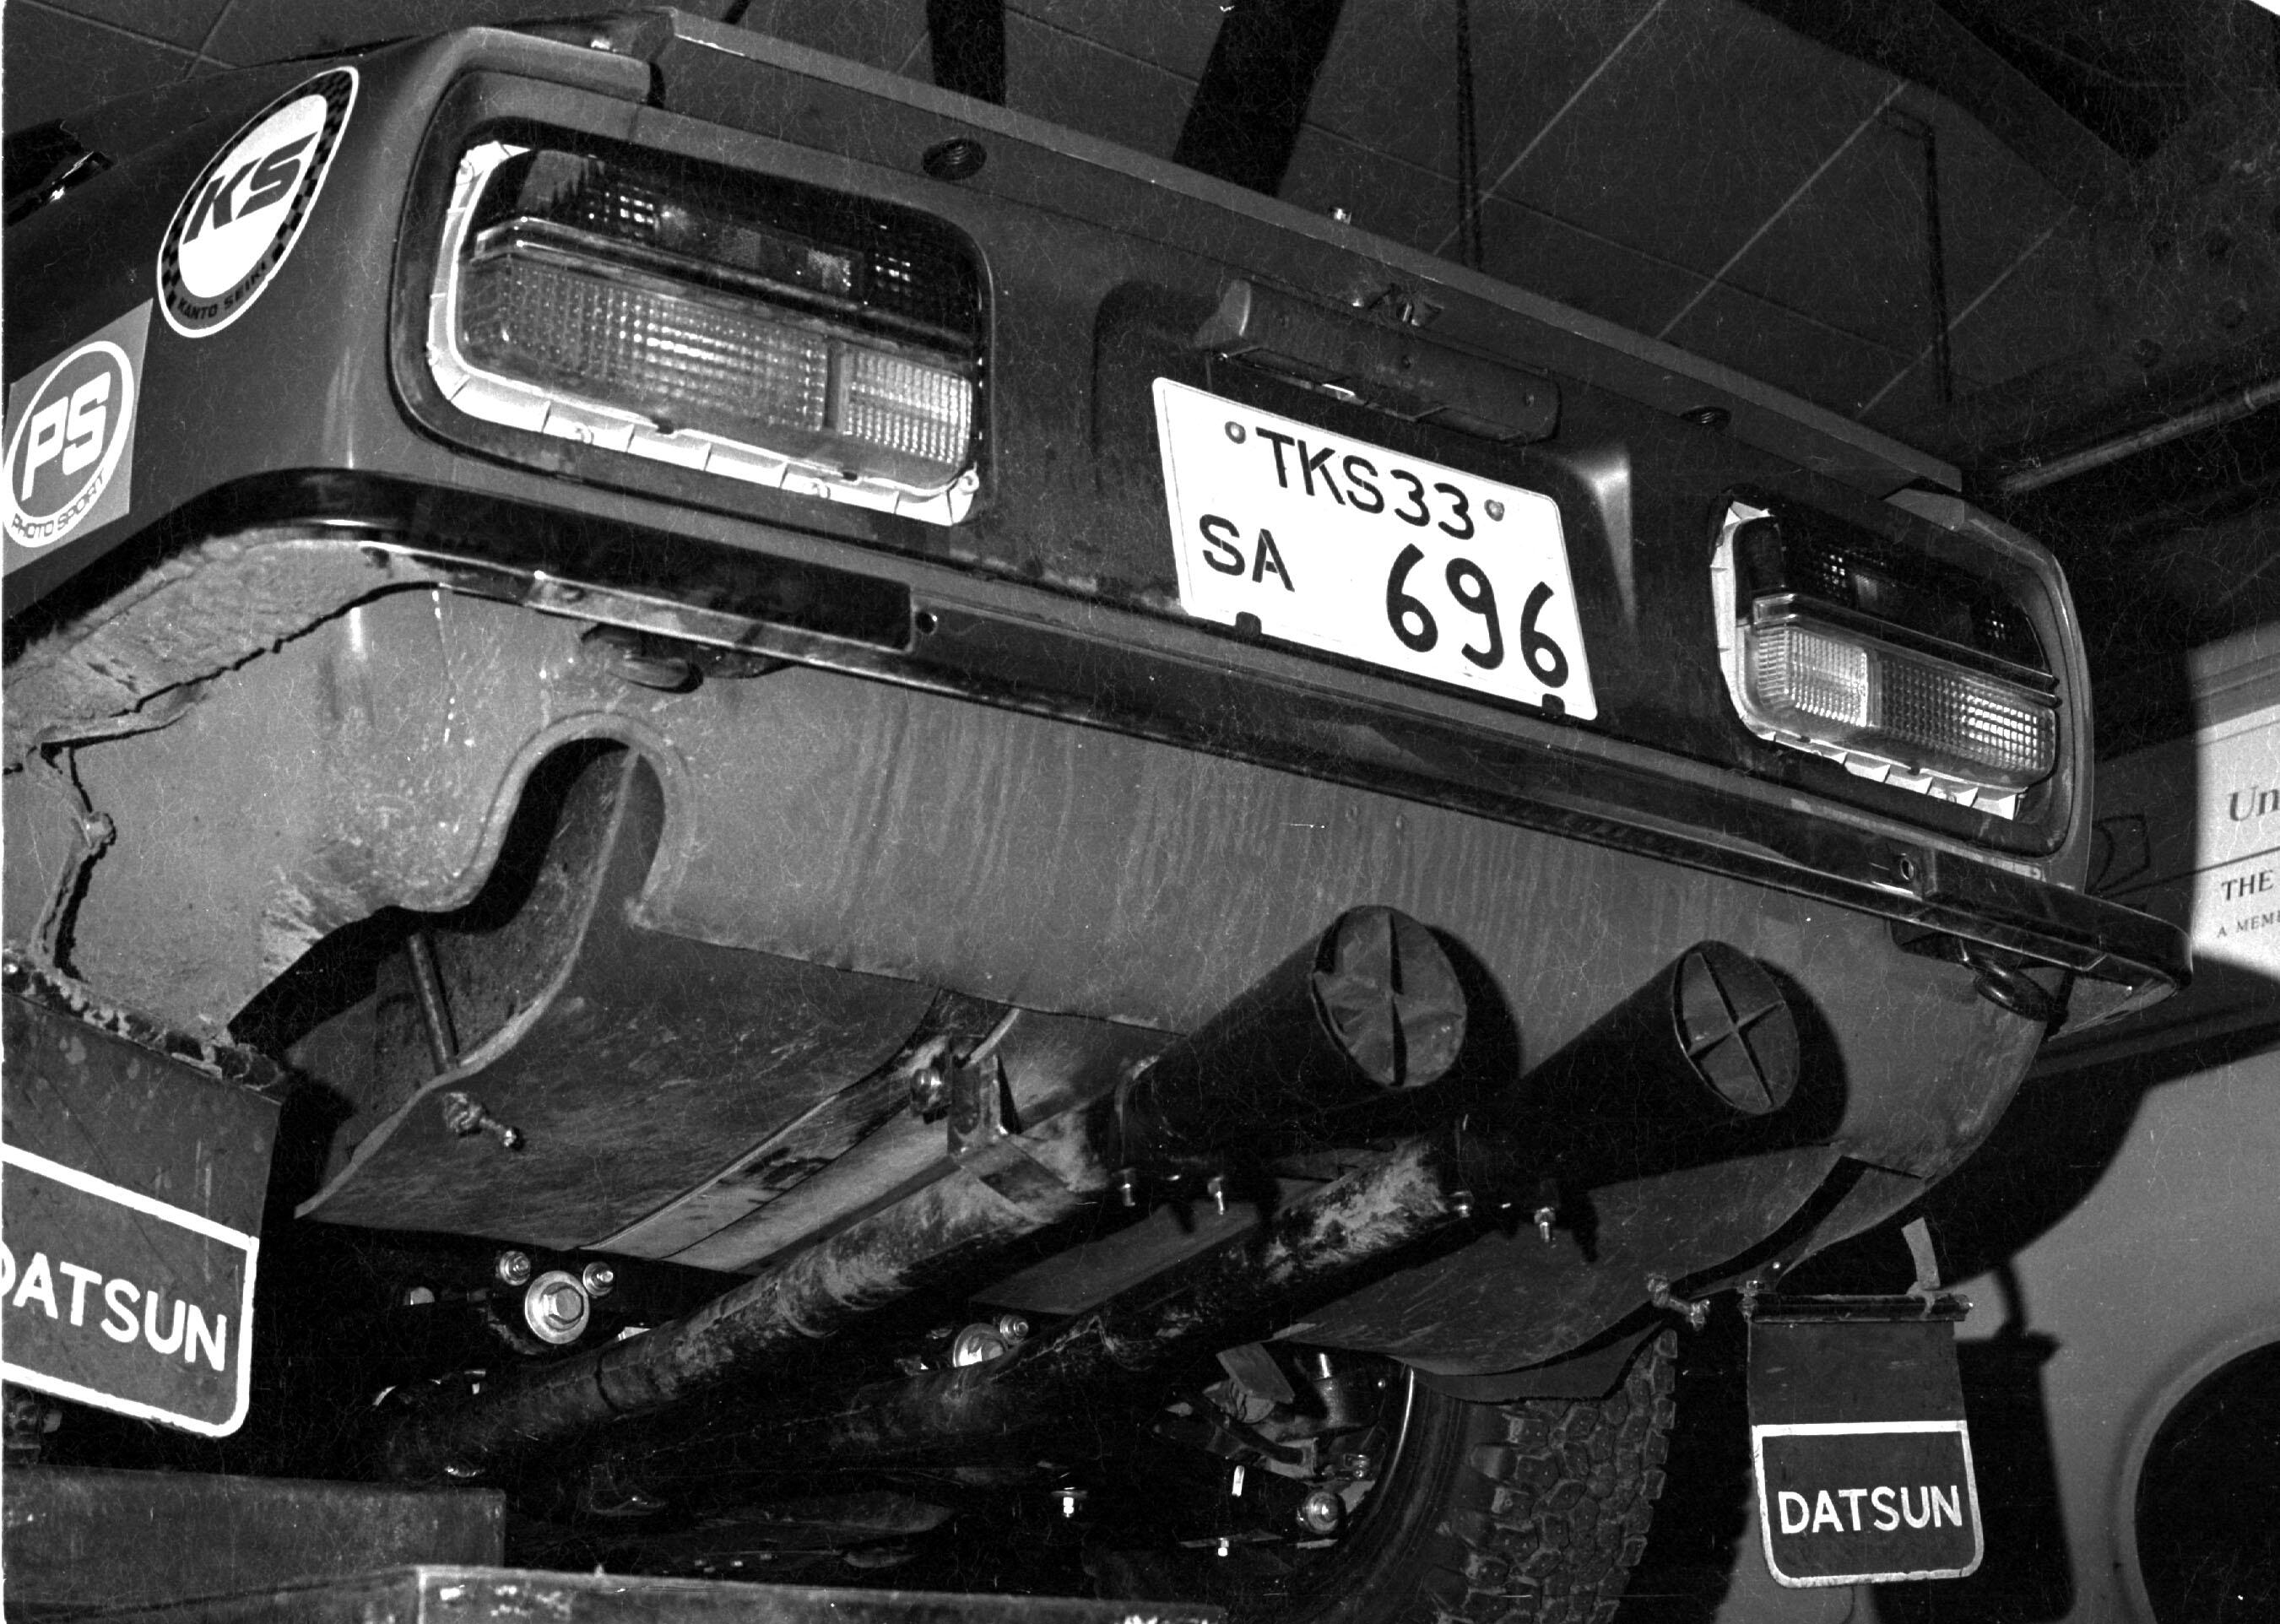
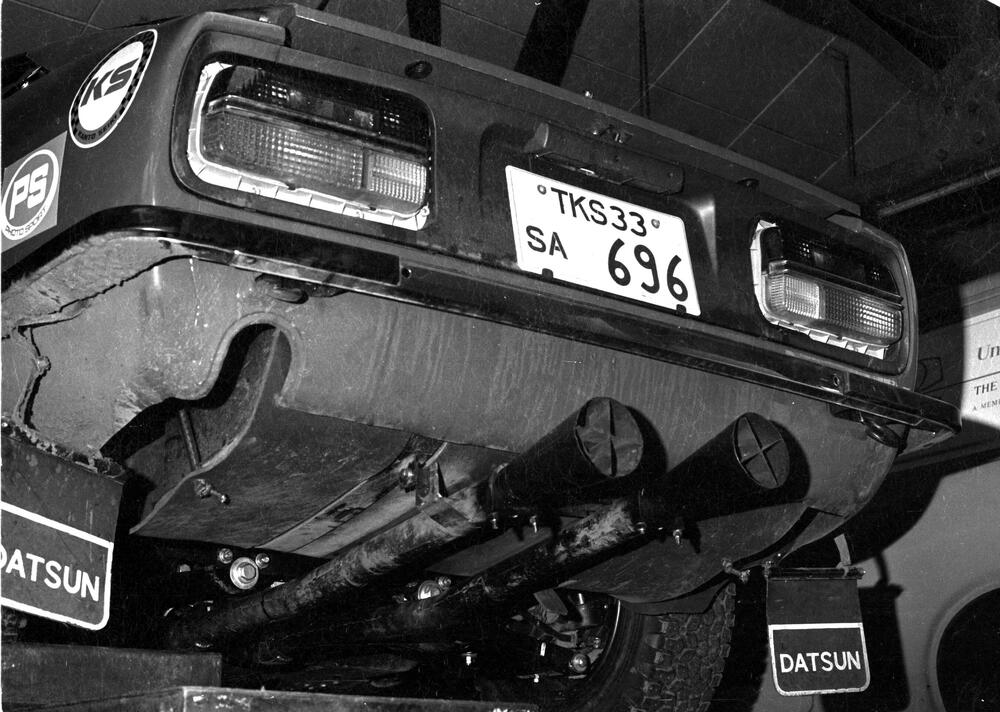
@HS30-H great picture. Folks also can see the clever later exhaust routing, which added considerable ground clearance. In addition, something I had not noticed before on the earlier cars - a rear c-chaped bracket, which I assume is for one of those mobile jackstands? A device like that would only be possible with the re-routing of the exhaust. It's clearly very bent out of position, to the point where it's likely not usable, but it's mere presence may have saved the fuel tank from whatever the car backed into.
-
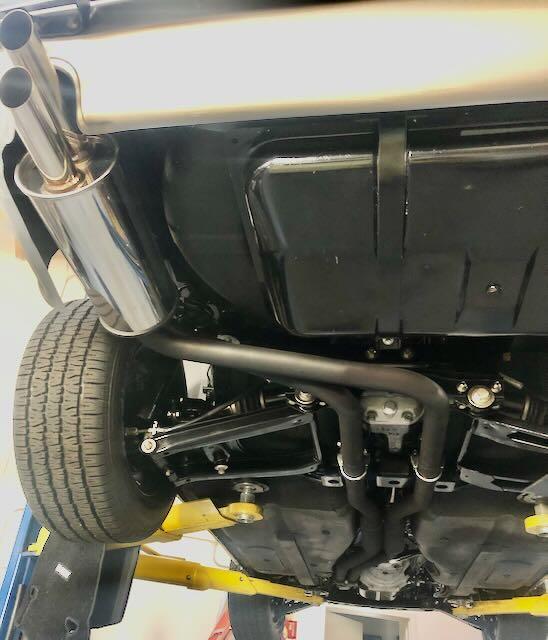
Stepping into the mosh pit here, I'll second Alan's thoughts that no system is likely to be 100%-bolt-on-with-no-mods-required, especially on an already custom car. I'd expect that whatever you may end up purchasing is going to need some massaging in order to fit properly, with ground clearance being a limiting factor. As far as pricing goes, I can also virtually assure you that whatever price you are paying now will feel like a bargain in a few years, because prices are only going up. I myself had the need for a stock-looking exhaust for a show/driver car I was restoring. I initially wanted a Speed Shop Kubo system, but as it appeared I'd be waiting a loooooong time for it, I elected to purchase a Spirit Garage system in mild steel, that I could get in under 2 months. Not only was it less expensive than stainless, it looked the part, sounded great, and fit in nicely for my purposes. In fact, I liked it so much that 4 months later I ordered 2 more, which ended up costing an extra 30%, because they could only get me the more expensive stainless at the time, and their listed prices had gone up by 15% on their web site. I've attached a photo so you can see the clearance around the differential. Circling back to required mods: this system needed to have diff mounts tacked on by us, so we effectively had unlimited leeway in setting the tolerances and clearances at that location. This is where the mild steel material came in handy, as it was a dirt-simple job to do. [EDIT: note for clarity - I didn't have correct mounting brackets in my possession, so we opted to tack on a bracket instead] FYI, there's no real point in me measuring clearance for you, because we set the tolerances ourselves by welding the brackets where we wanted them to be. You'd place them differently anyways, based on your application. I'd venture to say you'll always be able to tweak the split pipes to make it fit around an R200, but perhaps you'll need to be prepared to suffer a little in ground clearance as a side-effect. Knowing nothing about the Fujisobo system, I can't speak to it's quality as compared to the Spirit Garage system. Just visually, I'd say I personally prefer the more original look of the Spirit Garage rear section over the rear-flange-style assembly of the Fujisobo, but that distills down to personal preference. That said, I'll offer this thought: if you are concerned with clearance and tolerances for your custom setup, you'd potentially be better off with a Spirit Garage-type system, because I'd imagine you'd have an easier time positioning the split pipes and their mounts to fit around your diff than you would with the more closed Fujisobo setup. [EDIT: just a gut-check on this - I took a look at an R200 vs R180 on my cars, and I think no matter which system or routing you select, it will likely have to hang slightly lower on an R200 vs R180. It'll either hang lower because you are sending both pipes to the left of the diff, or it hangs lower because the R200 is slightly wider at it's base.] Hope this helps you in some way.
-
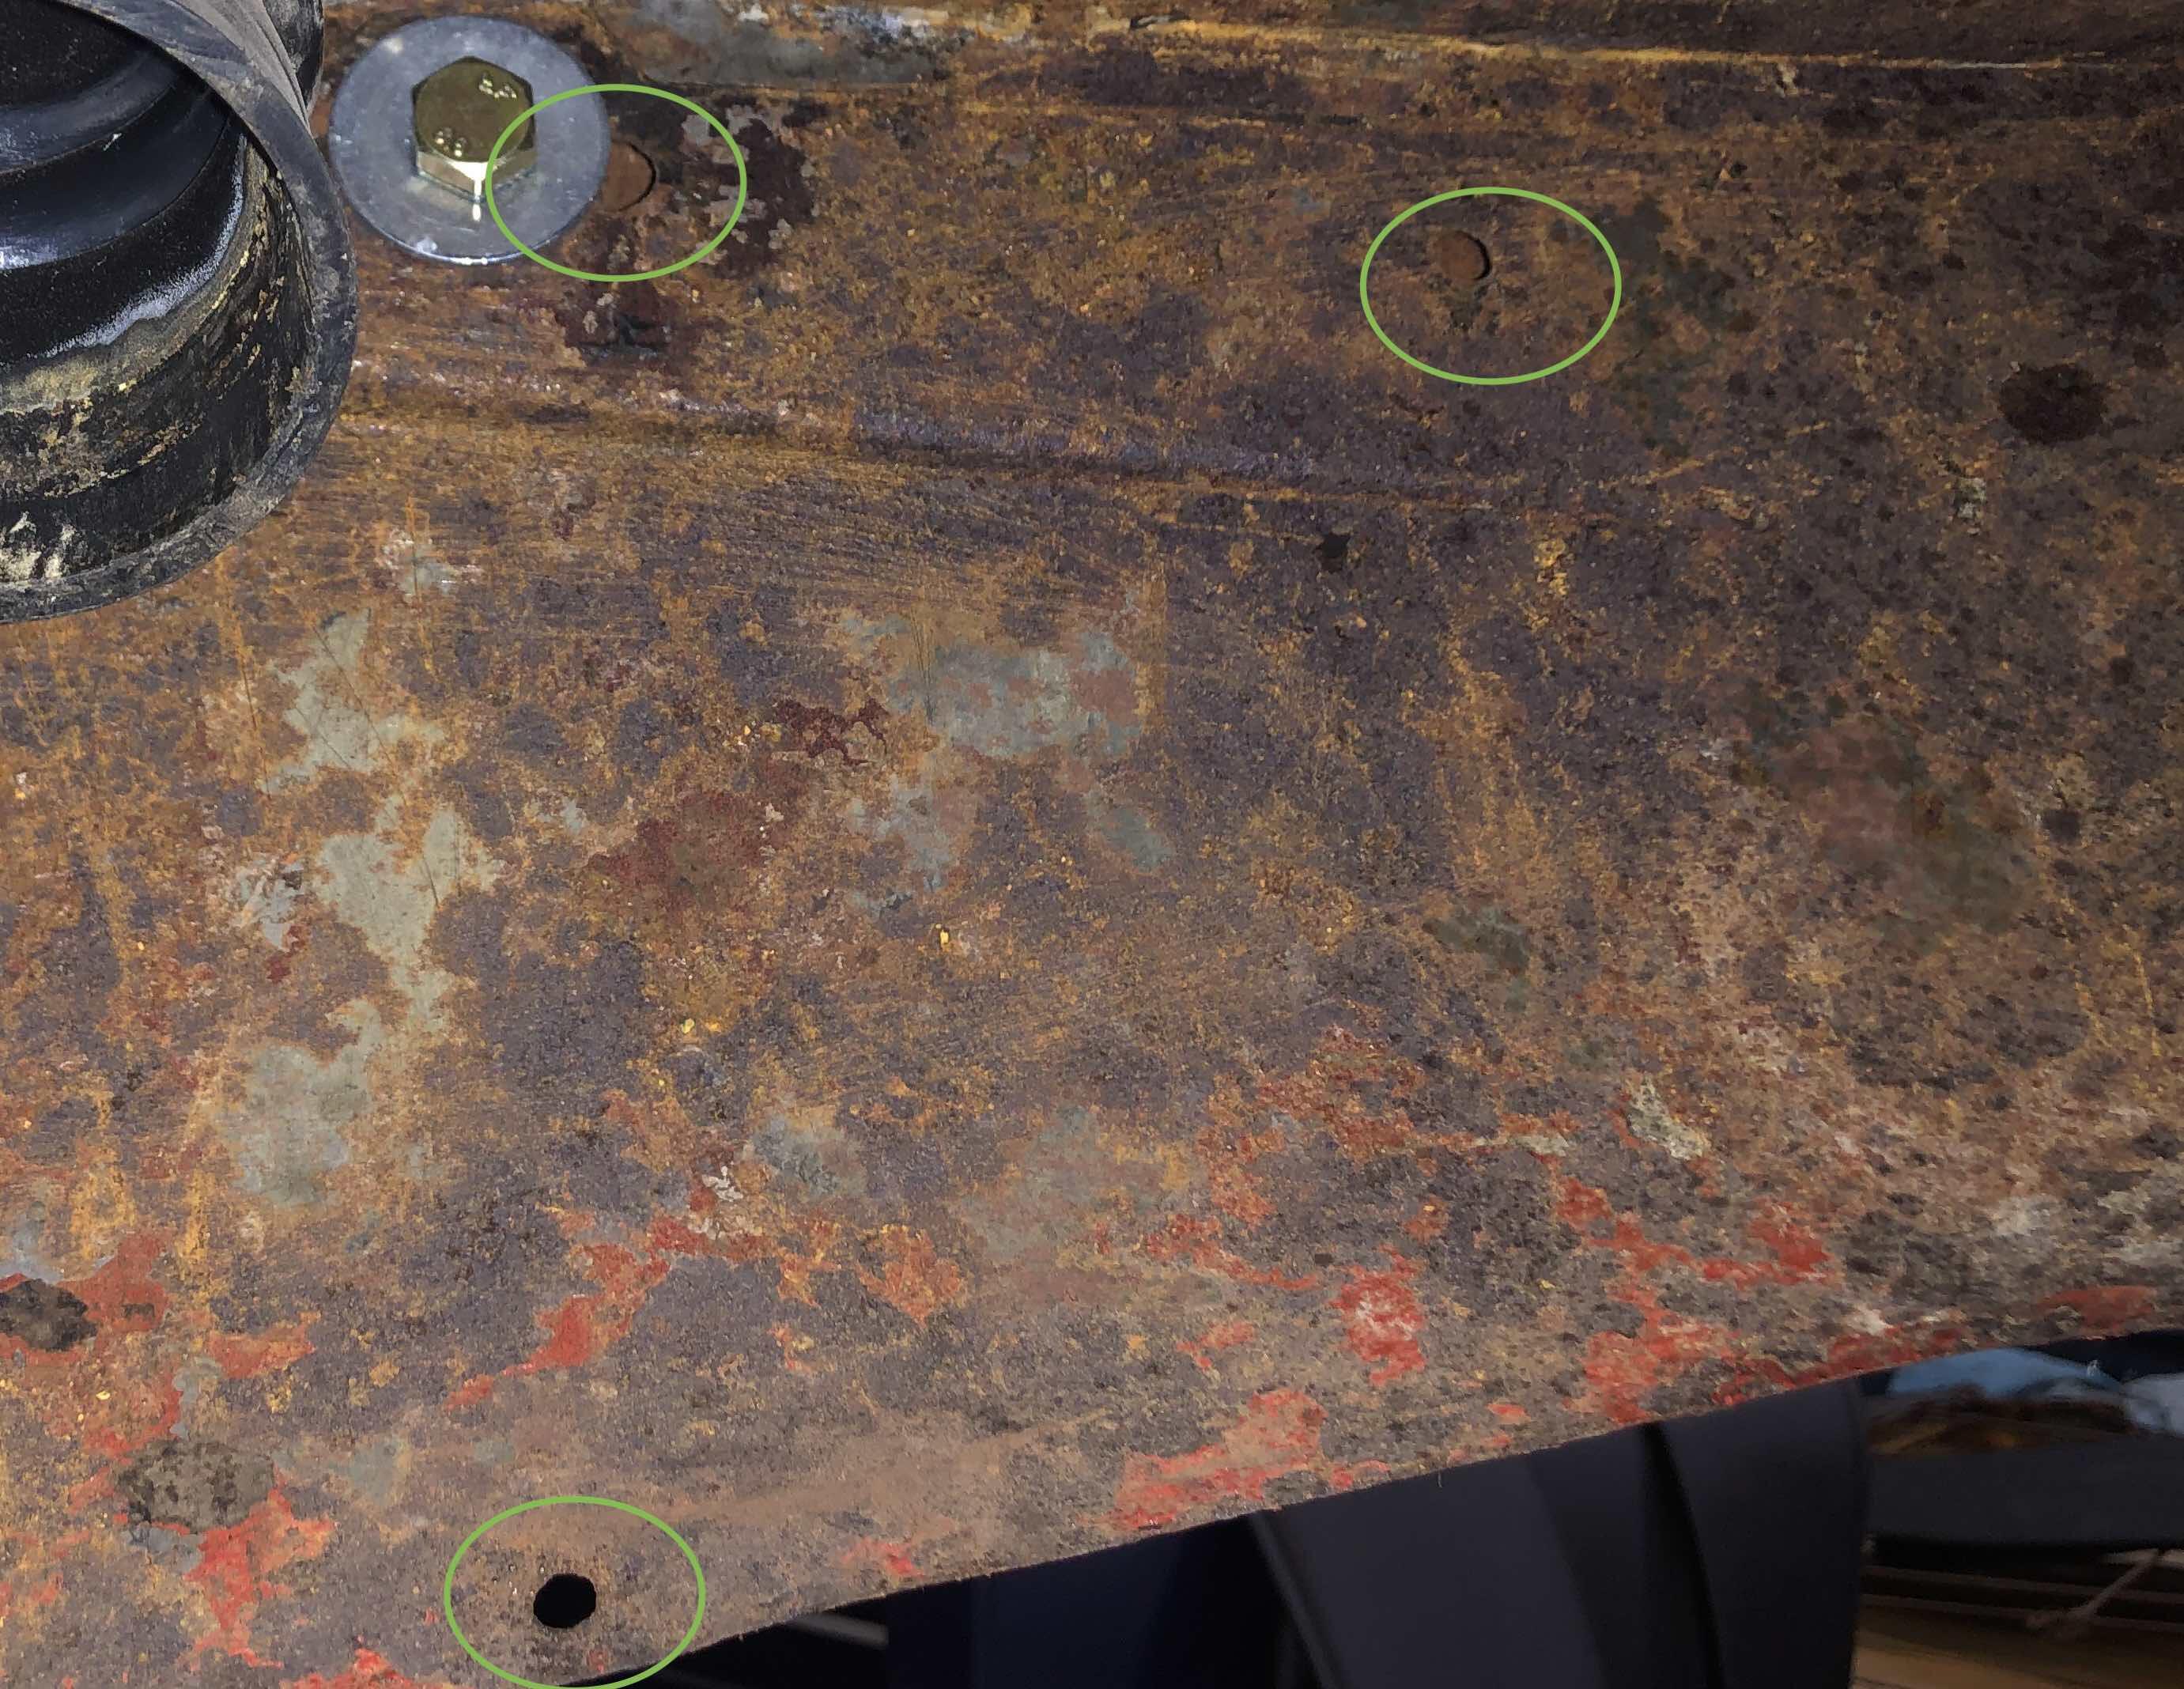
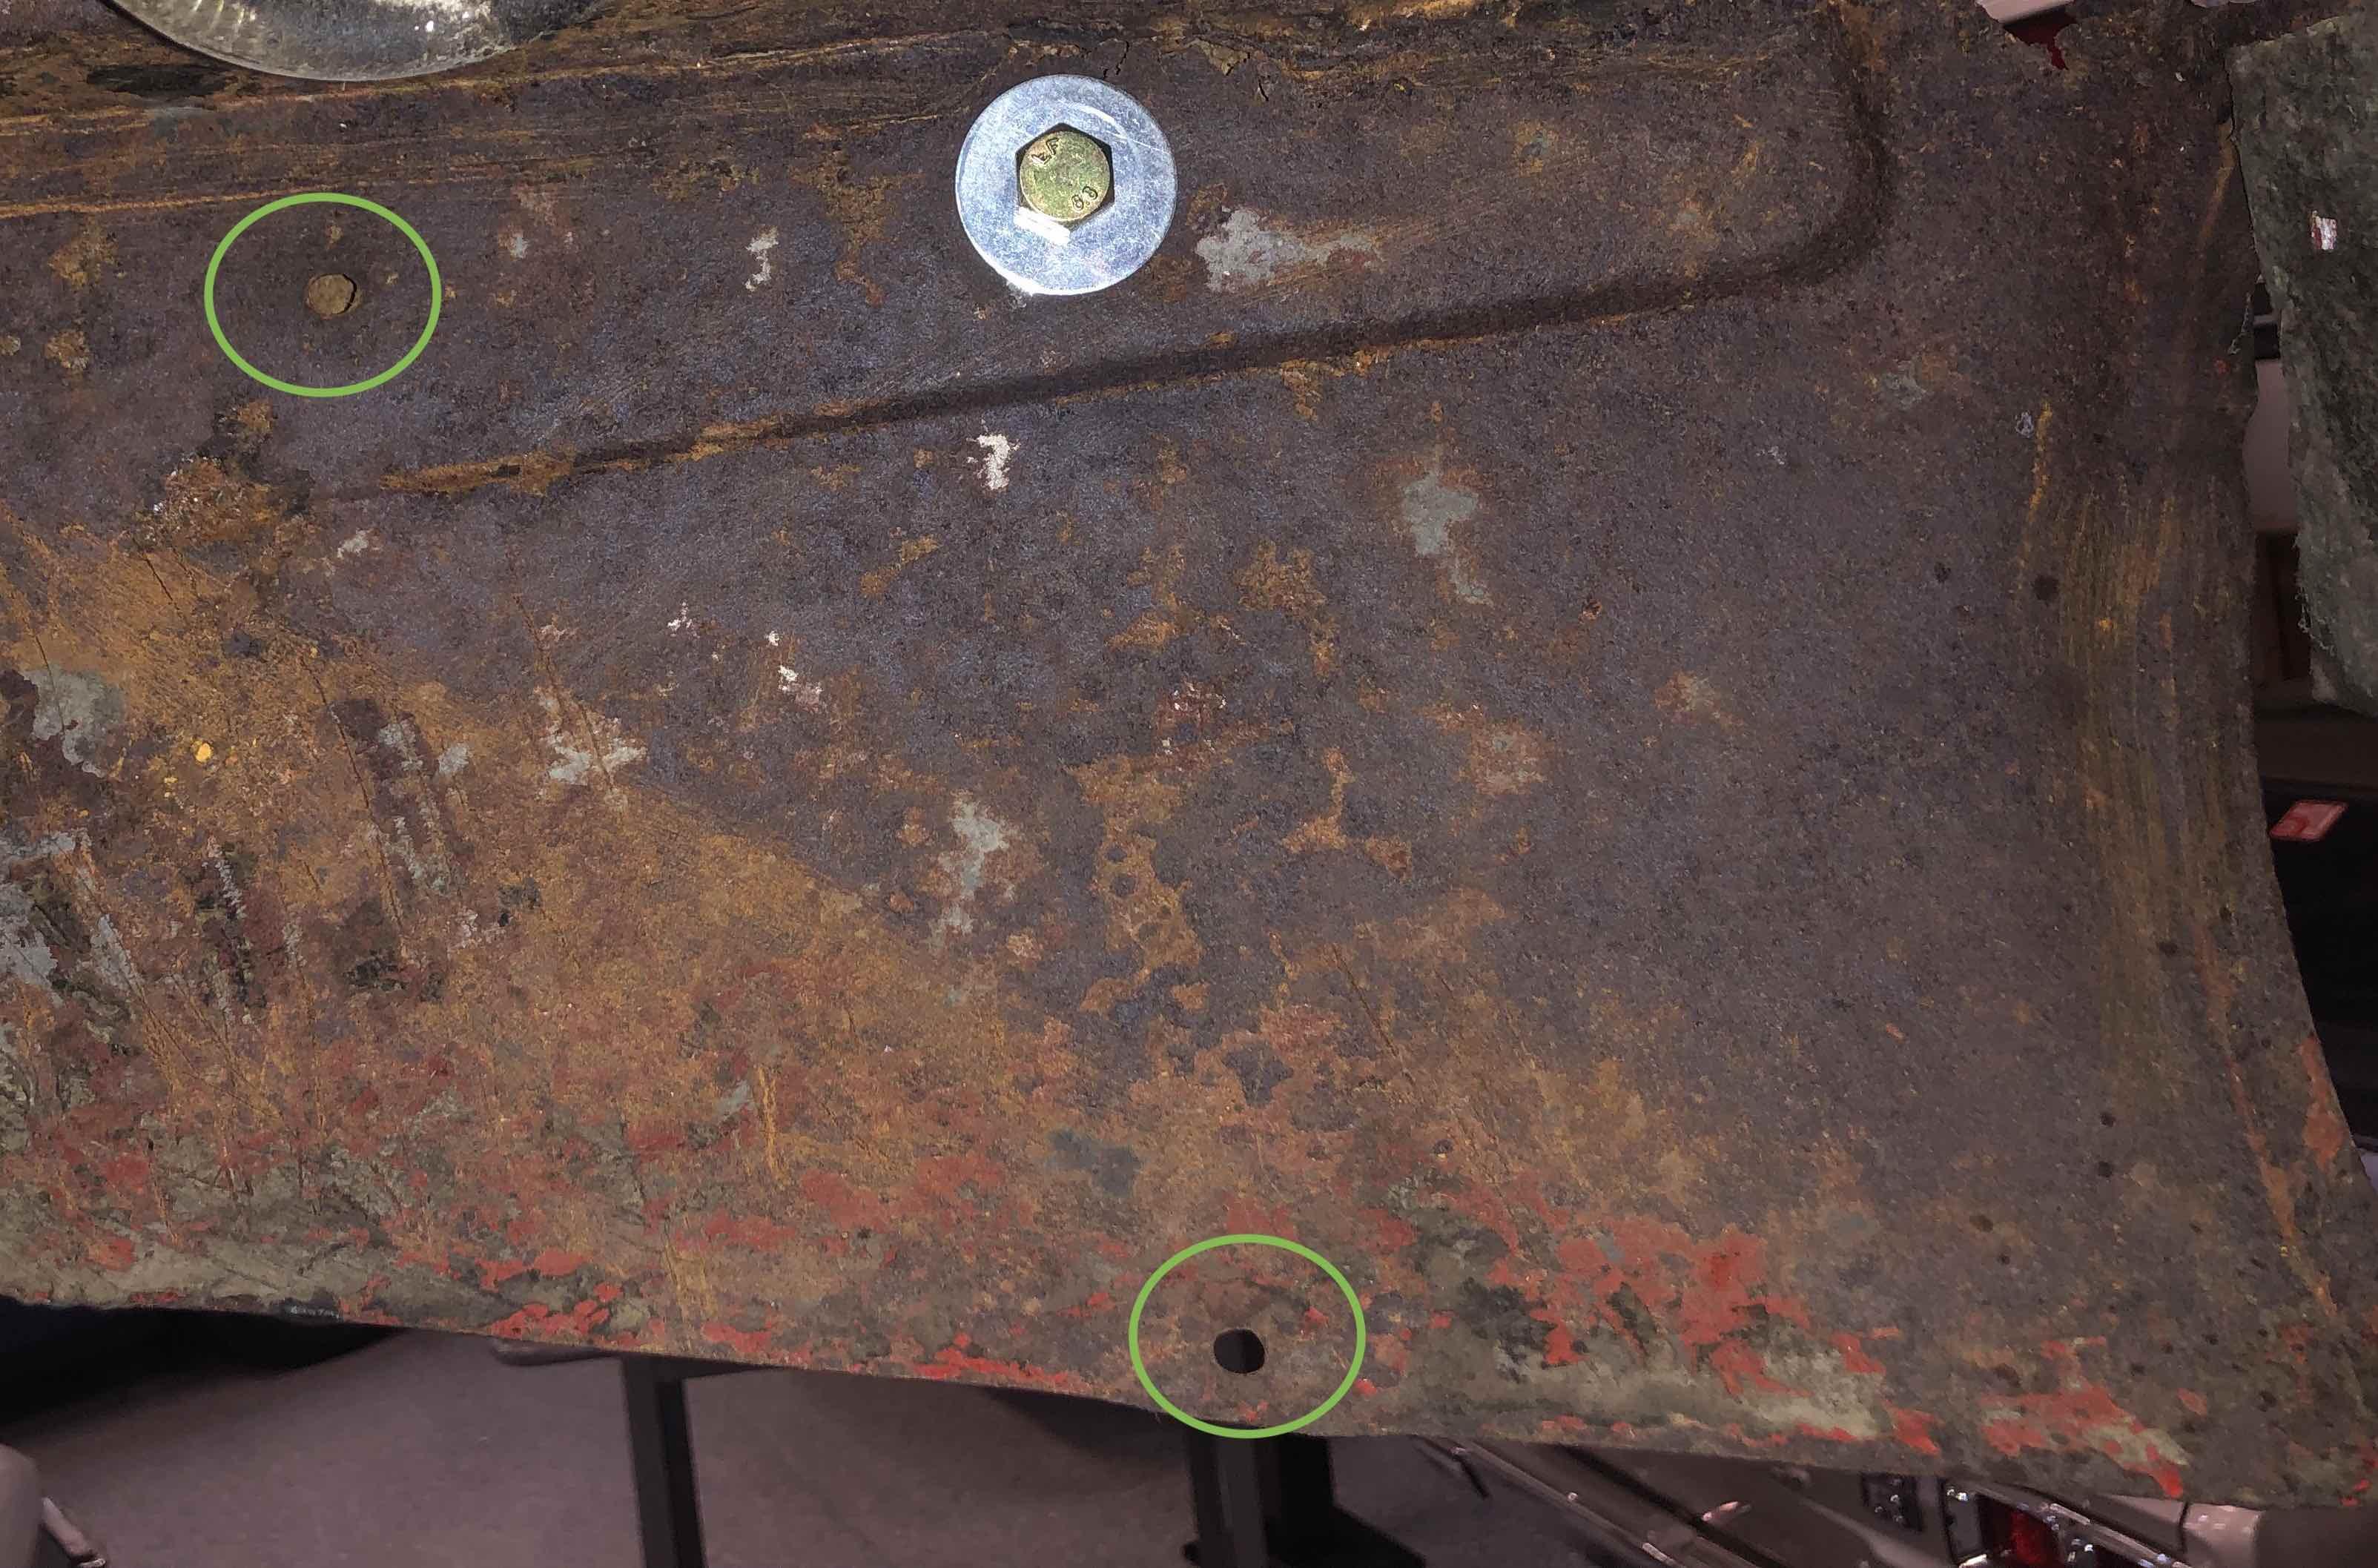
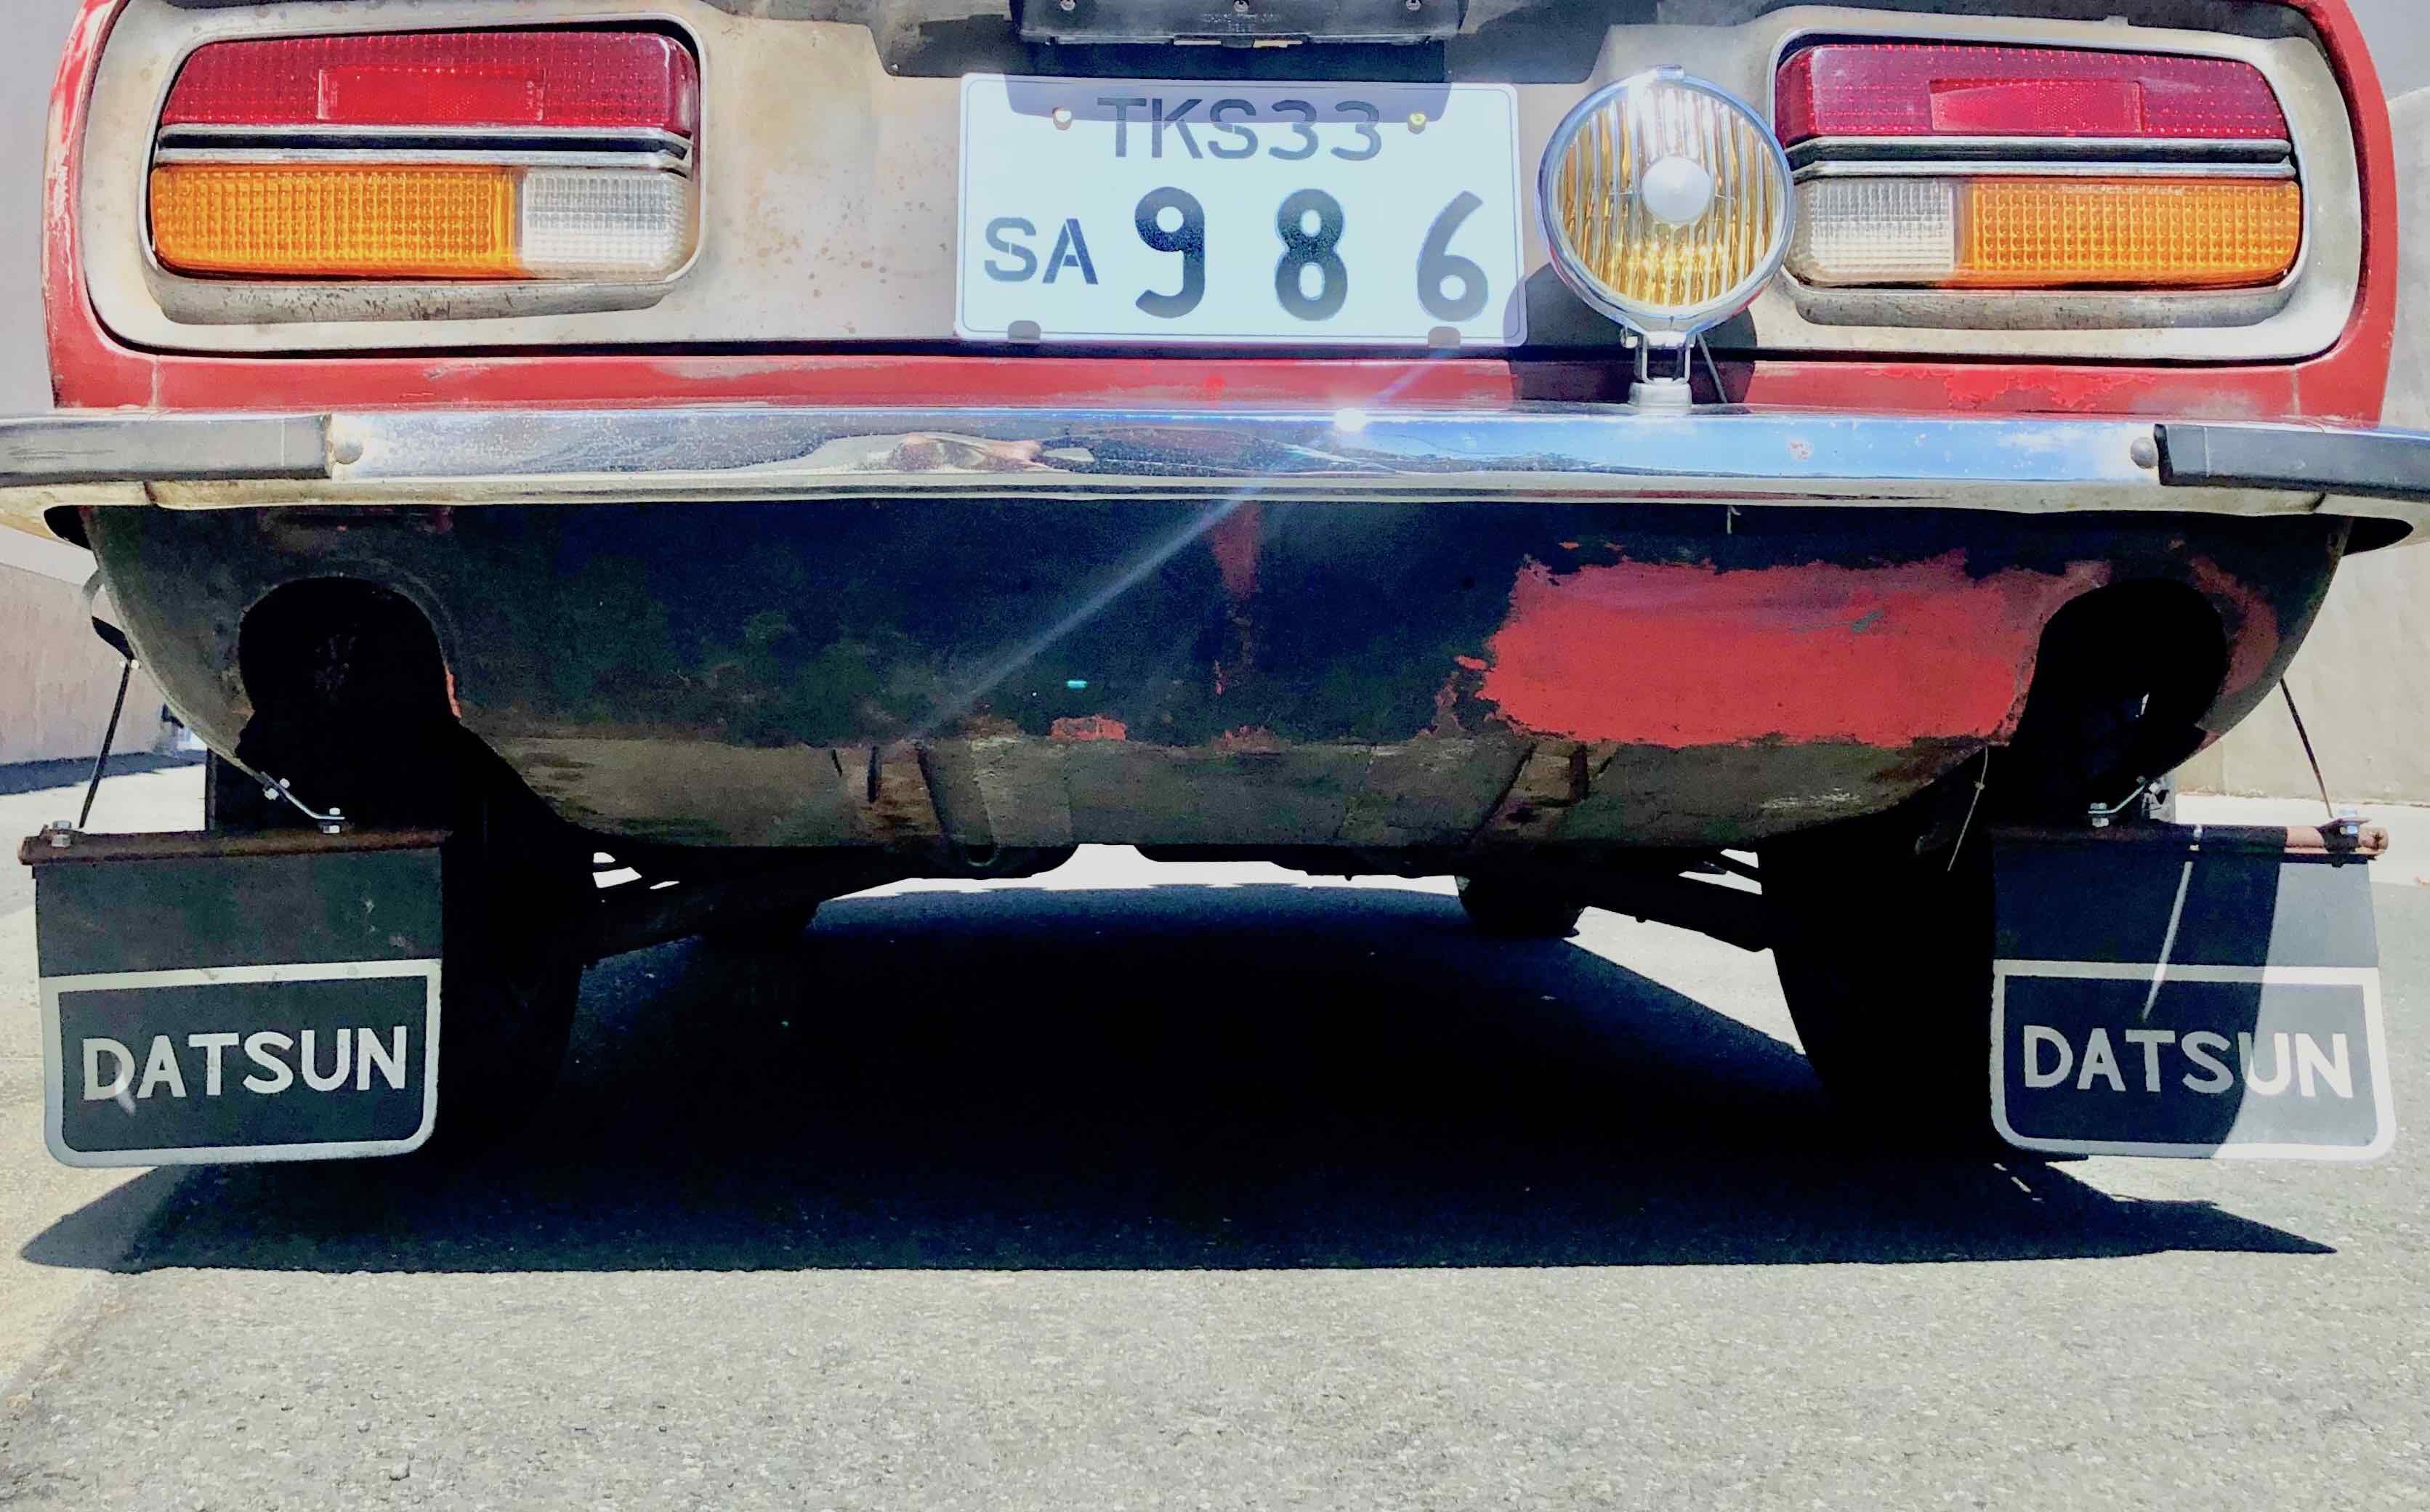
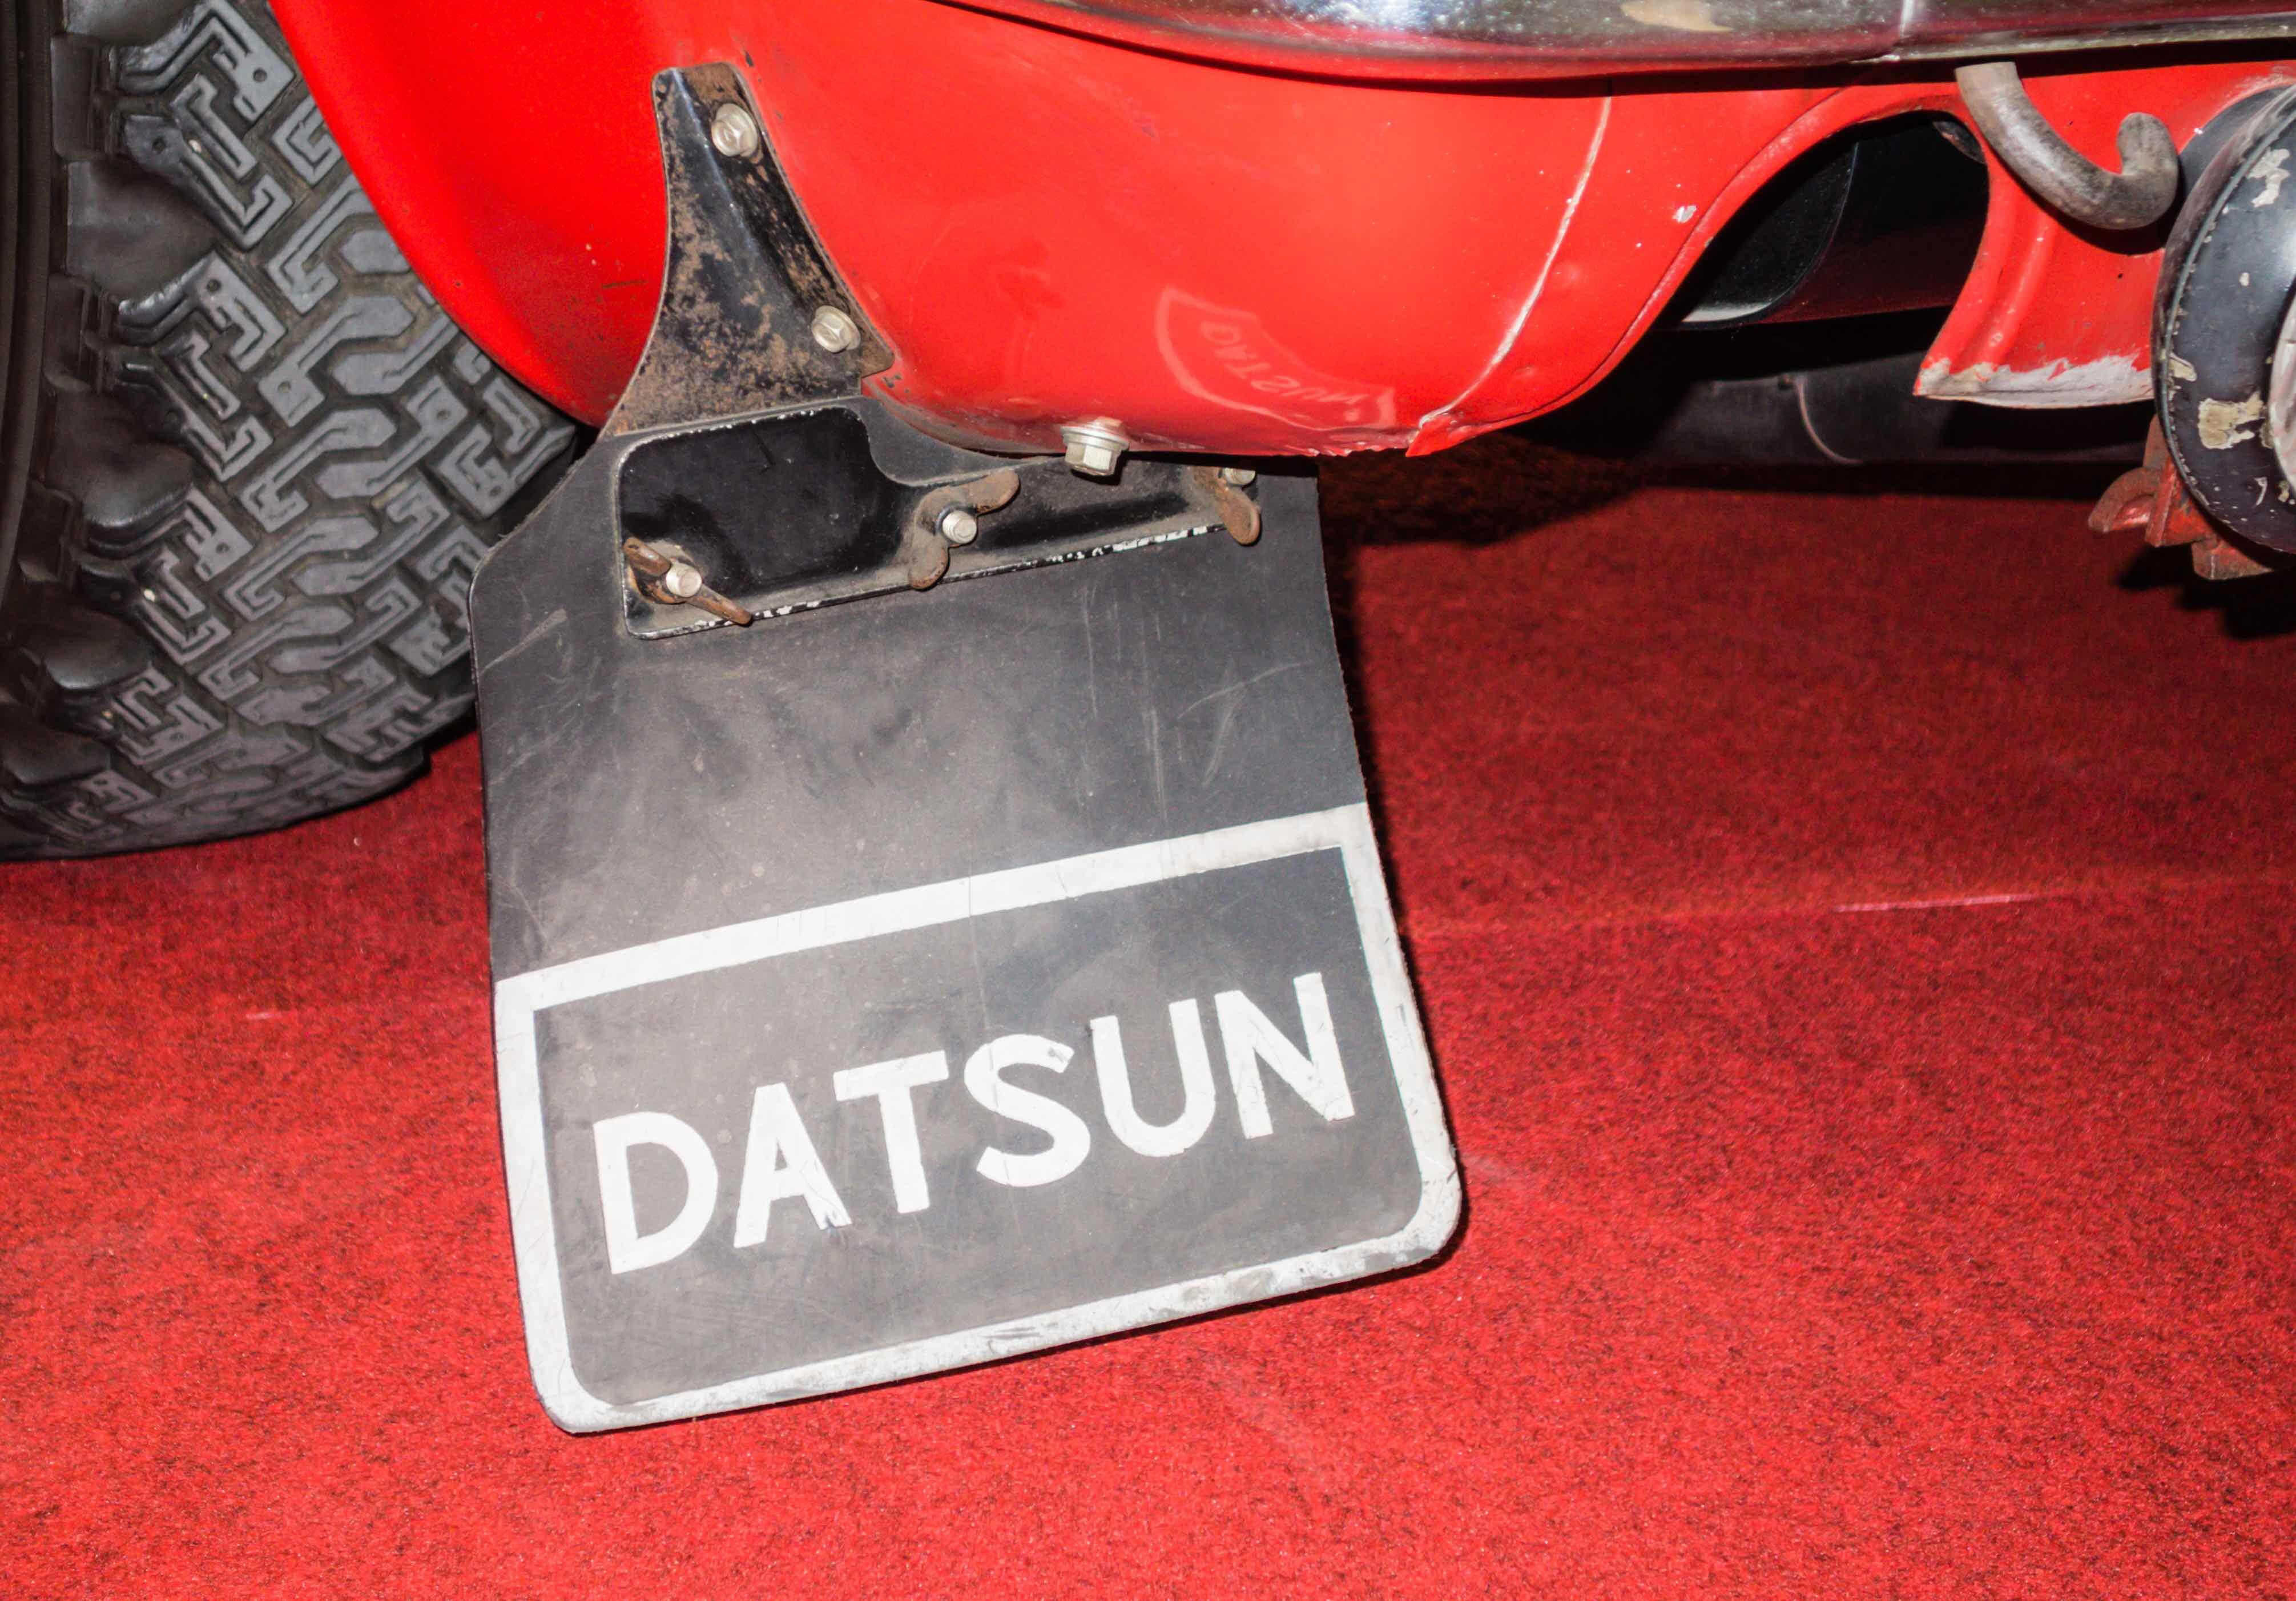
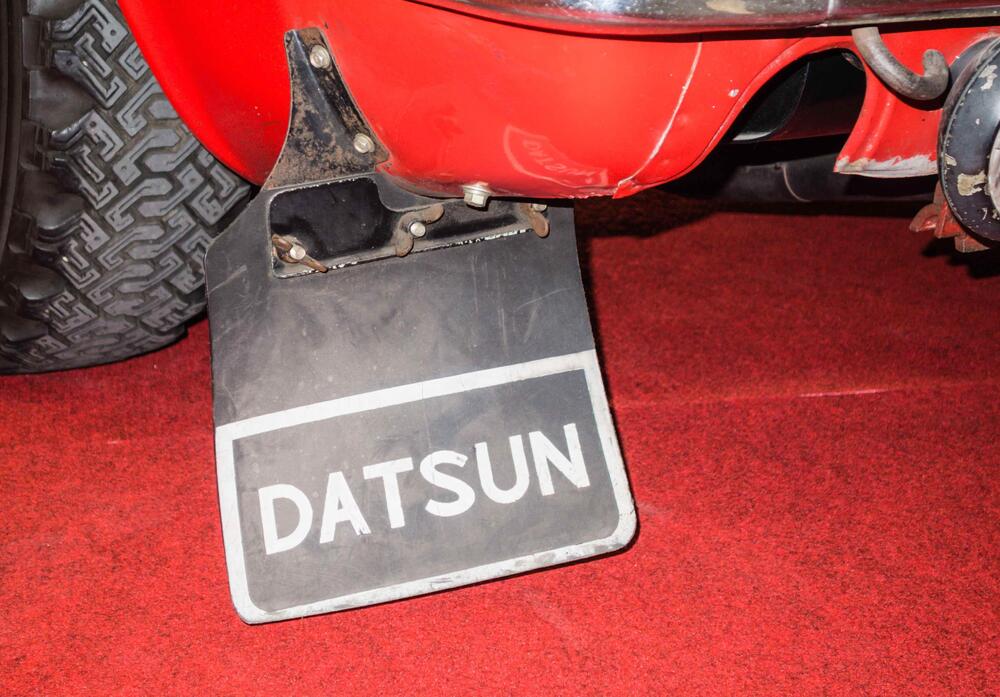
986 used the early-style mud flap system. I received a set of period-correct mud flaps with the car in 2014, but no mounting hardware. So I set about scouring period photos for some details on how they were assembled. The setup I went with was my best guess, given the information at hand. Thankfully, the job was made easier by the simple fact that the mounting holes were clearly visible, making locating the flaps a breeze. I chose 5/8" galvanized strap material for my outer brackets. This strap appeared to be roughly the right thickness - it was wide enough to drill a 7mm hole through, which was a ballpark guess as to the approximate size of hardware used. For the inner bracket, I chose a 1/8" thick steel bracket from Ace Hardware, which I bent into shape, making sure to leave the "Ace" stamp outward, for all to see! These materials were clearly not original, as I'd expect the real brackets to be made out of metric stock, but it served it's purpose for showing the car with the mud flaps in their approximate positions. I'll likely go over the choice of materials again during restoration, as I think I made the rear outer "spring-strap" slightly too short, giving it a "too straight" appearance. Also note that the right-side photo appears to have an extra hole by the bumper mount - my early assessment is that this is potentially just a random bumper mounting hole (or otherwise a hole used for other purposes, given it's size relative to the other bracket holes), as there is no corresponding hole on the left side. So I did not use it to mount the outer bracket. Instead, I hung the outer brackets by drilling a larger diameter hole in the strap, and affixed it between the bumper and body using the existing bumper bolt. I'm not yet 100% certain that this is the correct method, but it was close enough to make the flaps hang properly, so I went with it for the time being.


-
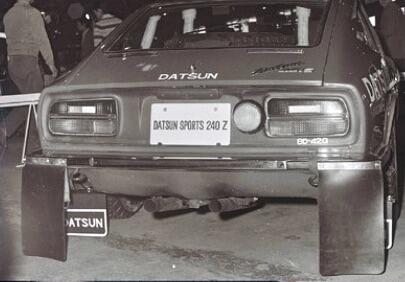
@Tweeds had a question about the mud flaps, so here is a little info on the evolution of the Works mud flaps. I've only included the early configurations that I know a little something about - I'd imagine there are other setups as well I'm not as familiar with. These are also not the greatest pictures, but they'll give some idea about the various styles the early cars employed. The first picture is 8D-420, an early test vehicle. Was this dual setup used in competition? it appears to be designed for serious gravel roads. The second picture is the early setup used through 1970 and 1971, which consisted of two outer metal straps, approximately 5/8" wide, bolted together and thru-bolted onto the car. These were accompanied by an inner, thicker metal bracket, which roughly held the mud flap in place, and could likely carry the weight by itself. I say "roughly", because there are several period photos showing the flaps having been moved backwards from their standard position during a rally stage. My guess is that the Works team were probably concerned about the mud flaps catching on something while driving, so they implemented a kind of outer "spring" system, that would give way, allowing the flap to move rearward, should it become entangled on a branch or rock. The third picture is from the 1972 Monte-Carlo car #5, and represents a later flap system employed for 1972, where the flap was more firmly fixed in place to the lower panel using a bracket.
-
Thanks Carl for sharing that information. Unfortunately I was just a toddler, so I missed out! it would be something special to have that poster collection now. Laughing a little bit to myself here about the display you describe, because there were probably very few US customers who even understood what rallying entailed. Most probably asked themselves why on Earth would they ever want to off-road their brand new Z, ha! Times have changed- today, everyone wants an SUV.
-
That dash is a nice piece,Kats, to compliment your other nice pieces. I personally think you are on the right track by doing it by hand. The parts that make that dash special are still intact, from what I can tell, and fixing the cracks by hand is imho the primary way you’ll guarantee they stay intact.
-
Wow @kats if you ever get those digitized, I'd love to watch it! I also am smitten with @HS30-H's idea of a Rallye Monte-Carlo exhibit with real fake snow. I'd have to find a set of studded snow tires to go along with it. I'll be a challenge to pull it off at JCCS, where temps reached 100 of Friday afternoon, not least because there would be a mad rush by show-goers for some ice cubes in an effort to cool down!