ConchZ
Free Member
-
Joined
-
Last visited
Everything posted by ConchZ
-

From the album: About town
-
Well, I got the little rust issues fixed to my satisfaction. I also got the headliner problem solved. The headliner I bought had an issue where it separated from the foam that was attached to it, literally falling on my head. The foam was sorta greasy feeling, so I didn't want to re-use it. I searched all over the darn island for some foam. A fabric shop(one of two we have) directed me to a Nicaraguan guy who does upholstery work. I ended up paying the guy $180 to put up new foam and a new vinyl headliner from stock he had on hand, plus recover the sun visors. The foam he used was thicker than the foam that came with the headliner I bought, and it cuts the noise and solar heating a bit vs the other one. After sitting the car in the sun a couple of days without the headliner falling, I am calling it good. Today, I put in the rest of the interior, except for the panel on the tail gate, which I'm still trying to figure out how to attach without drilling holes in it. Took it for a drive, and must say its significantly quieter than without all the interior panels! Imagine that. Am not happy with the MSA/Retro Belt seat belts I bought. I just don't like how much room the retractor takes up. Heck, I can't even push the seat all the way back without the back of it rubbing on the retractor mechanism. I'll figure something out, or maybe I'll go back to the original belts. Speaking of belts, I still gotta install the luggage straps. It's nice to have a dome light again!
-
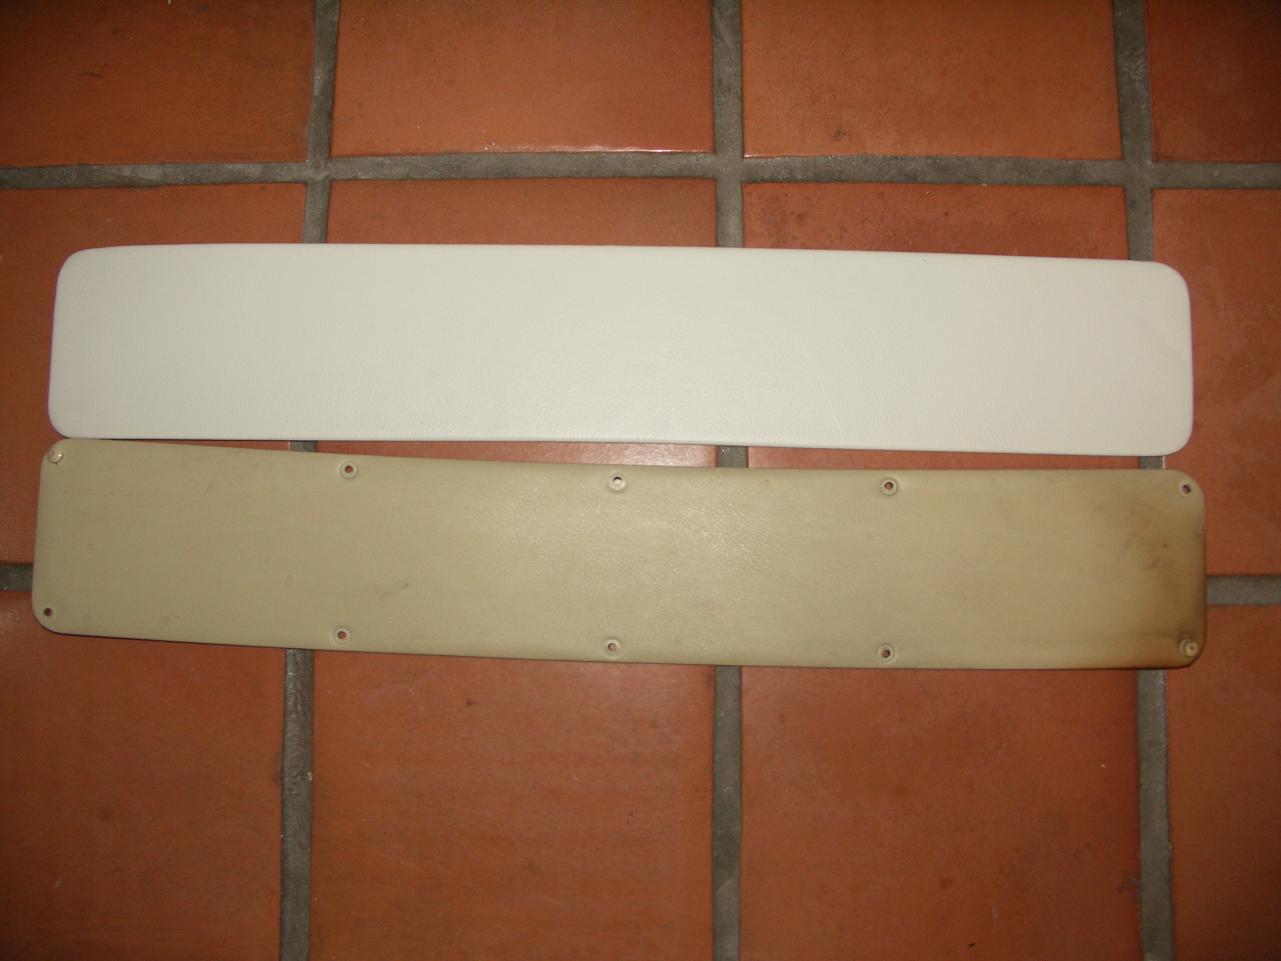
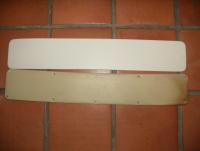
Ok, I bought a new vinyl panel for the inside of the hatch. It didn't come with any holes in it. The old one was attached via those little plastic pins that are used to attach all the plastic panels. It also had some sort of black sealer around the inside edge, probably to seal out exhaust gas. I like the look without the plastic pins, but that leaves me with using glue, which I'm concerned wouldn't hold. Has anyone had any luck using just glue? If so, what glue did you use? If I have to drill holes in this panel, does anyone have any tips on how to do it without messing up the vinyl? I'm thinking just put a piece of tape over it and drill. The attached picture shows the old vs new panel. Matt
-
I have the MSA speaker box. The nice thing about it is that it looks like it belongs there, and it doesn't break up the usable cargo space. You never know when you'll need some cargo space. On a whim, I stopped at a garage sale and found a brand new cast iron and ceramic kitchen sink. It was huge and heavy, but it fit right in the back of my Z, despite the MSA speaker box. I second that it sounds pretty good, too.
-
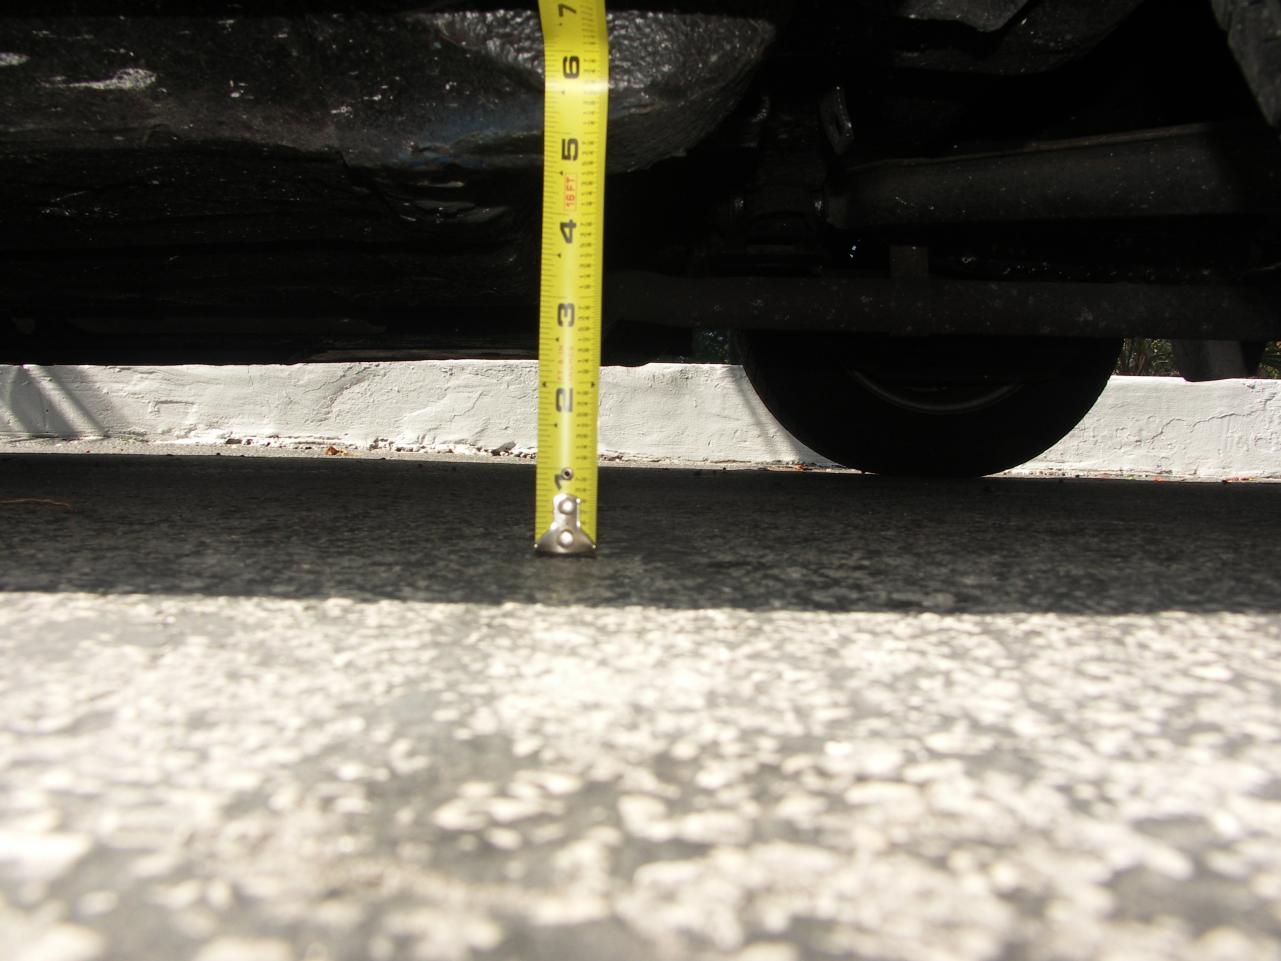
I'm thinking that a 1" front/rear sway bars, combined with front/rear shock tower support bars, plus 50 series tires would make any set of springs ride really rough. In any case, I'm assuming my stock springs are shot, given that my rear bottoms out on nearly every bump with two people in the car, so I don't think I should re-use them. Does this make sense? Any chance its just the struts? I doubt it, as the car doesn't have any extra bounce, and the struts have only about 20k miles on them (they're almost 20 years old, though). Attached are two pics, demonstrating the car's ride height. The one with the tape measure is showing the lowest point of the frame rail just inside the dog leg, without me sitting in the car. It's well under 6 inches. The wheels/tires are 185/70/14s. I'm refinishing the center caps. I'd like bigger wheels, but I sorta like having these old Keystones, because the seem rare. If I could be sure that the Tokico springs wouldn't lower the thing any more than it already is, I think I'll get them. At its current ride height, the rear mud flaps drag on speed bumps, damaging them. This might not be so bad if the rear didn't sag so much with my 200lbs sitting in it. Thanks for the input, nice discussion... Matt


-
Shops don't like to let you bring your own part because they don't want to be deal with issues related to defective parts. If you make it very clear that you will not hold them responsible for part defects, they will likely work with you. In other words, if they install your part and it turns out to be defective, then you agree to pay them to install another one again and again until you finally bring them a part that isn't defective. On the other hand, if they supply the part, and it's defective, then it's on them to keep putting in another part until they get one that isn't defective. This is why most shops only use the highest quality parts they can get, from a reputable supplier that they trust.
-
I've been doing a lot of research on this site and others to decide what combination of struts and springs to get. I've never seen a post that summarizes all the options, so I thought I'd write it up. I'm not an expert on the subject, so this post will be information drawn from the posts of notable experts. I'm hoping that writing this summary will help me organize my thoughts and perhaps draw out some advice on something I'm missing. So...here goes. First off, my car is stock, although it has fully poly bushings. My intended use is street use only. I may someday take my car to the track and get some lessons, but I doubt I'd ever be serious about tracking it. My comments will be geared to this usage. First, let's discuss ride height - my 240z sits on sagging stock springs, and is already about an inch below stock ride height, at just under 6 inches at the rear of the rocker. I like this height, which is good, because it is the expected drop from most aftermarket springs. Many people experience different ride height results with aftermarket lowering springs. Sometimes this difference is attributable to accidentally swapping the front and rear springs, or even from installing them upside down. Some people think the newer gas charged struts will make a car ride higher, even with lowering springs. I guess results will vary a bit. Next, let's discuss linear vs progressive rate springs - basically, progressive rate springs get stiffer the more they are compressed, while linear springs do not. The consensus opinion seems to be that progressive rate springs are the most comfortable, but they are not popular for track use because of their unpredictable dampening. Some even say they cause unexpected suspension movement, which results in control difficulty. I think this is only a problem if you are pushing your car to the limits on a track. Coil Overs - these are available from various sources, in either ready to install kits, or a kit that will require you to do some cutting and welding. Prices run from a few hundred to about $1600, with the cheaper ones not including the struts and camber plate you also need to buy. The advantages of these are that you can adjust ride height, swap out springs, and install wider tires. Coil overs are best for someone who wants to race, and are not necessary for my intended usage. Arizona Zcar springs - these are the only spring I can find that keeps your stock ride height. They are shorter than stock, but stiffer, so it works out to about the same height. I'm interested in dropping my height below stock, and these are also likely too stiff for my tastes. At 180lbs front and 200lbs rear, I believe they have the stiffest spring rate of all the options, although I can't find any numbers on some of the options. Suspension Techniques springs - these lower the car about an inch. They are linear rate springs. I can't find the spring rates on these. Eibach Pro-Kit - these lower the car about an inch. They are progressive rate springs. I can't find the spring rates on these. Tokico Performance Springs - These lower the car about an inch. Be careful, because these are linear in the back, and progressive in the front. I may like this. The linear in the rear would stop acceleration squat, while the progressive front ones would be more comfortable. Their spring rates are 140lbs front and 165lbs in the rear. That's it for spring options, so now let's discuss strut options. KYB - they have one option for a 240, and they say they aren't for use with lowering springs. This rules these out, unless you go with the Arizona springs. Tokico HP - these are the cheapest strut that will work with lowering springs. They are not adjustable. They are commonly referred to as "Blues". Tokico Illumina - these work with lowering springs, and are adjustable. A set of them will cost roughly $200 more than the HPs. For that extra $200, you can adjust between 5 firmness settings. Tokico D-Spec - these work with lowering springs, and are infinitely adjustable. Expensive, though. Tokico springs and struts can be bought together as a kit, at significant savings. A popular Z-specific vendor that has a complete Tokico selection is Beta Motorsports. When buying struts, it is important to make sure you get the necessary boots and bump stops. Most boots seem to have a bump stop integrated into them. Some kits seem to come with these boots, and some don't. A final consideration is whether or not to spring;) for the bump steer spacers, if you are going to use the lowering springs. In terms that I understand, these keep your lower control arm parallel to the ground, which prevents extra under steer at cornering limits. Here's more info on bump steer. They are available from various vendors, and fit between the bottom of the front strut and the control arm. Be aware that many people report that they cause rubbing of the control arm on the inside of a 14 inch wheel (but not on larger wheels). Black Dragon sells some that claim to be ok with a 14 inch wheel. I have 14 inch wheels. I am not sure if want to spend the extra $70 on these, but I probably will unless someone here talks me out of it. After reading up on lots of threads, here's my current thoughts. I plan to order a Tokico Illumina struts and spring kit and bump steer spacers. I probably don't need the adjustability of the Illumines, but for $200, it'll be a neat thing to play with, I guess. I'll always wonder, if I don't get them. Did I miss anything that I should be considering? Any corrections or additions to the above information? If so, I'll edit it and we'll end up with a nice buying guide that is written in layman's terms. Matt
-
anyone seen this before? I can't quite tell from the description if its the same old plastic dash cap, or if its actually covered with some soft vinyl. Interesting add, at least.
-
I use Contractor's Solvent to remove sticky stuff from anything. I've even used it to remove black tar from my white leather seats! It took it right off, and didn't hurt the seats. The only place I've found it locally is at Ace Hardware. Home Depot didn't have it. Matt
-
Wonder what they did to this one to get 250 HP out of it. The advertised 2.4L engine looks pretty stock, with the addition of a header and round top carbs. It went for $23,100, so it must've had something unseen in the two pictures provided.
-
I live in FL too, and couldn't find a good chrome shop in the whole state. I ended up shipping mine to Les, at ClassicDatsun in California. He had all holes the welded shut for the guards and rubber strips, so that the bumpers are perfectly clean and straight. They were then dipped in copper and nickel and chrome, followed by paint on the backsides. Both bumpers, with shipping both ways were somewhere a bit north of $1100, if I remember right. They've been back in the Keys for a few months, and are looking great, despite the salt air. Also, the coating seems very hard. The front bumper has been "bumped" twice, once by an idiot on a bike and once when I pushed the clutch in while parked, and had the car roll forward into a metal post. No scratches. It took paint of the metal post, though, and the biker nicked the front of my hood, so it was hard to believe the bumper wasn't scratched. I gotta get a brush guard....
-
On a previous post, I mentioned that I had noticed that sometimes my AC fan and my radio would keep running, even after I turned the key off. That post was about a problem with the AC blower fan and radio that turned out to be a loose wire, and was not related to the AC and radio problem in the other post. Today I figured out that the random AC fan and radio running after the key was off is not so random. Both the fan and radio will continue working after the key is off until you take your foot off the brake. They do not come back on when you hit the brake again. Now...newer cars will allow the radio to run until you open the door, so maybe this thing I'm experiencing is just an earlier version of that? Does anyone else's 1973 240z do this? My theory is that the fan and radio are both on the ACC circuit (both are wired to a blue ACC wire), and for some reason the ACC relay stays on until you release the brake, which turns off the brake lights. Don't know what the brake lights have to do with the ACC circuit, but this is actually kinda nice. Thanks, Matt
-
What about something to represent all the mods done to Zs over the years? The ease of modifications is part of the Z's popularity. V8 swaps and spoilers and air dams have been commonly done. Seems like you'd want a a genuine Scarab in your museum to represent the history of Z mods.
-
Sounds like we all have this problem with our S30s, and nobody has solved it. You can't extend the weather stripping, because there's nothing to attach it to. I can't not drive the car in the rain, because I live where it rains frequently and unpredictably. I can't even park it facing uphill, because we have zero hills. Our island ranges in height from sea level to 16ft. Not much slope. Maybe I'll get bigger tires/wheels for the front. I've thought about building up the corners of the hatch ledge, but not sure if you can do that enough without interfering with the hatch closing. It'd also look like a sloppy attempt to patch rust. I currently don't have rust there, as I've already fixed the little bit of surface rust that was forming, so I'd like it to look original and correct. I may try the idea of putting a lot of wax in those corners. If that works, maybe there's some clear sealer that can be put on there for a more permanent fix. That still wouldn't keep the water out of the hatch itself, but I think I can stop that by plugging up the two small drain holes on the inside lip of the bottom of the hatch. Mine currently have no rubber plugs. I have plugs on the two larger holes, but not those tiny holes. Were they supposed to be plugged?
-
I've got an issue with rain water pooling on the corners of the rear hatch ledge. The water gets deep enough to seep into the drain holes on the bottom of the hatch itself. From what I can tell, the water runs down the outer hatch weather stripping, and then drops into those corners. I figure it can't be good to have water sitting on the hatch ledge and seeping into the hatch. I don't have any rust issues there, and I'd like to keep it that way. Anyone else had and solved this problem? Matt
-
Ugh....WOW! Me like. Very nice job. Wish I could do that kinda work. Thanks for sharing the pics! Matt
-
I used to live in Bismarck, flying weather modification missions out of Bowman and Parshall. I did not have a Z then, so I can't help you. I can sympathize with you, though. Brr. I never knew they made exterior walls with 2x8s until I lived there.
-
haven't been writing as much as I thought I would. Hurricane season snuck up on me. I ride hurricanes for a living, and there's been a lot of new stuff to keep up with. Anyway, the car came back from the body shop in late May. The paint job looks great. However, it may only be skin deep. They cut a lot of rust out, replacing it with new metal. However, they somehow missed some rust in a few places. The rust became apparent under the paint very quickly. I've got some rust bubbles on the rear hatch ledge, where there was never any rust before. I've also found a rust hole on each side on the inside of the rocker panels, behind the dog legs. The dog legs were replaced with new metal, along with some of the interior metal of the rockers. I don't see how they could have missed this rust, and I don't see how I missed it as they did the work. I was there every day, watching. I feel like I missed something obvious, as the rust holes are so large that I can poke two fingers through them. You can't see them until you put the car on a lift and examine it closely. Anyways, I brought the car up to the shop today. I took my time bringing it to them, as I wanted to see what other surprises would present themselves. They will probably fix the problems. This is a small island, and I'm well known and well connected in the community. Being as the car is also a standout car, I think they'll want to protect their reputation and fix it right. I've put the car in two small shows already, and I drive it a few times per week. It gets lots of attention, and serves as a great business card for those who have helped me work on it. My show display includes cards from those who did the work that I couldn't do myself. One thing that makes it a standout car is the interior. I love it. I've not been able to finish it yet, due to problems with headliner glue, but it's going to be great. I love the white leather seats and the white leather shift boot. Gave the car its shakedown cruise, putting 300 miles on it during a trip north to Miami last week. Passenger side headlight quit, and the AC quit. Will look at those after the body work is corrected. Otherwise, the shakedown cruise went well. The speed limit on my island is 35 mph, so I enjoyed driving fast in Miami. It cruises smoothly at 85 MPH. You can't believe how good it sounds as you stomp on it under a freeway overpass. Those twin carbs with K&N filters scream, and the twin vertical resonator tips howl. On wet pavement, it's a blast to tease through the corners. Given that I drive a bicycle or a pickup for my daily drivers, it was a kick to pilot something with soul for a change. Will start posting pictures as soon as I get it done, but I've held off for some reason. Want to be able to show it as I intend it to look, I guess. Gotta get the interior finished up, and also need to do something about the wheels and tires. I love the old Keystone wheels that came with it, but need to do something with the rusty center caps. More later...
-
My 73 did this when I first got it. Another symptom was that the starter sometimes had difficulty cranking the engine, usually when the engine was cold. This cranking difficulty triggered me to look at the timing. It was set for an initial timing of about 30. Not sure why the PO had done this, although maybe he did it because the vacuum advance doesn't work. I backed the timing down to about 16 (mechanical advance does work, and brings it up to about 30 at around 2500 rpm). This cured the hard cranking, and then also cured the weird bucking under a light load. I'm not sure I completely understand why it bucked with an initial timing of 30, so if someone explains it, I'd appreciate the schooling. Anyways, check your timing.
-
I've been through the same thing with the fusible link on a 1973, which originally had a 40amp alternator, with a black fusible link. While maybe the link is good for 80amps if its a certain length, I bet it wasn't sized to stand up to 80 amps in a 73 with a 40amp alternator. There's just no reason it should be rated higher than the alternator. Anyway, I replaced it with a 40amp maxi fuse. I tried a 30amp, but that would blow when the alternator was putting out its max output. Its been a while, and nothing has fried or caught fire, and the fuse doesn't blow, so I think its good.
-
I have a similar clunk issue. I've replaced the mount, but not the strap. Today, with one rear tire removed and the car on a jack stand, and the other rear tire barely touching the ground, I had a friend put it in gear and let the clutch out just enough to make the car shift forward a bit, and then do it again in reverse. The position of the car on one jack stand lets you see the differential. (hint, throw an old wheel and tire under the raised side's frame in a strong spot, in case it falls off the stand. Better hint is that this is a stupid thing to do, but I got too curious for my own good) The front nose of my differential moves up and down a lot, and in time with the clunk. The strap seems to do nothing to stop this, as it's way too loose. I gotta find a new strap, I guess. Previous to reading this thread, I had assumed the strap was just there to keep the nose from flopping around like crazy if the mount broke. It sounds like its actually an important part of the mounting system, though.
-
I fixed it. I was really thrown off by the radio turning off when the fan was turned on, and all that. Couldn't see how a loose wire would cause that, but that was all it was. Whew.
-
I've had a strange thing going with my radio and AC blower for some time, and its now become a major problem. It started a few days after I removed and replaced my dash. When I shut the car off, sometimes the AC blower and radio would remain on for a few seconds to a couple of minutes. I just started up the car today, after not driving it for a couple weeks. The blower motor no longer works. However, when I turn it on, it causes the radio to stop working. The radio won't work again until I turn off the car and turn it back on. I'm hoping this will click with someone, so that I can find a starting place in my troubleshooting. Speaking of clicking, there's a relay at the top of the passenger kick panel that gets warm. It also clicks when you turn the key to ACC, and again when you turn it off. It doesn't click when you turn on the blower (which kills the radio). I seem to remember that the aftermarket radio is wired into a solid blue wire, and this wire was also connected to the blower, although I could be wrong. It's a pain to take apart the HVAC controls and radio far enough to check this, but that's where I'm headed next. Just wondering if there's an easy to replace relay that I should be checking first. Please help. I was wanting to drive the car from Key West to Miami on monday, but not if I won't have an AC blower. Matt
-
I paid someone. 8hrrs
-
It can be challenging to get results from a search. I've noticed that the site's search engine does understand most industry standard search engine tricks. Using them will help you narrow the results. Those tricks only work if the thread authors spell the words in their thread correctly. Sometimes narrowing a search doesn't work as well as you might think. For example, +"Black Dragon" will not return a thread where the author combined it into just one word, "Blackdragon", or didn't capitalize the B and/or D. You might get better results by simply searching for replacement vinyl. While I waited for my car to get back from paint and body, I think I read nearly every thread on the site dealing with interiors. At least the ones that interested me, that is. I also talked with Les at ClassicDatsun. Their prices are a bit higher than BD or MSA, but I'll pay their prices because they are willing to provide some tech support. On this site, you will find how to restore your steering wheel, your center console, your dash, your seats, and your vinyl. I've done all of those things. The results were good, although I'm not happy with my dash restoration. Its not the fault of the instructions, but more because the dash is now cracking in another spot, right over the glove box. I can't yet tell if the crack is only in the paint/texture, or if its deeper, so I'm waiting to see how far it goes. I'm betting it's in the paint/texture, and is because of poor surface prep on my part. I may have missed a spot while cleaning it up prior to painting...