Everything posted by rubrbulits
-
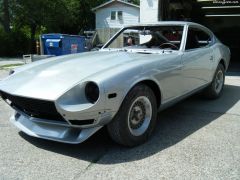
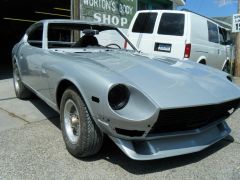
My 71 finally back from the body shop!
-
My 71 finally back from the body shop!
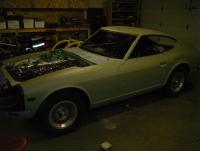
71 240z with BRE air dam. Bright metallic silver. Shortly after it gets home I will order a set of BRE Lemans style wheels. When I called Brock Racing Enterprises about the wheels, I was told Peter Brock would call me back to make sure I buy the correct size wheels for my car. Mr. Brock called me back a few days later and we talked Z cars for a good half hour! I was extremely impressed!
-
71 240Z. Looking for both rear quarters.
My Z is at the body shop and the body guy says he wants me to get the left and right rear replacement quarter panels. So far I have found them at Black dragon for a fair price, but they tell me they are back ordered 3 weeks. I cant find them anywhere else on the internet so far. Any suggestions?
-
Pertronix vs. points on my 71 240z. Here's my story.
Another issue I had besides the rev issue was a rough overly rich idle. It turned out my rear carb piston wasn't dropping all the way. After I fixed the carb issue it ran PERFECT! But just to make sure, I pulled the points and re-installed the Pertronix. Still, it wouldn't make it past 4300 RPM. I put the points back in an it runs fine. Like Arne said, there are usually other things going on and the carb was definately the other thing.
-
Pertronix vs. points on my 71 240z. Here's my story.
Yes, I checked that too. All magnets are there. Thanks.
-
Pertronix vs. points on my 71 240z. Here's my story.
Yes, I agree. I just drives me nuts when I solve a problem and don't really know why. The Pertronix worked perfectly when I originally installed it. But when I put the engine back together a few years later, there's a problem. There's a perfectly good reason for this. I just hope I can figure it out. I still have all of my Pertronix parts in a zip-lock bag ready to be re-installed when I get this figured out.
-
71 240Z. Another dashboard restoration.
I applied it just like you would apply "Bondo". With a plastic spatula thing. Then let it cure, sand it, re-apply it, sand more, reapply, sand it, and so on until you are happy with the surface. Be patient and take your time. It wont be right at the first application. It will take multiple layers and sanding and shaping to get it just right.
-
Pertronix vs. points on my 71 240z. Here's my story.
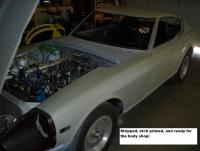
After I bought this car a few years ago the first thing I did was get the engine tuned as perfect as I could. The previous owner never had it running, but claimed the engine was rebuilt when he bought it. I believe this is true since the compression test i later did proved this is a new rebuild. Anyway I started with the complete carb rebuild kit with video from Z Therapy. New plugs, wires, cap, rotor, and the Pertronix kit with 3.0 ohm Flame Thrower coil. Of course the gas tank was full of gunk, ALOT OF IT, so I ran fuel from a gas can as I got the engine running and tuned perfect. I managed to get the gas tank mostly cleaned, but I still had to change filters about every 50 miles once I started using the tank. I drove this car for one summer, mostly on the weekends and it ran great, except for the fuel filter clogging often. I've spent the last two years stripping ALL of the paint to bare metal and etching priming it to prepare it to go to the body shop. I also pulled the engine and transmission so I could paint the engine compartment so the body shop wouldn't have to deal with that. Now the engine and transmission are back in the car and when I first got it to run it ran very good. But, all of a sudden it started running rough and wouldn't rev past about 4200 RPM. I noticed alot of threads on the subject of points VS Pertronix, so I decided to put the points back in to see what would happen. Well, installing the points made a difference. It revs all the way. I'm not saying one or the other is better, I just wish I knew why this happens. I've read numerous threads where people go back and forth on this subject, but no one seems to have a difinitive reason why this happens. Like I said, the Pertronix worked great at first. So anyway, this is my story and my 2 cents. Just wish I knew why.
-
71 240Z. Another dashboard restoration.
No, as long as its primerless urethane it bonds to just about anything.
-
71 240Z. Another dashboard restoration.
-
71 240Z. Another dashboard restoration.
No, its a 1971 240Z. What makes you think it's a 280? And, yes, the reason I "opened" up the cracks is because of how the vinyl flares upwards at the cracks edges. Also, I used the windshield urethane because it cures to a firm but flexible state, and its not silicone, so all of the other products you are using will bond to it very well. Of course before you fill with urethane you need to clean the underside well so the tape will stick so the urethane doesn't fall through. Most NAPA stores sell windshield urethane. Make sure it is PRIMERLESS! DO NOT USE SILICONE!!!!!! NOTHING BONDS TO SILICONE EXCEPT SILICONE!!!!! Thanks!
-
71 240Z. Another dashboard restoration.
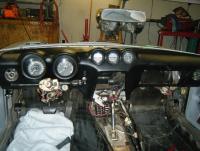
Before my Z goes to the bodyshop, I decided to pull the dash and fix some wiring issues. Then I thought, why not try to repair the three LARGE cracks in the dash. What have I got to lose. I started by using a razor to cut into and taper the cracks. After doing this the cracks were at least 3/4" wide and completely open. Then I filled them with primerless windshield urethane after backing them up with duck tape. 24hrs later I used SEM 68422 flexible bumper repair to finish filling then sanding then filling and sanding until I was happy with the surface. Next step was SEM 38464 vinyl/ plastic prep to clean the entire dash surface. Then I used SEM 39853 texture coating to cover the whole dash surface. The final step was SEM landau black color coat/ flexible coating. Sorry, I never thought to take before pics, but the three cracks were in the typical places, and you could almost slide your fingers through them. So, anyway, here's the after pics. The texture spray creates a courser surface, but still very acceptable to me. Plus, good dashboards aren't cheap! Lets see how long this lasts. I will update this if or when the first crack appears.
-
Parts interchange. 240 to 260z?
I am thinking about buying the 260z and keeping it around for whatever parts I can get off it. My 240z is in the middle of the restoration process and I am finding that it would be nice to have a donor car for all the little bits and pieces. I'm constantly getting held up because I need a grommett or bracket or some stupid little part that I cant get unless I order it and wait a week or two to get it. I guess the most important part I'm interested in is the tranny. Mine is automatic and works great. But its still an automatic. I still dont know the year of the 260z since the person I'm dealing with is the brother of the owner of the car. Without knowing the year of the 260, can anyone tell me if the tranny swap is possible without many complications?
-
Parts interchange. 240 to 260z?
I am restoring a 71 240z. This weekend I am going to look at a 260z for potential used parts for my 71 240z. Since I am in Iowa and finding these cars for parts is almost impossible around here, here is my question..... Which parts aren't usable?
-
I just cant get windshield on, please advice
I've been installing autoglass for 18+ years and here's what I know. Step #1 do this in a warm environment, not outside in driveway on a cold day! Step #2 set windshield on sturdy folding rack outside facing up. #3 install the gasket to the windshield starting at the two top corners so the gasket is installed evenly around the glass. #4 spray the rubber with a soap/water solution. #5 Now, start installing the stainless trim, I use a small regular screwdriver for the corners and the fiber stick for the rest. The corners are done last and yes, they can be a pain. Since it isn't installed in the car yet, you can grab the rubber and spread it apart easier as you work the trim into the groove. If the glass is in the car and settled in the pincweld you get no more flex causing the installation of the trim to be far more difficult, but not impossible. #6 Now that the trim is in the rubber, carefully flip the glass over on the stand and install the rope in the groove of the gasket with both ends meeting at the bottom center and overlapping each other about six inches and tape the excess rope to the inside of windshield. Cheap standard clothesline rope works best. #7 this step is up to you and here's why. Modern vehicle windshields are installed with urethane for structual reasons, but more importantly because of the airbags. The windshield is what keeps the airbags IN the car. If you had an airbag in a 71 240z and it deployed, The force from you hitting the bag would pop the windshield right out, glued in or not, the rubber gasket is the weak link. Any sealant or adhesive used in the rubber gaskets of the older cars was for sealing purposes only. If you choose to use a sealant you can use a product called "3m windo-weld sealer". or I just use my urethane. You want to lay about a 1/4" bead to the inner/ lower/ inside edge of the pinchweld, does that make sense? #8 now, soak the pincweld and the gasket with soapy water and lay the glass in the opening evenly. #9 put on some disposable rubber gloves and start pulling the rope. If you do this just right you will only pull a little of the glue through with the rope, sometimes none, and clean up will be fairly easy, or not. In my opinion, if you have a rust free clean pinchweld and a NEW rubber gasket, don't worry about using a sealant. However, NEVER EVER use silicone to seal anything on a car body. Silicone is corrosive and will eventually cause serious rust issues. This isn't meant to be a step by step instructional on glass installation. This is just basically how I would approach this particular windshield. I'm not taking sides here either.
-
71 240z gland nut removal.
Fortunately I managed to get it running very nicely shorty after I bought it last winter and drove it quite a bit last summer. If I hadn't drove it to begin with and realized how much fun it is to drive I just might lose interest. I've spent this winter dealing with ALL of the mechanical issues and everything else that should be done previous to body work and paint. Oh, and since it's an automatic, and I have the engine and tranny out, I sent the tourqe converter to a specialist who is able to cut it in half, fiddle with the guts, and re-weld it together. They increased the stall about 400-500rpm above stock. My transmission guy says its a "safe" increase that wont be bad for a daily driver, but I will notice better acceleration. I wonder.... Am I the first to try this?
-
71 240z gland nut removal.
Well, I managed to get one done last night. The nut finally broke loose, and to my surprise the insert slid right out effortlessly! Much easier than the fronts were. At least this time I remembered to soak all of the important areas with penetrant the day before I begin the job. So, if I get the other rear one done today I'm finished with the suspension finally. Of course while spending all of this time under the car I have also decided to start on all new brake lines. It never really ends, does it?
-
71 240z gland nut removal.
I'm installing the Tokico lowering spring and strut cartridge insert kit. Am I the only one battling the removal of these F#cking gland nuts! Every thread I read about replacing the cartridges and springs seems to claim its a pretty straight forward job. I can't find a single thread that deals with the gland nuts. I have finished the front end and was sucessful with one side, "after a long and difficult battle", and destroyed the other and had to order a used shock tube assembly from Zbarn. Also, when I managed to get the one nut off the front shock, removing the insert from the shock tube was a whole other problem. I definately don't want to screw up the rears for obvious reasons. And of course I'm working on my first rear shock right now and the nut is giving me grief. These gland nuts don't take much to get damaged when trying to loosen them. I used a pipe wrench, heat, and penetrant on the fronts, which tends to fold them over easily if you put too much into turning them off. I got one finally, and destroyed the other so bad that I had nothing to grab. I now have a REALLY big wrench for the rears, but it even wants to fold them over without much effort. At this point I have decided not to rush this and just keep soaking with penetrant and trying every day to crack them loose. Am I missing something here, or is this par for the course? So, how do I deal with the gland nuts, and if I get them off, how do I get the inserts out?
-
Brake line nuts.
If your going to try to flare your own lines, consider a quality flaring tool. I bought my "cheap" flaring tool at Oreilly's for around $25 and it can be a challenge to get a nice flare. After numerous attempts I did finally get the hang of it, but I can tell that a higher quality tool would be worth every penny. I can't tell you who makes a better tool, but you may want to do some homework before you make this investment.
-
Brake line nuts.
I'm getting ready to make my own brake lines for my 71 240z. I have found everything I need except the 10mm x 1.0 brake line nuts. I've tried my local Autozones and Oreillys and Napa with no luck. I can buy brake lines with the correct nuts everywhere, but not the nuts ONLY. Where else might I try to look. Or do I just go ahead and order them online. Thanks.
-
71 240z compression rod issue
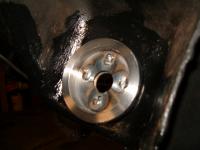
Ground down smooth and painted.
-
71 240z compression rod issue
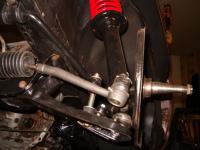
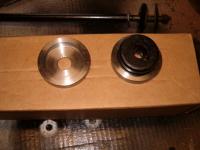
So here's what I did. A friend of mine owns a machine shop and made these for me out of mild steel. Amazing what a 12 pack can get you. I still can't figure out how the original peices were missing, but the rest of the metal on the TC box and frame rail are in excellent shape. Although this car had its fair share of rust, it's not in all the typical places. So anyway, I drilled four 5/16" holes in each peice and welded them on. Good to go! And yes Enigma, I might just heed your warning about the urethane bushings. Iv'e read numerous threads about how these bushings are a risky application on the compression rods. I threw in an extra pic of the rest of my front end, just because.
-
71 240z project.
Yes, I've done all the work myself so far. I'm not going to do the exterior paint though. I know too many people who paint for a living and I will gladly pay them to get it right the first time.
-
Dashboard harness.
My Z has a production date of 7/71. I just found a dashboard harness on Ebay that is out of a 10/70. Is this a match? Mine does have an automatic transmission and the auto seek am radio, but that shouldn't matter, right? I have 2 hrs to figure this out.
-
71 240z compression rod issue
Iv'e been looking around different places trying to find something similar to the original rings but have had no luck. It's finding something thats "cupped" thats proving to be the challenge.


