Everything posted by Mikes Z car
-
arkansas large lot series 1 parts on ebay
A bunch of us retired folks could drive down there in our largest vehicle (truck? RV?) and swarm over that pile like ants, leaving it picked clean. What an analogy huh?
-
Some funny wobble in my steering... Input??
That guy behind the wheel is the most important part of the car. For a quick look I have have had someone wiggle the steering wheel back and forth while I lay under the front end looking for anything moving in some way it isn't supposed to.
-
Help: 280z hatch support hinges
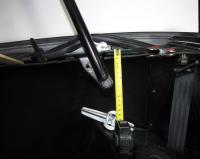
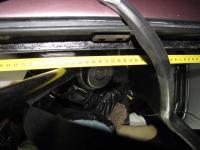
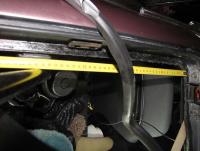
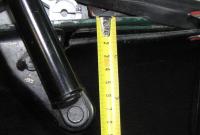
Here are pictures from a 240Z, don't know if holds true for 260 or 280Z. Distance from metal lip down (weather strip not installed yet): Close up of down measurement: 354 MM from metal hatch lip to front of rod mount (no weatherstrip there yet either): Measured from metal lip not weatherstrip at far right of picture:
-
What Are These Things Falling Out Of My Vent??
If the birds don't croak you are safe to munch away, sorta like the old canary in a coal mine routine. I swear I now remember seeing one of those in my car on the floor. No clue about what it might be.
-
Help finding 260z build date(the tag is gone)
This isn't as exact as you were looking for but the Z car registry at Z Car Registry - Online Spreadsheets - EditGrid appears to indicate it was made between 2-74 and 4-74 so from that it would be 2-74 or 3-74 or 4-74
-
Inspection Lid Clips - Reproductions??
May as well make another set of them, tried to buy them today and got the out of stock message.
-
brand new 240z dash under $1000
Imagine what the final price would have been if it had been perfect. I noticed that 72Z dash has a metal flat bar across that goes under the radio. The 71Z I used to have and the 70Z I have now have a plastic piece there. On both of my cars that plastic piece broke, I guess the metal bar is a better idea.
-
Wipers wont work
Hmmm I just realized I am in over my head here as the accessory relay only has a normally open contact the normally closed contact would not be used. Now I wonder if the ACC circuit is wired to the wrong wire on the ignition switch? Hope this helps, I am outta ideas.
-
Wipers wont work
I wonder if the wires on the accessory relay could be switched around so the normally open connection is now the normally closed? Also does the radio do the same thing, play when engine is off and not play when it is running since it is supposed to be on the accessory circuit?
-
Weld shut or bondo very small holes in body?
I forgot when I welded shut the larger 1 inch holes on the back hatch from a wing I took off I ground down the welds with a dremel which wanted to jump around and hit the paint. Had to replace the drive belt on that dremel. The smaller holes would make it more difficult to avoid the paint so I will try something else to fix the holes. Want to keep water out until I can paint the car. Right now the back hatch just has duct tape over the wing holes. Might be a candidate for a mention on the red green show, they like duct tape. Thanks for the compliment on the picture. I got lucky, just stuck the camera in the door and tried a couple of angles since I couldn't see the viewfinder. Typed in brazing in a search engine, ran across this thread on sealing up holes: Filling holes [Archive] - Classic Car Restoration Help Forum - Eastwood Shop Talk
-
Weld shut or bondo very small holes in body?
Good thoughts on the damp bath towel and the JB Weld. Will try welding first. Thanks for all the great ideas I couldn't have learned this much by searching on the web.
-
Weld shut or bondo very small holes in body?
Thanks for the video on soldering. I learned the welding paper that protects paint only works if the surface is vertical and the door in that area is somewhat horizontal so unless I want to take the door off I don't think I will try welding. If I were sure I was going to paint the car soon so I didn't have to worry about the paint I would try the welding. Might try the JB weld. Thanks to everyone for teaching me options. Mike
-
Weld shut or bondo very small holes in body?
hr369, Indenting the holes seems a good idea. I had forgotten the soldering option. Is scraping the metal clean and using acid core solder sufficient preparation for soldering? Do I need to back the hole with a steel washer or something while filling in the hole? Mike
-
Weld shut or bondo very small holes in body?
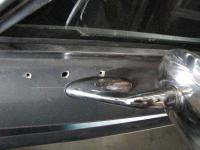
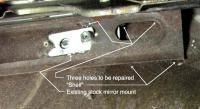
When I removed the aftermarket mirrors the PO installed on my car three holes were left on each side of the car when I put a stock mirror back on the drivers side. Two workers at a local paint and body shop gave me different advice on how to fix the holes, what I would call the hard way and the easy way. The hard way is to weld over the holes and the easy way is to put body repair tape on behind the holes and bondo over them. The last time I welded over much larger holes the weld splatter damaged nearby paint a bit though the body shop has welder's paper they say will protect the paint. I plan on putting just enough bondo in the holes with a dab of paint on them to hide them to keep water out, I will not be feathering the surrounding area for now. I may paint the car later just don't have time right now. My question is has anyone had experience with this they can share as to whether or not I can put tape behind the holes and have it work? I think Eastman sells a small hole repair kit but it looks like it is for larger holes. View looking straight up inside driver's door, the front of the car is to the right: Holes in Driver's door:
-
resetting odometer - any better ideas than with a drill?
That is a great idea though a minor change I would make would be that in addition to saving the girls they get to drive off into the sun with them.
-
Roadster featured on TV show El Rey's Garage
I noticed today the TV show El Rey's garage featured a red 1966 Datsun roadster. The show is on 3net which is DirecTV's 3D channel. I don't know if the show appears on other channels. They painted the car, fixed holes in the gas tank and sold it.
-
Splash Pan
If I ever get my hands on one I am going to document the dimensions and hole locations for possible duplication. I wonder if it cuts down on water getting in the engine compartment and helps reduce corrosion?
-
Some Z's laid to rest
I have been putting JY VINs in the z car online registry at Z Car Registry - Online Spreadsheets - EditGrid I hope Carl sees them there or maybe he started that registry I don't know the history behind it.
-
1970 240z uk project
I have thought of putting in extra drain holes in lower areas that tend to rust, anyone know if there is a way to put in a drain that stays open in in such a way that water can get out from the inside but cannot get in from the outside? Like a 90 degree hose or pipe that comes out of the hole somehow? Or maybe a rubber plug that looks something like the throttle boot at the firewall does but is not as long so it doesn't hang down to be visible?
-
Heater blower motor squeal stop
Thanks, making the background white took some time with the paintbrush program but I had seen that done on graphics elsewhere on the net and noticed it can provide clarity depending on the material being presented.
-
Glove box liner- make your own
You are welcome Mike.
-
clicking coming from center console on 72 240z
If I am interpreting this thread correctly my car also sometimes clicks. It is a steady rhythmic click about one or two clicks per second on my car and doesn't seem to be related to RPM or whether the car is moving. With the great ideas here I will be in a better position to analyze it if it does it again. I initially interpreted it as a thermal click but that made no sense to me. I thought it was coming from the starter area or passenger footwell area.
-
Rear frame rail interiors anti rust spray
Hi all, I sprayed all interior channels of the rear frame rails and interior of wheel wells of a 240Z with two cans of Transtar amber anti corrosion material using existing holes where possible. The front frame rails are more likely to rust but I had already sprayed the interior of the front rails on my car. A thread describing how I did the front frame rails is here: http://www.classiczcars.com/forums/body-paint-s30/40048-two-frame-rails-tc-rod-there-floor-between-them.html The Transtar amber anti corrosion material I used is described on another blog here: Hatch anti corrosion interior passageways - Blogs - Classic Zcar Club 240Z rear frame naming convention I used (is there some standard for this?): Preparation of the four crossmembers: 1. Front two crossmembers- I had to drill two 5/16" (or 8 mm) holes behind the seats on the floor, one behind each seat to access the two crossmembers right behind the seats (what I am calling front crossmembers). Right side -passenger side in U.S. shown -other side prepared in the same way: These two holes could have been made under the car to avoid having holes in the floor behind the seats. 2. Middle crossmember- I had to enlarge an existing slot at the bottom of one of the shock tower braces on the floor with a large screwdriver to allow access to the interior of what I am calling the middle crossmember. Only one slot needed bending to access most of this crossmember, that one slot can be bent back later if desired, I left it bent open for possible future sprayings since it won't show when I put the shock tower vinyl back down: I also enlarged a slot on the floor inside the tower braces on both sides of the car to gain access to a two inch long portion of the middle crossmember on both ends of it. The slot I used is closest to the back of the car inside the brace, see the two drawings immediately below for further clarification. This step possibly could have been skipped but I like to spray everything. These two enlarged slots will never be visible in the car. Total of two slots INSIDE the braces were enlarged, one slot on each side. >> 3. Rear crossmember- Removed rear plastic interior side panel finishers (not my car- thanks to whoever has this car): Spraying operation (tip- cover spray nozzle and top of can with a ziploc bag when spraying as wand tends to pop off can sometimes- prevents getting Transtar on your car or hand): 4. Front crossmember right side (both sides done the same way): Spraying inboard from access hole Spraying other direction, toward side of car 5. Middle crossmember: I sprayed the middle crossmember by inserting the wand into the slot I enlarged slightly with a screwdriver. See step 16 below for more info. I also sprayed inside the last two inches of this crossmember on both sides of the car by inserting the wand into an enlarged slot inside each tower brace. See step 2 above for more info. Top of picture is towards front of car. 6. Rear crossmember (spraying towards middle of car from both sides): Right side Left side 7. Frame rail right side (left frame rail was sprayed in the same way): Spraying forward from access hole Spraying toward back of car 8. This drawing shows drilled holes location, one of the slots that needed prying open a bit and access for rear crossmember. It does not show the tower brace slots inside the brace that I enlarged for that detail see last two drawings in step 2 above.: 9. Existing holes and "walls" in the rear frame (I used the front four existing holes for spraying both frame rails at the sides of the car, vinyl on shock tower was peeled back for access to middle holes): Preparation details: 10. For spraying the two front crossmembers behind seats on the floor I drilled a 5/16 inch hole (8 mm also would have worked) in line with an existing hole in frame rails and 40mm from the front edge of the existing frame rail hole. A 5/16" (or 8mm) hole is just large enough to allow the transtar wand with its 360 degree brass spray head to fit through. 11. I pried open the floor sheetmetal slot a bit at the shock tower brace bottom by twisting slightly with a large screwdriver to give access for spraying the center crossmember. I also pried open the floor sheet metal hidden inside the brace itself to access a two inch long closed off area on both ends of the middle crossmember. Although I did this someone else might want to skip it. 12. I removed the side finisher panels immediately in front of the tail light finisher panel to gain access to the rear most crossmember. 13. I peeled the vinyl up from the floor on the shock tower braces to allow access to an existing hole in the floor to spray the inside of the side frame rails. 14. I poked a hole in the bottom of a trash bag and taped the hole in the bag around the holes I would be spraying into to prevent getting spray on the interior of the car should a wand be pulled too far out of a hole while spraying is in progress. Notes: 15. The Transtar plastic spray wand can get kinked when spraying the side frame rails forward of the rear wheels. I actually broke an old wand practicing for the actual spraying and realized the frame rails that go forward and down from the shock towers make two turns, kinda tough on the stiff plastic wand. To minimize the chance of breaking a wand I inserted it gently until it met resistance at the second turn a few inches from the front crossmembers. I pulled the wand out and then inserted it into the existing hole behind the front crossmembers to spray the bottom part of the side rails just behind the seats. This existing hole is 40mm towards the back of the car from the two holes I drilled for the front crossmember. This bottom part of the side frame rails behind the seats is only about 4 inches long so after the wand goes in about 4 inches there will be felt resistance as it tries to turn up towards the shock tower. As soon as I felt that resistance I stopped inserting the wand as I had already done the portion of the frame rail the wand was trying to turn up into from the shock tower hole. 16. The center crossmember didn't want to let the wand go through the bent slot more than a few inches at first with the spray head on it so I used a wand with no spray head that used to come with the spray wand set from Transtar. The wand set I bought 26 Mar 2014 did not have a white third wand with no spray head however a brass spray head could have been cut off the 2nd wand that came with this recently purchased wand set and that headless wand used then. I used the old headless wand I had from the earlier wand kit purchase. I finally did get the wand with the 360 degree brass head to insert the full length of this middle crossmember, I just had to gently keep trying by trying different entry angles and by gently twisting the wand back and forth. Didn't want to kink the wand with brute force. 17. There is a blockage in the rear most crossmember in the middle that is maybe 6 inches long. To get around that I used a headless wand as that is skinny enough to go through the blockage and followed up with a wand with the brass 360 degree head on both side inserting it gently as far as it would go. The 360 degree head has a spray that sprays forward as well as spray towards the sides so the coverage is more than 360 degrees. 18. I made a mess, this project is a great job for the street as the Z frame has many joints for the Transtar spray to flow out of before it becomes waxy non moving anti corrosion material. ******************************************** While I was at it department - (sung to the tune of that old Beatle's song "I should have known better"): I also sprayed the interior of the wheel wells since they tend to rust and were accessible with the finisher panels out. After that since I had some Cosmoline handy I painted with a brush all metal I could reach including hidden areas not covered with transtar material. The Cosmoline I have is fairly thick and would not have flowed into the seam the way the freely flowing Transtar material did so I used the Transtar material first on the seam followed up by Cosmoline painted everywhere behind the finisher panel. If I had had no Cosmoline handy I could have dipped a brush into the Transtar spray by spraying the transtar on the bottom of the wheel well first. Left side of car wheel well. Right side done the same way.
-
Making a modern power antenna work in an S30
This is a very old thread but the diode idea also works for a radio shack power antenna model 12-1330A. I pulled the interior panel over the antenna off today and a PO had put in that model of radio shack power antenna. The PO had never connected the power up/down leads to the antenna. With the diode the antenna works fine.
-
Dash help
Remembering from when I took the dash out of my parts car there are two screws, both at the very bottom of the dash, one on each side of the dash a few inches from each side of the car. The screw points up. Might need a mirror to see it.


