Mikes Z car
Free Member
-
Joined
-
Last visited
Everything posted by Mikes Z car
-
 I agree, Sketchup would allow more to make use of a drawing of an SU carb. It would be easier to make a Sketchup drawing of an SU carb if one had a spare carb to make measurements off of. I experimented with importing higher resolution pictures into SU. I think I read that if the pictures get large in size it impacts performance.
 -
Me too, I don't like to even see them like that. At least this one has a partial roof over it. The back part might be getting a little rain but the rear hatch area is easier to fix I think? I will send that guy a car cover anonymously with instructions it is to be used only on a nearby Z.
-
Thank you for sharing. I think it would be really neat to have a sketchup drawing of the Z carbs. I have a dream of grandeur where the drawing could be animated to show normal operation and faults with solutions. Sigh, my imagination for use of SU is better than my skill level I think. I imagine your floor plan idea will work. We have SU pro at work. I notice from using the pro version that it has a built in access to a 3D warehouse with a search function. We wanted to draw a bathroom remodel for a project and I found an existing bathroom I could use and modified it. I had to "explode" the download before I could edit it and accidentally discovered how grouping can have subgroups that can be further exploded for further editing. Once the whole bathroom was exploded the sink and other fixtures could then be exploded. Get me to talking about drawings and we will be here all day. heh heh.
-
Hi Stanley, The free Sketchup will import pictures by selecting file, then import. The only thing I know for sure that the pro version will do that the free one won't is it will save the drawing into an Autocad compatible .DXF format. I must be honest here, getting those two pictures to line up 90 degrees with each other and be the right size was a bear for me. If you just want to import a picture and draw on it that much is easy (and fun!). What I do is draw a couple of right angle lines that come together where I want a corner of the picture to be such as the lower left then I import the picture and click on the corner where those two lines converge. Move the mouse away from the corner and click when you have the size you want. Google has videos available that teach various aspects and their technique is likely better than mine, I have watched a couple of them. How do you use Sketchup? Mike
-
I never met EScanlon but grew to admire him from his posts.
-
I personally enjoy details like this, thanks for posting. I was speculating that the 280 ash tray is not as deep because smoking was declining by then? Kidding.
-
Updated 30 Mar 2014: Screenshots: Rotating view (click to zoom in): Front frame rails: Rear frame rails looking towards front of car: Sketchup drawing for download: 240Z frame rails whole car 20 Mar 2014.skp.zip Sketchup drawing viewer can be downloaded here: Download | SketchUp Revision history: 2013 Dec- Updated drawing includes holes I noticed in the frame behind the seats. (Holes are now in correct location if you happened to have viewed this drawing the first couple of weeks in November) There are a total of four holes added to this drawing from the original, two behind each seat. They are in the same location on the floor on a 1/1970 car and on a 1/1972 car where I have seen them. The two holes behind the drivers side seat are in line with each other vertically so that with the plugs out you can look straight down from inside the car and see the street. Same situation for passenger side, trying for clarity here. The holes are 20 mm in diameter. The holes are in the middle of the frame rail that heads back and up towards the floor beside the shock towers. 2014 March 30- Updated drawing to correct the diameter of rear frame holes next to spare tire just forward of the tail lights. Also the rear crossmember in front of the rear bumper is now shown correctly as being open on both ends, before it was shown as closed off. The attached sketchup drawing is done to scale and includes the front and rear frame for a 240Z. Can be viewed with the free program sketchup, download from Google (Mac or PC, can work with Linux). Can be zoomed in and viewed from any angle. The drawing was made from measurements from my own car and from the chassis dimension drawings to maximize accuracy. Can be converted to Autocad readable .DXF with Sketchup pro for importing into Autocad. May need an older version of Sketchup pro to make the resulting .DXF work with an earlier version of Autocad. I found it interesting that the inside frame rail to frame rail measurement on the rear frame rails where the spare tire well is on my car measured about 10 MM further apart than on the chassis dimension drawing. The manufacturer must have made a slight change there unless whoever made the chassis drawings was off a bit in that area. I made my sketchup drawing agree with the dimension on my car. Drawing does not show narrowed section on both front rails located about 5 inches behind the radiator support. I could not accurately define that narrowing with the tools I have so I left that off for now. Litecoin QR code for donation:
-
Is getting the spindle pin out easier on a rust free car?
-
Thanks Mike, Hope I can think of some other ideas.
-
I can't get to that link from here, maybe it is similar to this, Harbor Freight I noticed last week is selling a $179 borescope camera 8MM in DIA with recording, don't know if it is a good one. I'd love to hear about results you get. Don't know why I get excited about looking inside hollow areas for anti corrosion work but I do. I would think the spray mist might float around and get on the lens, might want to cover it with clear plastic of some kind if you try that? Or try a before and after recording? Please post the fun you have with that camera if you can and want to. I remember FastWoman talking about cosmoline anti corrosion grease in an old thread, I believe favored by the military around WWII for metal protection. Something by that name is sold on eBay in a spray can, don't know if it is the same material. It is expensive to my taste, I have thought of spraying it just in the areas on the Z that have the most rust that I haven't already sprayed with the transtar amber material (a waxy sticky stuff that flows freely when applied and never seems to dry after it gets waxy and sticky).
-
You are welcome EuroDat. I'd love to make an animation of spraying the inside of the frame, front and back. Still have more to learn though about accessing the back frame rails.
-
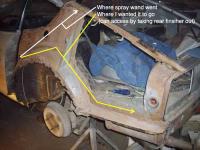
Here is an old thread on spraying inside the front frame rails, the dogleg and the front half of the rear wheel wells from the inside the car. http://www.classiczcars.com/forums/body-paint-s30/40048-two-frame-rails-tc-rod-there-floor-between-them.html There may be others, this one I remember because I posted to it. The Transtar wand I used in that post is stiff and when I removed the finisher behind the driver's seat and sprayed back towards the rear wheel as described in that thread I found out later that the wand went up towards the roof but likely still did some good for the wheel well. With further removal of inside finishers I will be able to do further spraying with Transtar amber to get areas I missed before. See picture, I apologize to whoever has this car I can't give credit as I don't have a name saved with it. I had hoped the wand was going to go over the wheel well arch as pictured here but to do that additional finishers need to be removed I believe. I will get to that area over the wheel well later with more spray. Hope this is useful.
-
EuroDat, Thanks for the idea of using a lever to pry on the suspension to move the bushings. Good article on spindle pins, thanks for the link, looks like Blue's car. Replacing all bushings seems like a great idea, a sure fix for any problems instead of guessing. Wade, I do know someone here who races Z cars, he may know how my car is supposed to handle. Thanks, I hadn't thought of toe in or loose wheel bearing nuts causing twitching. Those things I can check myself too. Tires don't look worn at a glance though I will take a closer look at them. I will start collecting replacement bushings. Sigh, I was hoping for an easy fix, there isn't one. I was hoping to avoid the spindle pin hall of fame scenario.
-
Right after I bought my current 1970 240Z in 2008 I noticed when driving it that it would twitch left and right slightly seemingly randomly and I could not feel any of that in the steering wheel indicating to me the problem was coming from bad rubber suspension bushings. My previous 240Z, a 1971 model I had 30 years ago did not do that. I considered putting a video camera under the car aimed at the suspension to see where a bushing might be flexing but couldn't figure out good placement for the camera. Maybe a magnet mount would have worked. I had noticed the T/C rubber bushings were very cracked so I replaced them and the handling returned to normal with no twitchiness. I have noticed threads regarding replacing the LCA and spindle rubber bushings. My two related questions are: 1. Is there any way to tell which rubber bushing needs to be replaced if there is a handling issue? 2. How do I know I have a bad bushing if the car is handling okay (if there is an answer for this question)? My car is handling fine now but I have been wondering about the spindle pin and LCA bushings since others are going to a great deal of effort to replace them.
-
Hopefully someone else can make use of the info, I had fun making that lens. That empty nutrition tube someone at work gave me sat around here for a couple of months before I noticed it might be good for something.
-
Thanks for taking the time to capture and upload the video. I gained some insights into using Autocad from your work, I think you said you were using Autocad but there was discussion of another program too. If too many people see your skills with Autocad someone is going to offer you a job if you don't already have one and maybe if you do have one!
-
You can view the page at http://www.classiczcars.com/forums/content.php?r=196-Engine-bay-light-lens-make-your-own-replacement
-
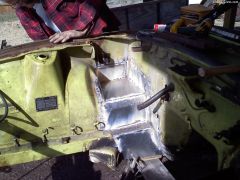
Mine was replaced due to fuel overflowing out of both carbs plus I was having a hard time starting the car, I imagine due to flooding. The overflow was not just a drip or two it was a constant flow, scared the heck out of me with visions of an engine fire. Replacing it stopped the overflowing.
-
-
Kuro, Thanks for posting the link. 4:48 into the 5th part the late Carolyn Dudley talks about her enthusiasm for the first Z she saw. She was president of ZONC (Z Owners of Northern California) back in the mid 80s and I really enjoyed her enthusiasm for the car. I was in ZONC back then. It was nice getting to see the history of the Z and Carolyn as well. Mike
-
Well I bought the 1971 240Z in 1976. There were no signs of changes/upgrades that I recognized. I hadn't thought of the possibility of an r200, back then didn't know they existed.
-
On the 8/71 240Z (HLS 038??) I used to have the diffy was in the later further back position. Why I remember that small detail on a car I last saw 27 years ago in Sacramento I don't know other than the fact that I really liked that car, my all time favorite along with the 70 I have now..
-
Hi bstrudg, What kind of car do you have? By order you mean you would like to have a picture marked with which line is the gas feed line, the gas return line, the brake line etc.?
-
Thank you for the correction. Had two windows open, one right other wrong, Murphy's law.
-
ksbeta, Thanks! In looking at the 3 can spray spray option I stumbled across another that is a single can that Eastman Chemical Company - The results of insight? sells, on the reviews, some liked it some not: (I don't work for Eastman nor do I know anyone who works there etc) Silver Cad Aerosol 12 oz Item #10022 Z In Stock - Ready to Ship Today Only $14.99 Buy 3 or more for $14.49 each and save 4% Spray-on the realistic look of silver cadmium plating It's not plain old silver paint...Silver Cad Aerosol faithfully replicates the special bluish-silver tint of the original cadmium plating used on many engine and transmission parts. •Restore underhood and under-car components •Acrylic lacquer •Withstands up to 250 degreesF •Can covers about 6 sq. ft.