Mikes Z car
Free Member
-
Joined
-
Last visited
Everything posted by Mikes Z car
-
 I replaced the synchros and bearings in the 4 spd I had in my first 240z but I am no mechanic and knew that then so I took everything apart very carefully and laid it on newspaper in the same order it came apart. I also took a lot of pictures every step of the way as I wasn't sure I trusted myself to remember how everything fit. It worked fine after that with no spun bearing noise like it had before.
 -
I somtimes take things apart in a plastic bag to keep springs from taking off to undisclosed locations. Also the shower can work if I close the door and put something over the drain.
-
Hard to believe a few minutes after the picture was taken you roared off the driveway into the street with that car...
-
I think Radio Shack used to sell dial string. I have restrung a few old radios as well.
-
FastWoman, That is a terrific idea of moving the shunt. It might be okay with the same shunt if I remember that in a worst case scenario with a dead battery it might peg showing over 40A for a while until it charges a little at least I assume that is worst case. Capturing all loads through the ammeter would mean I would have to relocate the power wire for the parking light relay mod to the starter post. I will have to ponder on doing that. Not sure I want to go with LEDs at least yet anyway. Mike
-
I wonder if ethanol needing a richer mixture could have an effect? This site has prominent headache making info for me anyway: http://members.rennlist.com/pbanders/ecu.htm#TL If ECUs tend to blow the power output devices this mod could greatly prolong their life I would think.
-
Thanks FastWoman, Appreciate the details on making the large alternator connector and on rewrapping the wire harness, I wondered what might be used. Sure would like to keep my ammeter working as for some reason it appeals to me as a means of knowing what is going on. Would have to run heavy gauge to and from it to the starter post.... Not sure that extra run is worth the trouble. Some use voltmeter readouts to avoid that. Ammeters use a shunt or near short circuit across them, I assume the shunt for the 240Z would be right across the ammeter connectors, does anyone know? Rambling a bit here. I want to do the turn signal/brake relay mod but radio shack doesn't sell the cat no 702012 triple pole relay any more but I found them at Digi key: http://search.digikey.com/scripts/DkSearch/dksus.dll?Cat=1049447&k=702012 Mike
-
I was hoping to avoid putting in another wire for the Alt to battery circuit but logic dictates otherwise, thanks FastWoman.
-
I have wondered about cars with a 40A to 60A Alternator upgrade with the stock link (or what I have a 60A Alt with a 40A fuse), if a dead battery would maximize current flow blowing the link VIA a 60A charge current since the link is between the battery and the Alternator?
-
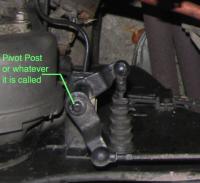
My 71 did the sudden takeoff off from idle. I had cleaned the linkage and didn't get improvement not that that would never work I imagine. In later years I wondered if the throttle butterflies had dragged on the inside, on the side of the carb but that car was only 5 years old back then and I wouldn't think it would have done that at that mileage point. My current 70 240Z doesn't seem to do that for some reason and the linkage is still in the stock configuration as per Ron's posted link to a solution involving a modification. One thing I didn't do on my old car (as opposed to my "new" 40 year old car heh heh) is to take the "pivoting post" off and lube it. Good job on your video Mark as it clarifies for me anyway the stuck aspect since you disconnected the gas pedal side of the linkage and show what happens with the engine running and you open the throttle by hand. Mike
-
Update: Just got a call from John at http://www.frostfighter.com/. He said they are working on new technology that will give them about 100 different grid sizes. He didn't say this but this will make it much more likely they will have one that will work for the Z. He said they keep getting calls on this as to when this new technology will be available and he said his engineers keep telling him soon but no date is given. He says to keep checking their website. He mentioned a cost of $57. Mike
-
FastWoman, Thanks for the info on ethanol. I have thought of putting a "T" in the rubber gas line that runs between the carb floats on a 240Z and the bottom of the carbs, keeping it capped and tied off in an up position for normal operation and when it sits over winter dropping it down and uncapping it to drain out the ethanol. I have heard of putting a little oil in the gas tank to cut down corrosion I wonder if that would help with corrosion from ethanol? Mike.
-
If that were my car I would temporarily replace the harness ground on the ground connection side of the sending unit maybe with a wire with alligator clips on both ends. Or put the temp ground on the non ground harness wire that goes to the sending unit and drive around and see if the gauge readout is stable. I would be interpreting your experience as an intermittent connection though I could be wrong.
-
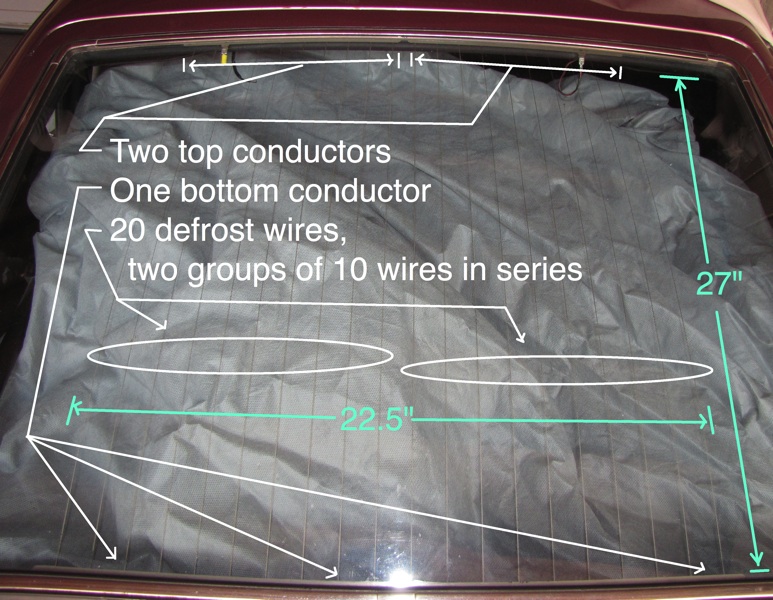
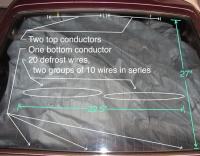
Hi all, As information I want to replace the over cleaned and thereby worn off defrost grid on my back hatch but don't want to put in new glass to fix the grid due to expense. Examination of the grid with aluminum foil as a probe and an ohmmeter (I also used a wire tracer) revealed far more damage than could be repaired using the permatex bottle of conductive repair paint. I wrote to customer service at www.frostfighter.com who make replacement defrost grid kits and they told me this: my strong suggestion is to wait until we release our new grid sizes. Check the website as this is where these new sizes will show up first. I have no ETA from engineering other than "soon". When I wrote to them I asked this: My 240Z back grid is 22.5" X 27" as shown on the attached drawing and won't work with your $33.95 defrost grid repair kit number 2616 with 16 grid wires because your kit is too wide. However what if I got your kit 2616 and used it in a different way than intended by turning it 90 degrees to run top to bottom instead of side to side? This would run the grid top to bottom as my original grid is but I would cut the top conductor in half and run 8 grids from each top conductor to the bottom conductor with the bottom conductor being kept intact. That would give the total length of each grid line to be 54" well within the 40" to 61.5" width limit you list on your website for the 2616 kit. I assume the width limit you list is to keep the current level within acceptable limits for each grid wire. I realize one of the top conductors would have no connection tab as I would have cut an original conductor with one tab in half. A new connection tab could be made by cutting out a tab on one end of the top conductor that has none or by narrowing one end to work like a tab. A slit would be put in the grid conductor cover for the newly made connection tab to stick through. I am wondering if it is possible to solder the conductors to the grid wires to make the connection more secure. FWIW Mike
-
FastWoman, A7dz, Thanks for the shelf fill in idea. I just went out and put a marble on various places on the hatch shelf as my car is parked on a flat concrete floor and on some areas it rolls to show water runoff toward the back of the car but in the middle there are areas the marble indicates the water would run toward the front of the hatch shelf and thereby into the car.
-
I had an 85 300ZX with digital dash and the main part of the gauges went out and the replacement new cost was $800 if memory serves either that or that is what I paid at the salvage yard. I decided I didn't want expensive items on a car after that. The gauges were rather novel though and I enjoyed that part of the car. I like computer graphical things.
-
For a long term situation I thought of putting toothpicks in the carb tops where that plunger is so the carb piston can't rise up.
-
Good idea on the closed grommets. By coincidence I noticed closed grommets in Shuck's (now Oreilly's) auto supply the other day, most wouldn't need the 2" diameter that I do though I did see smaller ones there. Going under the scuff plate would work, maybe less spray risk in the car going that way, easier access too. At the time I already had the rocker panel side flaps pulled up for other work. Not sure anyone would have a use for it but when I get further along with the 3D sketchup drawing of the frame rail I will put it on my blog. I understand sketchup drawings can be pulled into Autocad as a 3D wireframe drawing. I have been working on and off on that drawing for a year.
-
I am curious about how many miles are on your car as my compression tests out similar to yours and I am wondering how many miles might be on my engine. Thanks, Mike
-
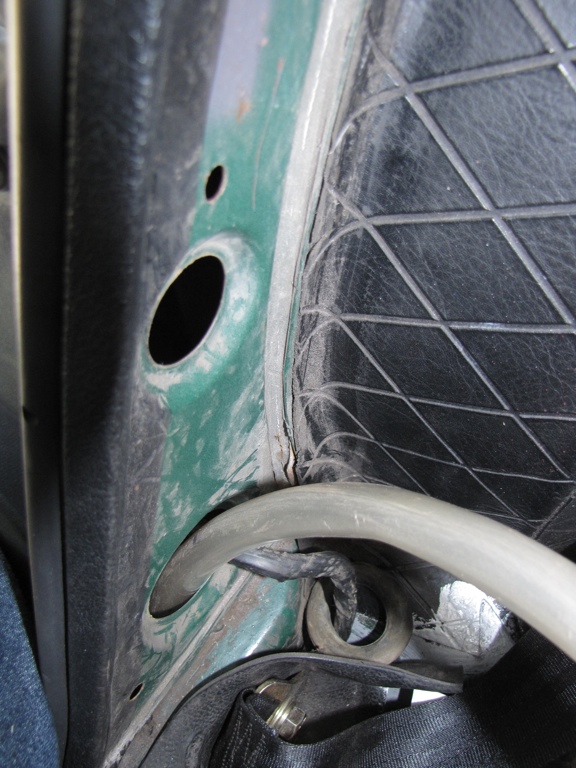
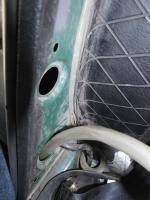
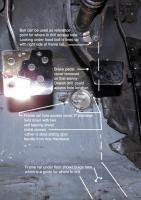
Thanks Joe and c240z, Joe, You are very welcome. c240z, I don't have all the tar off yet, I wish. That shiny stuff is just paint. I got the tar off the hard way, I chiseled it off with a putty knife but there are other posts if you use the search function that will reveal better techniques than the one I used. From memory one way is to use dry ice or just wait until January then hit with a hammer and the other way is to use a heat gun. I might mention that I used trash bags today to protect the interior of the car from spray as I used the holes on the inside of the car in the floor to access the engine frame rail. I put a bigger hole in the bottom of the bag than the floor holes and taped the bag up to the edge of the hole so when I pulled the spray wand out too far while it was still spraying I didn't get anything on the interior of the car. I taped the bags up and out from the hole on all sides. In the same way I put trash bags around those three holes on the side of the car normally covered by that finisher right behind the seats (and put the bags over the seats) so I could spray in down low in the dogleg. I also got the rocker panels though I want to evaluate somehow whether I got both sides of that "welding plate" that is inside the rocker panels that may have blocked off some of my spray. The bags helped a lot. I also pushed the wand back and over the rear wheel well from that highest of the three holes behind the seats but I don't know how much good I did with that. Also I put a clear trash bag over the spray can and tubing (my hand stayed outside of the clear bag) to keep the spray contained when the tubing would pop off the can. The clear bag helped me put the tubing back on the can. That bag helped a lot to keep that stuff off my hands and me. It is sticky. I have used most of 3 cans of that amber anti corrosion material so far. Mike
-
I got my first Z at Loring AFB. That is why it was so rusty. Nice car though and a favorite along with the 240 I have now.
-
Wally, Aha! I also have an early 1970 240 and haven't got to pulling off that coating material on the back floor yet but I would say those holes are a great place to squirt anti corrosion material into. On newer cars I believe under there is where the tire tools go and there are doors there for access. Hmmm. It would be under the carpet and not visible, I might put doors there. Thanks for the picture. Mike
-
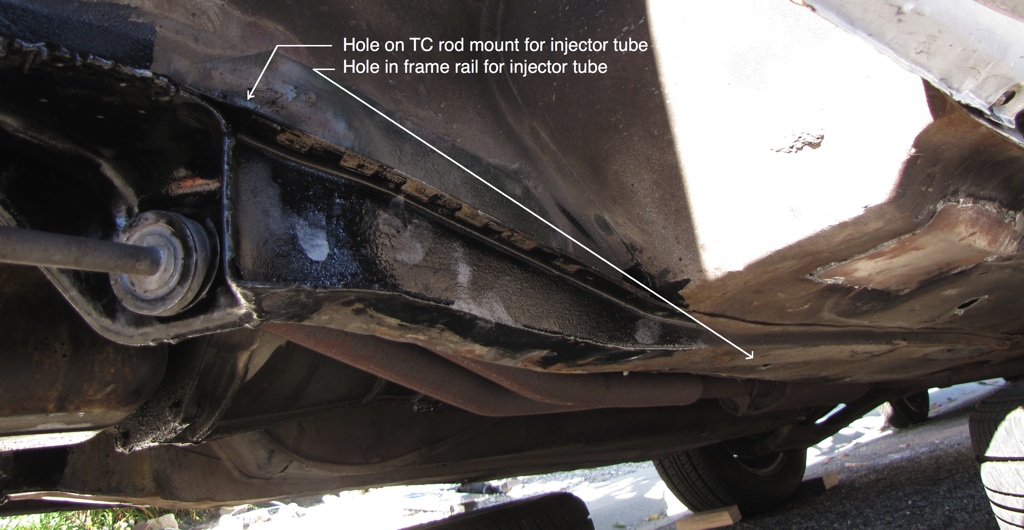
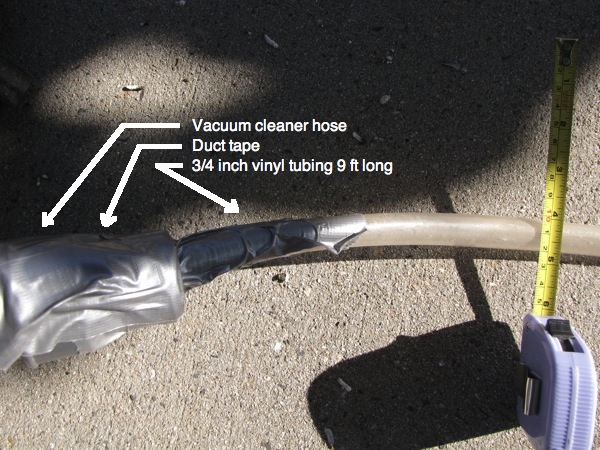
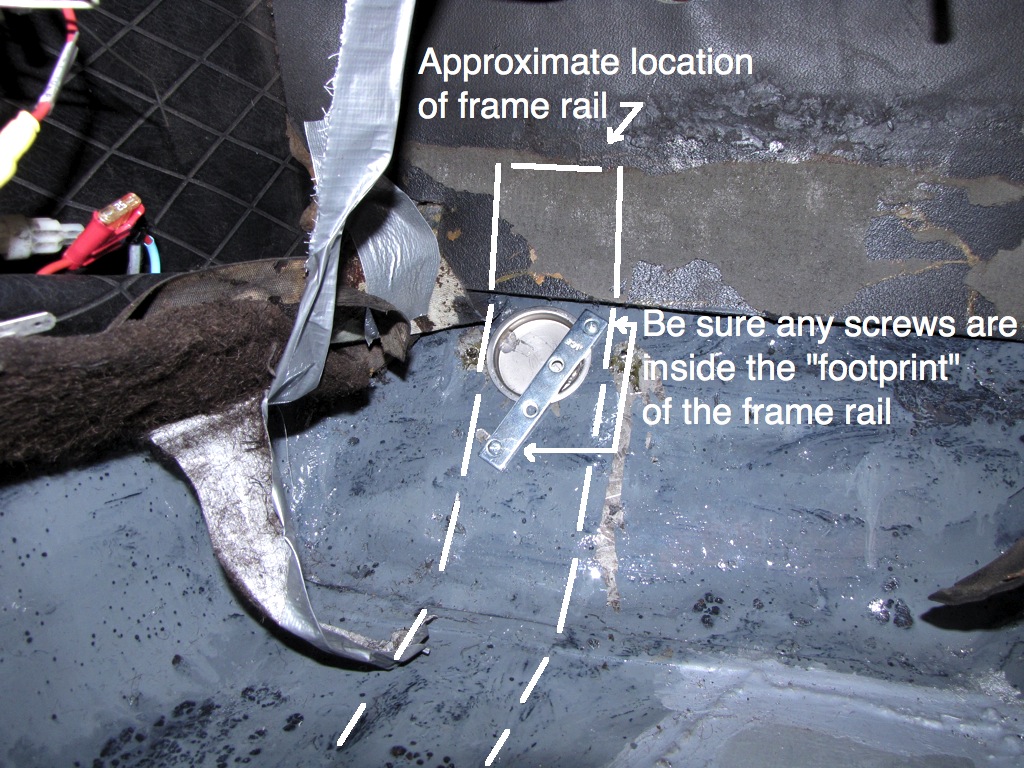
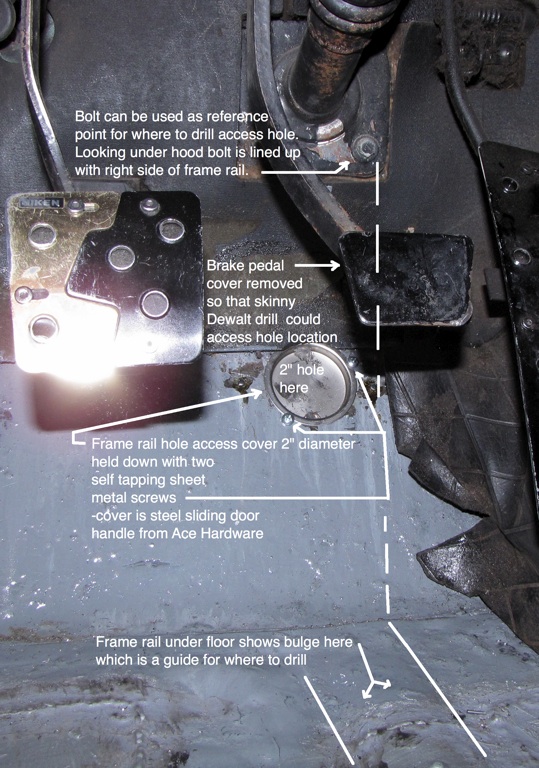
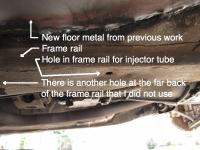
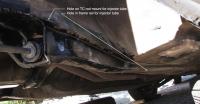
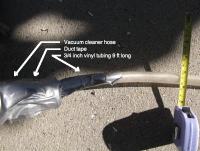
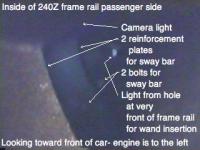
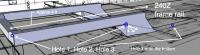
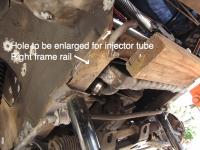
Here are the rest of the pictures I took. In case it matters to someone I made the 2" holes by drilling a pilot 1/4" hole and then used a stiff wire bent at a 90 degree angle to rotate back and forth in the hole to tell where I was as far as getting centered on the frame rail. I repeated that with a second hole if necessary. As a part of this for future spraying I vacuumed out the bottom of the dogleg with a piece of 3/4 inch tubing taped to a vacuum cleaner. I was amazed at how much dirt had gotten in there. I picked up the vinyl tubing an inch or so and pushed it back into the hole at various angles to maximize the surface I was able to make contact with and clean. The pictures of inside the frame rail show a couple of curved reinforcement plates about 2 ft forward of the passenger firewall near the crossmember. It is good to be gentle with the Transtar tubing in case you run into one of those obstructions. Another idea is to gently twist the tubing as it goes in since the tubing has a slight curve to it as this greatly assists getting the tubing past any blockages inside the frame rail. I took off work for two weeks and spent time working on the Z. I probably won't get too much else done this year as the weather is about to get too cold. Mike

-
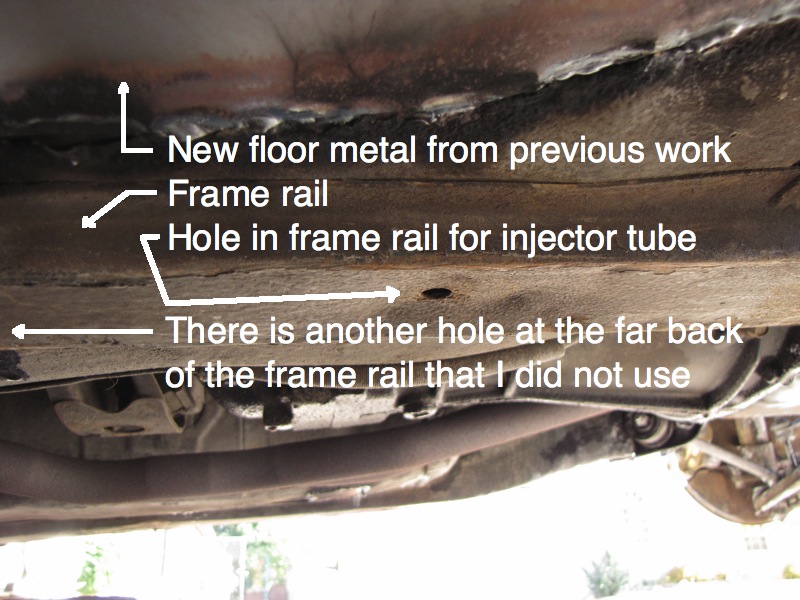
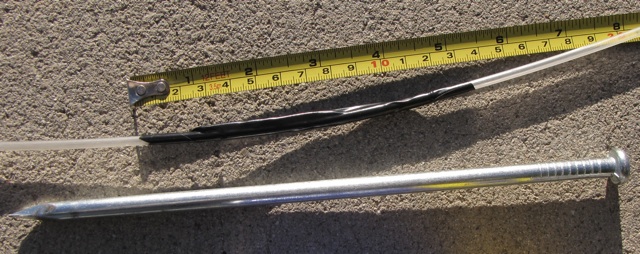
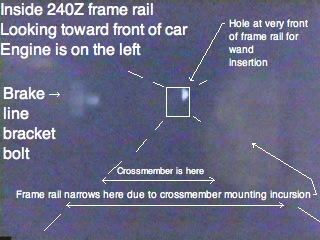
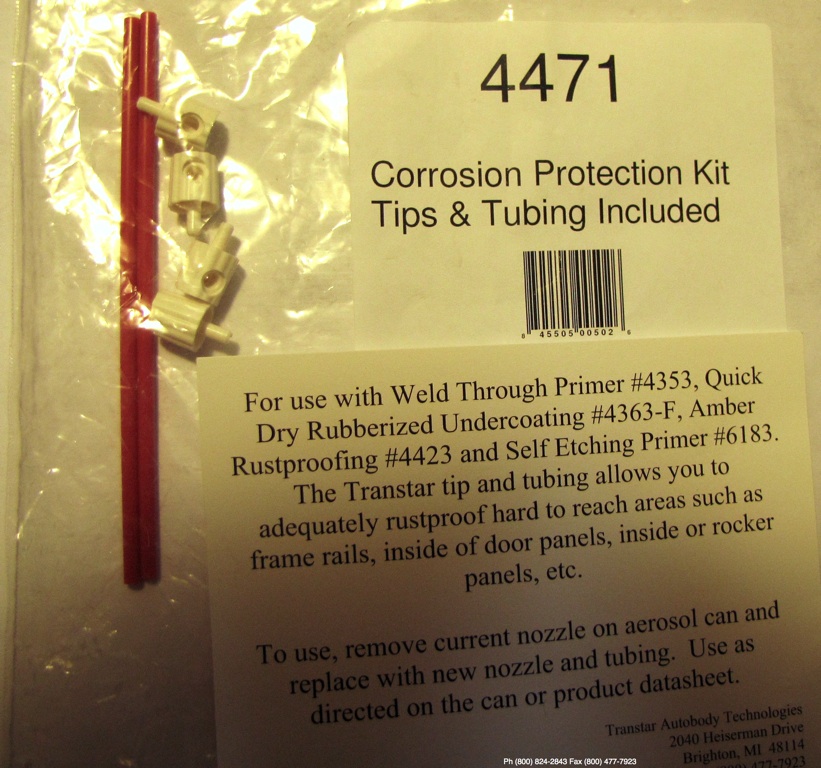
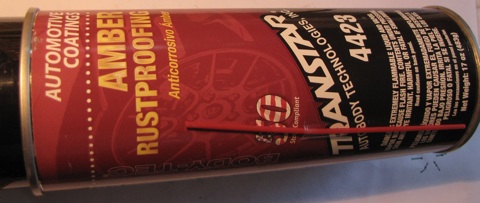
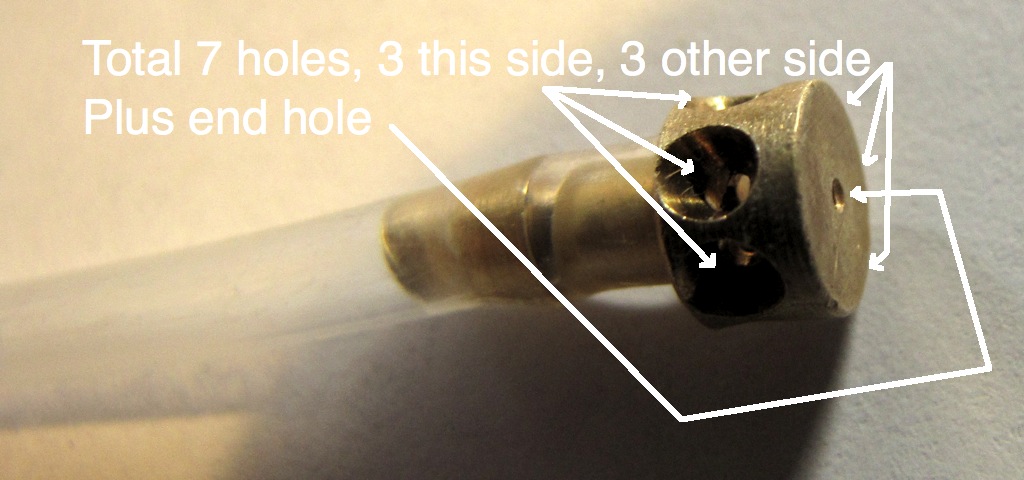
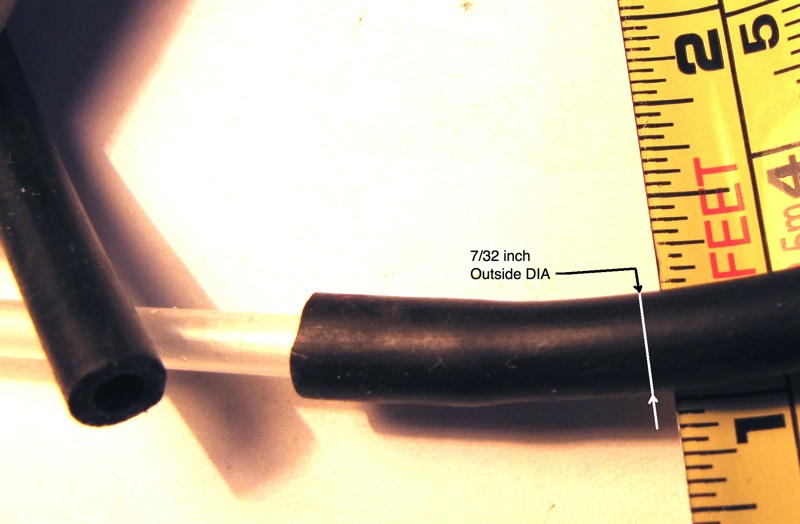
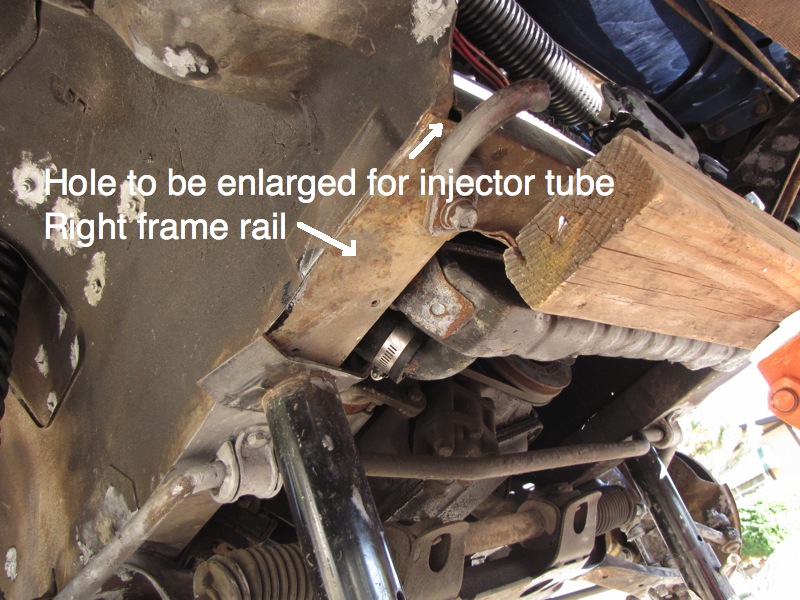
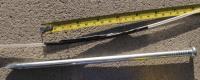
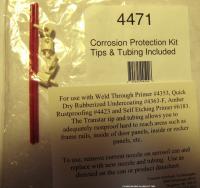
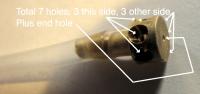
Joe, This may be more info than you wanted and I will apologize for that however the info may provide possible data points to further the idea of coating the interior of the frame rails. The wand I am using comes in Transtar kit number 4471, made by Transtar Autobody Technologies 2040 Heiserman Dr Brighton, MI 48114 Ph (800) 824-2843, Fax (800) 477 7923 I got my wand at a local auto paint store for $25 (I thought that was a lot for a wand). Please see attached pictures for more info, either this post or a next one as I will exceed the 10 file attach limit. Usual disclaimers apply, I don't own any stock in Transtar, don't know anyone at Transtar etc. The wand in that kit I am using is three feet long and comes with two wands with a spray nozzle and a third wand with no nozzle possibly to be used as an extension. The wand fits Transtar amber #4423 spray cans but may fit other cans. With the Spray I am using the wands are reusable apparently as long as I soak them in hot soapy water afterwards. The spray is Transtar 4423 ($13 a can here) which is what the body shop that did my floor pan welding recommended though I have no other info to suggest it might be good. It had a low viscosity when I applied it, sprayed as a fine mist and freely overflowed out of any available hole. A week afterwards it has a waxy consistency where I checked the overflow from my car as it got on the street. I hole sawed large 2" diameter holes in the floor pans in the middle of the frame rail which is larger I would think than anyone would normally need. This was to access the engine frame rail near the firewall that I could not reach with the 3 ft wand from hole #1 (see frame rail location of 3 holes I used on attached drawing) in the frame rail at the front of the car by the radiator support. There are other (bolt) holes my drawing doesn't show however the Transtar tubing is stiff and pretty much needs a fairly straight run as it is inserted without turning too much. The 2" holes were also because I wanted to look inside the frame rails with a cheap boresight camera I made from a $29 pinhole camera I got off of eBay which needed a 2" hole. Whatever is just big enough for the wand you want to use I imagine would work great. I had to slightly enlarge hole #1 in front for the wand nozzle to fit through by driving a handy nail that I found that is 9 inches long (what a monster) into the hole. A tricky aspect of using the Transtar spray is that considerable pressure builds up in the wand which has a tendency to cause it to pop off of the can if you slightly snag something as you pull the wand out while spraying. When this happens it takes a moment for the spray to stop as the pressure in the wand is relieved on your hand. I plan on using this spray on the interior of the frame rails through the floor pan holes I made but think I may cover the can and the end of the wand with a trash bag and/or cover the interior of the car to keep spray out of there. It may be possible to extend the wand to 6 ft long by joining the 3 ft extension tube that has no nozzle to a wand that does. I tried this using heat shrink and tape to join two 3 ft sections but the pressure in the tubing was too much and the joint leaked. Someone gave me some 7/32 rubber tubing to try that fits tightly on the tubing to join two 3ft sections but I would think that joint would have to be taped well to prevent it from blowing apart during use. Mike 01_Transtar_spray_can.txt


-
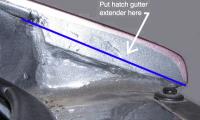
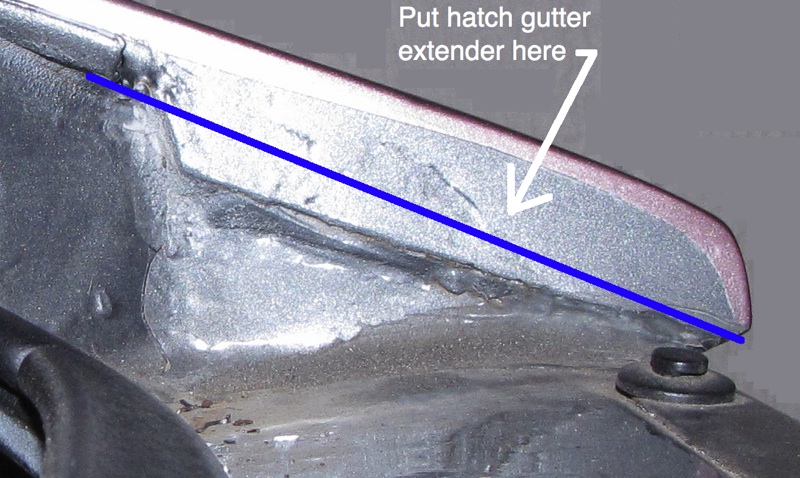
I have been wondering if there is an easy way to keep water off of that flat area under the back hatch. The idea hopefully would be to find a ready made item that could be modified to make an "extended gutter" that would divert water coming down the hatch gutter on the lip of the hatch opening on the sides to prevent it from being dumped on the flat area in back so that it continues on and gets dumped outside the car. I won't mention how long I have been trying to figure this out (a year?). If anyone has any ideas at all on this I would like to see them. See attached pictures for what I was thinking though there may be better ideas. The drawing is an end view of an extended gutter that would be siliconed I guess to just above the flat area on the sides from just under the existing gutter to just beyond the flat area. Mike