Persimmon240
Free Member
-
Joined
-
Last visited
Everything posted by Persimmon240
-
 Oh look, my first customer - and I don't even have to incur shipping charges! Time to turbocharge the 'ol Singer...
 -
Holy smokes $200! There is a set of used straps on eBay (including the hardware) for $14 that are just begging for a refresh. I think I have found an alternative to winning the lottery...
-
Yes, I too would be interested in seeing the impeller blades. Here is where I go out on a bit of a limb (pier?) and say that the factory pumps has cast iron impeller blades whereas a lot of the cheaper aftermarket pumps had pressed steel ones. The cast iron types result in less cavitation than the pressed steel ones at higher RPM's - he said... I can't tell you the last time I used the word "cavitation" in a sentence! Any liquid dynamics PHd's care to pour over their notes?
-
Captain, Interesting, so the later cars had the same size straps (as the late Series I) but ~1/2" larger slots in the mounting hardware. I'm beginning to feel a Noble (or is that NoBull?) Piece Prize coming on here!!
-
Mike, Cripes, it looks like we are going to have to start a "how wide are the slots in your parcel strap mounting hardware" thread. Perhaps yet another subtle but significant change in the 240Z lineage. I have a late Series I model, what about you? Anyone else care to chime in on this question? Perhaps a poll is appropriate asking "How wide are your straps?" broken down by date of manufacture. Maybe there are some sexy strapless numbers out there? Now where is that tongue-in-cheek icon when you need it...?
-
Mike, Well I must have a really rare "edition" of parcel straps as the (believed to be stock) ones I worked on from my car had darn close to 1 1/2" straps and the slots in the mounting hardware were almost 1" wide. I believe the correct expression for fitting 1 1/2" of material into a 1" opening is called, to use a sewing term, "gathering". Just an addendum... the pack strap material I used is very thin - just like the stock parcel strap material. Not sure, but the automotive type store might be selling tie down, tow strap or even seat belt material. It's waaay too thick for this application. You might try a sewing, crafts or on-line store instead. Can't help with the Japanese cotton thread either.
-
Bryan, I suppose I should advise the purists to look away from their screens now. This is what I did...source some 1 1/2" black backpack strap material from an outdoor place (Maybe REI in the U.S. or MEC in Canada). I also purchased a small tin of Tremclad Aluminum paint (spray or brush). Take pictures of the originals and then cut the adjustment and attachment hardware off. Refinish the hardware (6 pieces plus 8 screws). Take your pack strap material and mounting hardware into a shoe repair shop along with the original strapping and have them sew the mounting hardware on using the stitching pattern from the originals. Bring 'em home and slide on your length adjusting hardware and reattach. Unfortunately my car is a couple of thousand miles away from me or I would send pictures too. Hope this helps. Don't tell the judges at the concours!!
-
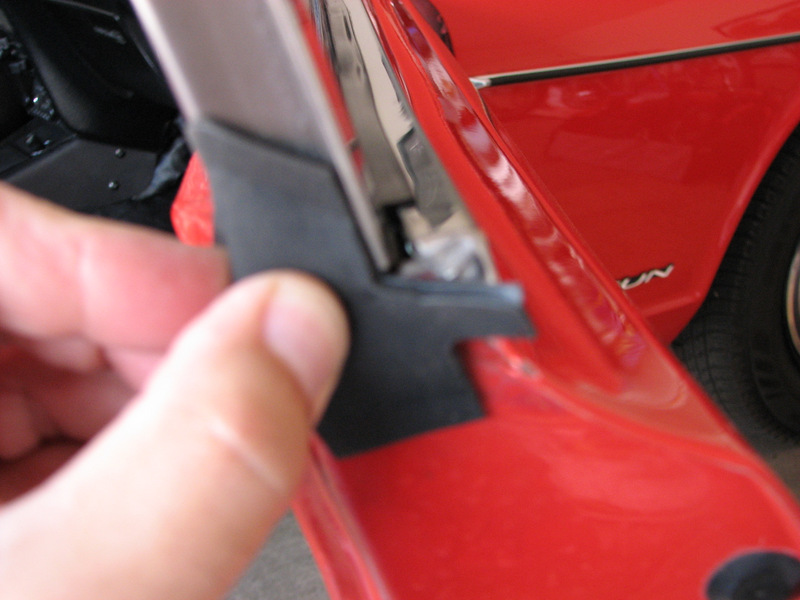
Matt, Hope this attempt works. The seal goes partially on the door frame and partially on the window frame. The pointy part faces up and the point wraps around two sides of the window frame. There are two tabs on the rubber - one goes under the door panel and the other goes under the chrome trim that has the window wiper in it. The picture is of me test fitting mine - hence the digits in the way

-
Pull the glove box light out of it's socket first. You then collapse it top and bottom and a little on the sides (after removing the Phillips screws that hold it in the dash, of course) and slide it out. Yes, a couple of R&R's will make a new one look old.
-
I'd be in for one or two of the shift maps also.
-
Steve, You'll like them. I had stock sealed beams and wiring in my 240 and then went with Cibie's (from Daniel Stern) with 55/60W H4 bulbs and my own copy of Dave Irwin's headlight relay wiring harness (when he wasn't making them for a time). Now I am not afraid to go out at night (in the car, I mean). Not sure I can use the expression night and day but I will anyway. Cibie headlights and auxilary lights have been around for a looong time. Used to be that any rally car worth its Tripmaster had a bunch of Super Oscars hanging all over the front. One of the first upgrades I made to my Honda street motorcycle back in 1974 was a 7" Cibie H4 headlight to replace the stock sealed beam. It is still in my garage with a replacement Cibie after the first one took a rock after 20 years. Jim
-
They go out, towards the engine compartment.