e-tek
Free Member
-
Joined
-
Last visited
Everything posted by e-tek
-
 Great work on it for sure! Too bad you didn't do some more cleaning and prep on it before applying the POR15 though. It's a fantastic product - but needs a very clean and rough surface. Many times people complain it didn't stick, but it's always because they didn't follow the directions to the letter. I use a lot of POR15, but I make sure to only put it over surface rust, well scraped rust, or etched and sanded metal. The fish eyes you expereinced were due to contaminants like silicone, brake fluid and dirt. I usually spray the area down with Marine Clean, then wipe with Wax and Grease Remover until the paper towels no longer show dirt. Any rust or bare metal gets a good spraying with Metal Prep, a phosphotic Acid etch and I don't put POR15 over any painted surfaces. You may want to scrape off any spots that don't appear to be adhering - before it gets worse. Otherwise - way to save a wreck! Me thinks you'll do OK. Just get them properly fit first, using vise grips, clamps and/or screws to position them solidly before welding them in a tack method moving around the panel until it's all done. Good luck!
 -
Started cleaning up the valve cover and head today - ...and finished up the detailing on a couple parts....
-
Really looking good. Gonna be a beautiful ride.
-
What a great idea - and an even greater Grandad!
-
Got me there....
-
Front and rear bumpers for my 72....
-
Thanks - I tried that several times but the inner pieces got caught up. I was able to get it all apart be disassembling all of it then removing the pieces, but not sure if I can get it together in the same way. Still have my original question - why the difference? They are from a 72 like the OP's, but different.
-
AWESOME. Like a big model. Where did you buy all your parts from?
-
The color I used was actually a GM Engine Color - close enough!
-
On this small of a car, you may get away with a gallon total. At any rate, buy a gallon to start and spray 3 good coats to start, then block it out. How many times you have to "break through" (sand to metal or fiiler) and how many low spots are left, will determine how much you need to spray on the second go-round. You will wait about 10-15 minutes between coats, but read the instructions on the can - and talk to the paint supply guys, the guys who know their stuff are a great resource. Normally 3 of each component - whether it's base-clear or single-stage Acrylic Enamel. The new water based paints may need 4 coats of base as it's very thin. No problem. Good plan. If you are painting it yourself - and Red - IMHO, I would use a single stage acrylic enamel. Any runs, dry spots or heavy orange peel can be sanded and buffed. Clear can be sanded and buffed too, but with base-clear there's more things that can go wrong. Every large city has many Auto Body Suppliers who sell to the public and (usually) give great advice on the product, how to use it as well as tip sizes, drying times, mixing ratios, etc. Thanks. As an aside - Dupli-Color sells a Single Stage lacquer type paint that is REALLY easy to use - no mixing, no thinning and no hardener!! Lacquer was outlawed years ago, but somehow they got around it. I have it in Silver for my car, which I'll paint this summer. Good luck!
-
Worst way to start a reply! I use the search first all the time and RARELY get the answer I seek. Today I searched Engine Color, Block Paint and Engine Paint and I got this thread - and a few others. At least after you "made your point" you - ironically - gave us the information we needed. Thanks. But if you're not doing a concours restoration, Dupli-Color's GM Engine Blue is very close.....

-
It's a rounded point - for sure.
-
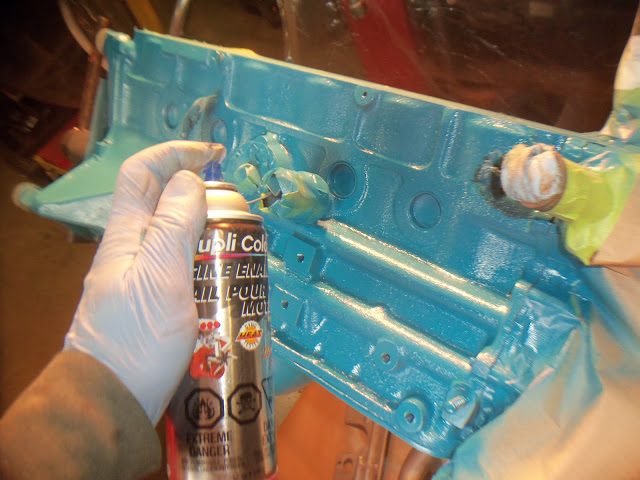
A little more cleaning.... And it's Painting day!! First I used Dupli-Color'sSelf Etching Primer - too aid adhesion, especially on the bare metal spots.... Followed up with 4 coats of their Engine Enamel - In various colors - Also detailed several parts, some of which you can see above, as well as the 10 minutes I spent on the fan below: Then I turned my attention to the carbs - ...and what do you think I found inside? Why those are bits of Alphapha leaves deposited by the Leaf-Cutter Bee! They use bits of leaves, stuffed in any holes they can find, to deposit their eggs which will hatch next spring. Happened while the car was stored at the in-laws farm. Once disassembled, everything went into the soaker, until tomorrow.
-
Well, I tried it warm - same results - look at these cans!
-
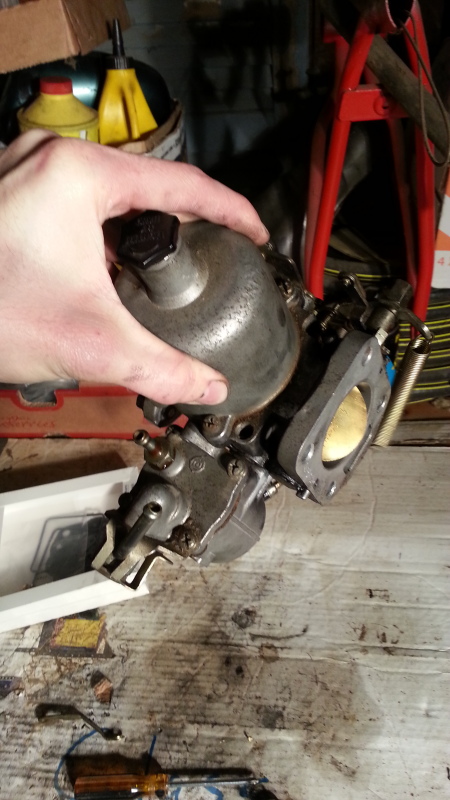
I was just dismantling my 72 SU carbs today and notice your float bowl cover isn't "under" the carb body edge as is mine. I had to remove the float assembly by removing the parts above the cover to get it out.... Anyone know why the difference?

-
Once the frame and apron are welded back to the same spots - with similar spot and tack welds - it'll be as strong as the factory set-up.
-
Holy COW!! Double WOW!! That is some awesome undertaking. Amazing what someone can do that says "I have no idea what I'm doing ;-)" ! Definitely the right way to do it tho - it'll be nice to have all those issues repaired in one swoop. Thanks for recording and showing it to us!
-
Sounds like you are well on your way to figuring it out! The issue of stumbling at a higher rev point or load, is almost always due to either (vacuum or centrifugal) advance not allowing the distributor to advance, OR, a fuel restriction. While you want to be sure both carbs are sucking, you can do that very quickly by putting your hand over the intake area of each carb. So long as they both suck the palm of your hand in, you are good to look elsewhere first. Once you iron-out the basic SPARK-FUEL issues, you can then balance the carbs. I did a 100-point restoration (meaning EVERY ITEM WAS NEW OR REBUILT) on a vehicle last year and was chasing a very similar issue. I had gone through EVERYTHING imaginable, including removing the fuel line and pushing air through it, as well as measuring the volume of fuel coming to the carb when cranking - which was normal. After another few hours of chasing my tail (3 fuel pumps, rebuilding carb 3x, rebuilding distributor 2x and more!), I found it to be a 3" long flexible elbow in the fuel line that was collapsing when the engine was loaded (revved up)! ARRRGH! It's a learning game for me - repeated daily!
-
Tearing down the rest of the engine and cleaning it up to get it painted and detailed.... Lots of crap removed.... Also got a few more cans of Dupli-color's Undercoating to do the inner floor boards and put an extra coat under the car. Lucky it'll all be hidden - because I wasn't impressed with the globs of product that continued to build up on the can and fall onto the area sprayed....
-
wow wow wow. Simply amazing.
-
Frikken GEORGEOUS!
-
One would THINK it'd be easy to ask a few questions and get started, then ask a few more and get it painted.But autobody work isn't as 'universally' understood as say - woodworking, or home renovations. Bodywork iteself is a skill that takes MUCH more practice than hammering nails would impart. And sanding contains within it the understanding of what grits are required for the eventual top coats, while priming and painting not only require considerable physical skill, but also some understanding of chemistry. With that in mind, I'm on forums to help - not thwart, so lets see if I can impart something helpful here As far as stripping the paint is concerned, the methods are almost a wash: Chemical strippers are messy, but get down to metal fast. You still have to use the DA to finish it though, so most think they may as well just do the entire job with the DA. I can't imagine where heat and a razor blade would be any faster on an entire car, but that method may be easier on parts where the paint is nearly falling off already. Point is - you RARELY need to strip ALL the paint off a car - unless it's checked/cracked right down to the metal. So.....Start with 80GGrit on the DA and (using a good 3M mask!) sand the entire car until it'll all 80G smooth. On any parts where the paint keeps flaking back because it's "checked" (cracked), use 40G or paint stripper or a razor to remove it to the metal. After you've got it all to metal or 80G smooth, go over it all again with 120G, then 220 G on the DA and/or by hand. On areas that need to be repaired, try to use the hammer and dolly, carefully, to get it close. Then use a little filler, but first, grind it to metal with 40G on an angle grinder so the filler will bite to the metal properly. Once everything is repaired, filled and smooth, wash the car with lots of soap then clean water and blow dry, then use a "Wax and Grease" removing solvent with many paint-grade paper towels. When it's all clean, masked and blown dry, you can spray a 2-part, high-build Epoxy primer over the entire car - no etch required. 3 heavy coats (1/2-3/4 gal on a 240z) to build it up enough for sanding, with a little black (from a spray can) dusted over top to use as a guide-coat. Using 120, then 220 on long blocks you'll sand it all to get it even. Look up "cross-hatch sanding" . After blocking it all all out, you'll spray another 3 coats and repeat the process, but with 400G, then 600G wet. You may still need to spot prime areas that either need more fill or break-through to metal. Wash the entire car again, blow dry, use wax and grease remover and then you're ready for sealer and paint. Actually that DOES sound easy! Too bad it isn't!!
-
Love this thread even more every time I look at it....great work.
-
-
Awesome!!!!!!!!!!!!!!!!!!!!!!!!!!!!