70 Cam Guy
Free Member
-
Joined
-
Last visited
Everything posted by 70 Cam Guy
-
 Thanks Leon! I thought about stiffer springs in the front briefly as well but I am quite happy with the ride quality as it sits. I'll definitely look into a bigger front ARB. Currently I just replaced the end links for the stock sway bar.
 -
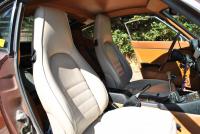
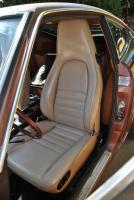
Thanks Dr. Rob, I do agree getting them an inch or so lower would really finish the look. I had one of the tall guys at my friend's shop sit in the car today, and he actually had a good 2-3" above his head when seated in the car. I forgot to ask how tall he is but I am 5'8" and he has to be at least 6 feet tall. I appreciate the ID suggestions on these. It made me do a Google image search for "porsche 944 seats" and "porsche 911sc seats", and they look very close to the 944 leather seats. Both guys have said they are Recaro's regardless of the model from which they came. Looking at this link I got from the search, I'm pretty convinced they are 944 http://www.rennsportmotors.com/1986944turbo.html# Drilling new holes in the front seat mount and bolting the sliders straight to that would lower the front ~3/4" (thickness of bar + spacer). Doing some modding to the rear brace will net maybe 1cm. You would probably need to fab a new bracket in the rear to go lower since the sliders are outside the rear mount 'pedestals'. If I recall, the sliders on these seats are 16" apart (hole center distance). The forward bar I cut to 18" and the rear bar is cut to 17" wide. You can probably see the rear bar looks a little crooked because front-to-back distance of the bolt holes in the sliders are about an inch different on either side
-
For sure, JC, if you want to convoy with us, you're welcome to join us! Safety in numbers right?
-
If I put the car in the first post, no one would have to scroll down
-
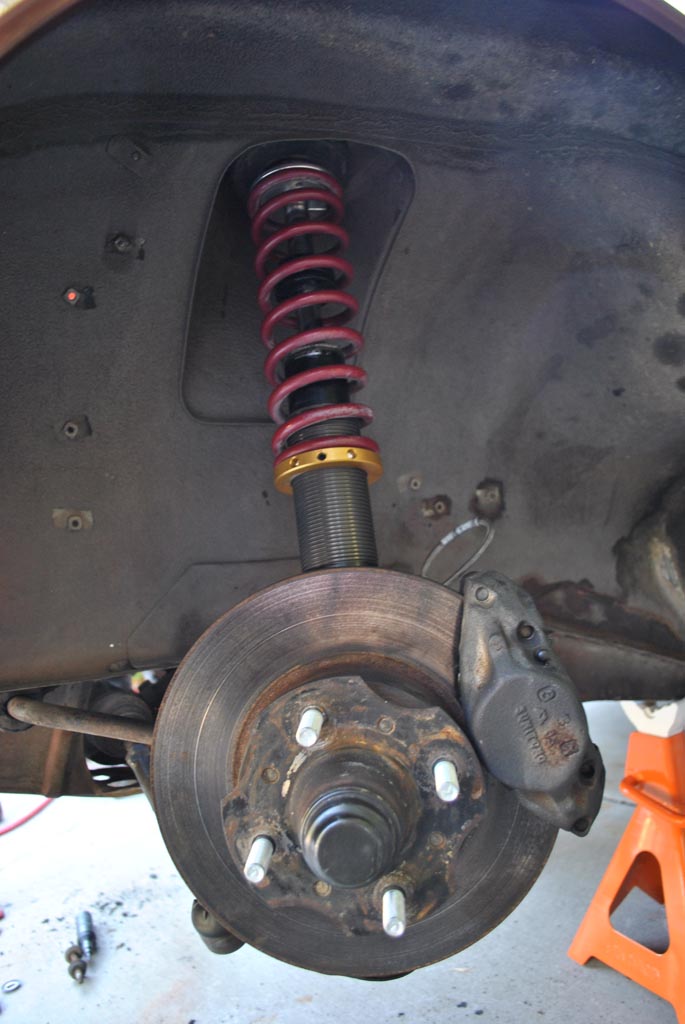
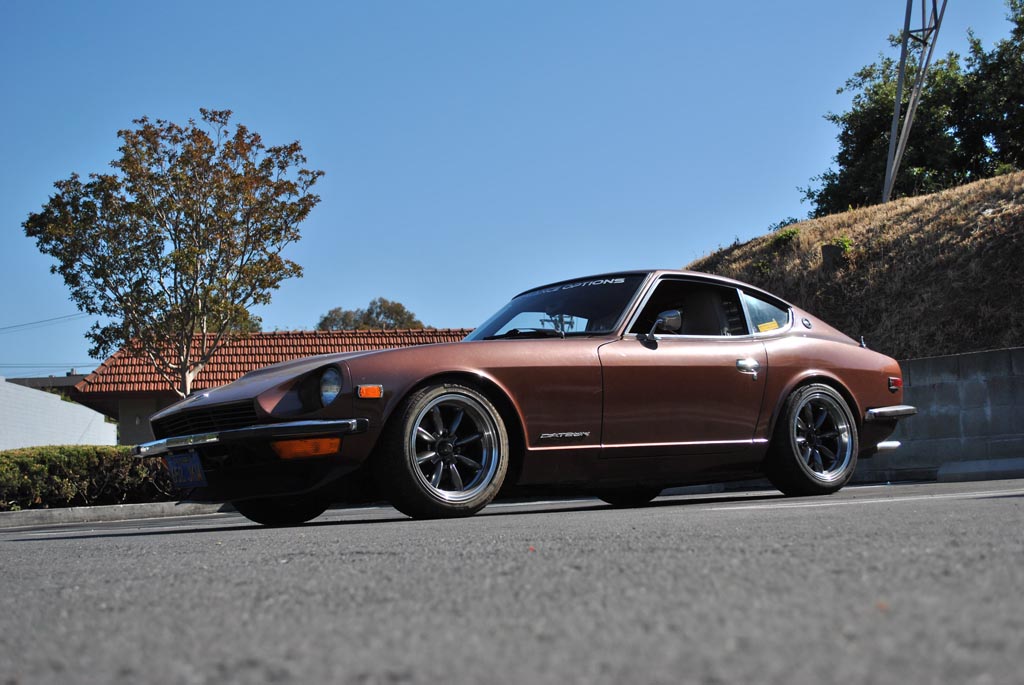
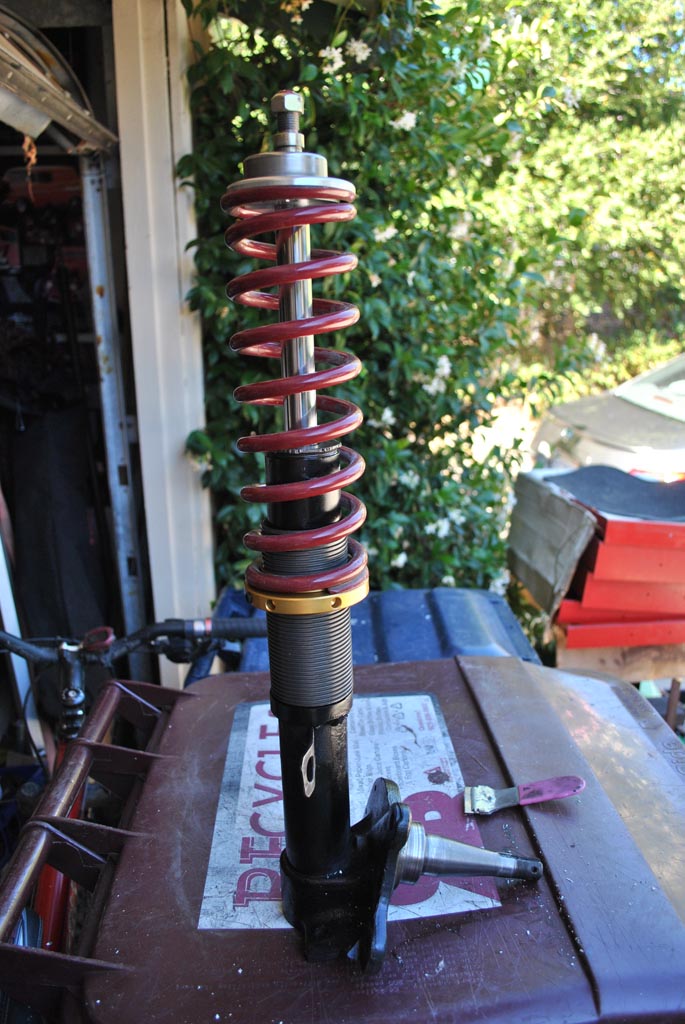
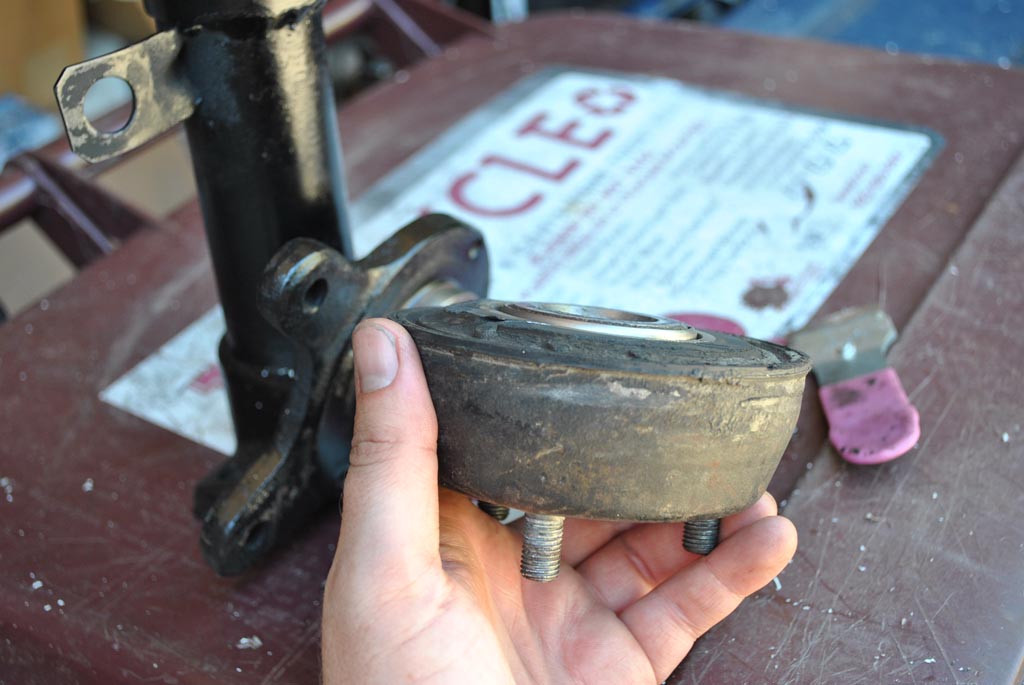
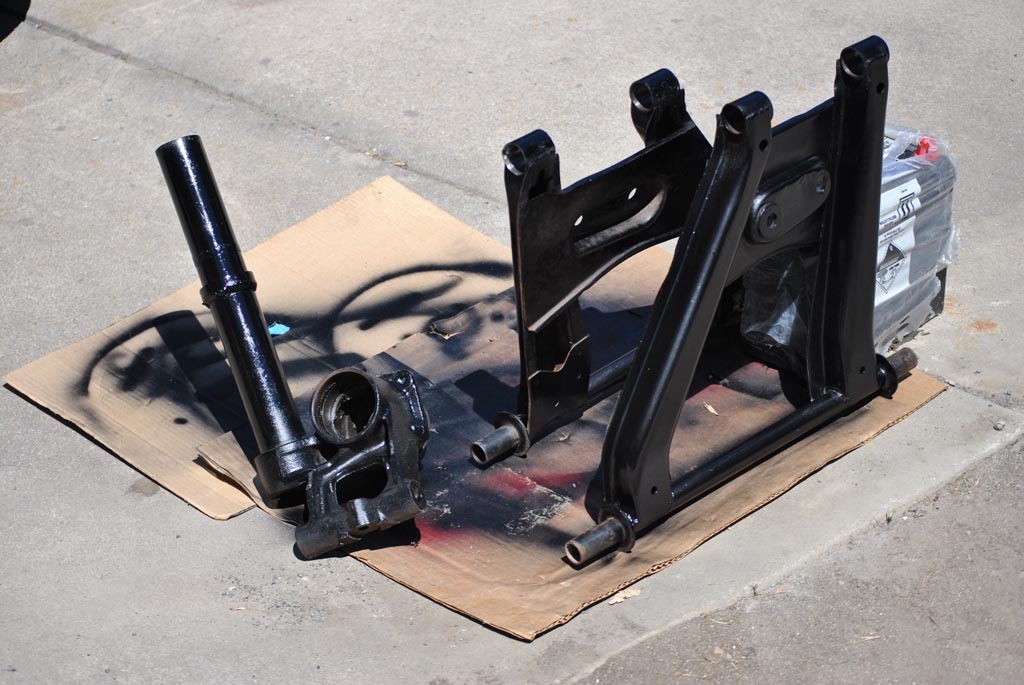
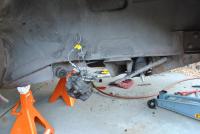
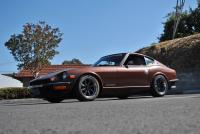
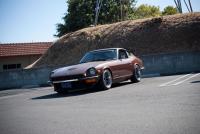
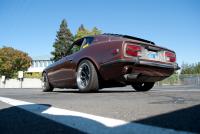
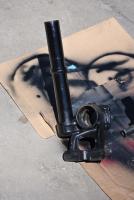
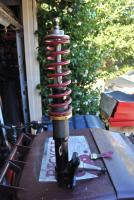
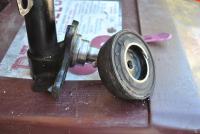
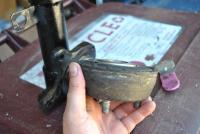
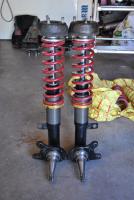
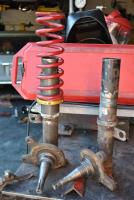
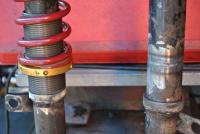
The next challenge was to figure what to do with the insulators. EMI camber plates are still not in the budget and I didn't want to cut/weld the body for permanent camber plates. In a stroke of inspiration, or something, I decided to cut the insulators in the way you see in the pictures. This lets the flat top hat sit against the strut bearing and there is still some vibration damping. I understand this is not necessarily ideal for all out handling but I also knew this gets me ahead of where I was. I experienced the same woes many had with spindle pins. It took torch heat + press before they came loose with a big bang. After that, taking them apart was smooth sailing. Assembly of the rear struts (bearings) basically is a big PITA. I had a press to use and it still sucked. I am happy everything I got is new and good quality because I don't want to do that anytime soon again :stupid: I did the swap in a weekend (when everything was ready to go), only calling on my dad when I needed a set of hands to start the strut nuts in the rear. Those things are heavy! I also chose to grind the rear struts so they fit between the rear control arm bushings. The Energy outers are a little fat. It didn't take much and now they go in with a little persuasion from the hammer. It was 2 long days of work. A while back I had decided I loved the Rota RBR and soon discovered newly available sizing. I chose 16x8 +4 in Hyper black and am running 205/50/16 General Exclaim UHP tires. These were the lightest tire with this performance, in this size. They were also rated #4 in the Ultra High Performance Summer Tire category from Tirerack. This was next to Michelin's, Goodyear's, and Bridgestone's. I am very happy with them so far. They stick good and look great. Ride quality in the end is surprisingly good. It took some time to get the ride height right for driving around the streets. Pot holes are a little jarring but overall the ride is nice and the tires only rub in the rear on big road dips. I am also squeak free, I liberally used that goop that came in the Energy box. My good friend says it's still smoother than her Jeep Wrangler Handling with good tires and suspension? Awesome. I am thinking about a front sway bar for the body lean but I think I'll try a front strut bar first. I'm sure I'm forgetting some stuff but it's been a long road because life happens and I stay busy. Hope you enjoy the pictures!

-
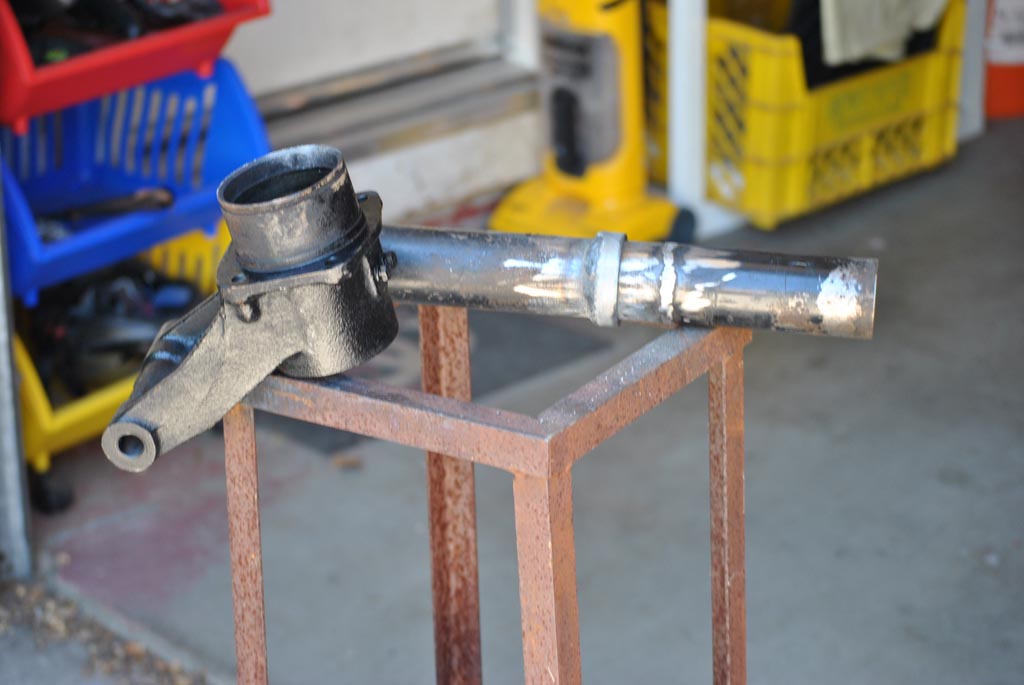
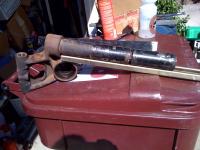
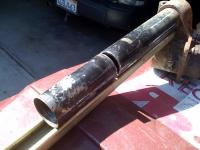
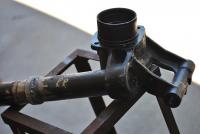
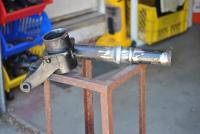
The actual work and cutting of the struts was not terribly frightening to me because of my other hobby with 4wheelers and rock crawlers. Fab and welding is pretty much required for that. I did a lot of reading and measuring to make sure I understood how to do it correctly. I also used the instructions on JohnC's / Beta Motorsports website. It proved exceedingly helpful to validate my own numbers and give me some confidence. I used a chop saw at my friend's performance shop to cut my rear struts. I used a MIG to weld on the rings and weld the tubes back together. To keep the tubes straight, I clamped angle and channel on either side of the tube and made 4 tacks. I checked for straightness after each pass and inserted the shock. I used a flashlight to peer down the tube and verify penetration. I used the grinding wheel and flapper wheel to clean the weld area so the sleeve would slide on. For the fronts, my friend suggested I use a pipe cutter, which worked very well. He has a large one he uses. Once I cleaned up the edges, he TIG'ed them for me. It was much faster because there was nothing to grind in the end and the sleeve went right on. more to come in next post...

-
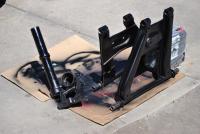
This all started almost before I had my Z running. I decided I wanted the options that go along with the coilover conversion and sectioned struts. I would like to thank Jon Mortensen for his initial help and advice. I've also read and re-read numerous HybridZ posts to better understand the workings of Z suspension (many written by him and John Coffey). I also ended up buying his old shocks and springs to start my project. I had also decided to source used struts and found some so I wouldn't need to cut the originals. This, of course was in case I didn't like how it road. It took me forever to get all the parts bought and ready to do the swap. I disassembled the rear struts before checking prices on rear bearings and that prolonged the madness. I'm glad everything is new but it hurt the wallet a bit. The parts tally grew and grew, so the car has: Energy poly bushings, black (have not installed the mustache bushings) new wheel bearings front and rear Hawk HPS pads front stock TC rod bushing with ball & socket kit from MSA New tie rod ends RCA's (bump steer spacers) that allow 14" wheels from MSA Nissan Quest rear studs at each corner Rear strut bar Illumina shocks Eibach 2.5" springs 225 lb fr / 200 lb rr I used sleeves, perches, and top hats from a circle track racing supplier more to come in next post...

-
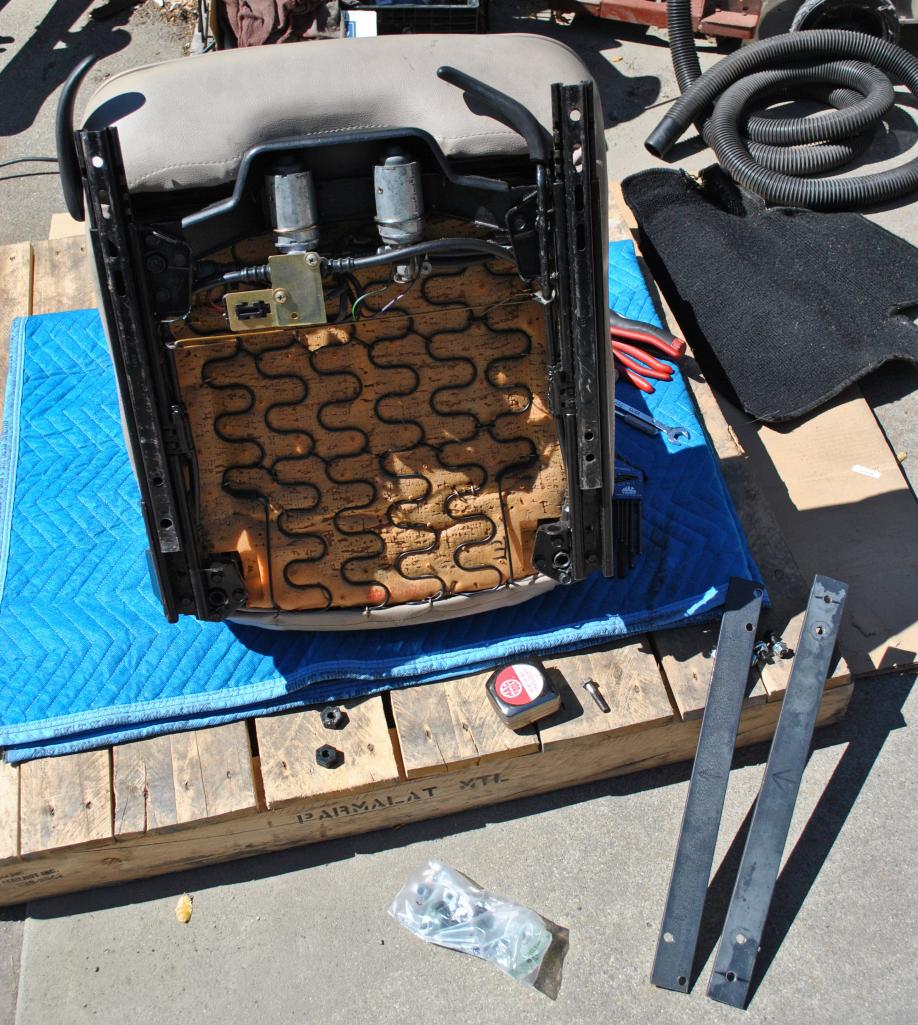
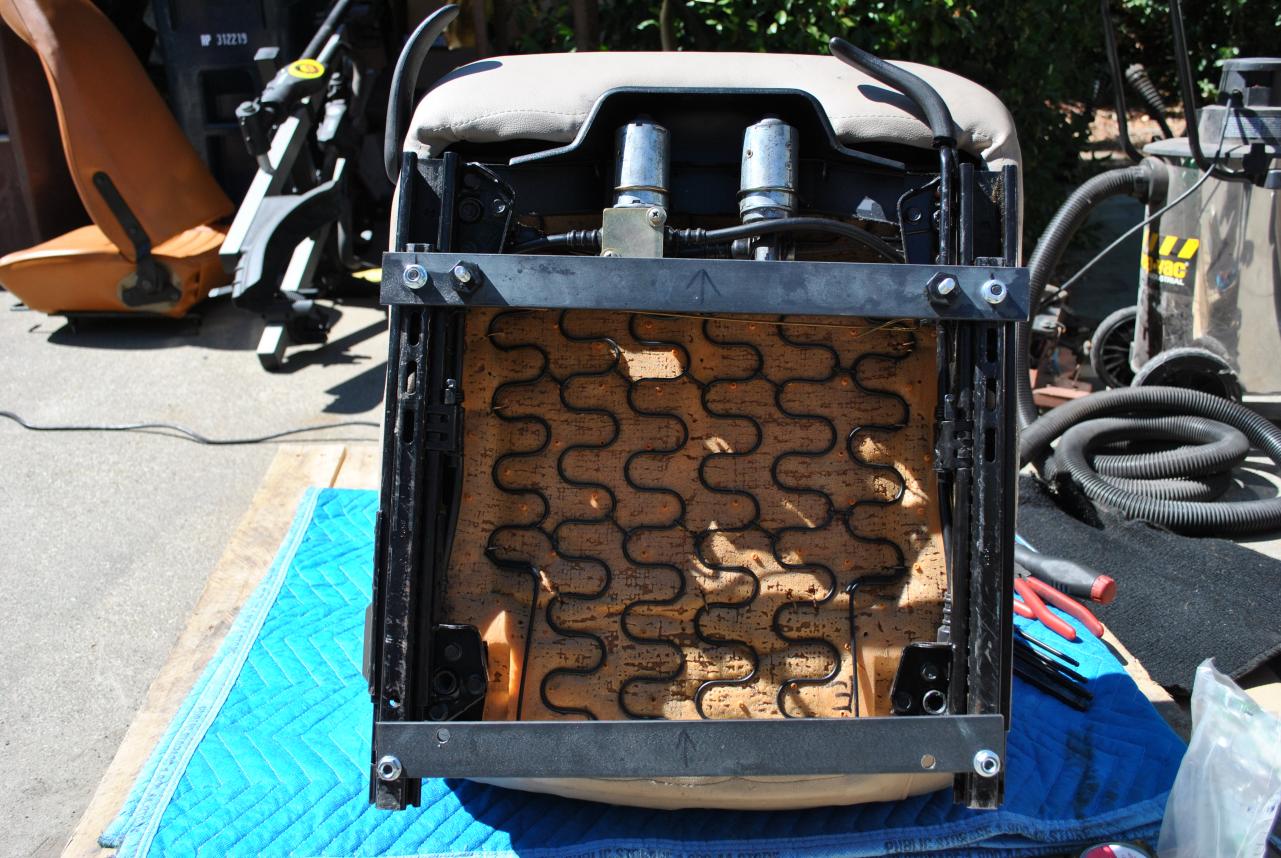
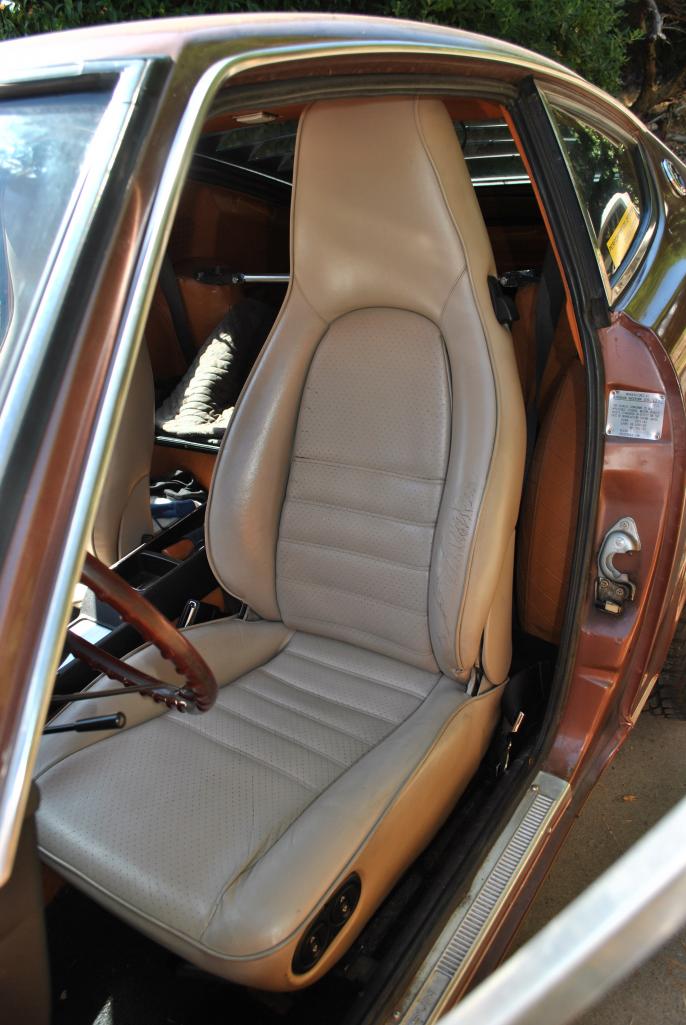
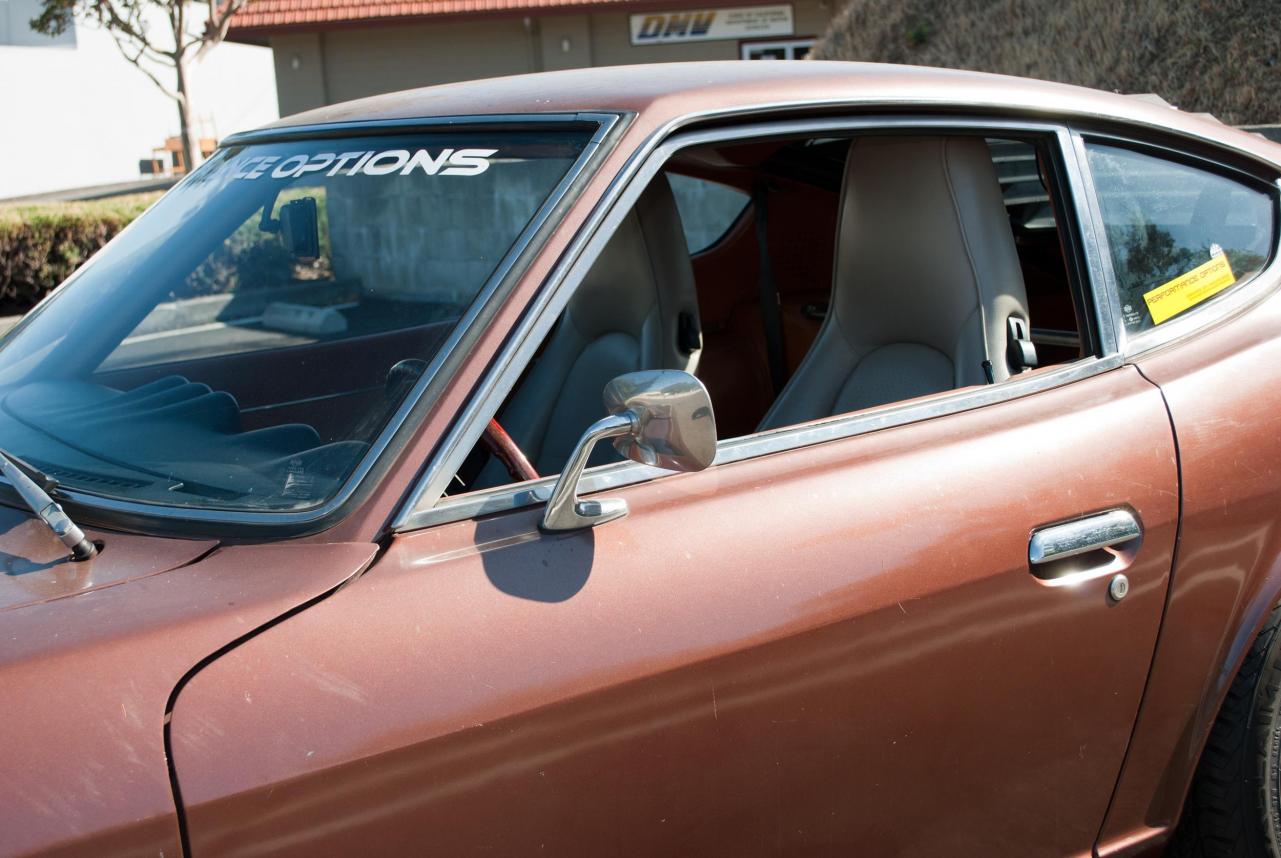
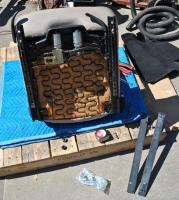
Some of you may remember seeing the first post months ago. Well, I finally made time to make brackets and install the seats. I've also been told more recently these are out of a 944, and not a 911. They all look so similar I ended up keeping the Porsche sliders. After removing the Z seats, I could tell the modern sliders were considerably stronger. The Z sliders only lock on 1 side and the other moves freely. The Porsche sliders lock on each side, which, I would assume, contributes to some stability. Adapting the seats to the mounts just took some creative use of steel flat bar. I found the lowest profile bolts and locking flange nuts to mount the seats as low as I could. The bolts are class 10.9 so I'm comfortable with their strength. Installed, the seats look like they were made for our cars. I sit a bit higher in the car but it's not too bad. I can probably get them lower but I don't want to cut or drill any of the floor bracing. The Porsche seats are wider so the sliders come very close to the floor bracing in the rear. I installed these with the intent of not drilling new holes or cutting. If you're 6 feet or taller, you will want to get these lower than I have probably. I love the feel of these and am more happy with the color than I expected. Eventually I'll get the driver seat wired up but it's nice as it sits now. I also love the fact these flip forward with the switch. It makes tossing in a bag quick and easy. Unexpected perk


-
Whenever I replace wheel cylinders or calipers, or flex lines, I like to do one side at a time where possible. Just yesterday I did the calipers on my friend's Jeep and did one side at a time. When replacing a caliper or flex line I will gravity bleed that corner before setting foot on the pedal or pressure bleeding. Once the air bubbles have stopped from the bleeder, I have a helper in the car do the pedal for me. I instruct them when to pump up the pedal, hold it down, release, etc. You should always verify you have brake pedal before going on a test drive
-
It looks like Hooked on Driving has the track reserved from 9/8 to 9/10, but yeah, no mention of the 9/8 event on their site. Unfortunately that is also the middle of the week and a couple days before JCCS. Another time maybe http://thunderhill.com/calendar/event.php?eid=20100601003857595
-
If you don't go Rebello, there's always http://performanceoptions.net/
-
My old Camaro was an automatic with an original style radiator. When I replaced the radiator with a Griffin unit, I added a B&M oil cooler and plumbed the lines to it. You should be fine with a similar setup. If I recall, the applications were based on horsepower, but it has been a few years
-
Sounds like a great drive! Unfortunately that is the week I'll be in Bend, OR enjoying the local mountain biking and brewers. It's the home base of the Deschuttes Brewing Co and some amazing scenery
-
Just want to put in my 2 cents. It is my understanding the Spectre dial FPR is not a back pressure regulator. Is that what you've put on your return and have you verified the correct pressure at the carbs? I have tried mine on the return side and it did not work to regulate pressure. It's possible I missed where it was replaced. When I simply blocked the return on my car equipped with the mechanical fuel pump, pressure held steady at 4 psi or slightly less, not too high This is not to say the carbs couldn't use a proper cleaning but just some food for thought.
-
Old school cool! Big thumbs up on those. I am also a big fan of the Mkii's. Before I sprung for my RBR's I was looking at their 15x8 or x9 Looks like you have a whole family of Datsun's in the background
-
Cool, what size/color did you choose? The step lip on the 513's and 002's look great
-
If it is necessary, I don't see why a machine shop couldn't (on a mill) if they have a good setup. I would imagine the setup would be on a tall side but it could be done. This, of course, doesn't address if the piston itself, has enough material. 20 or 30 thou doesn't sound like much though I could see it being tough on a lathe with the rod attached.
-
Some food for thought, the door sill on my 07 Civic coupe says 32psi at all 4 corners and I believe it weighs in around 2900 (tires are 205/55/16). It shouldn't be a problem running 32 in our lighter Z's. You'll definitely get better tire wear and contact patch with the right pressure
-
COol, can't wait to see daytime pictures. Are those Diamond Racing wheels? The stance looks killer but yeah, it's looks pretty low in the rear
-
Jon, you're right, he was was saying 50/corner at 4 corners. $200 is only like 2 hours of shop time at an independent around here. My friends charge $95/hour and they are on the low side. Dealers around here are upwards of 150-190/hr. This is also why I asked if they were removing the struts too because I've dealt with my spindle pins already and no way can a shop come close to 2 hours. Hell, even a team of techs would be hard pressed to R&R 4 Z struts if the spindle pins don't cooperate, without any sectioning. With the way some of the guys on HBZ are doing that S13 coil swap I could see the cut&weld going faster than the cut/section/weld we've done. Bring me a strut and I could cut it, and weld on that lower perch they are using fairly quickly. In that situation, I could see that $200 is not unreasonable for an experienced welder/fabricator This is why I asked if this was a friend and if they were removing the struts, it seems silly low. I guess I was premature, if my friend said $200 to cut/weld my struts, I'd be cool with that. If a shop I don't know says $200 to do everything, I'd wonder exactly what John Coffey just said
-
The Star Specs are a great tire, congrats on the upgrade! 46psi does seem awfully high for our Z's. What is the max cold pressure on those, like 44-46? 50? I bet with the performance tire, you would see even more comfort at 32 psi and have great performance.
-
Is this at a shop? Friend? That is only like 2 hours labor (at a shop rate) to R&R 4 Z struts. I'd say that's a deal if their work is quality. Perhaps I didn't interpret 'removal' correctly, you do mean the person(s) will remove the struts from the car? I have done the cutting/welding myself but I have a welder and have friends with a nice welder. I would give my $200 to someone if I could not do it myself.
-
You could have felt the difference between running air horns and not running them. On SUs, Mikunis, Webers, etc, you should really run the air horns if there's space. Some of my friends running ITB's on their Toyota's use foam Motorcycle filters secured over the air horns. I would always run a filter on a street car. There is just too much dust and grit that can wear your internals If this link works, UNI makes foam pods in a number of sizes. Redline also has similar filters (Redline filters in the pic). You can browse your local Cycle Gear or motorcycle dealer to see what they have on the shelf http://www.denniskirk.com/jsp/tpl/cmn/prodlist.jsp?attributes=48:3035&category=11102&brandId=806&_requestid=592534
-
http://www.napaonline.com/Search/Detail.aspx?A=FPG21157SP_0147184177&An=599001+101971+50018+2018010+11024+599999+109999+59999+2999999 You'll need to click to shop online to see the part but the 'head saver' or cylinder head shim may be an economical solution to canning the block. It's an option though I don't have personal experience with these
-
Those actually look more like Work Equip 01's. Styling is subjective but they can look good on the right car. It really depends on the size if they are rare. Wide width and low/negative offset increases desirability I personally feel like the SSR Mkii (mk2) is a much better looking 4 spoke wheel for our cars. They are 2 or 3 piece and have a step lip. They can be bought in 15x7, 15x8, 15x8.5, 15x9, low offset. SSR is short for Speed Star Racing For those curious about old school and new cool JDM wheels and where Rota/Konig/Drag get ideas for most of their wheels: http://speedhunters.com/archive/2008/09/03/the-101-gt-gt-cool-japanese-wheels-pt-1.aspx http://speedhunters.com/archive/2008/09/05/the-101-gt-gt-cool-japanese-wheels-pt-2.aspx http://speedhunters.com/archive/2008/09/10/the-101-gt-gt-cool-japanese-wheels-pt-3.aspx