Randalla
Free Member
-
Joined
-
Last visited
Everything posted by Randalla
-
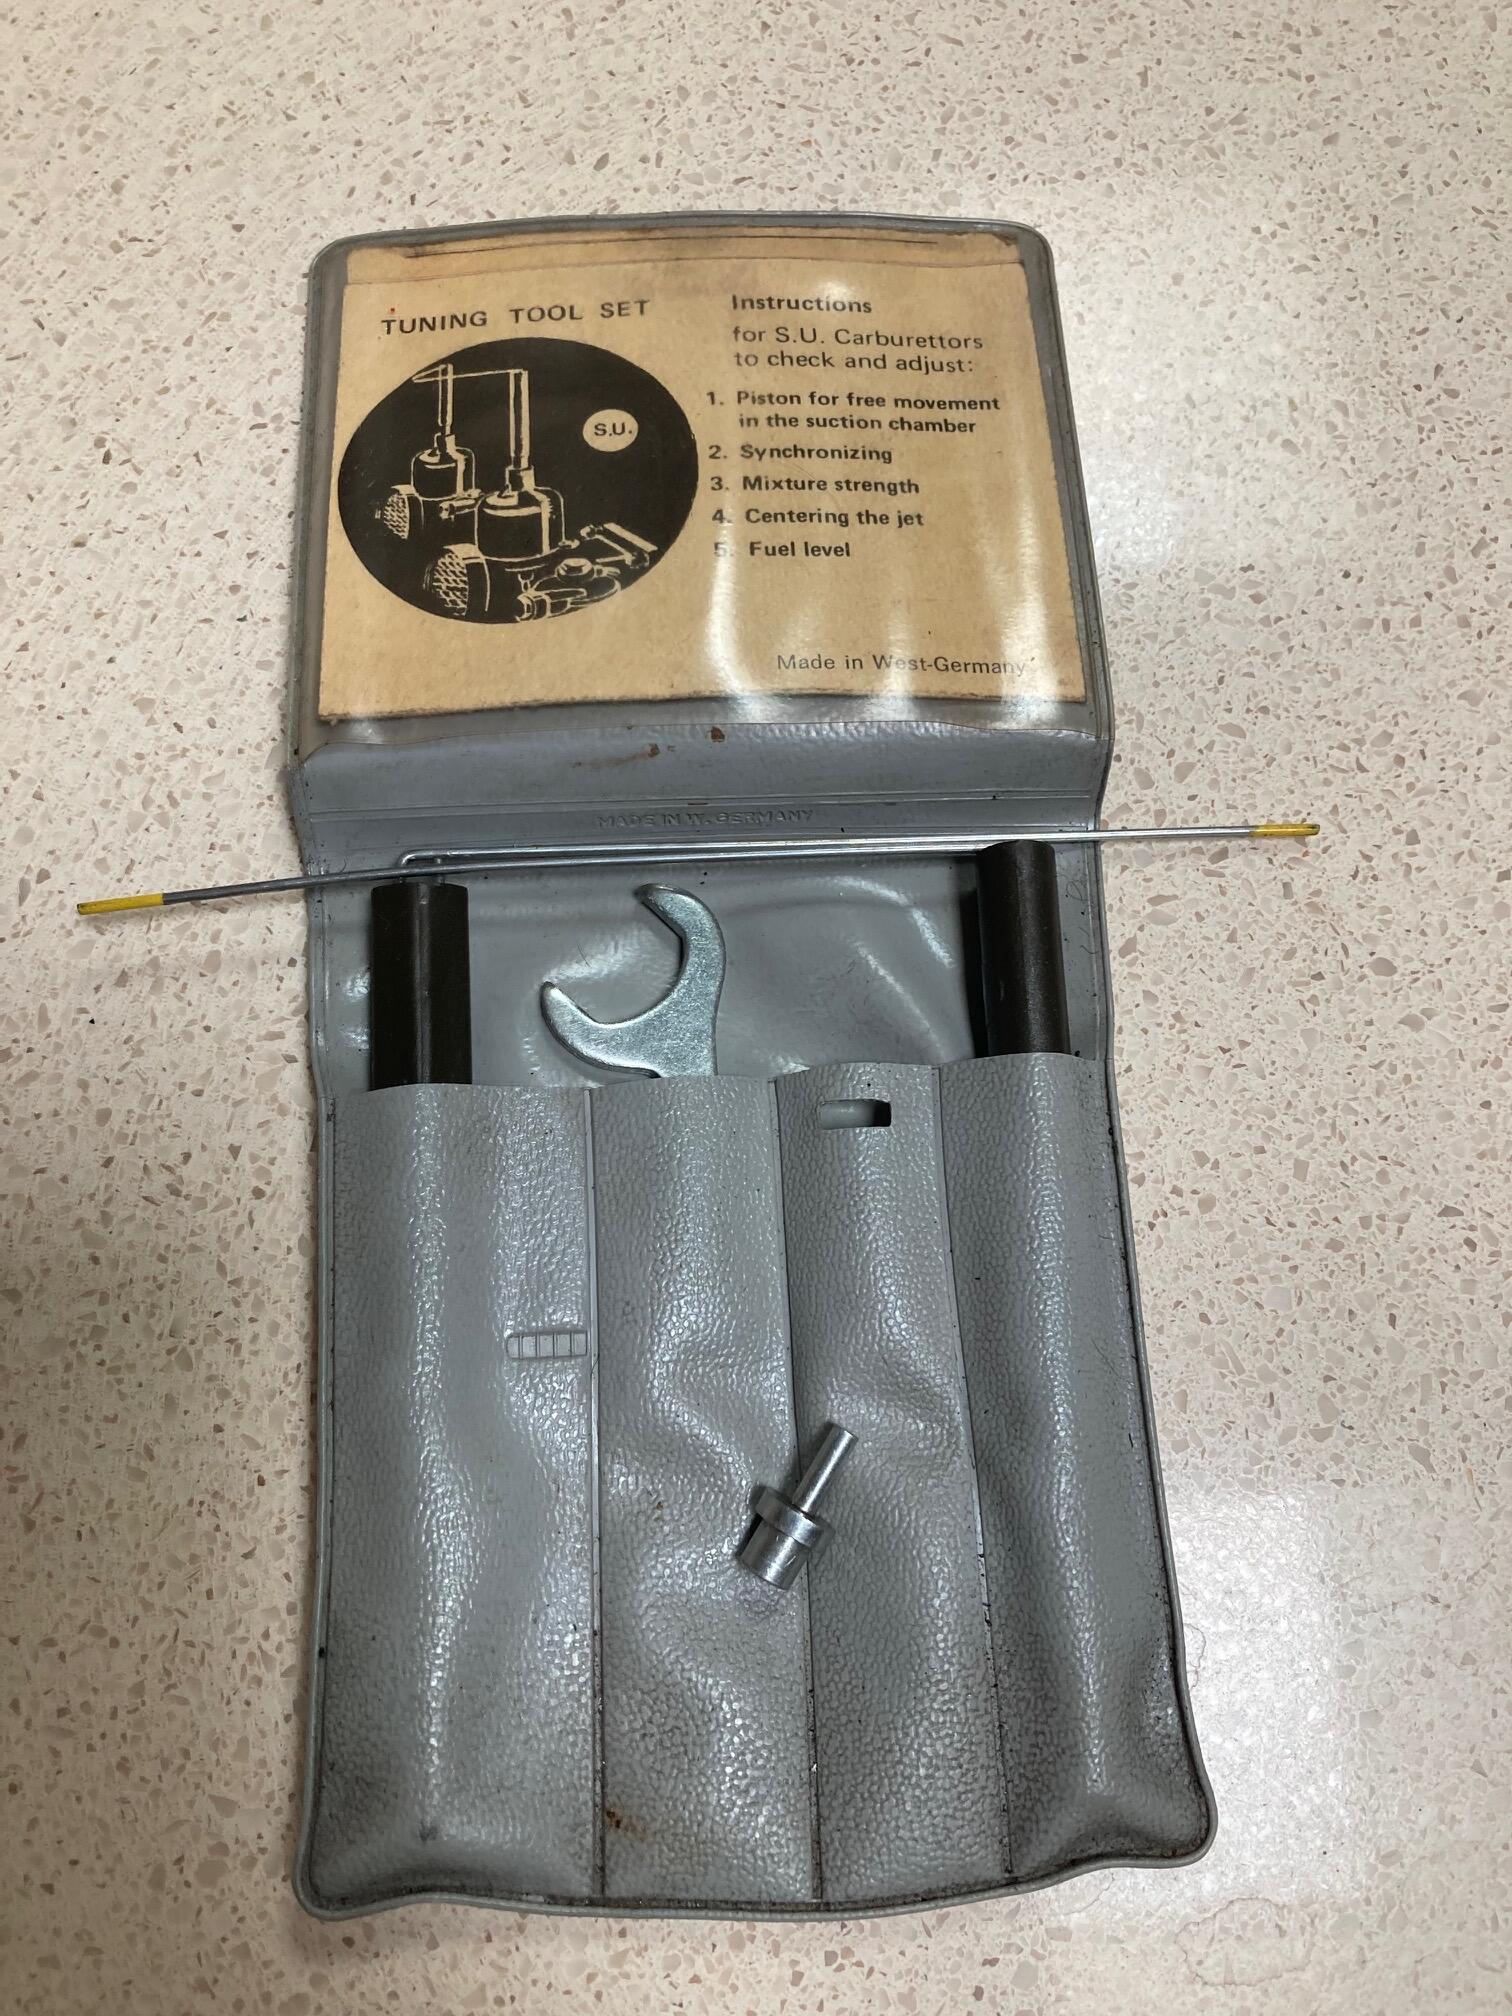
 Here is the SU tuning kit mentioned in post above. I just checked on eBay and they are available for $40. The small aluminum fitting laying on top of the gray package is the one I was referring to.
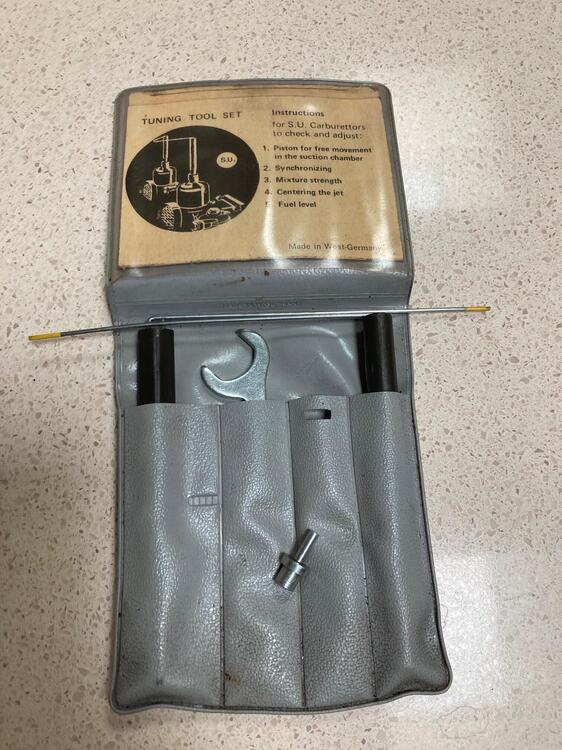
-
9 times out of 10 the problem on 4-screws is a misaligned nozzle, particularly if the large retaining nut underneath was loosened for some reason. There is a tool to help center the nozzle. If you take the needle out of the piston you insert the tool instead, which centers the nozzle in the casting. While the tool is in the piston and the piston pushed down in the chamber, tighten the large nut in place. Once the nut is tight, remove the piston and remove the tool. Before you re-insert the needle, chuck it in a drill motor and spin it to make sure it is perfectly straight. If it is, reinsert the needle in the piston and screw the dome back on. I'll take a photo of my tool and post it here shortly.
-
Well, just checked and I have power at the lighter so at least it is grounded. Need to check further to see if there's a wire from the gauges to that same ground that may not be grounding (broken or disconnected wire). Would have thought the gauges would be grounded through the part of the dash structure itself, but maybe not.
-
Why didn't I think of that?🙂 Thanks for the suggestion and quick check.
-
I'm told that the two gauges share the same ground at the cigarette lighter. Could that possibly be the issue?
-
Just checked all the gauges again to verify. Fuel swings from empty to full (right) at start up and stays there till car is shut off (regardless of how much gas is in the tank). Temperature does not move from the full cold position (left). Everything else work as it should (ammeter, oil pressure, etc.). Thank you for your thoughts Captain Obvious.
-
Steve, Thank you for weighing in on this problem. I realized this morning that I left out an important part of this issue. The box I mentioned is supposedly attached to the back of the speedometer. I neglected to mention where it was located. I haven't stood on my head yet to look under the dash to see if I can spot the box. Maybe someone on the site has a speedo in their parts stash they could snap a picture of. If this is indeed the culprit the next question is whether there is a replacement, or a work around. On my Roadster I was able to open up a small metal box attached to the steering column and replace the guts with a resistor and wire it in place.
-
I have a 1972 240Z that I'm having an issue with. This past year on a club run, I lost both the temperature and fuel gauges. Prior to losing them I noticed the readings were way off, and swinging slowly from one end to the other before both stopped working all together. I had a similar issue on my Datsun Roadster that I traced down to a faulty instrument voltage regulator, which steps voltage down from 12 volts to about 9 volts for those two functions. I'm wondering if that may be the same issue on my 240Z. I've seen photos of a box on the back side of a 1973 240Z that someone told me provided the same function. If true I'm wondering if that was only on 1973 models, or earlier models as well. I'll need to find one or find a work around. Can anyone help?
-
Thanks Patcon. Appreciate your intentions🙂
-
Finally had a chance to take a friend's 240Z hood latch apart and measure the length of the cable from the cover at the latch end, to the cable stop at the end towards the latch. For those interested, the measure should be 1-1/8". Mine is now back together and the release and lock are working great.
-
Thanks Mike. I had seen those posts, but unfortunately they don't directly address my issue at this point. I already installed an emergency cable release in the event this happens again, but want to restore the original function using the T handle. Just trying to ascertain the length of cable from the end of the cover to the latch itself. It has to be pretty precise to function properly. It's probably close to 1 inch but I can't be sure. Thanks again for weighing in Mike.
-
After more than 50 years my original hood release cable finally gave up the ghost, breaking right at the release latch. The entire replacement is available for around $75, but I thought I'd take a shot at refurbishing the old component parts. Where the cable goes into the T handle, it was originally crimped in place by the factory. My first step was to grind flat the end of the metal rod threaded into the T handle that the cable went into, center punch the end, and drill the center out about 1-1/2" deep with a 1/16" drill, to fit a 1/16" braided cable from the local hardware store (you'll need roughly 4 feet). I also picked up some aluminum crimp on cable stops for the end going to the hood latch itself. I mixed some JB Weld up and smeared it on the end of the cable going into the T handle, then squeezed the metal end flat in my vise for good measure. With the cable in the T handle end secure, I'm now turning to the latch end. This is a little tricky, and where I'm hoping someone can advise. I need to be sure the end of the cable coming out of the black cable cover is cut to the correct length before crimping on the aluminum cable stop. Too short and it won't allow the catch to engage the pin on the hood. Too long and it won't pull the cable enough to release the catch. As best as I can tell the catch needs about 1/2" - 3/4" of travel. What I need is a good measurement for the cable length from the point it exits the cable cover to the point where the ball is crimped on to keep the cable in the "birdcage" bracket. My best guess is around an inch but I don't have one in tact to measure. Can anyone assist? Thanks!
-
Thanks guys. Just found the post someone made showing the tool they made to trip the catch. Should have searched harder here. Thanks for your responses.
-
Just went to pull my hood release and the cable broke. Looks like it must have broke at the hood catch itself, so it is not readily accessible. Is there a work around to get the hood open from underneath so I can replace the cable??? Any help is much appreciated.
-
Thanks much guys! I thought it was somewhere in the 90's but could not find the actual years. I subsequently found a post somewhere else that said 1993-2002, but unsure if that's right or not. On my car the seals really fit perfectly, even the 45 degree angle. I seem to recall having to cut off about 8" for a perfect fit, and then as Chuck said, buried the seam under the kickplate. Was not aware (or had forgotten) that the rear door seals were longer. Makes sense that they would probably be in better shape than the front seals. Appreciate the assistance guys!
-
I installed these on my 1972 240Z 10 years ago and was very pleased with them. Trying to direct a friend who needs to replace his seals but can't for the life of me find what year Kia Sportage works. I seem to remember the ones on the front doors fit best. Anyone recall what year Sportage seals fit.
-
Steve, Good point on the inertia switch. Now thinking of going back to a mechanical fuel pump to avoid the need for an inertia switch and assuring lower fuel delivery pressure without a regulator. Thanks for the reminder.
-
The 280Z we are converting is a 1975. I've always been a huge SU fan and though some may make a case they are not as dependable, I've not actually found that to be the case. In fact when something needs to be addressed on the induction side, I'd much prefer the simpler diagnosing and repairs of SU's. When set up properly you can forget them for the most part. The pluses are they sound great, tip-in response is more lively, and the car is much more fun to drive. Admittedly, I'm biased having, owned over 20 early Z's with L-series engines and worked on countless others. Long live the SU's!
-
Wondering what, if any, issues I may have with this swap electrically. I've done this many times for 240Zs I've owned, but am unsure what other functions the ECU manages on a 280Z that I'll have to work around. I plan to manage fuel pressure with an inline regulator to compensate for the difference from 3-5 lbs. (carbs) to +30 lbs. (injection). Thanks for your help/thoughts.
-
Maybe I'll try running them in my Z to see if I notice a difference.
-
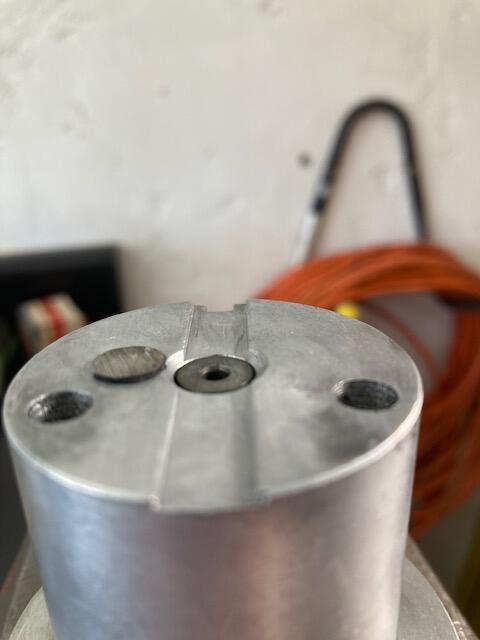
Thanks for weighing in Captain Obvious. Not sure I understand your response. At idle, the effect of the higher sitting piston would pull the needle further out of the jet tube allowing more fuel to be sucked out of the tube and across the bridge, correct? I.e. the same as raising engine speed with the idle screw. The material is definitely steel, as I tried to carefully file one of inserts flush with the bottom of the piston. The non-metallic chunk you reference is in exactly the same spot as the steel inserts in the pistons I have. Seems to be someone experimenting/modifying the stock inserts with larger diameter steel ones???
-
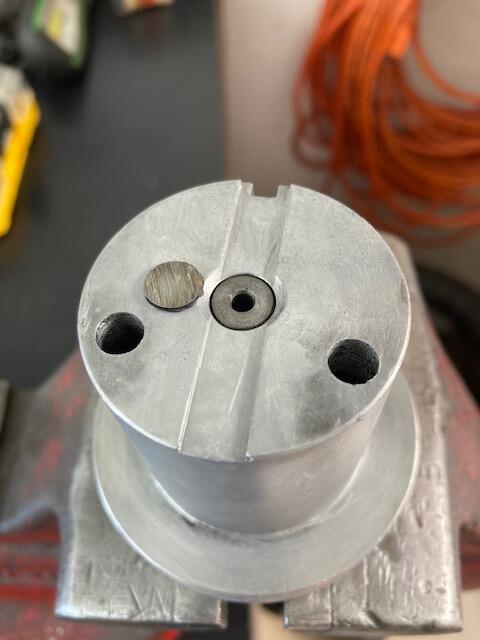
This is a first. I've probably rebuilt 60-80 Z SU carbs over the years, but have never seen this modification. These pistons were in a set of early, 4 screw carbs from a customer's 1970 240Z. As you can see in the pictures it appears someone drilled and inserted a short piece of steel rod into the bottom of each piston. The end protrudes below the bottom of the piston raising the piston perhaps 1/32" off the bridge. The net effect would richen the mixture significantly, similar to dropping the needle from the piston. The piece is small enough that I wouldn't think the extra weight would impact throttle tip in but I can't be sure. Anybody else seen this modification before?
-
Not a fun job, but got it just about wrapped up. I did have to drain the radiator, remove the lower hose, remove the alternator, and completely unbolt the large compressor bracket. It was a two person job to hold the compressor up while lining up all the bolt holes to re-attach the large steel bracket. Now that I've done it, I could do the job in half the time (isn't that always the way?). A fair amount of time was spent assessing how to tackle the job. Thanks for your input guys.
-
I have the compressor and bracket separated but still no room to get the bottom bolt. Looks like I'll have to go in from the bottom, necessitating draining radiator, removing lower hose and removing alternator. Arghhh!