emccallum
Free Member
-
Joined
-
Last visited
Everything posted by emccallum
-
Glad you found it! You may want to consider going with a LED compatible flashers (blinker and hazard). When I put my car back together the running light fuse was getting really hot. I swapped all the bulbs and flashers to LED and it made a huge difference. Several threads on this. I think I bought everything from Amazon.
-
Same screws on mine as well.
-
What fun would it be if it worked right the first time!
-
Is the hinge hitting the metal piece thats on top of the rubber? I think it is supposed to be offset.
-
https://jdm-car-parts.com/products/nikki-fuel-pump-rebuilt-kit-for-prince-ha30-fairlady-s30-skyline-gc10-with-l20-l24-engine?variant=39616128811117 This may work, but check to be positive!
-
I did buy this Nikki pump from ebay, but I cant recall if I just used parts out of it or swapped the hose connections. Chances are I spent too much time and money to get an OE pump to look and work properly!! https://www.ebay.com/itm/163290448232
-
Just a heads up, I think I remember some posts about aftermarket mechanical fuel pumps not working because the arm wasnt hitting the eccentric. Best to see if you can find an NOS one or if you have an original rebuild kits may still be around. I wish I could remember exactly what I went through to get an OEM rebuilt, but I recall having a large ziploc of parts and pieces. My car (72) does just fine with the mechanical only. A bit long to start after sitting, but no other issues.
-
@kcpope, I have one. PM where to send it too.
-
Let me look around and see what I have.
-
As soon as you lay under the dash, you realize you forgot the first tool you need, or its under your back and you cant reach it. Great work!
-
While you have it open, you can suck on the vac advance rubber hose and make sure the advance is working properly. Plate should rotate and return. I dont think that's your issue but gives you some piece of mind that advance is working. Replacing pertronix (as Patcon suggest) is easier than removing the head.
-
No, I would just make sure that the shaft doesnt have any play (wobbling around). Remove the cap, remove the center rotor (part that spins), then wiggle the metal shaft left and right. If it does have play, then you have issues with the dizzy bushings and it needs work. It will have play up and down but should not have play laterally. Take the #4 plug wire and swap it with the #3 plug wire. Swap them at the plug AND the distributor cap. If your fouling plug moves to #3 then you have an ignition problem, if it doesnt you have a problem somewhere in the motor.
-
I would eliminate everything I could before pulling the head, especially since you have good compression, no smoking and no signs of a bad head gasket. You may want to remove the rotor in the dizzy and check the dizzy shaft for play. It should have no play. If it has play that can cause inconsistent firing. I dont know if it could cause a single cylinder to always missfire or how a pertronix would be affected. I do recall you getting better running when you were messing with the ignition wiring. Maybe swap a plug wire just to be sure it isnt one of the wires.
-
Maybe glue a thick piece of rubber to the top to cushion the speed shift!
-
I used this BAT auction car for a lot of reference pictures. Lots of detailed pictures. https://bringatrailer.com/listing/1971-datsun-240z-124/
-
It isn't too bad of a job. When I was young we used to a few pieces of heater hoses to hold the chain in place! Take your time and dont forget the two front bolts on the head. I hope you find something wrong 🙂
-
1,800 and 6 months.
-
Tri city plating did mine. It was expensive and took a long time, but they did a good job.
-
Looking great. Its game on now. My defroster hoses had been modified by mice. I got some decent replacements from datsun rescue. I need to go through my "extra" box and get you some pictures to see if you can use any of it.
-
There has to be a reason its 400 more. Looking at the pictures on the websites I noticed that the Vintage dash has the metal integrated into the center dash area and the datsun garage one doesn't seem to have that. Maybe call vintage and ask why you should buy their dash. Still cheaper than I paid for Just dashes. Your car is going to look great.
-
sorry....
-
Agree with Patcon, I think you will have a big mess. If something doesn't go right (crack) and the glass has to come back out, thats going to be a disaster to clean up. Here is a video of a guy that put sealant under the lip after installing the glass. Personally I would install it dry, and if it leaks then add sealant. https://www.google.com/search?q=youtube+installing+datsun+windshield&oq=youtube+installing+datsun+windshield&gs_lcrp=EgZjaHJvbWUyBggAEEUYOTIHCAEQIRigATIHCAIQIRigATIHCAMQIRigATIHCAQQIRigATIHCAUQIRifBTIHCAYQIRifBdIBCTIyNTE3ajBqN6gCALACAA&sourceid=chrome&ie=UTF-8#fpstate=ive&vld=cid:9b4f37af,vid:H77PZfCmwcU,st:0
-
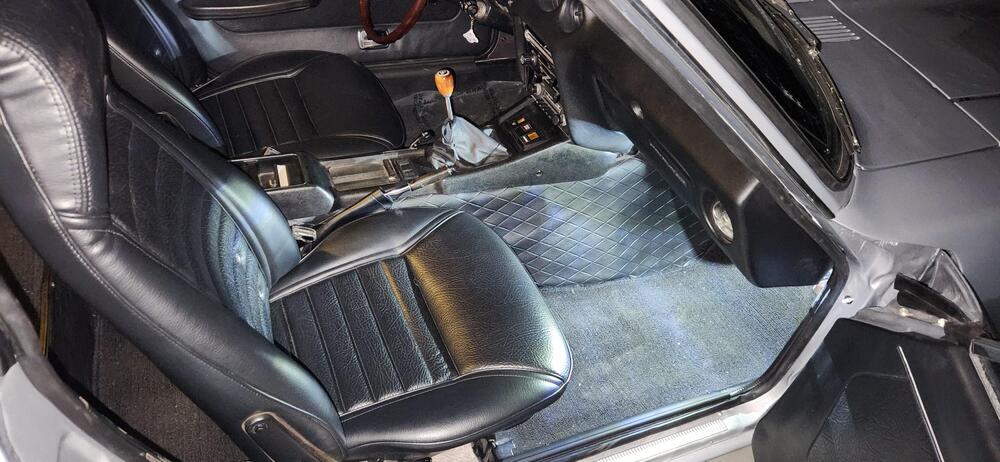
Got some round LED's and made some floor lighting using the OEM wiring. I mounted them with some pieces of aluminum and used 3M emblem tape to hold them in place. I got the lights from amazon. Very pleased. Thanks @zKars for the idea.


-
Dang that sucks. I used just dashes. Took forever to get it back but I was pretty pleased with their work. Like inline said, the gauges did fit tight. It looked to me that they replaced the entire foam as they repainted the whole frame and all the foam appeared fresh. I got a local shop to get a new windshield. I think it was around 250 or 300. I guess I got lucky putting it in. I really lubed it up with some silicone rubber lube. Gasket and frame. I remember thinking, this thing is too big to fit when I got up to the top. I just kept pushing it down and went slow. Are you using an oem gasket? Maybe the old windshield was just brittle. I have two spare windshields ( not OEM) if you want one. They are in ok condition. I guess the silver lining is that you broke it and not your helper. Glad to hear you are making progress!!


-
That's code for "Made in China"