LeonV
-
Posts
2,270 -
Joined
-
Last visited
-
Days Won
1
Content Type
Profiles
Knowledge Base
Zcar Wiki
Forums
Gallery
Events
Downloads
Store
Blogs
Collections
Classifieds
Everything posted by LeonV
-
Found metal at the bottom of my 5-speed. What next?
LeonV replied to KDMatt's topic in Engine & Drivetrain
I'd start it and run it through the gears before putting the exhaust on. -
Do you still have the emergency switch on the right inner fender? Reconnect your interlock system, fasten the seatbelts, press the emergency switch button, and see if it works.
-
Thanks! Post up after the float adjustment and test-drive.
-
I had to sand a chamfer in mine to get them to fit, also using the Energy Suspension kit.
-
I just Retired, Moved, Drove Z to it's new garage.
LeonV replied to Oiluj's topic in Engine & Drivetrain
Congrats Julio! -
Excellent, looks like we're on the same page. Out of curiosity, what are your jetting specs for the Z and Roadster?
-
Most Z-cars have so many air-leaks from rust holes, bad weatherstripping, missing grommets, etc. that it probably doesn't matter whether you seal those c-pillar vents or not...
-
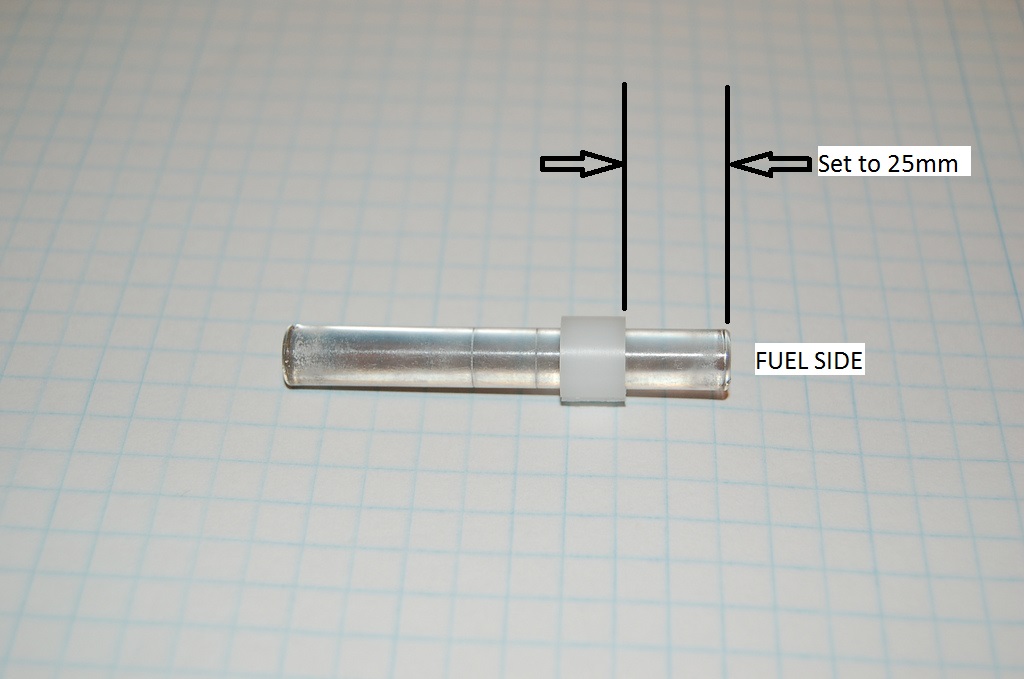
If that is the case, your fuel level is likely at (or over) the brim to the auxiliary venturi passageway. In other words, your float levels are likely too high. Are your air horns wet with fuel after running the engine? Proper float adjustment is done as follows: This is assuming you're using the right side of the rod to dip into the fuel, as pictured. Adjust the floats so that the RIGHT side of the sliding collar is flush or slightly to the left (1mm) of the RIGHT hash mark on the PC rod. That should measure 25mm using the depth gauge on a caliper. Here's how I set my floats: Write down your current float levels as measured with a caliper depth gauge, using the method as described above. Sounds like you're at 23mm. Remove the cover and put it upside-down on a workbench. Using a caliper, measure the distance between the float and the cover when the float tang just touches the needle valve, as shown in the 8.5 dimension in this photo: DO NOT worry about the actual number but do write it down. We're only concerned with the difference. If your floats are too high, you need to increase this measurement by the amount that your floats are off, i.e. this is a 1:1 relationship. For example, if your current float setting is 23mm as measured from the top and we want it to be 25mm, then increase the distance between your float and cover by 2mm. Visualize what this does and you'll understand. That means that if you measured 8.5mm currently, then that needs to be increased to 10.5mm. By setting floats this way, I can usually get them close, if not perfect, in one try. DO NOT be concerned if all three carbs have slightly different measurements between the float and cover. We're only worried about the actual measurement from the jet stack shelf down to the fuel level (with the engine running).

-
No, sorry. I'm talking about measuring the float level using Keith's tool. It's a clear tube made of polycarbonate with a sliding collar to mark the level. You said, "They are a bit low from the mark on the glass tube" and I want to quantify what you mean. "I can tell you how far the level is from the outside top of the cover to fuel level." - That's the number I was curious about, mine are at 25mm measured from the jet block shelf (as I like to call it) down to the fuel level.
-
When you check the floats, take a caliper/depth gauge and measure the distance between the bottom (fuel-side) of the clear tube and the collar. If it's 24mm or less, you need to lower your float levels. I run 25mm on mine. 23mm is the height of the aux venturi passageway, as referenced from the float gauge.
-
I don't see what else an over-pressure condition could have done. You're checking the float levels with the car running, correct? What is the actual measurement? Double-check your sync, not that it's related to fuel pressure.
-
Have you checked your float levels?
-
@Jeff G 78
-
I bet Jeff would be interested, he's in MI... @Jeff G 78
-
I'd love to grab it but not sure how soon I can be in Davis.
-
I bought a car on eBay a couple of years ago. Paid the deposit ASAP and then the price in full after getting in touch with the seller. Had the car shipped from Florida and the paperwork mailed to me using USPS Certified (or Priority, don't remember).
-
Sell to Denmark dude. You may also get away without paying the eBay selling fees if you do so.
-
Love it, great job Rob!
-
My point was that there is no way to know whether the transmission came from a Z/ZX just by looking at it. I've seen people get screwed over when they're sold a "close-ratio" gearbox judging by the casting only to find out that it's not actually a close ratio box.
-
You'll get even more muddled-up when you realize that the casting change applies to ALL Nissan 5-speed boxes! A 5-speed with one ear and the speedo bolt at 6 o'clock may not even be a close-ratio gearbox at all. http://www.gracieland.org/cars/techtalk/gearing2.html
-
Great stuff, thanks for posting!
-
Precisely. Many of those "upgrades" are poorly engineered, i.e. pieced together without thought to performance. A prop valve isn't going to help poor engineering. Placing a prop valve in the front will lead to instability during braking, or at the very least longer stopping distances. The harder you push the pedal, the more rear bias you will have. This is the opposite effect of what a proper braking system is supposed to do. A properly placed prop valve (in the rear lines only) will increase front bias the harder you push the pedal, i.e. front brake pressure will ramp up quicker as weight is being transferred to the front. Stoptech has some good writeups on brakes, here's one on proportioning: http://stoptech.com/technical-support/technical-white-papers/proportioning-valves Some good quotes from the article:
-
Never put the prop valve in the front lines, proportioning is done by limiting rear pressure.
-
To machine or not to machine (flywheel resurface). That is the question
LeonV replied to zKars's topic in Engine & Drivetrain
I was in a similar situation with the last Z clutch I did. The flywheel looked great, like a brake rotor. I lightly sanded the surface with some medium grit sandpaper with a flat stone backing. No issues. -
Nice camera skills!