Everything posted by fiveleaf
-
Help me ID these wheel/rims?
I could always re-use my current lug nuts for the first issue, and spacers would take care of both the potential to rub on the coilovers and the fitting of the hub (and give me more clearance than what I currently have - very tight!), but they look pricy to buy new. I'm leaving the decision with him; if he want's my wheels, he can buy spacers in addition to changing the tires over. Thanks for the input everyone
-
rebuilding double webbers
I am also in the process of rebuilding triples, and just bought 3x rebuild kits & manifold vibe mounts from racetep.com. When I called, I asked them to pricematch (as they advertise) webercarbsdirect.com, and their response was that the DCOE rebuild kit from webercarbsdirect uses non-genuine parts from Japan. I don't know who's right, but I paid a little extra and went with racetep. Weber Carburetors. 818 764-1901 Carbs 40 DCOE 45 DCOE 32/36 32/34 Jeep. Top-End Performance 818 764-1901 If I remember correctly, there is a great write-up done by someone on this site about cleaning up the exterior of a set of triples. I've been looking for it for the last 30min, was it ZsOnDaBrain? Was there extensive use of a dremel? I'll continue looking around for it, it might be useful to add to this thread. Also, Tom, I have a bunch of pages from Pat Braden's "Weber Carburetors" that you should read. I'll send them to you; give me your e-mail address?
-
Help me ID these wheel/rims?
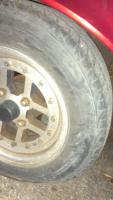
Tires read ZIEX ze512. Struts have been shortened. Thanks for the info! I've yet to make a decision.
-
Help me ID these wheel/rims?
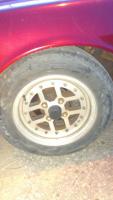
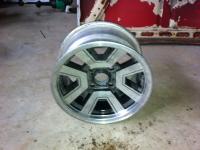
I live next to a mechanic on his apprentice course who has taken a liking to my rim/wheels. He has offered to change all my tires over to his rim/wheels an put them back on my car. He recently helped me with my 240z (on which they are currently installed), which was partially race prepped by the previous owner. I don't have any experience with this aspect of my car, and am wondering if there could be any reason asides from aesthetics that the previous owner had in mind when using these rims/wheel/tire combination. Here are photos of what's on my car and what he wants to trade me for: His photo is the one without the tire.
-
Issues-Modern Voltage Regulator: How to Wire?, Brakes: Vac Assist, Buying: Nut/bolts?
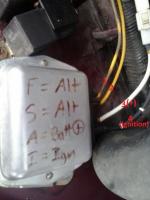
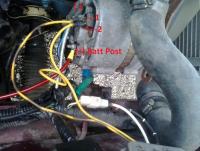
I just picked up my 72' 240z from the shop. I'm having issues with a few things before I'm able to even think about driving anywhere: (1) Alternator does not charge the battery or provide power to electrical system when car is running. Alternator was taken to machine shop prior to this, where it was re-wound and confirmed working. He also sold me a voltage regulator (modern solid-state), which is currently installed. I believe that I installed it wrong. Some pictures are below. (2) The Brake Booster Hose and Check Valve were removed by the shop, and it's been a long time since I've seen the car (almost 2yrs). The Check Valve seems to be an easy find, but does anyone know where to find booster hose? Which ones would be compatible with a 72' 240z? (3) The dash isn't bolted in, and I don't have the necessary hardware fasteners (screws/nuts/bolts) to put it in. Are there common sizes for these avail. somewhere? I suppose they should be common metric sizes, and avail. in stainless steel in most hardware stores? Here's some pictures of the current voltage regulator as it's attached to the alternator right now:
-
Re-wire of the Dash Harness over the summer
I'm not sure how to edit posts with the new fourms... been awhile :$ SteveJ, sorry for making the font of my car's specs so small. I probably would have missed that too. Anyways, if painless is the way to go, my first question has been ansewerd this morning. It would be Painless #30021, 18-circuit, wires only. In addition to what is provided in the 12-circuit, this would add wires for my electric fuel pump, raido control (used for up/down), backup lights, and an Accessory circuit. Others (Power Doors/Windows) might be used elsewhere, but I doubt it. Wires physically extend to the four corrners of the car, as well as into the engine bay. Also confirmed (via calling painless) that their wire guage is larger diamater than the stock 240z wires. $416 + tx/shipping. What remains? A source for heatshrink, recommendations on any other materials/references I might use (as well as painless or non-painless)...
-
Re-wire of the Dash Harness over the summer
I followed a few links from Vintage Connections, but have been unable to find a place that sells the same colored wires for the z. I purchased the Vintage Connection "Professional Kit CK-2" and "Professional Kit CK-4", as well as their crimping tool, when I re-wired the engine bay. I will refill the CK-4 kit so that the new (Painelss or otherwise) harness will mesh well with the stock harness. Is there any jury-rigging involved in the painless harness? I thought that it would attach pretty well to the regular harness, only using slightly larger gauge of wire & labeled every few inches with what that wire specifically does, instead of the factory spec color codes. Have you read anything about people having to jury-rig the painless harness? Mentioned above, Headlight and parking light relays will be used. HLH and PLH from Dave (ZsOnDaBrain). Strange, link works for me...
-
Re-wire of the Dash Harness over the summer
See car info at bottom for specs that may affect wiring. Car is currently at Whitehead Performance in Toronto, waiting for a new Mallory Ignition Sensor for the distributor. It really needs to be running while I'm working on it, and I'm only willing to make the tow once. For those interested, Whitehead Performance also has described a solution for the famous door-adjustment issue; apparently re-shimming the hinges works well. I spent a lot of time re-wiring the engine bay two summers ago. Much better now. Vintage Connections with proper tools and heatshrink used throughout. Everything cumulates into that port in the firewall under the passenger's feet. The dash is a real nightmare, to say the least. Electrical fires and multiple el-chepo splices don't fare well in old wiring. I want to re-wire the dash, but I am posting here because I am unsure what exactly I need to purchase, and if there's any resources out there I should be aware of. Questions follow, any advise/input appreciated (1) It seems like the majority of others that have gone before me have used and said good things about Painless wiring harnesses. Which harness do I purchase (already having a new modern fusebox from MSA) (2) I have a lot of cheap heatshrink, but it is exactly that... cheap heatshrink. I've bought multiple packages of the good stuff, but it's very pricy to buy locally. Want to recommend me a good online source? It all looks too good to be true, and most of it probably is. (3) Asides from a vintage connection CK4 refill kit, and heatshrink, is there anything else I'll need? Fuses/relays for other devices? Gauges to be done later. Too pricy for now, especially for something that's accurate and looks stock. (4) I've done a few searches, and everything kind of points to this one thread. More knowledge is always appreciated! http://forums.hybridz.org/index.php/topic/29786-painless-harness-to-z-column-harness-headlight-combo-switch/ Thanks! ------------- Car info: 72' 240z (L28 triple webers); manual transmission. Mallory Unite, Hyfire VI CD ignition, Crane PS92 coil. Halogen Headlights High-output running lights (future) High-output dashboard lights (MSA package) High-output alternator Wiper Motor Upgrade (future) Electrical fuel pump and (fan in the future) No blower motor or related wires/pipes Car is bare metal (with POR-15 anti-rust) from the firewall to the end of the rear hatch The (+) terminal of the battery leads to a power distribution block, which directly powers the high-draw equipment (headlight relay, CD Ignition box, CD Player & amp). The rest of the car is also powered from this block. ----------- Headlight and parking light relays will be used (thanks Dave!) --------
-
MSA Fusebox
If you do happen to find someone that fabricated covers for these, or come up with a asthetically pleasing solution yourself, please shoot me a pm Not exactly a real priority for me, but it would be nice to cover it after the re-wire.
-
Under 24hrs to flush coolant & winterize. No start. Long term storage.
Thanks! My problem is still opening the valve... good to know there's probably a drain port on the bottom of the rad though. Hope it has one (aftermarket). No blower motor or heat exchange to worry about
-
Under 24hrs to flush coolant & winterize. No start. Long term storage.
Aha, the Canadian winter. I have about 24hrs to winter prep my z, for at least the next 10 months. It will be staying in this garage at least until I graduate. At least a year and a half. So here's my problem: As a busy student I get no time (or $) for my z anymore. It's stored a 5hr drive away from where I attend school, and if I see it, it means camping in the garage with her. I'm currently about 5km down the street, using the internet There is no antifreeze in the coolant system right now. Recent $5k engine rebuild. Winter is coming. I am leaving her. I've (of course) researched a little before coming out here, and plan on: Pouring oil in the spark plugs. Removing Batt. Plugging possible mouse holes. Fuel Stabilizer. ... And coolant refresh. I was using a Crane HI-6 (CD Ignition box) to a PS92 ("CD Ignition Only" coil). The CD Ignition box is dead, and I can't get my hands on a regular coil. I can turn the car over, which would (I assume) be enough to pump the antifreeze/water through the block... but I'm unsure how to open the valve that allows it to go further than the radiator. On that note, I've never actually properly drained my coolant. Exploded once, my first experience removing a water pump, and hose replacement have all been... messy. Questions: 1. Further recommendations for long-term storage 2. How to get the temp sensor to open the valve! 3. Is there a coolant drain hole (like the fuel tank has?) 4. Do our water pumps flow enough volume to refresh a coolant system on battery power alone? (Because if the volume is anything like a oil pump...) EDIT: 1972 240z, L28, Unilite distributor (with Crane HI-6 and PS92 coil).
-
Hi Z friends
Your z looks great. Nice and clean I know this is a LOT of reading, but as far as lowering/suspension on your z goes... FAQ from Hybridz (scroll to "Brakes, wheels, suspension" section) And here (on struts) is the longest thread I've ever printed. Good Luck!!
-
HI-6 not recieving trigger signal from Unilite
I left the paper with the distributor numbers with the car, before I left for the field. Visually, it's rectangular holes with an optical device. I'm not an expert, but I think it's safe to assume it's Hall effect. I agree with Adrian; I'm opting out of the resistor and going to remove it from the harness entirely. I didn't want to test it before I left, out of fear of damaging the module without a resistor. I just got back in, and will try this all tomorrow. For now, I'll go enjoy a thimble of beer and pass out. I'll keep you updated, thanks. EDIT: Work has been unexpectedly fast-paced all day for the last few days, and I haven't had a chance to get to the 240. It needs to run by Friday. I'm sure it will, and that my issue is probably just the unilite module.
-
HI-6 not recieving trigger signal from Unilite
I'll grab the part numbers next time I go up to base. It's parked outside, with the interior down to bare metal. I was trying to get it to run for a lapping day, and ended up stranded in a parking lot. I leave for a week-long exercise (military) on Monday, and if I can't get it running tomorrow, I will flat-bed her to somewhere. I believe both of the ignition modules are the same. It was another regular at the auto shop on base that told me it was a magnet that wears out after I told him it was hall effect. I didn't know enough about the module to contradict him. Adrian, yes, you are right; the red wire is receiving the +12V currently. I'll try the test tomorrow morning. Dave, is this supposed to be +9.5V on both START and RUN? It is currently wired inline with the fuel pump, for testing purposes. I'll head to the local parts shop and take an extra ballast resistor. Would the module blow immediately? If so, It's blown, and you just saved me from blowing my spare. My next step is to pick up a spare ballast resistor, install it with the test wire (from the fuel pump), and try the previously mentioned tests. If they fail, I'll install the new module and re-test. As of Monday morning I'm gone on ex for 7 days, but will continue next Monday if I don't figure this out tomorrow.
-
HI-6 not recieving trigger signal from Unilite
Forgive my inexperience. ---- Green (+12v) from the Unilite get's +12v from a section of the fuel pump +12v. If the fuel pump is on, I know it's getting power. Brown (ground) from the Unilite is grounded about a foot away. Green (trigger out) from the unilite is to the white (points) into the HI-6. Tested for continuity from it's connection inside the unilite to the other side of the firewall (bullet connection to HI-6) ----- Seems weird that it would be a defective module. I have an extra, but isn't it magnetic and more subject to wear (opposed to failure?). 1) I'm quite certain the Unilite +12V (red) to earth (brown) is good. I'll test it anyways. 2) Connect one end of the test bulb straight to Batt (+). Connect the other end to both the red and green wires at the same time. Turn the engine over. Blub should flash with trigger output. Isin't this what the HI-6 flashing indicator LED supposed to show? 3) With the ignition on "Run", is to block/unblock the optical trigger. I should get a spark from the main coil wire. Measured with a timing light or spark to earth. Just wanted to clarify #2 before proceeding.
-
parts
If you're on a tighter budget than what's offered at MSA and the like, there's been some experimenting at hybridz... http://forums.hybridz.org/index.php?/topic/83080-new-weatherstrip-alternative/
-
Where to check for rust??
Around the rear hatch seal, and the hatch itself. Inside the front fender. Just below the doors. Above the rear tire. Try feeling the inside for more serious rust that may flake off. If the car has been re-painted, rust bubbles may appear close to the window seals. I was told this is caused by not removing the windows when re-painting. I'm sure I read an article on this somewhere...
-
HI-6 not recieving trigger signal from Unilite
My next move would be to take the distributor off/apart to look for bad connections, but was wondering if there should be something else to check first. I've been repairing the 240's engine bar harness for the last few weeks and may have pulled something loose putting the new 3-prong quick-disconnect on the unilite. I also have a used ignition module for the unilite at the shop, but I'm pretty sure that they are magnetic and don't usually just stop working. Any ideas in which direction to go?
-
HI-6 not recieving trigger signal from Unilite
Was hoping the car was going to run today. Just put the new starter motor in, and turns over well. The HI-6 has a signal light on the front of it, which is solid red when powered up, and flashing red while cranking to let the user know that it is receiving a valid trigger signal. Mine turns on to solid red, but does not flash when cranking. In the troubleshooting manual, this means I am not receiving a valid trigger signal from the distributor. The wires to the distributor have all been checked for continuity all the way to inside the distributor from the HI-6. I tested the HI-6 by taking the white trigger wire and touching it to ground. It flashes the LED every time it is released from ground, as it should. Wiring the Crane HI-6 to a Mallory Unilite distributor is shown clearly in the HI-6 manual. http://cranecams.com/pdf/90006000e.pdf Basic wiring for the HI-6 is shown on page 2. Green Tach output taped up for now, blue cylinder select grounded (6cyl engine selected). Recently rebuilt L28 (<200mi) Mallory unilite distributor (Tested 3mo ago, new ignition module 3mo ago). Crane HI-6 ignition Crane PS-92 coil
- I Just got ANOTHER 240Z, she's gonna kill me!!
-
Sound deadening removal, floor panal rust, POR-15 question
Well it's been awhile, and I'm STILL waiting on the POR order. I've switched suppliers because the first eventually told me his accountant advised him not to accept paypal from a Canadian bank. All the sound deadening is off; I'm beginning to get a little surface rust as it's been sitting for too long exposed (garage). Most of it came off nicely with a chisel then wire wheel, softer bits came off with a heat gun and scraper. Bare metal from the firewall to the rear of the hatch. I would have treated it immediately, but want to use their products for some reason. I'm going to use a little mason-jar siphon airbrush to apply it. Very little [or no] overspray, and cheap enough not to worry too much about losing a gun. For now, it's electrical. Just about every connection made in the engine harness is stripped (now rusted) wires in electrical tape. I found my electrical gremlins. At least it's easy to make nice new grounds while it's down to metal like this. I'm thinking a new grounding block in the cabin to shorten some wires and ground the amps to. Still waiting on seats, I've taken many pictures, they're at the auto club in my shop camera.
-
Who all sells Zedd Findings floors
Wow... I called last month or so. It is possible I am thinking of someone else, I'm sure it was in Kingston, and he was a member of the Thousand Islands Z-car club. My mistake then, and apologies.
-
Sound deadening removal, floor panal rust, POR-15 question
I found the best prices to be at http://www.por-outlet.com
-
Who all sells Zedd Findings floors
The Thousand Island Z-car club is currently non-existent. Charlie has sold all (most) of his z parts to someone in the US awhile ago.
-
Sound deadening removal, floor panal rust, POR-15 question
I'm going with POR-15, with a glossy black POR topcoat to go overtop. I've been sanding for the last week now, and am almost finished the entire passenger's side. Seats/dash/console are all out, I'm mostly using an angle grinder. I picked up a 7" giant makita grinder to make the drivers side go faster. This grinder with a wire wheel attachment (and no guard) can remove sound deadening like no tomorrow. Most of the work is being done with the smaller shop angle grinders, and a 4.5" sanding disc. The kind that are thick, with layered sandpaper. Those things last forever. The transmission tunnel and firewall had some crazy spray-on stuff that proved impossible to sand off. It was thick, like tar, and would melt before flinging off the angle grinder. I was in a t-shirt the first day and got a large piece of the molten stuff, which lit on fire mid-flight, on my forearm. Never again. I was actually about to give up on it... until a hammer and chisel worked their wonders. FAR faster than the sanding method. And a good thing -- the front of the tunnel came off with chunks of rust on the bottom. All surface. Pictures to follow!


