esmit208
Free Member
-
Joined
-
Last visited
Everything posted by esmit208
-
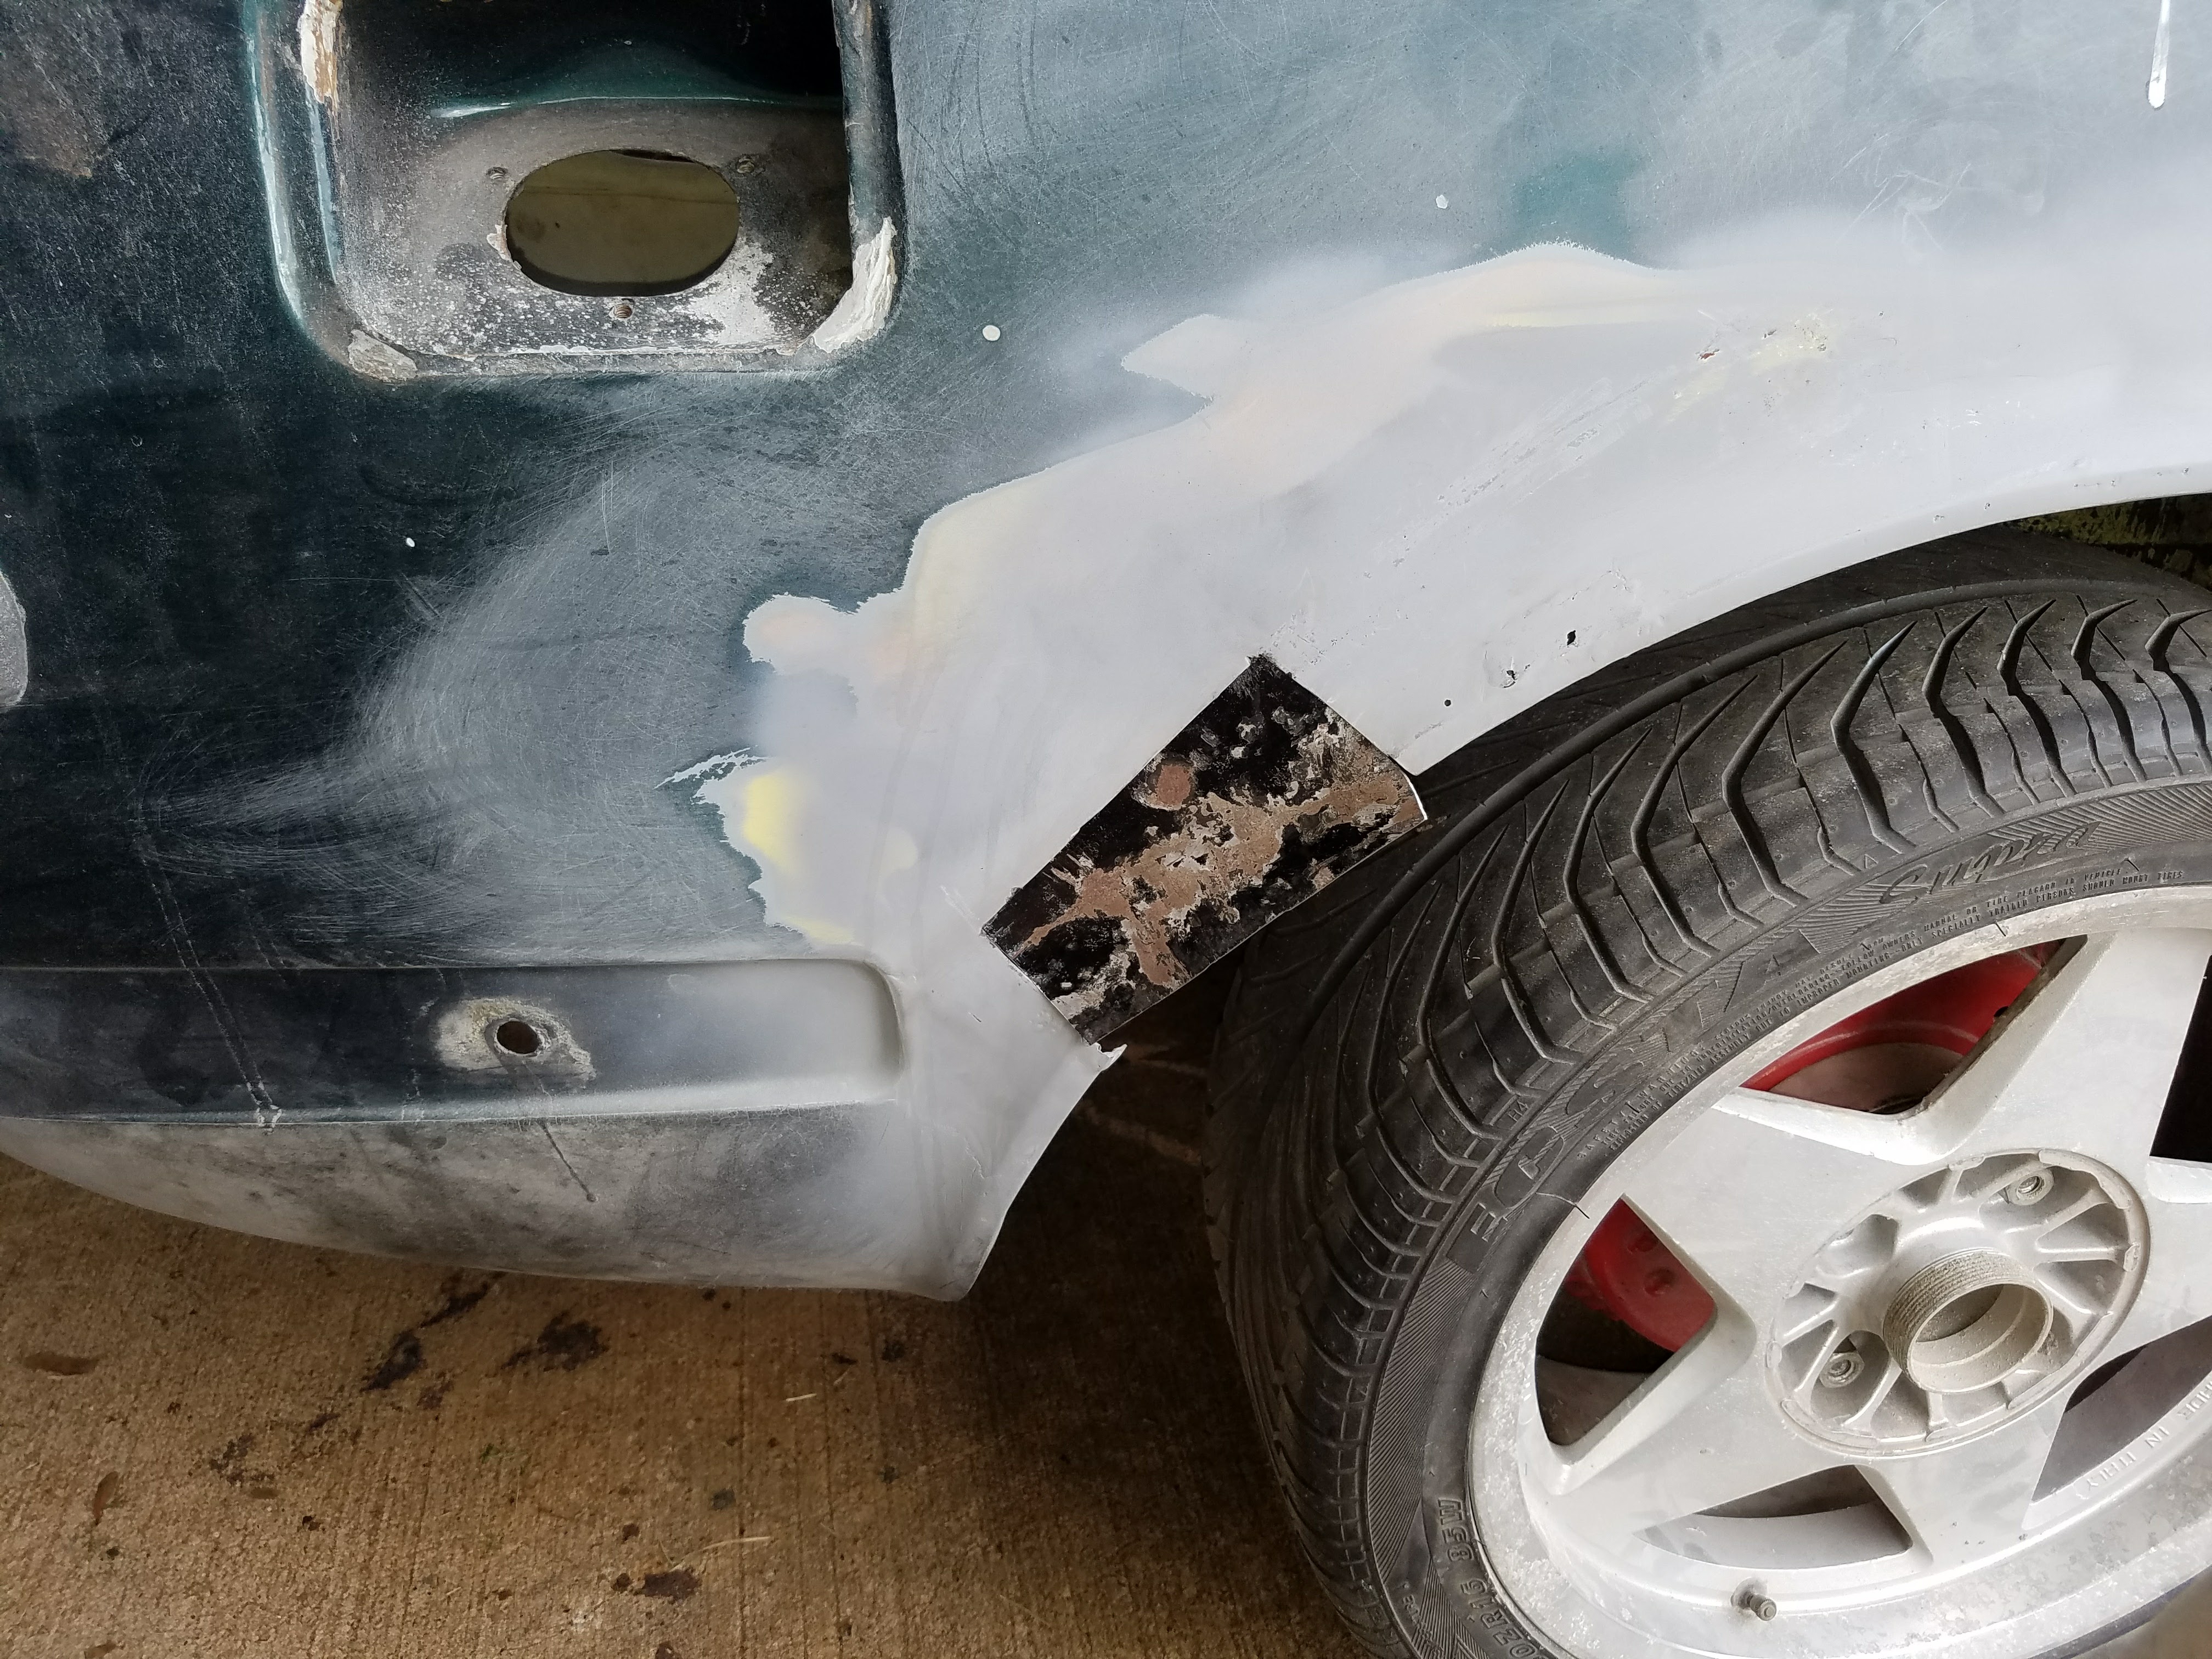
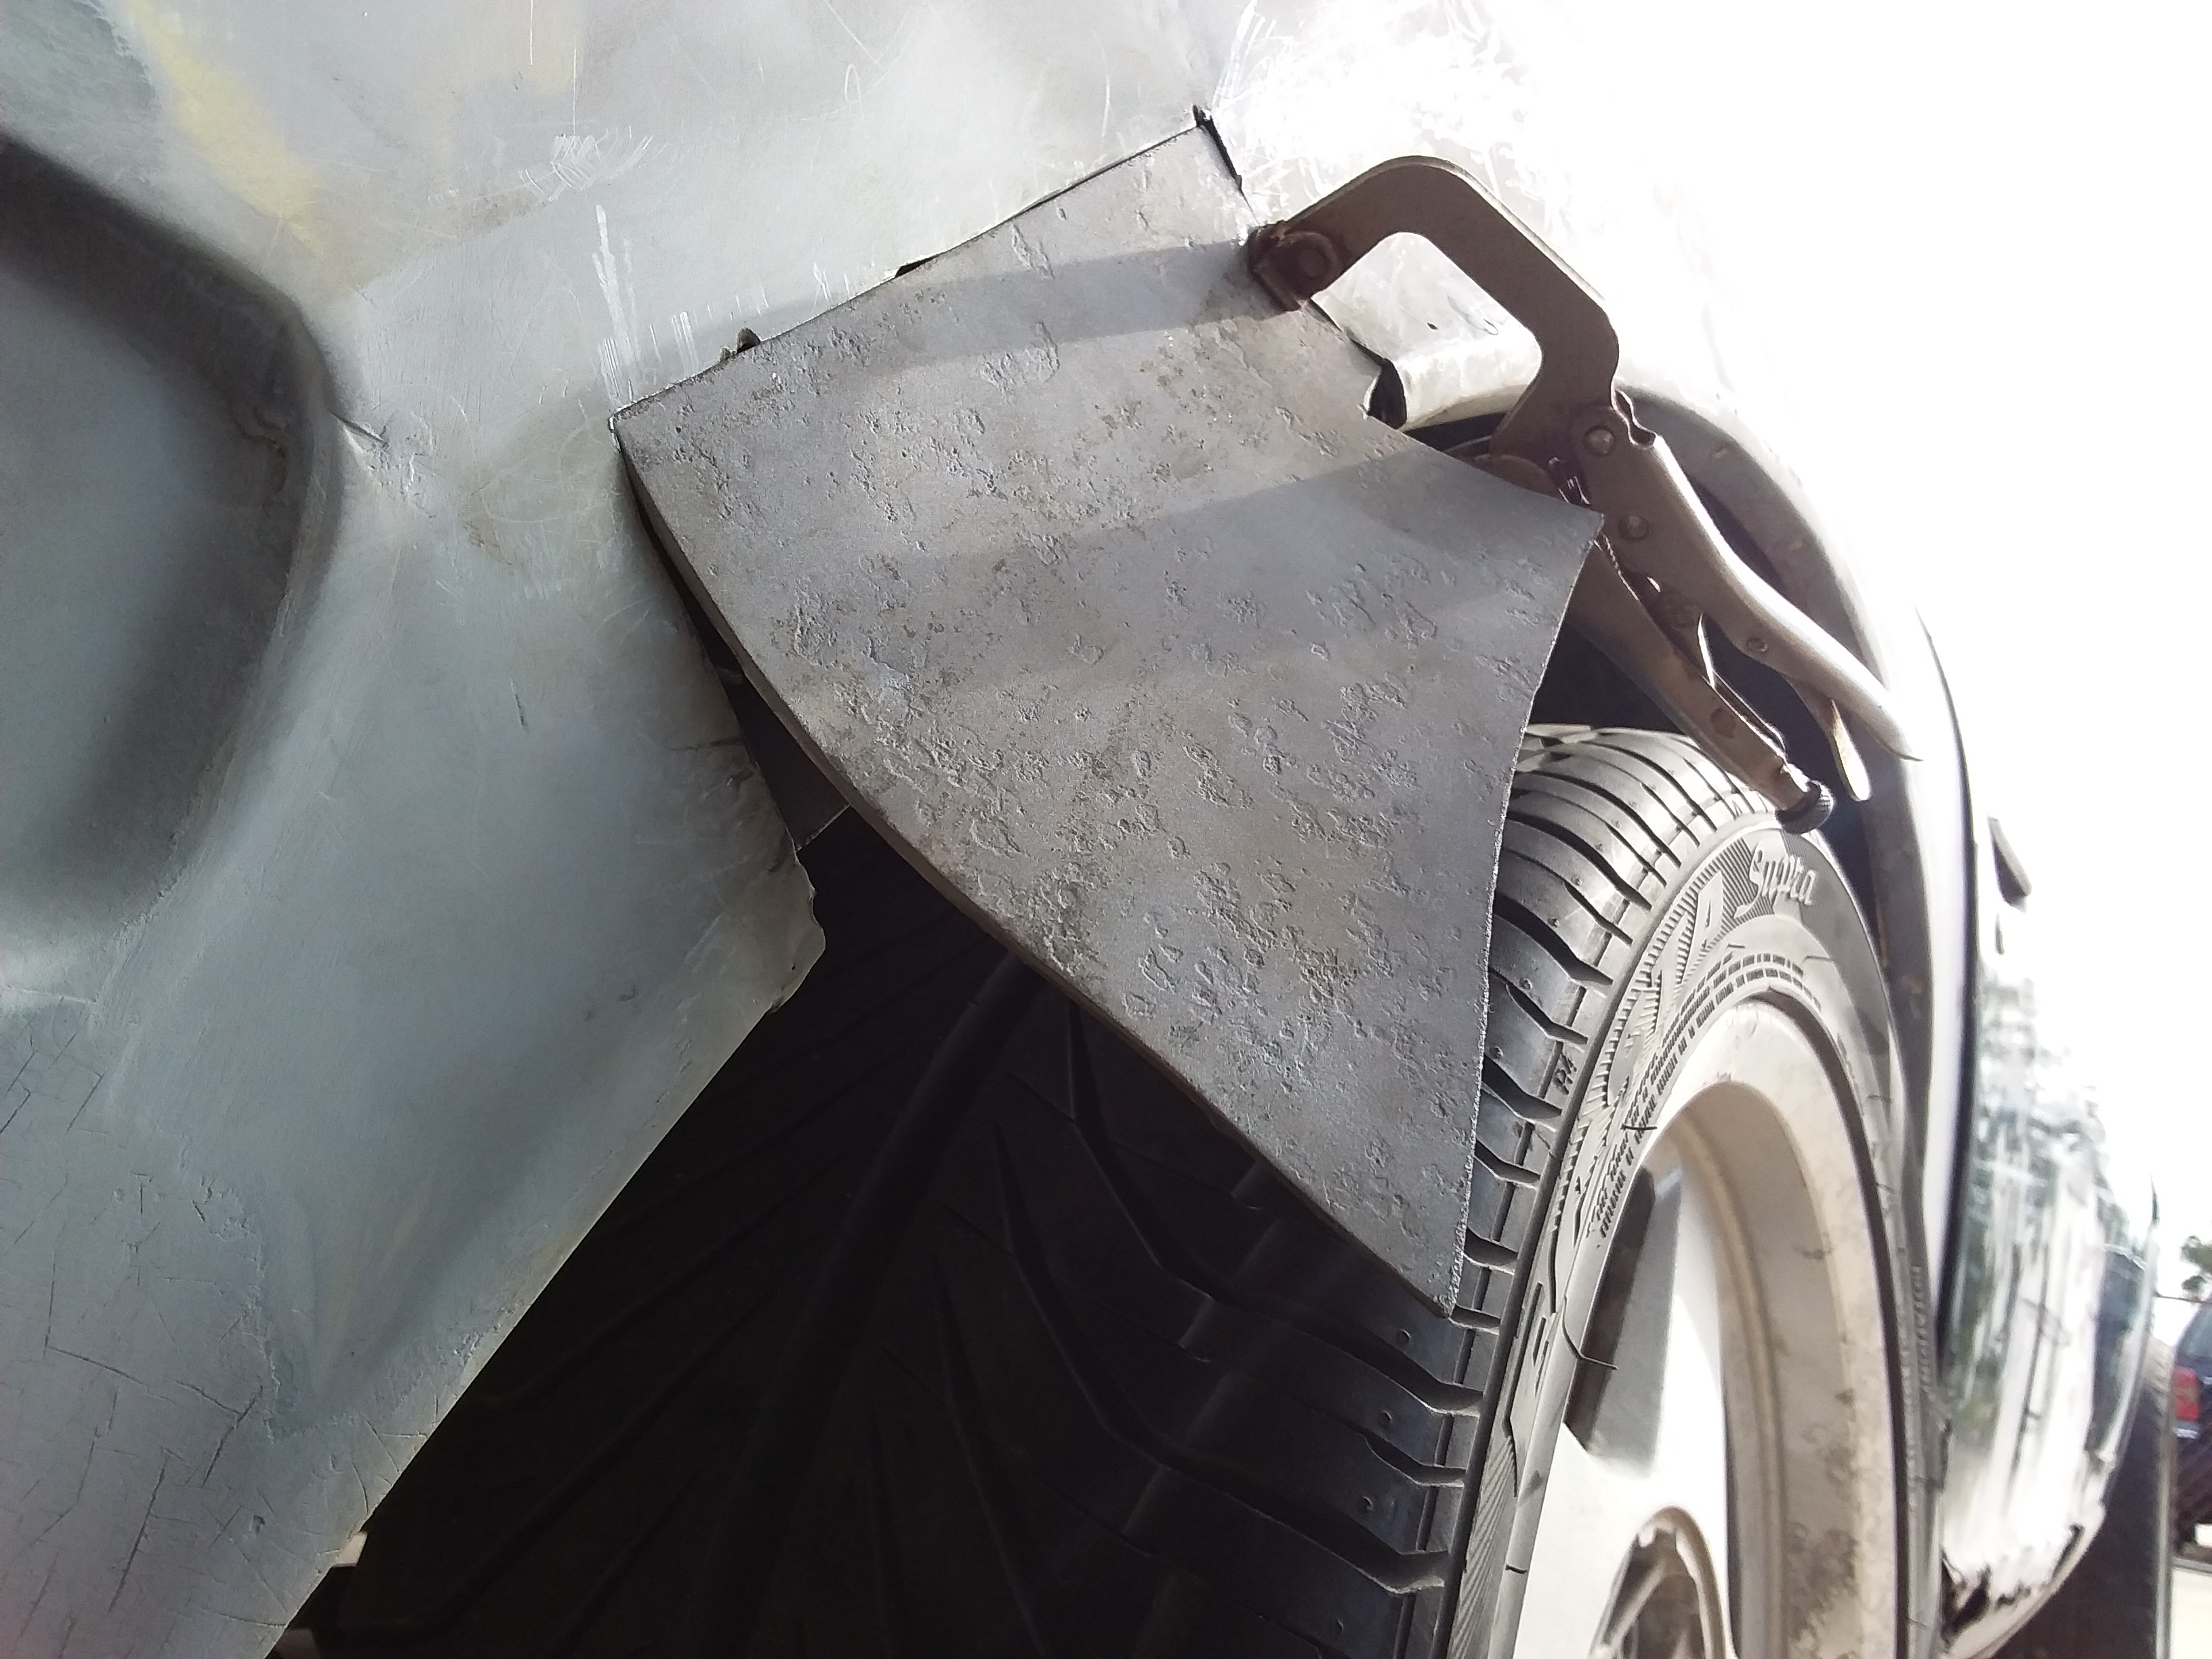
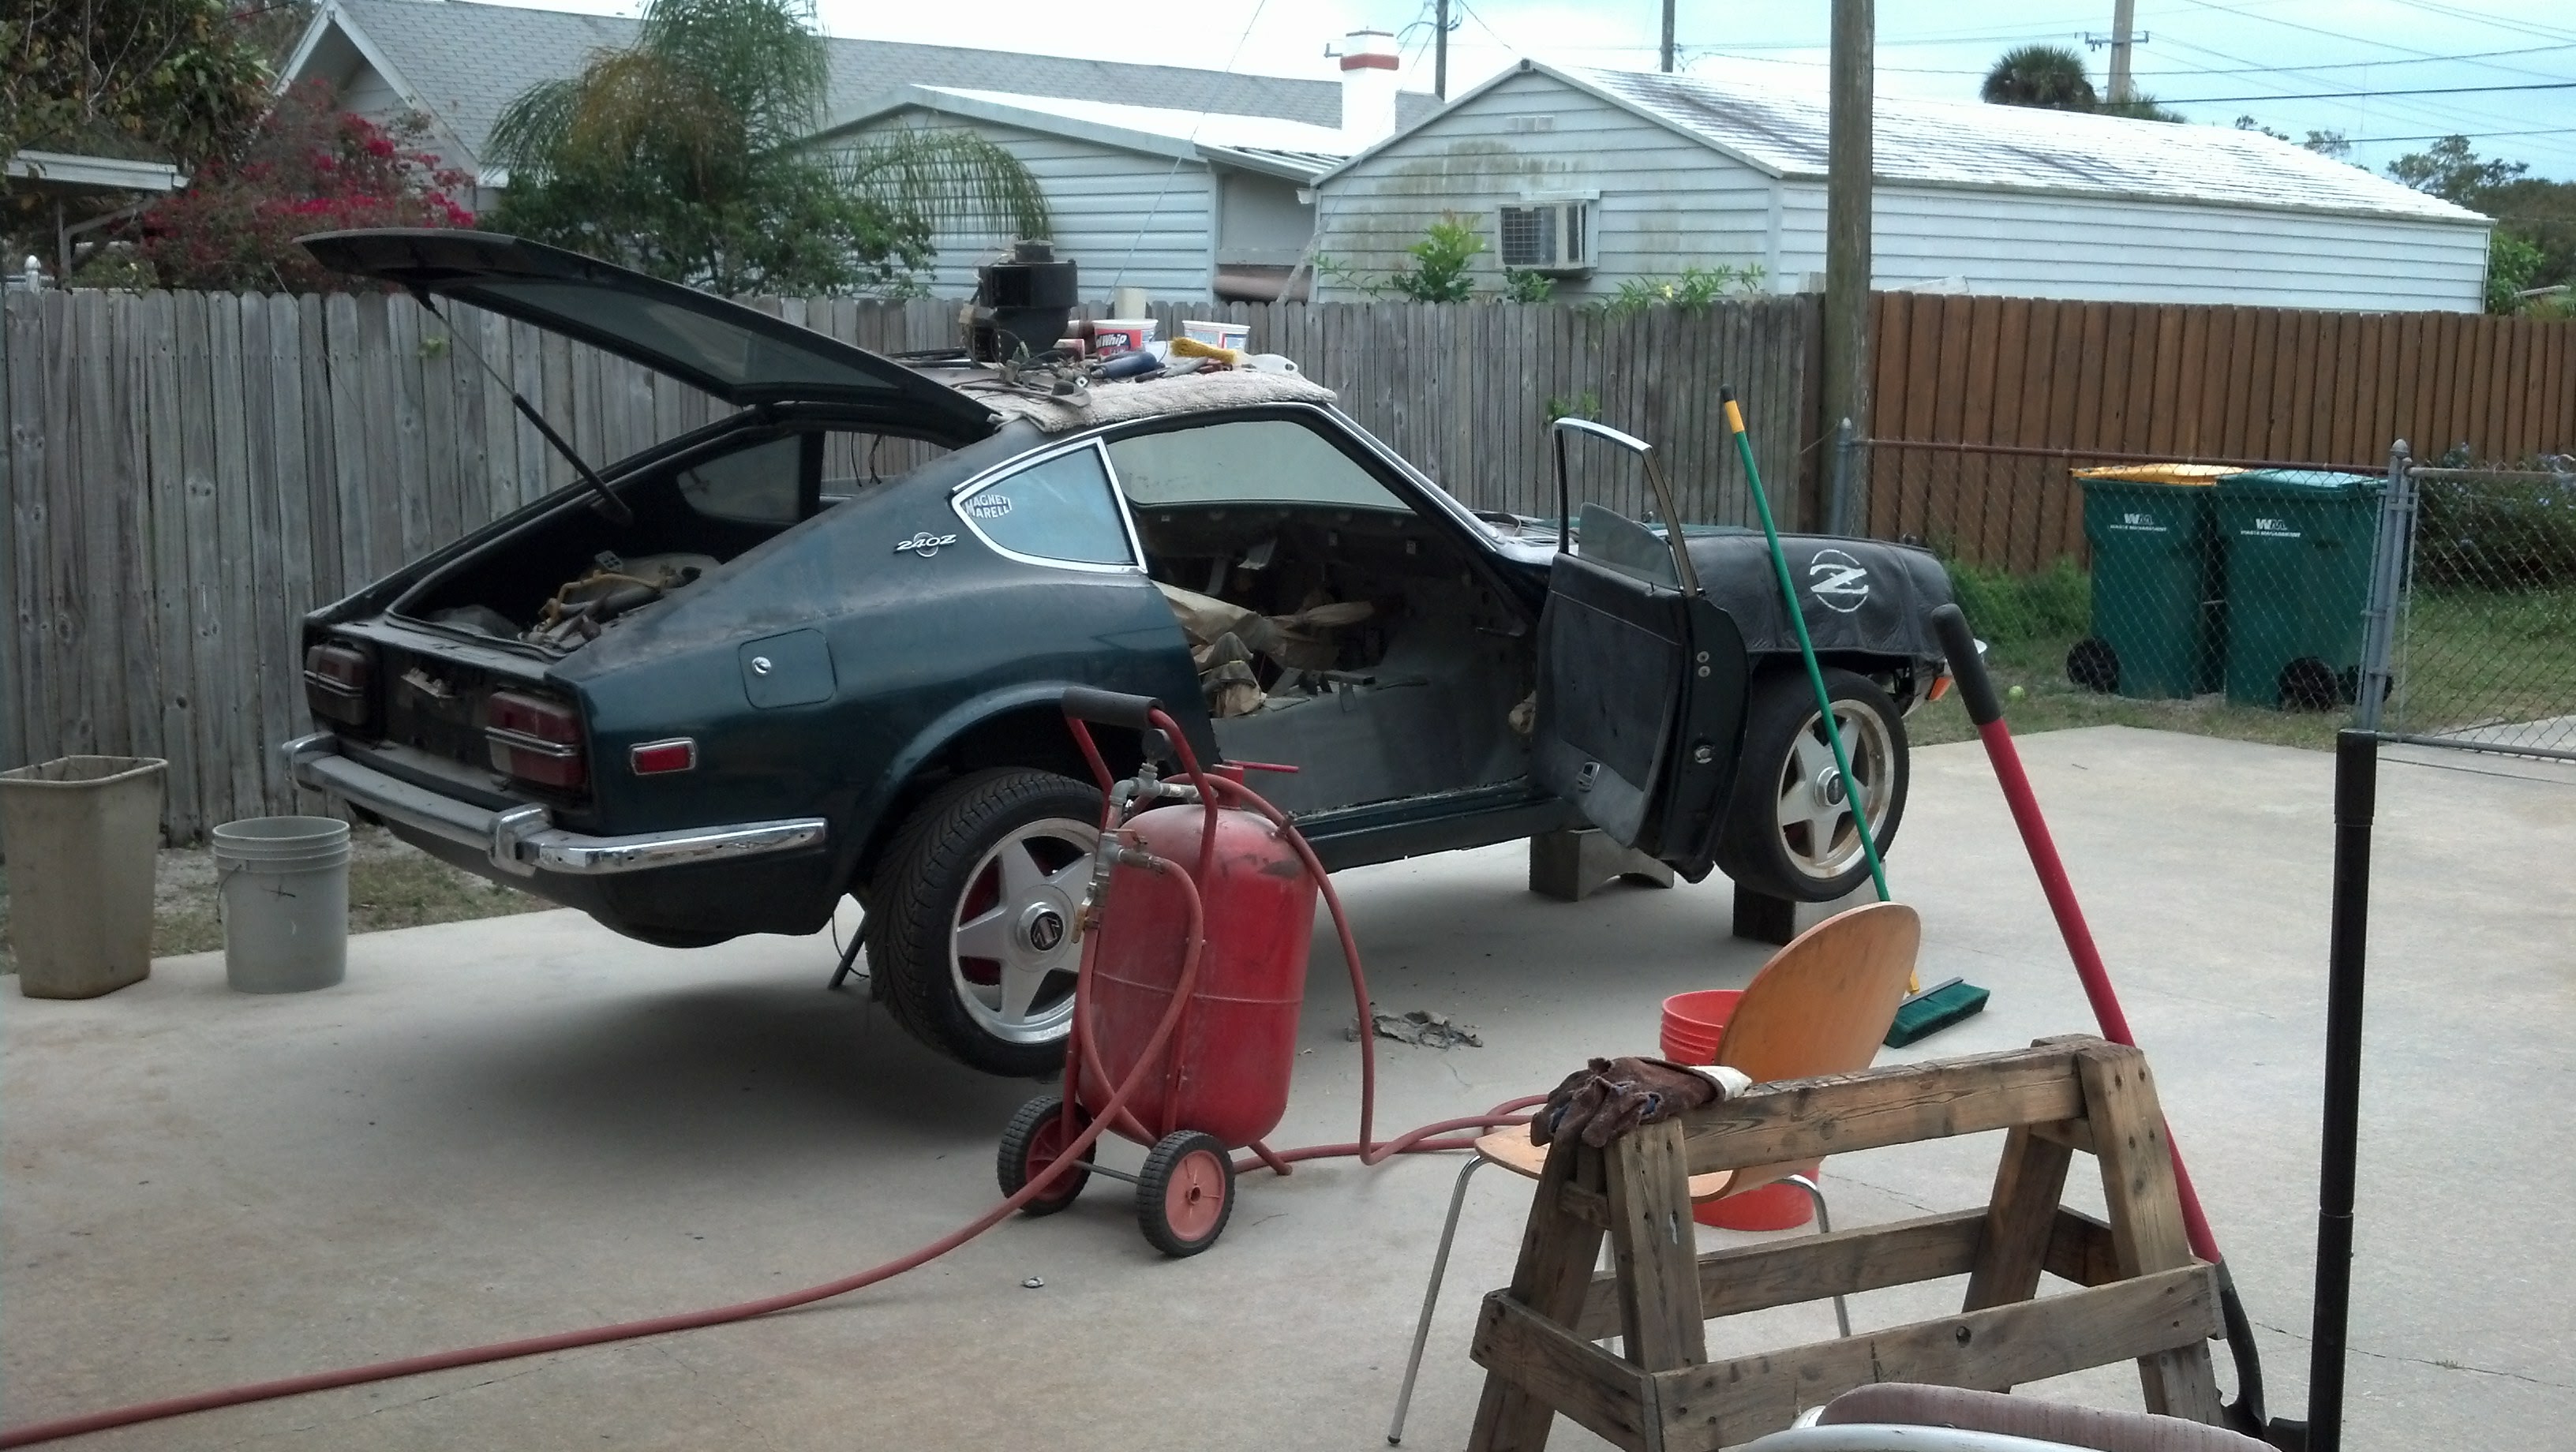
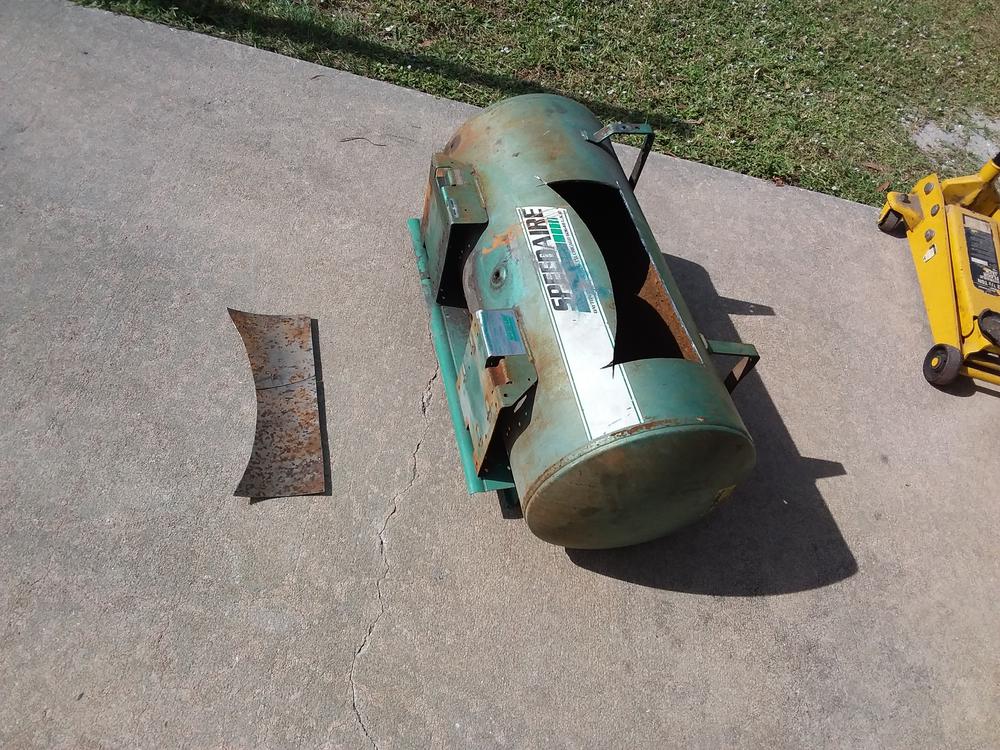
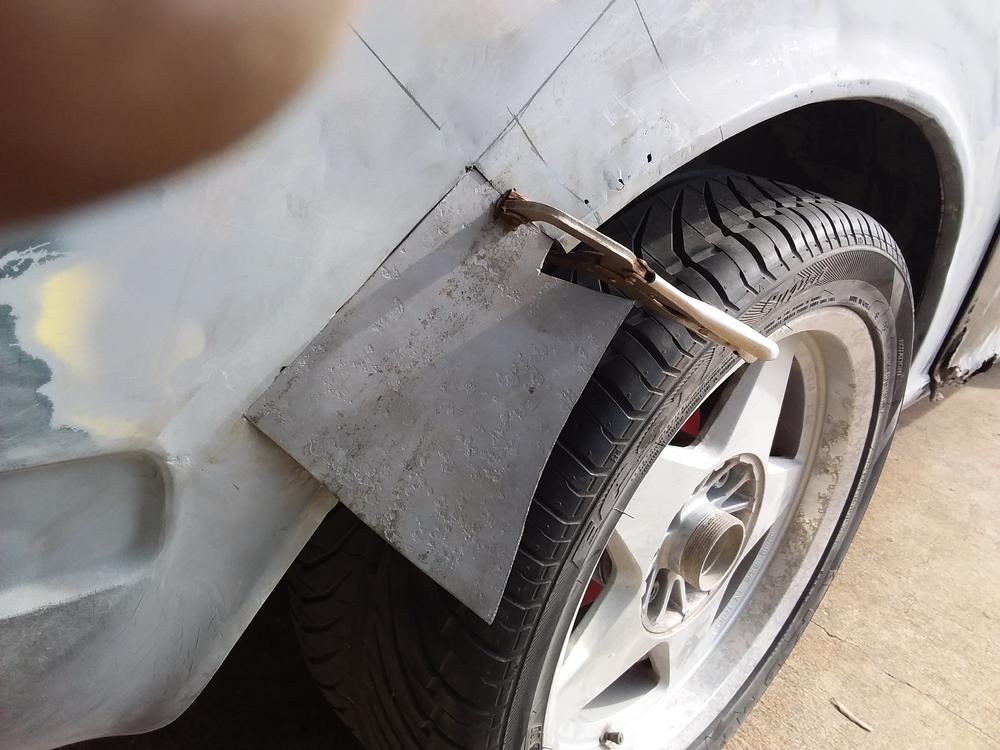
 Gentlemen I finally got the time and gumption to attack that right rear wheel well. What began as a bubble under the paint mushroomed into a rather large cancered area after a few moments of sweeping with the sandblaster. This area has been troubling me and I needed several months of study and thought to figure out my approach. The contours of this particular area make it quite a challenge to replicate satisfactorily. Not sure if I needed to cut the inner wheel well I began with the outer skin. Using a rotary cut off tool the outer skin was removed only to expose a rather large rusted area on the inner well also. Spots like this that are not in plain site are part of the reason we get fumes inside our cars. It may not be a gaping hole but any hole will let in fumes. Anyway another post for another day. OK some pics. My neighbor threw out this old air compressor and when I drove by I saw my contour. Next I took an impression from the left rear as guage of how much to cut out. Then traced it onto the tank. Word to the wise, stay away from HARBOR FREIGHT electrical tools. Enough said. After some triming and fitting, about 75 minutes later it slipped in nicely at the top. The plan is to secure it at the top with 2 or 3 short beads and cool it quickly with air after each short run. Cooling it should minimize metal stretch. After it is secured at the top, then cut the extending piece just longer than what I need, and that will make pushing the bottom into place easier without flexing the upper portion of the panels outwards. In the photo with the black patch, that was my first attempt with a piece that began as a relatively flat pie e of metal. Needless to say it probably wouldn't be sufficient. But I have plenty of patience and the practice gets me a little better each time. I had to cut several patches more than once. Watch this space over the next several weeks. Ciao!
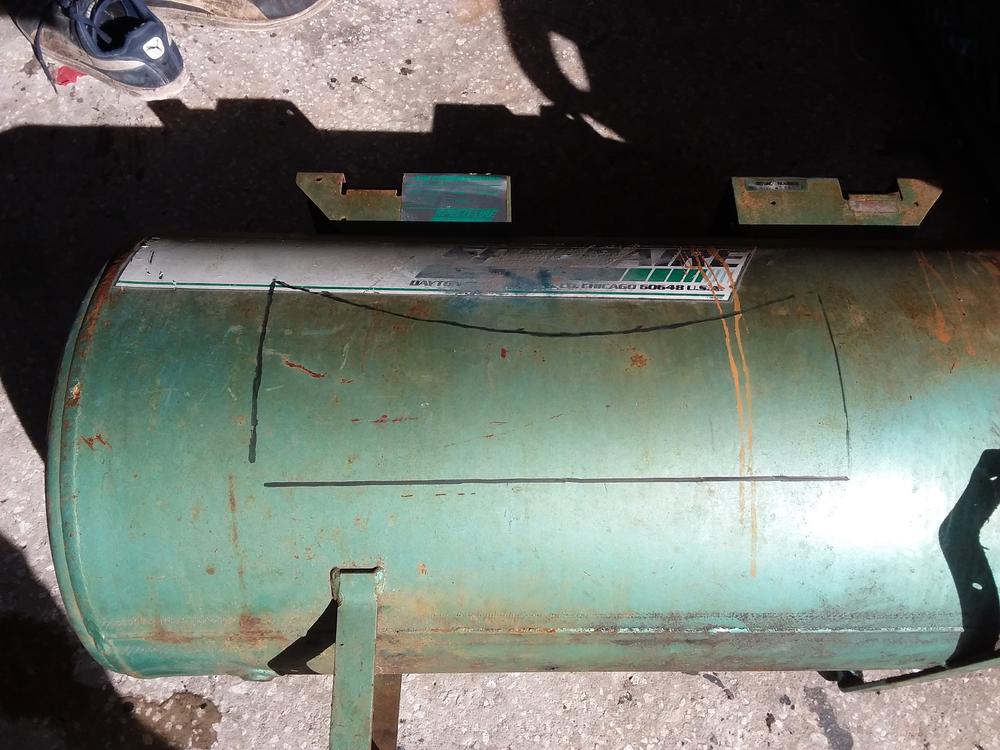


-
I used one of these, it works great. https://www.ebay.com/i/272339825478?chn=ps&ul_ref=http%3A%2F%2Frover.ebay.com%2Frover%2F1%2F711-117182-37290-0%2F2%3Fmpre%3Dhttps%253A%252F%252Fwww.ebay.com%252Fi%252F272339825478%253Fchn%253Dps%26itemid%3D272339825478%26targetid%3D378963980296%26device%3Dt%26adtype%3Dpla%26googleloc%3D9011817%26poi%3D%26campaignid%3D936468908%26adgroupid%3D47758128158%26rlsatarget%3Dpla-378963980296%26abcId%3D1129676%26merchantid%3D111841060%26gclid%3DCj0KCQiAgZTRBRDmARIsAJvVWAu-AQ2b5XgAZLwukY-wb1ubwKQEluX900t8dDx_TYG6s4yyvRL0rSAaAowPEALw_wcB%26srcrot%3D711-117182-37290-0%26rvr_id%3D1383558672012
-
993MD I had to simplyfy and understand this same issue. (1) Each indiviual carb has the exact same adjustments. MIXTURE ADJUST.....25 cents size adjustment that points at the ground. When adusting you must flip in your mind (RIGHTY TIGHTY, LEFTY LOOSEY). My carbs have a small high spot that allows you to better see one rotation as I'm sure all the early SU's do. Some came with an 8 sided adjustment screw which allowed you to see how many FLATS you may have turned it. When making this adjustment make sure the filter is removed so you can actually see what is being adjusted. It sets the intial distance between the needle and the jet orifice. When you pull the choke cable for cold start this opening gets larger thus allowing PERIODIC ENRICHMENT. This is the first setting when synchronizing, as you may have read. If this adjustment is not the same you may never get a perfect balance. (2) 10 & 10 work in unison, enough said. (13 & 14) work together and 13 should set the final balance after you get the carbs snychronized. NOTE TO 993MD...Then bent shaft connecting arm with the plastic socket is incorrect. This arm may have been installed by a PO because some previous owners didn't have the right length arm or didn't know how to abjust the arm properly. That is probably how the ends got damaged. This can also cause an imbalance between the 2 carbs causing the entire movement to be uneven. Get the proper rod. ZTherapy may be able to help. Thats it. 3 simple adjustments and of course the proper tool and you can set them up. I used to be terrified to make any adjustments but after lots of reading and video watching I have become comfortable tuning these little things. I am looking forward to installing my triples and going to work although some DYNO time is always money well spent. Good luck and GET THE RIGHT ROD. I use this type of sync tool. Old but effective. https://mossmotors.com/carburetor-synchronizer-tool?utm_source=google_shopping&gclid=Cj0KCQiAgZTRBRDmARIsAJvVWAsCw0KS1lsfwWsnJwij7wq3qw2Bzh0r_z-Yiwoj376M1dnFQMjuYWQaAkyBEALw_wcB
-
-
993MD I had to simplyfy and understand this same issue. (1) Each indiviual carb has the exact same adjustments. MIXTURE ADJUST.....25 cents size adjustment that points at the ground. When adusting you must flip in your mind (RIGHTY TIGHTY, LEFTY LOOSEY). My carbs have a small high spot that allows you to better see one rotation as I'm sure all the early SU's do. Some came with an 8 sided adjustment screw which allowed you to see how many FLATS you may have turned it. When making this adjustment make sure the filter is removed so you can actually see what is being adjusted. It sets the intial distance between the needle and the jet orifice. When you pull the choke cable for cold start this opening gets larger thus allowing PERIODIC ENRICHMENT. This is the first setting when synchronizing, as you may have read. If this adjustment is not the same you may never get a perfect balance. (2) 10 & 10 work in unison, enough said. (13 & 14) work together and 13 should set the final balance after you get the carbs snychronized. NOTE TO 993MD...Then bent shaft connecting arm with the plastic socket is incorrect. This arm may have been installed by a PO because some previous owners didn't have the right length arm or didn't know how to abjust the arm properly. That is probably how the ends got damaged. This can also cause an imbalance between the 2 carbs causing the entire movement to be uneven. Get the proper rod. ZTherapy may be able to help. Thats it. 3 simple adjustments and of course the proper tool and you can set them up. I used to be terrified to make any adjustments but after lots of reading and video watching I have become comfortable tuning these little things. I am looking forward to installing my triples and going to work although some DYNO time is always money well spent. Good luck and GET THE RIGHT ROD.
-
I like the green also, but the BABY POOP, oops BUTTERSCOTCH BROWN is for secretaries! Black interior is the only one that suits the car to me.

-
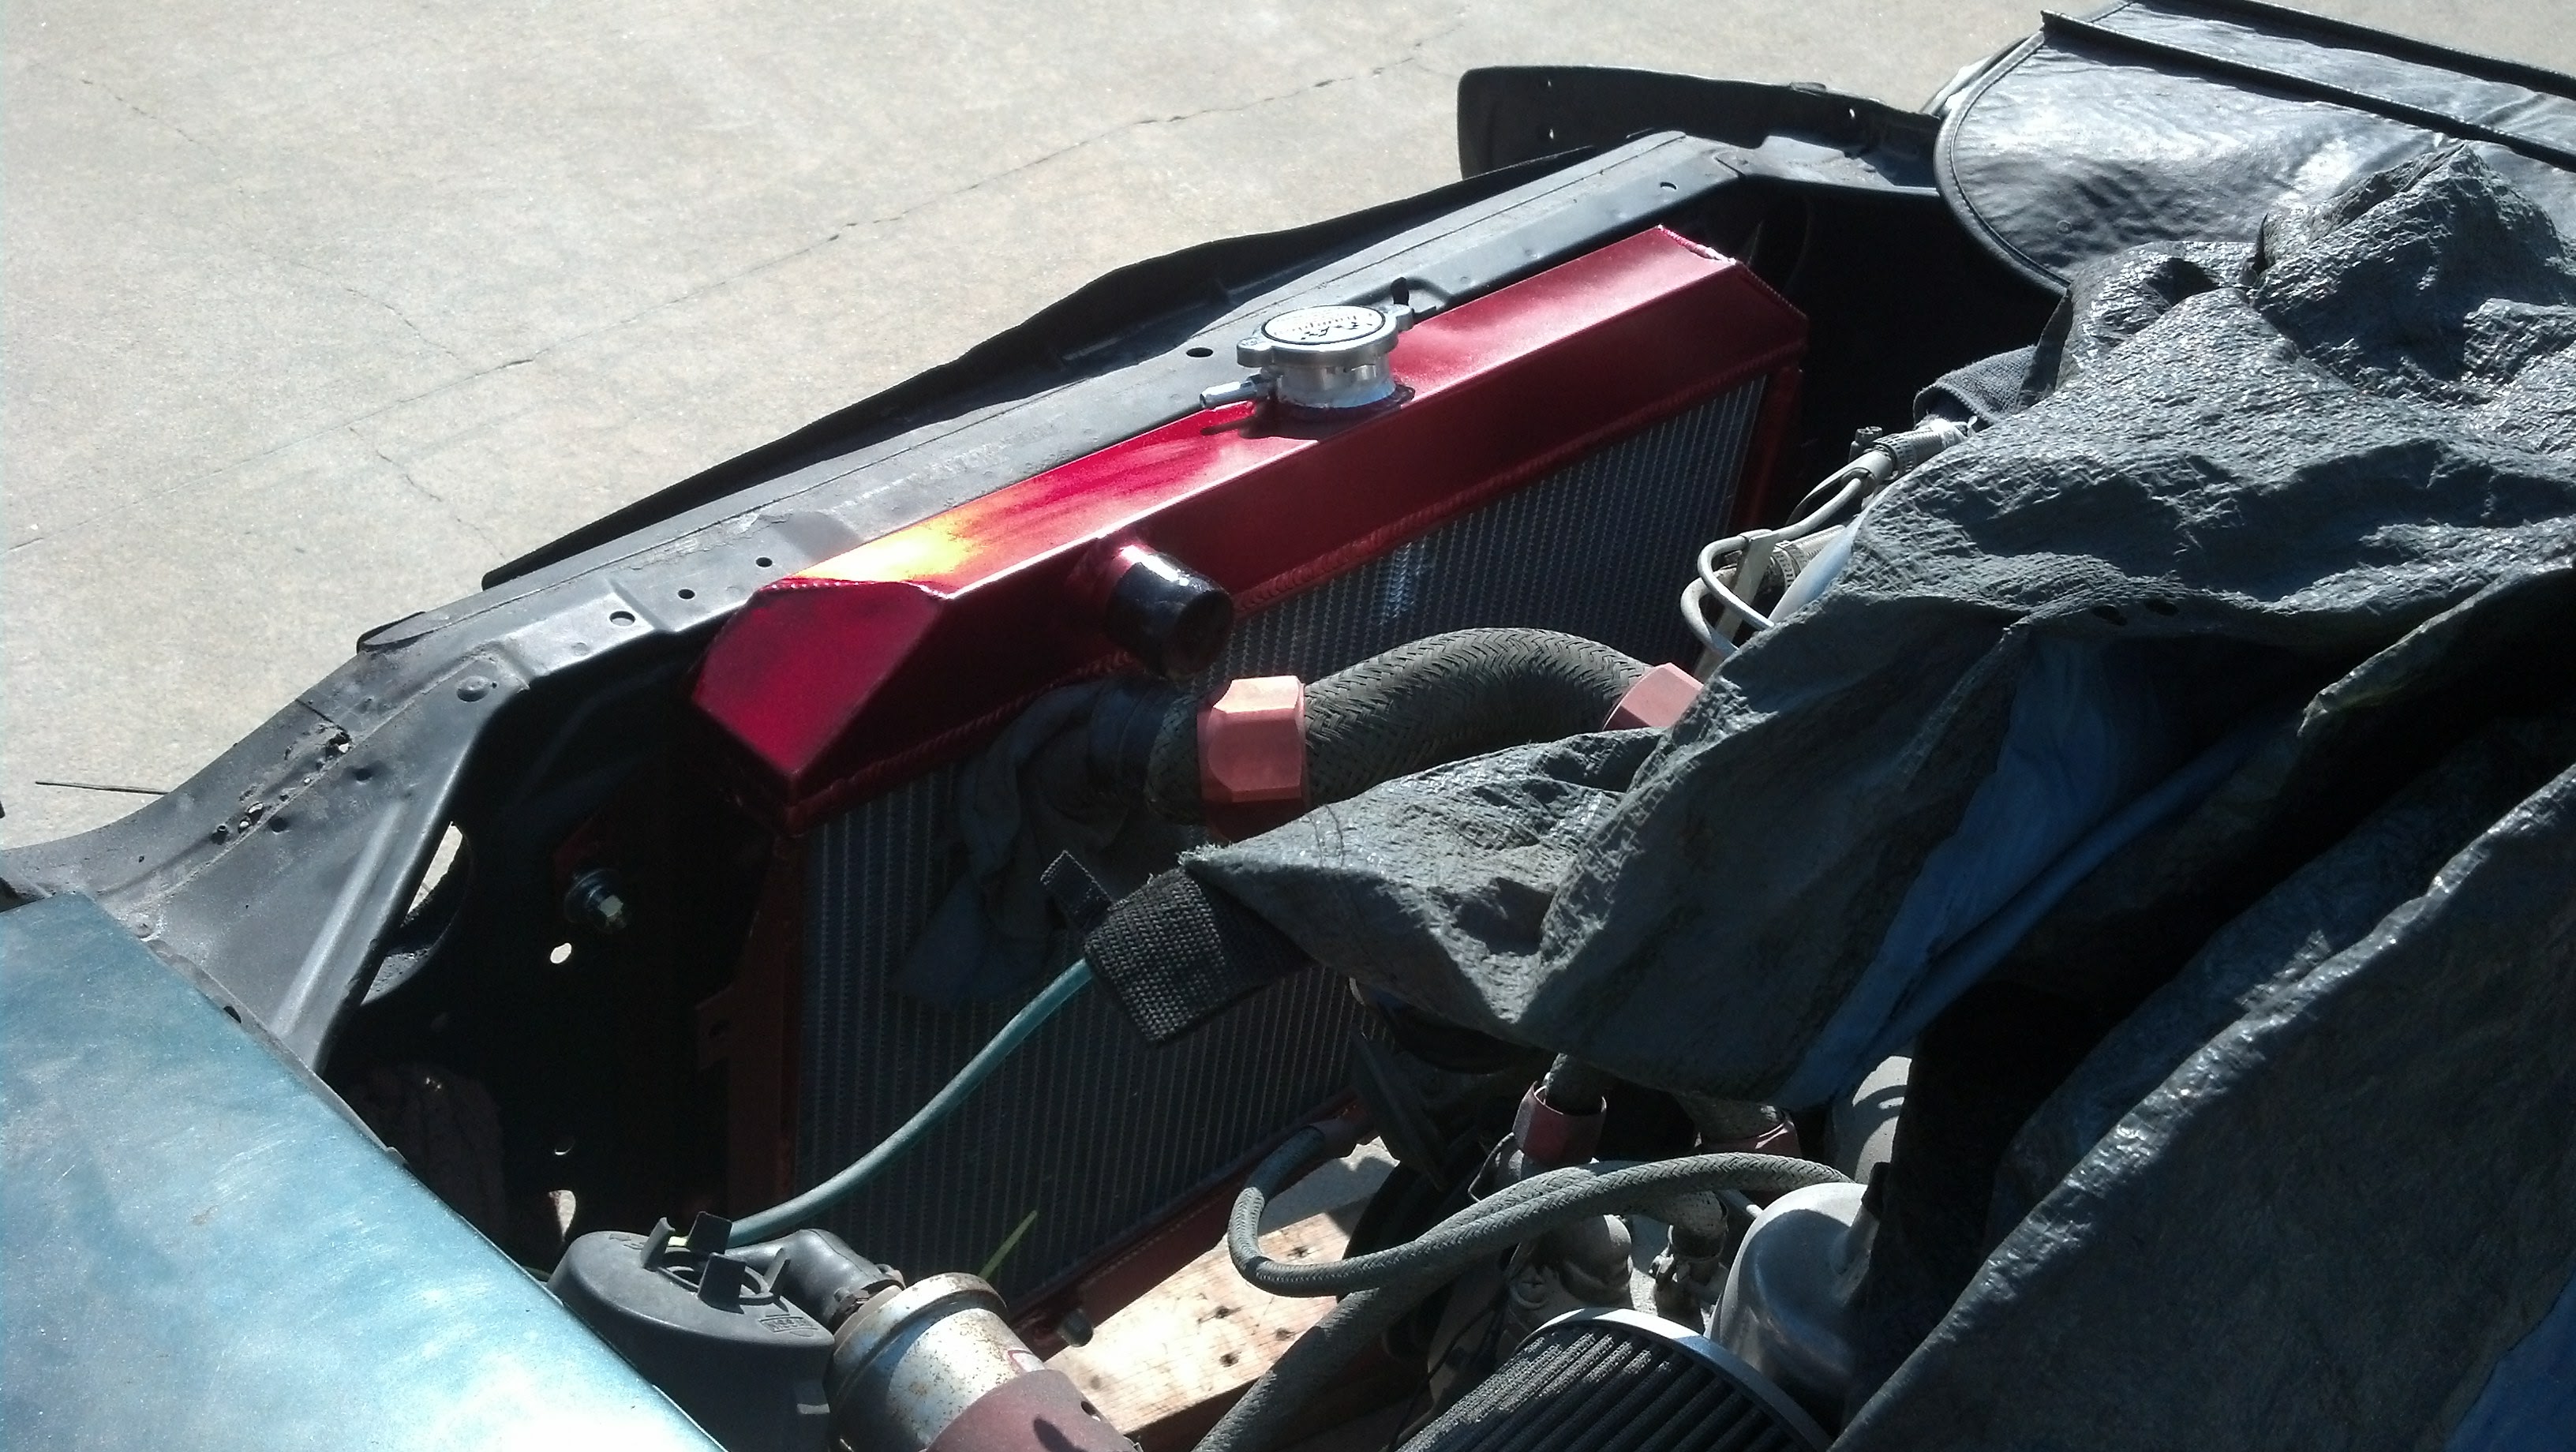
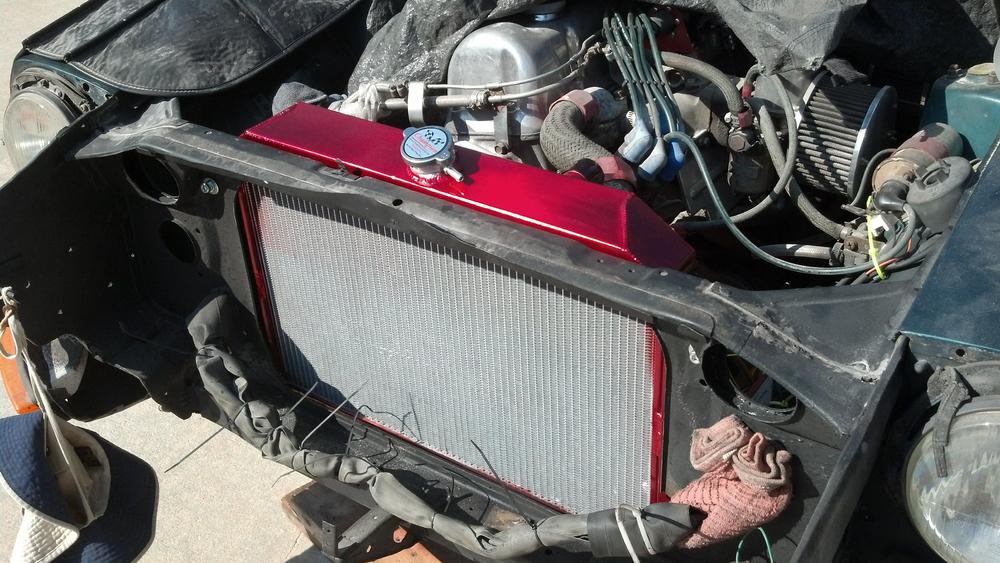
I bought a Champion with a desire to convert to electric fans for (A). To take the weight of the fan off the water pump (lost at least ome pump due to the weight of the original metal fan), (B). I have read that it reuslts in a few more horses, (yet to be confirmed). Champions fan attachment is not the best and in addition you have to buy the control circuit seperately. I live on the east coast of central Florida and there are some days when unquestioned cooling is essential. When I get it all installed I will give some first impressions. I painted the tanks on mine just because ...................I'm cool like that!

-
Many of the seams around the wheel wells did not join well and were filled with the best seam and joint sealer they had at the time. I am currently doing some metalwork on #6333 and found plenty of shrunken and dried seam sealer where the wheel well and the floor meet inside the hatch. Also many of the debris deflector shields were removed from these cars to allow clearance for larger diameter wheels. If they have been taken out from underneath the car then the floor behind the rear wheels got a constant DEBRIS BLASTING which exposed raw metal over time and compromised already dodgy metal joining. Get underneath and try and clean and reseal any spot where perpendicular pieces of metal join. Sealing it back up can be done but you have to be meticulus. Tail light seals, hatch seals and underneath. I spent about 2 months just resealing the floor in mine, what with metal replacement and exposing leaky areas but it will be worth it not to have the exaust smell. BTW sandblasting exposed all the leaky areas.
-
I agree. This will give you a chance to sort out that spaghetti bowl and get rid of the things that were added (UNECESSARILY) in many cases. Also get rid of any main harness splices. Solder connect them back the way they should be. These 48 year old wires were never designed to be spliced into. SWEATY BETTY just recently finished his build and installed a brand new harness. Maybe an idea for your car. Either way you really need to pull the dash and harness out of the engine bay and methodically rework and recover the entire harness. Its really the only way to be sure.
-
SIMPLICITY..............My friend is the beauty of these machines even after you add tons of performance!
-
I wanna go....Please take me. I don't eat much, even BBQ. I'm clean, I don't fart, at least around others, I have my own money, I'll even buy the beer. JUST TAKE ME!
-
Very nice to know. I always wondered what those were on the floor for. When they were brand new I was a kid and never got to see inside one. But they looked DAMNED COOL going down the street then.
-
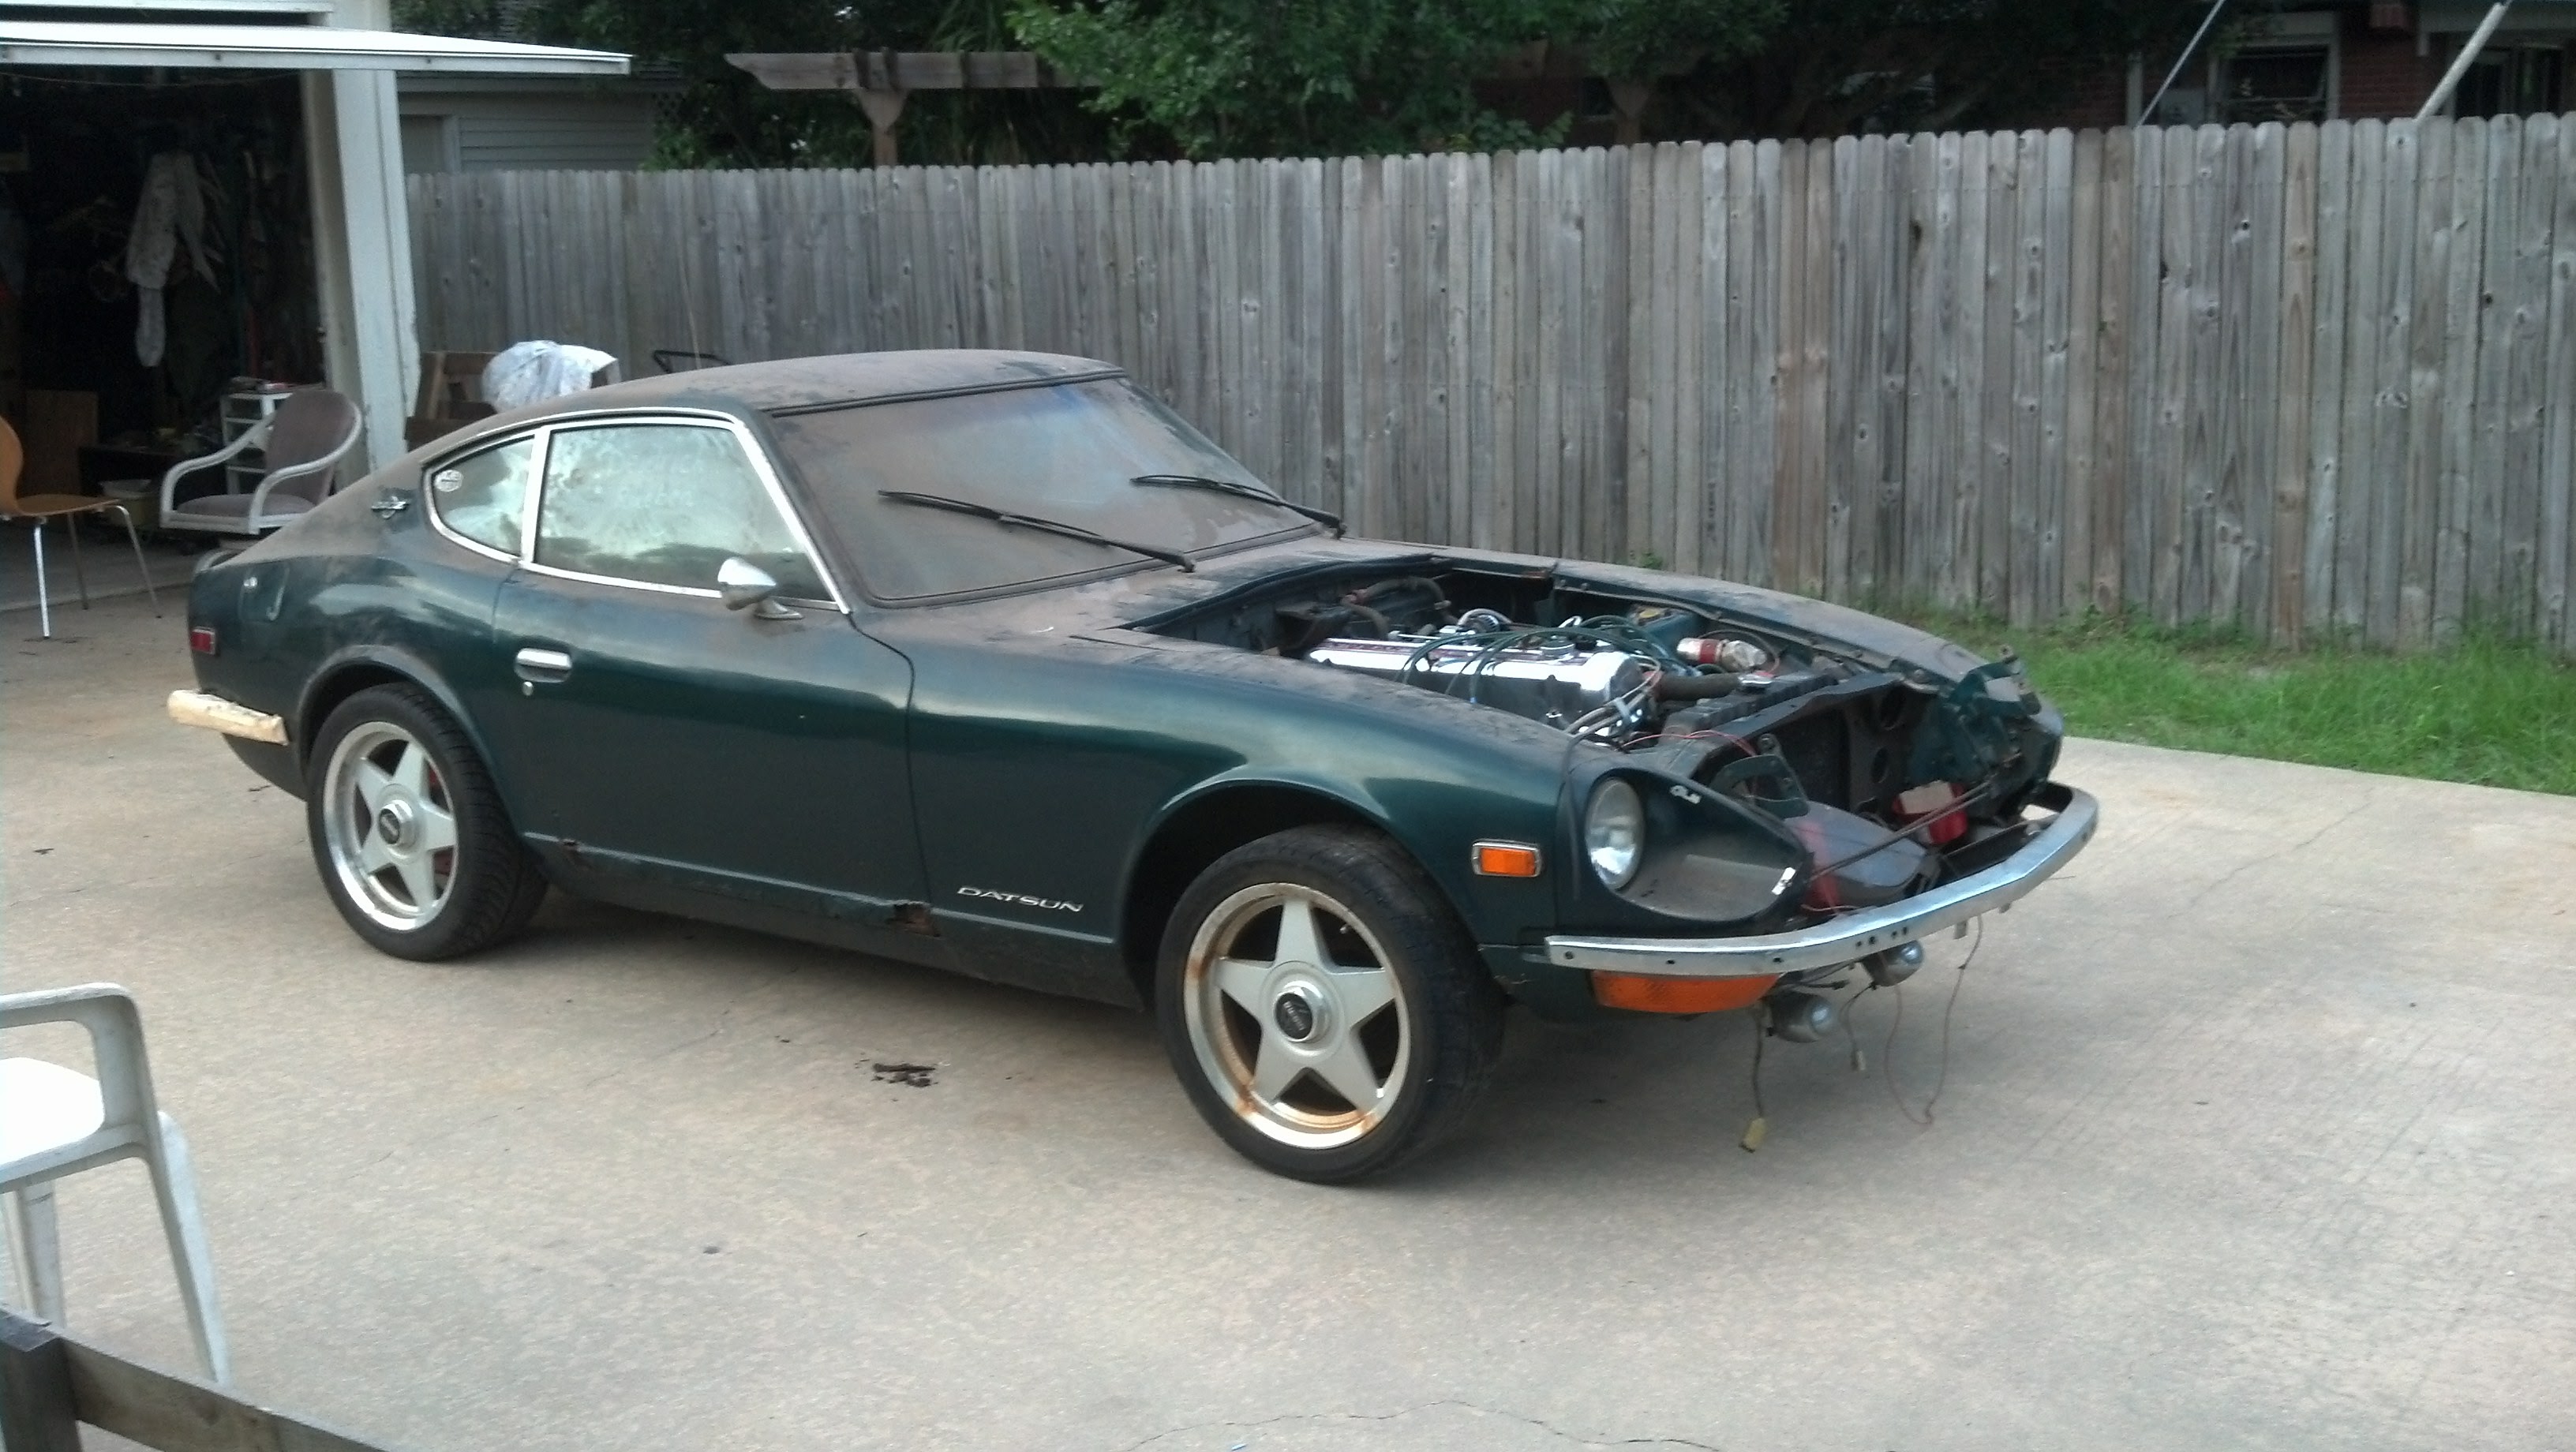
I drove mine from September 2000 until November 2005 before the main harness fire. And yes it was a daily driver. Did one 6000 mile round trip to Santa Barbara from Florida one week after 9/11. So I am sure I am over 100,000 marker, and like JWTAY finishing metal work, plan to have it reassembled and "running" next summer. Could be repainted by this time next year

-
I thought that shroud actually came with the radiator as a one piece item!
-
Nice job. Wish I had more time for projects like this. Have the equipment but not enough time. Stupid paying job gets in the way most of the time. Ooops......time for me to give them their lump of coal!?
-
If you choose to go the remanufactured route there are a few companies that have them in stock. The good thing is most take the core as an exchange. ZCAR Depot advertises (2) but there is a $100 price difference.
-
My heart POUNDS! Even here in Florida!
-
882993 You are attacking this issue in the proper fashion. I'M IMPRESSED! These carburettors are really simple. 4 adjustments: ENRICHMENT CIRCUIT :AKA CHOKE common on all carburettors especially SU carburettors BALANCE SCREW: Named for obvious reasons used for synchronization another very simple procedure once you have the proper equipment. RICHNESS ADJUSTMENT: Once again named for obvious reasons. On our carbs suggest 2.5 turns intially as a baseline adjustment and then fine tune from there. PROPER FUEL PSI: Often overlooked. Mechanical pumps driven by the engine, electric pumps driven by the battery. Use of a regulator is strongly suggested with electrical pumps. If I am correct, at least in my two, the factory left a connection on the main harness for conversions from mechanical to electric. Plug and play once you locate it. There are hours of videos on YOUTUBE that explain tuning our carbs step by step. You can see what moves if the choke is operating properly, how the mixture happens, etc. Being able to see and hear really removed the intimidation factor for me even with triple side drafts. The choke cable sheath if in disrepair will change the travel limit of the enrichment circuit, possibly not allowing full travel even when you have exhausted the travel of the handle on the console. I like your style, NOT AFRAID. Do some more reading and try to put aside time for learning. Get the correct tools so as not to ruin anything. Z Therapy also is a good technical resource. Be patient and good luck.
-
Try http://www.blackdragonauto.com.
-
I agree I would have to see it to see if it is worth the effort. Would be a good donor for a bad sunfroof installation, glass is all there. Front and rear are worth $500. Don't know about restoration though.
-
I went a step further after removing the entire assembly. Each control cable has an E clip at the anchor/swivel point. These are easily removed with a jewelers screwdriver. Be careful they have a spring loaded effect when they release. Suggest disassembly with a large beach towel to avoid things bouncing away. Do one cable at a time so you don't confuse reassembly. I then straightened one end just enough to get the insulation to move over it without damage. Then smeared anti-seize on the metal cable. Slide the outer insulation back and forth to spread it. I also let a set sit in transmission fluid just to free them up, took about a week. My car has spent most of its life in moist climates but it is a common problem. Grease the achor/swivel point generously. I used a very small model paint brush. After the metal cables free up the anti-seize prevents future freeze and stiffness. It took most of the morning to complete but they work as they did back in 1970. For those that don't have a set of jewelers screw drivers you will see the need if you need to remove interior knobs. As SITEUNSEEN said be patient, everything releases just find the release point. Good luck.
-
Ably You have probably figured it out but if you rotate the wheels it's puts both the inner and outer studs at the optimum angle for assembly and removal. Nice job BTW. I too like seeing new parts show up even if it is at someone else's garage. It makes me believe all these great parts really exist! Is it me or do the rear LCA's need to be BEEFIER? They look really nice but over the long haul is it enough. Definitely a weight savings and some have reported autocrossing with them, but they just seem to be a little svelte! Tell me what you all think.
-
WIFE..............Guess what HE is doing with the cash!
-
JOY I for one am glad you stepped forth to lay this matter to rest. BUT JUST FOR THE RECORD TO THE ENTIRE COMMUNITY, these incessant questions about what something is worth annoy me to no end. Ultimately it is worth WHAT YOU ARE WILLING TO PAY FOR IT! Personally I would not consider myself an enthusiast with the idea of buying cars or anything else for that matter just to flip it. But if that is someone's thing then go for it. I take pride in crawling around cars, taking them apart, and putting them back together as good as or better than when brand new. Even considering the market I wouldn't consider selling one of mine unless it was to keep my family off the street. "SOMEONE" asked a question and it seemed as if it was just throwing something against the wall to see if it would stick. I take everyone here seriously, be it a problem with their car or any type of assistance needed if I can help. Once again, FOR THE RECORD, from this point forward I WON'T respond to VALUE QUESTIONS. The car looks great and but for a wash and wax and new tires it probably is a 4 out of 5.
-
Yes that "SOMEONE"''term used loosely" was being much too coy about the car. No pictures just asking what a Fairlady is worth. I guess he was trying to avoid getting snaked. I agree with the attached post. Easily 30K with a little T L C. Probably much more than "SOMEONE" is willing to pay. He seems to be much more interested in those with half a brain anyway! Good luck with the sale. Use the 30K wisely