Mike W
Free Member
-
Joined
-
Last visited
Everything posted by Mike W
-
 In my opinion, the only way to go is with a clear bra. However, you need to be really careful about the film that you choose as they vary greatly in quality and longevity. After I had my car painted, my son pushed me to do this (he had it done to a new 2010 Camaro he purchased and was sold on the product) and so I went for it. It was not inexpensive like the 3M spray mentioned above, but after almost 2 years I have very minimal chip damage to any of the covered areas. I decided to cover the entire hood (as it is small compared to more modern cars), air dam, headlight buckets and headlights themselves, rocker panels, as well as the front section of the rear fenders in front of the wheels. Essentially any place that was subject to rock chips. All told it cost me about $800, but given what I spent on the paint and body work, this was cheap insurance to me. The installer also had to make this a "custom" install as they do not make pre-cut kits for our cars. That did add a little to the price, but well worth it in my opinion. The installer was very knowledgeable about the different types of films and in fact steered me away from 3M. He told me that 3M essentially invented the product, but many other companies have surpassed them with superior films. The one I used on the Z I believe was made by SunTex (I can verify that if anyone is interested) and it is "self healing". If you do get any abrasions on the film, warm water or sunlight will bring it back to normal. He also mentioned Xpel as a good product as well, but preferred the SunTex film. I am sold on this concept so much that I also did my new C7 Corvette as well as my wife's new Volt. Cars are huge investments and the cost to apply this to me is worth every penny to protect that investment. Hope this helps. Mike.
 -
Mike, Very cool story and I wish you the best in trying to locate your dad's car. Your story makes me appreciate even more the opportunity I had to rebuild / restore my Z (which I have owned from the very beginning) with my 27 year old son. It was a great experience and in the end brought us even closer together. Although this will not likely have a lot of impact on the location of your dad's car, there is a very big Nismo event happening this weekend down in the San Marcos area of Texas. Given that you are in Dallas I thought that I would at least make you aware of it so you could perhaps take part in some of the planned activities. And who knows, you might even discover a few new leads to your dad's car. You can find more details about it at the following site: Nismo Fiesta » Home The event is sponsored by the San Antonio Z club (called Z Sport) but will also be attended by a number of folks from the local Austin club as well (Capital Z of Texas or CZOT for short). Our local club is geared a little more to the first gen S30's although we have our share of ZX's, 350's as well as 370"s. The San Antonio club is pretty much opposite ours in Austin where the vast majority of members are sporting 350's, 370's, GTR's etc. Even if this did not pan out in the context of locating your dad's car, I think you would enjoy meeting some of the folks here and taking in the great scenery with all of the cars that show up. You can check out pictures from some of the past events on their web site as well. I have attended the last 2 years and will also be at the car show on Sunday as well, but I can tell you that it is one of the best attended Z events in the south. We have people coming from all over (not just Texas) and so it is a great opportunity to meet some die hard Z folks and see some great cars. On top of that, Texas has some fabulous driving roads and one of the events on Saturday is a cruise through some of the best roads in Texas. Hope to see you there and definitely keep up posted on your quest. Mike.
-
When I did mine, I used the same paint that I used on all of my suspension parts and that was Eastwood rust encapsulator (as a primer) and Eastwood Extreme Chassis Black as a top coat. Came out great and I have not noticed any flaws in the paint from flexing or any other movement that may take place with that part. Although I was very satisfied with the result, if I had to do it over again I would have it (and all of my suspension parts) power coated as I believe this will ultimately hold up better than paint in the long run. Hope this helps. Mike.
-
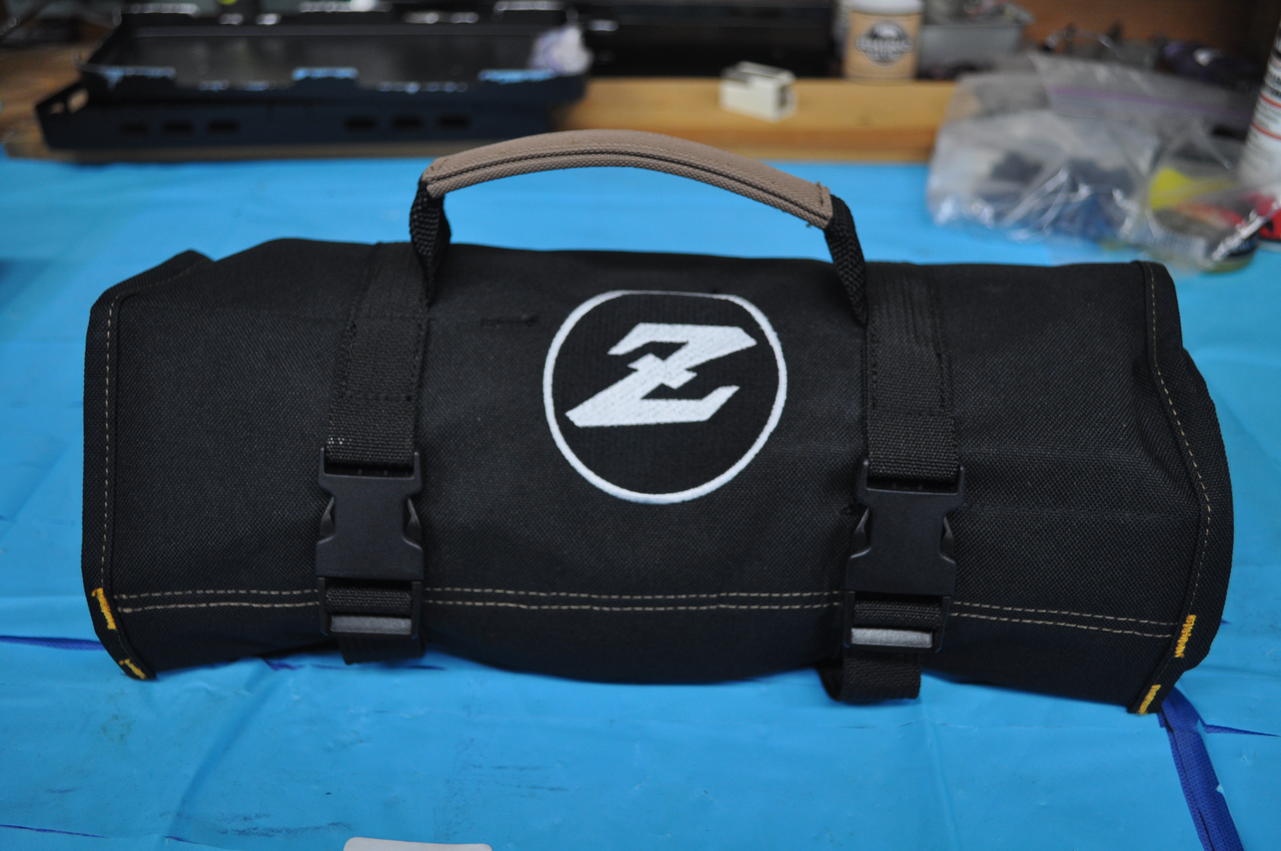
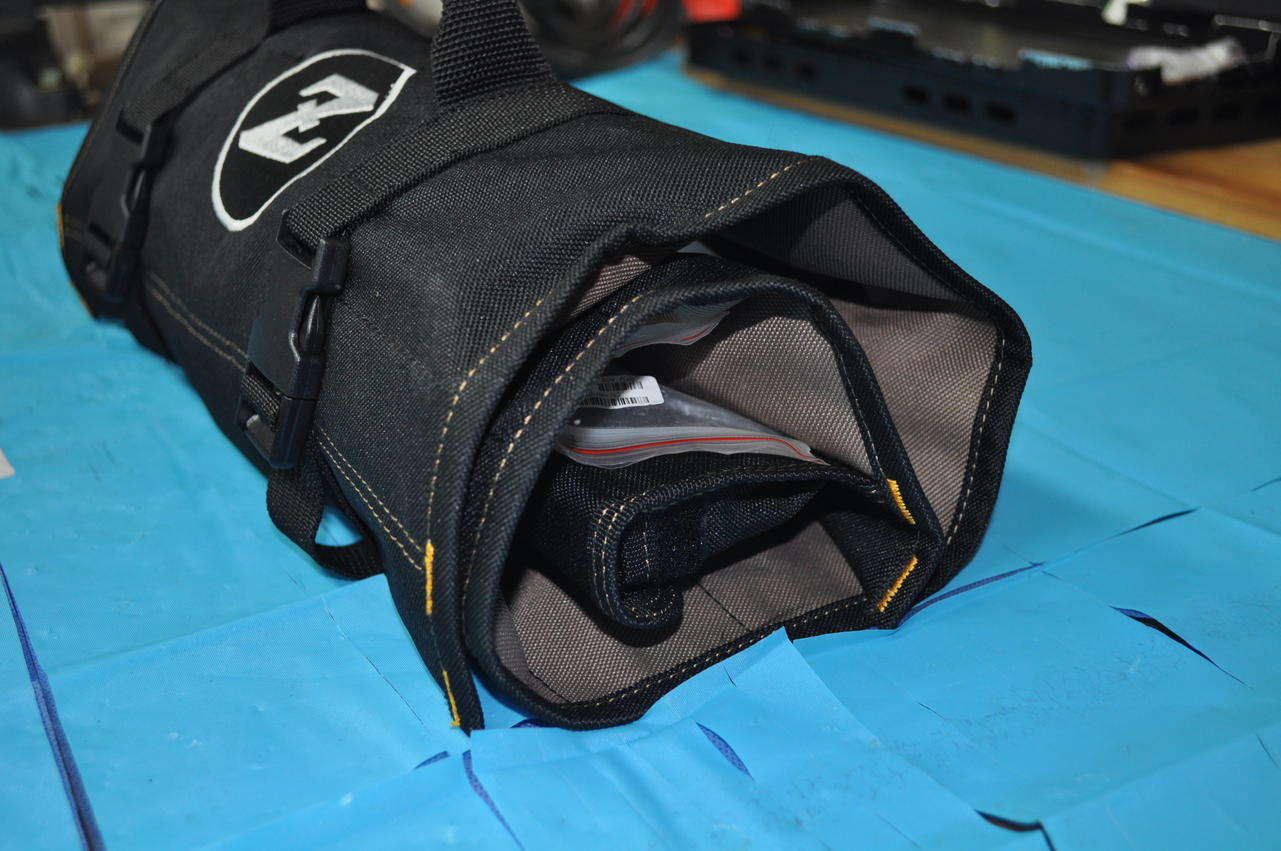
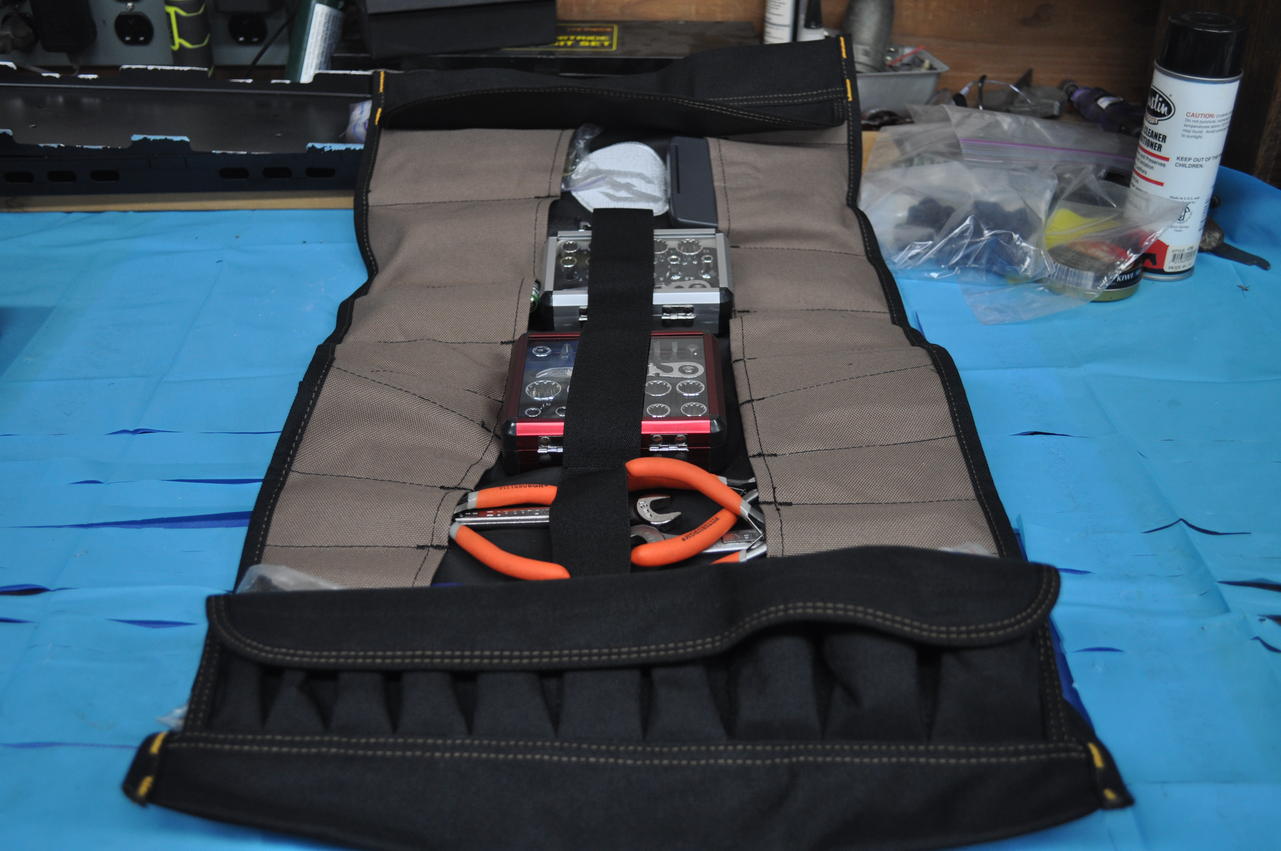
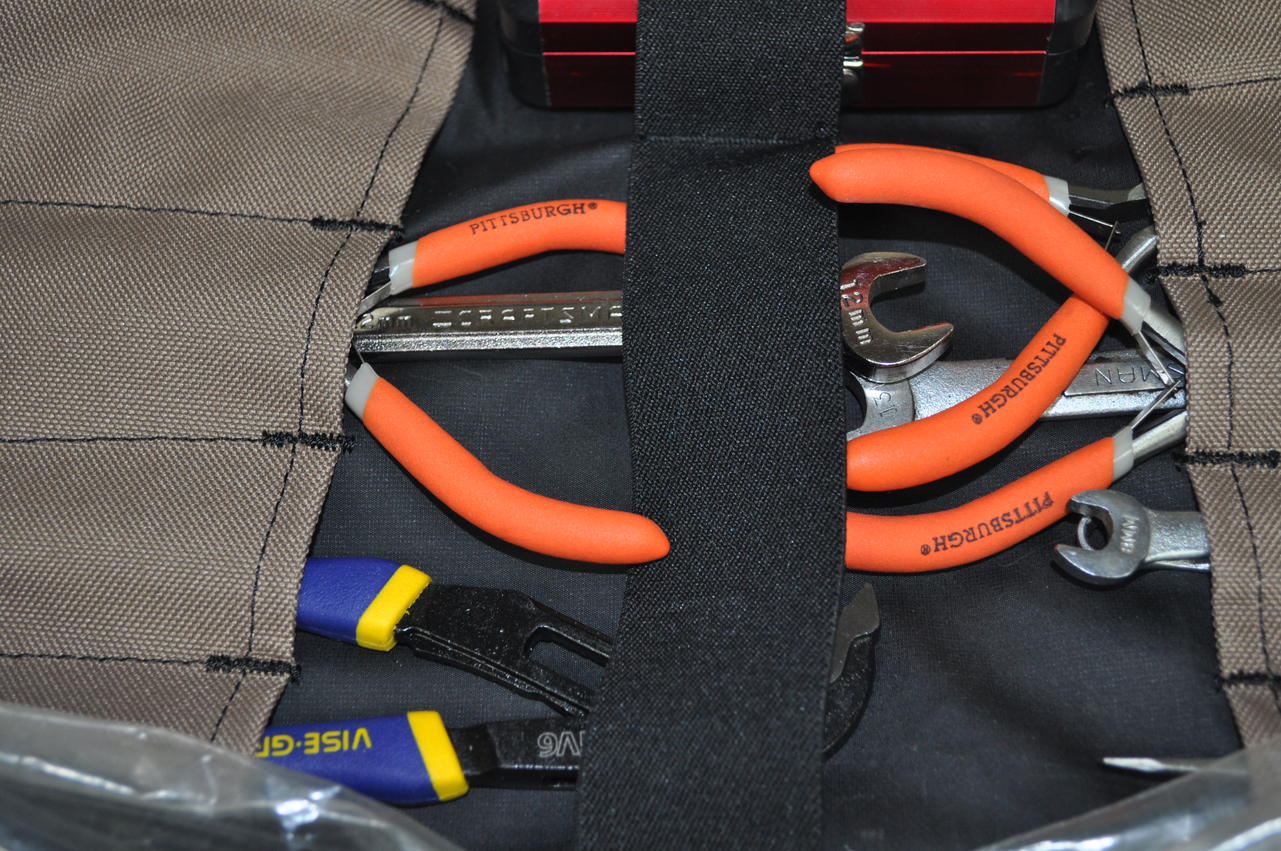
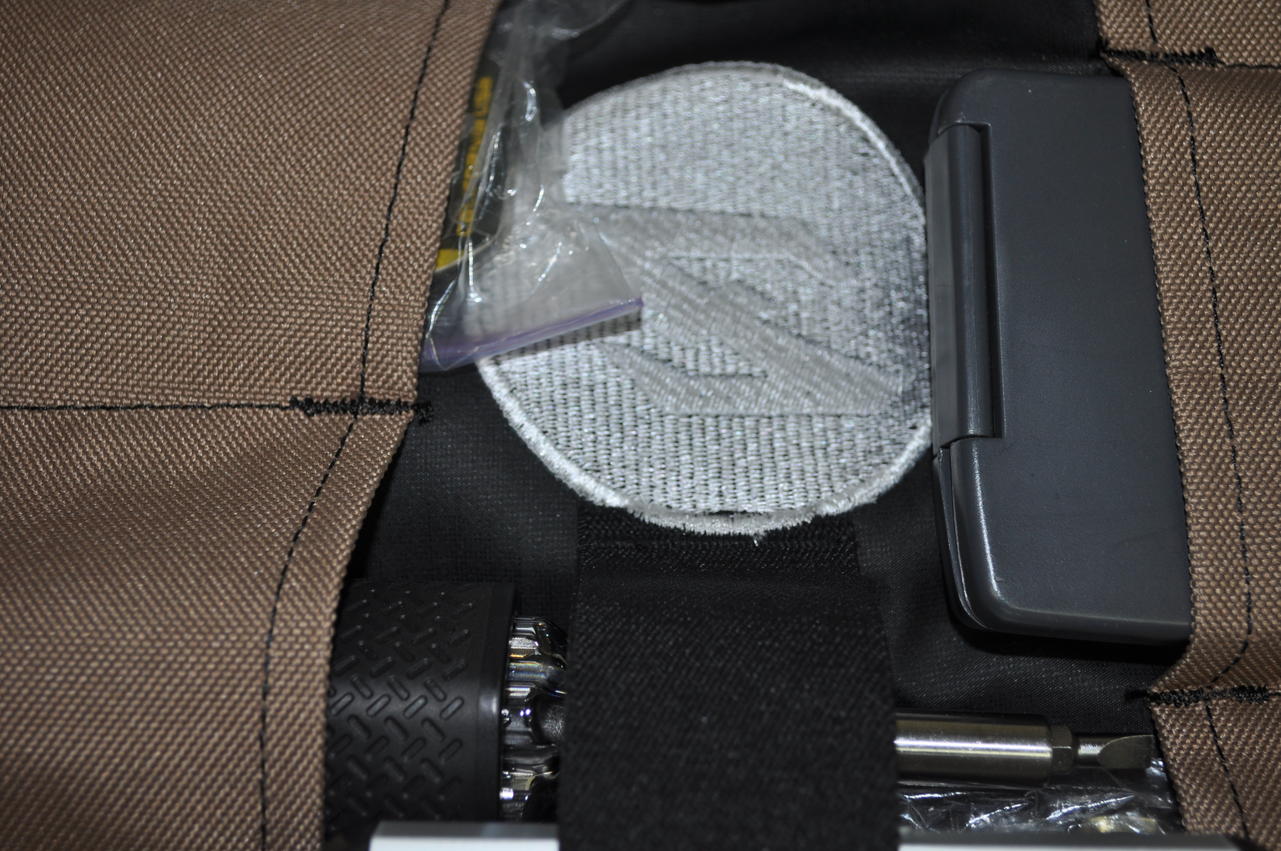
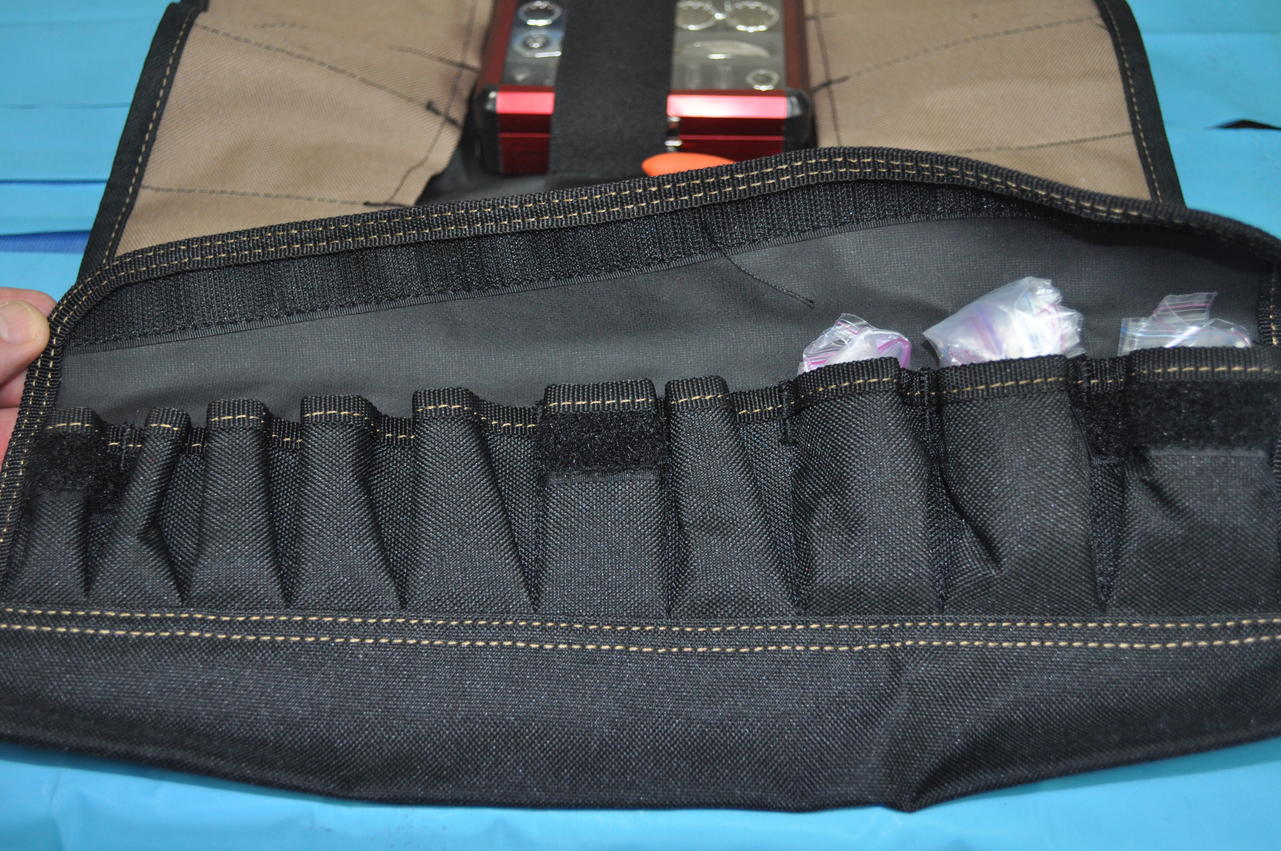
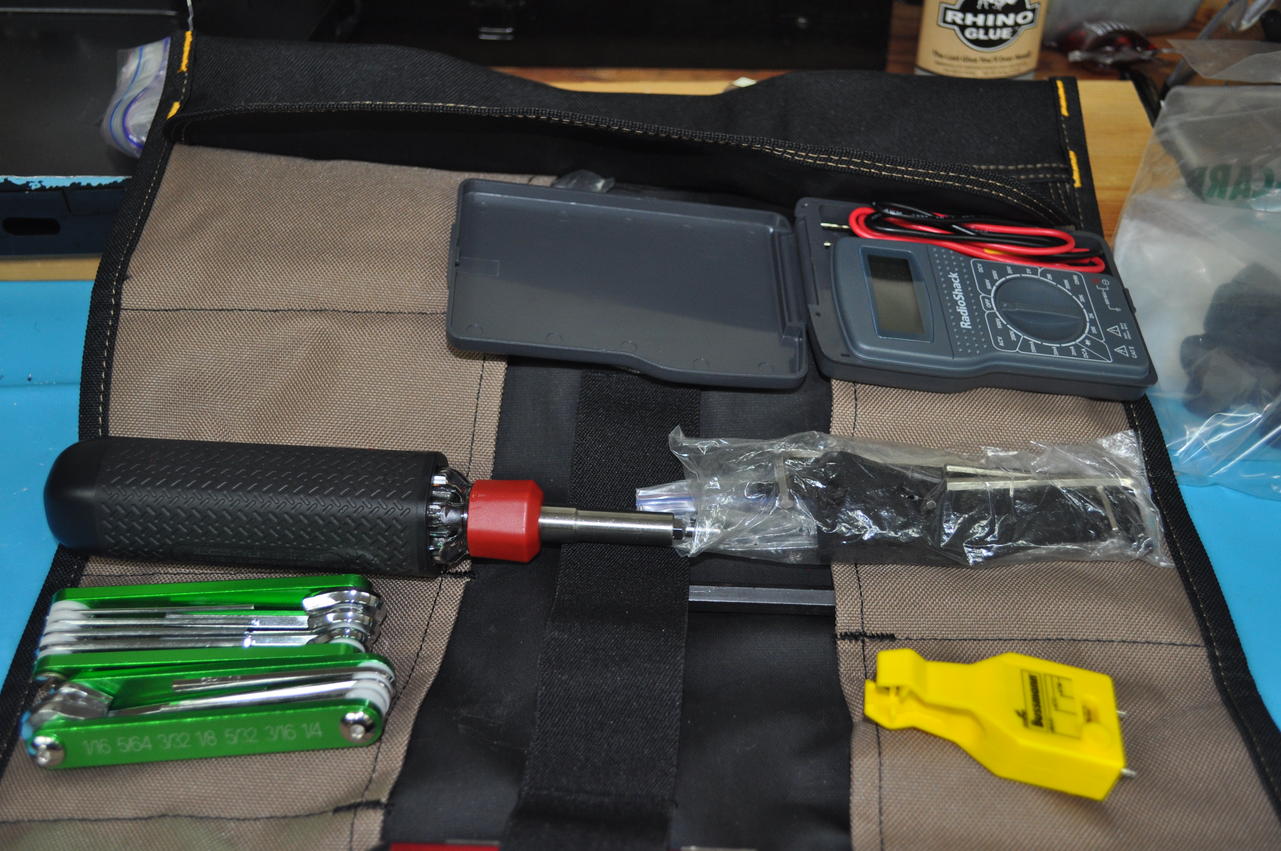
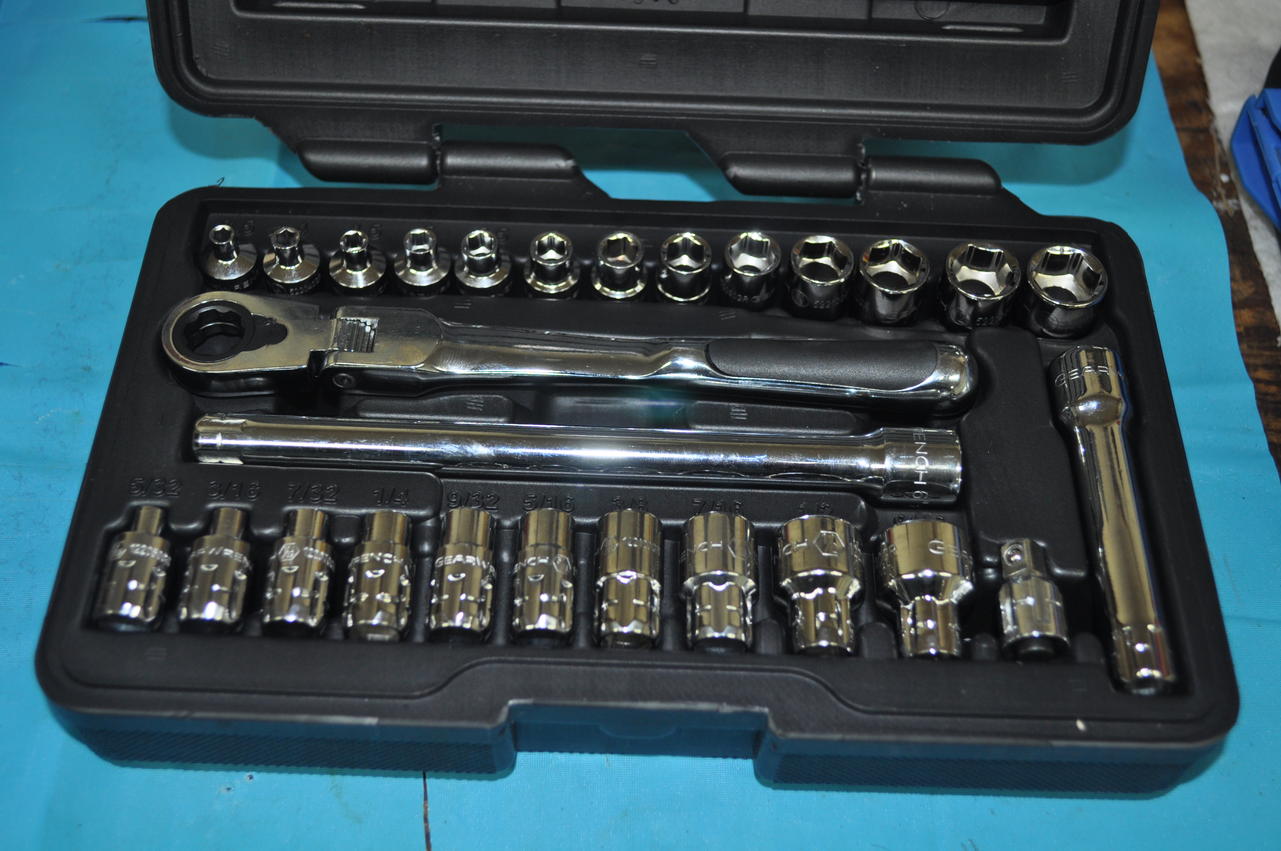
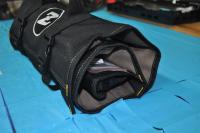
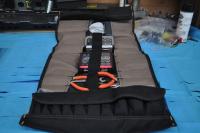
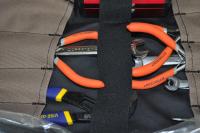
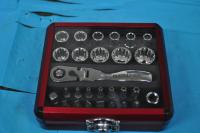
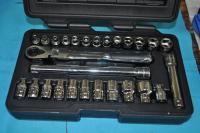
I'm way delinquent in getting some pictures up of the tool roll. Have been distracted by a number of things recently but finally got around to taking a few shots. My "must have" tool requirements may be different from others as I need some specific tools for the Webers / linkage and my ignition system is all after market. I've also made a lot of changes / upgrades to my electrical system so I have some non-standard fuse requirements as well. I wanted to carry some basic tools including screwdriver assortment, basic wrenches (socket as well as open end / box), allen wrenches, tie wraps, etc. Managed to fit it all into the roll, but I did purchase a couple of new tools that were more space saving. One was a multi drive screwdriver and the other was a mini 1/4" ratchet set. The ratchet set is very compact and seems to be made fairly well. In addition to the tools in the roll itself, I also carry a 3/8 hollow socket set from Gear Wrench that fits perfectly under the driver seat. With that and what I carry in my tool bag, I can pretty much take care of anything that is typically going to go wrong. In any case, I've included a bunch of pictures. Hopes this helps anyone thinking of making this purchase. It took some effort to make it work for me, but in the end I am happy with the result and the product is very well made. Mike.


-
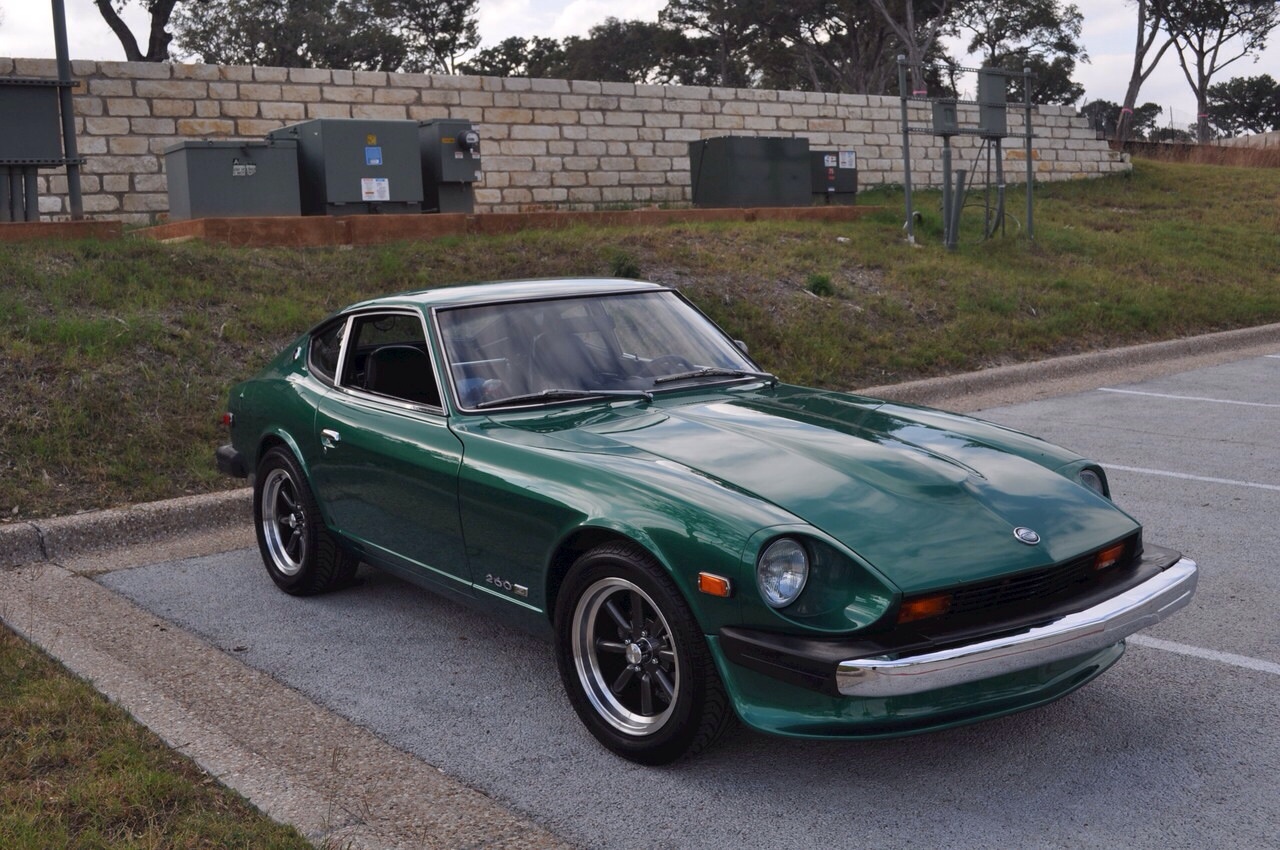
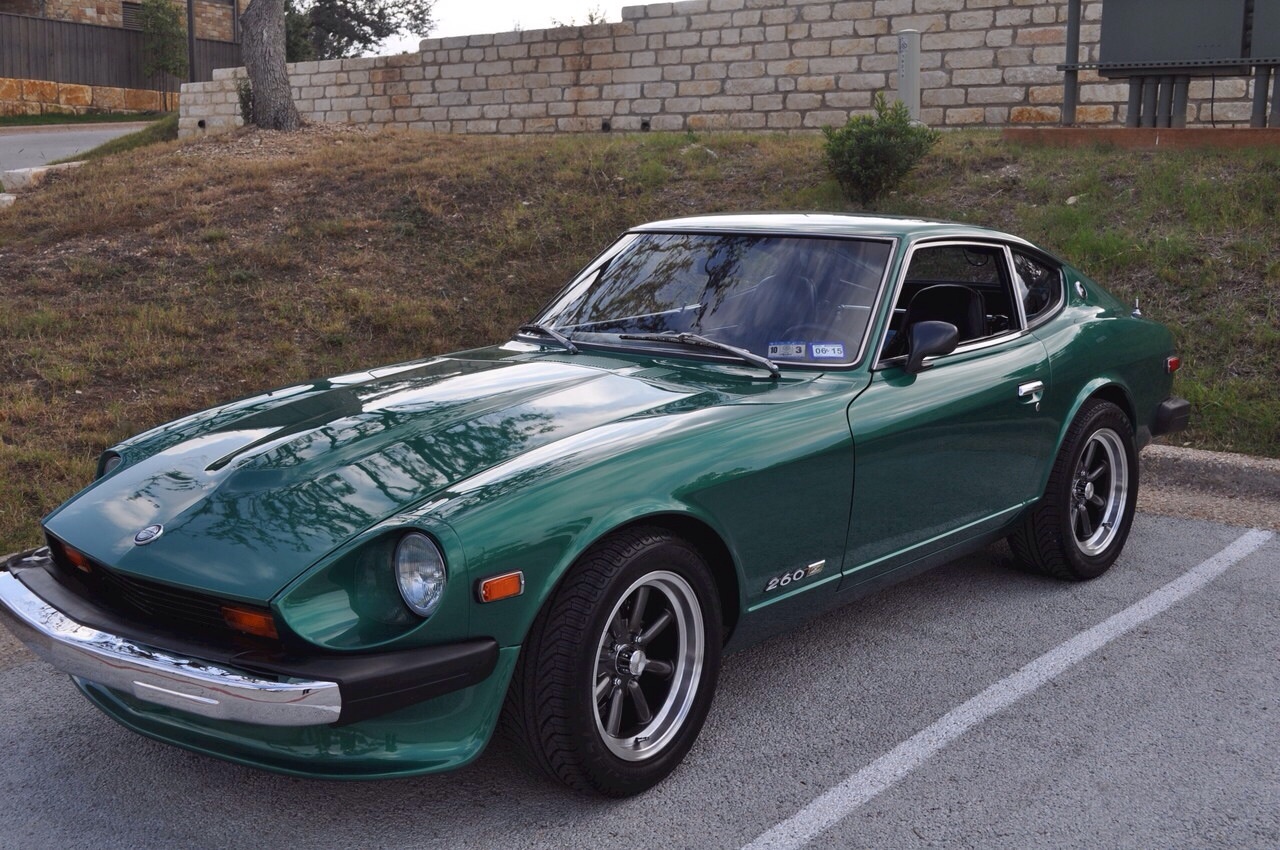
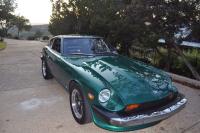
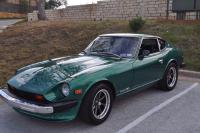
The car was completely repainted including the engine bay in the summer of 2012. This was the original color of the car and I am the original owner and have always been partial to the color. It is unusual but it definitely stands out and I do get a lot of compliments. The paint used is base coat plus clear. It was done here in austin by Kevin at the Austin Z Clinic. Did a fantastic job. Hope this helps. Let me know if you need anything else. Mike.
-
Here's a couple for you. I think you get the idea but if you need some additional shots, just let me know. Mike.

-
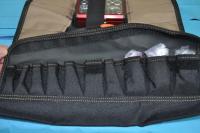
I've been meaning to respond to this, but have been out of town and have not gotten to it until just now. In any case, my kids got one of these for me for Christmas this past year. I was carrying an old plastic Sears tool box where I kept spare fuses, basic wrenches, small socket set, allens, and a few specific things for my ignition system and the Webers. The plastic tool box didn't really rattle and actually fit quite well on the rear deck right behind the seat, but it looked awful. So they got me one of these, although mine has the "Z"' embroidered instead of the "Datsun." The same seller you are looking at on eBay sells both styles. I can say that the roll is very well made and looks really nice sitting in the back deck of my car. The inside pockets vary in size and there are quite a few of them. It also includes 2 large cloth elastic bands that can also help to hold things down and in place. It also includes a series of small "pockets" on one end that can hold small pieces like fuses, etc. A Velcro flap covers all of these pockets so things do not fall out. All in all it is pretty well designed. I do wish a few of the main pockets had been made a little larger, but in the end I pretty much found a way to get all of the critical tools that I carry in the roll. It wasn't easy to accommodate a standard 1/4 socket set so I ended picked up a small compact one and it fits nicely under one of the bands. I have not taken pictures of it but if it would help you in your decision, I'd be happy to do so. Just let me know. In the limit, it's worth the eBay asking price in my opinion. It's an even better deal if you can get the seller to give you a discount. Mike.
-
This is the best reason I can think of.................. Mike.


-
Charles, I use the Mallory Promaster #29440. The specs are as follows although I don't see any specific spec about spark strength. The max spark output is rated at 55kv. Coil Wire Attachment: Male/HEI Coil Style: Canister Primary Resistance: 0.600 ohms Coil Internal Construction: Oil-filled Coil Color: Black Maximum Voltage: 55,000 V Turns Ratio: 105:1 Secondary Resistance: 12.3K ohms Inductance: 7.3 mH Peak Current: 100 mA Spark Duration: 500 uS Mounting Bracket Included: Yes Coil Wire Included: No Ballast Resistor Included: Yes Coil Shape: Square Height (in): 5.297 in. Length (in): 3.706 in. Width (in): 3.846 in.
-
Great info especially about the tension on the adjust screw. Yes please keep me posted on what you find with the bronze bushings. My plan is to disassemble the remanufactured rack over time and re-build that one with at least new inner tie rod ends and so if I can get the bushings as well, that would be a plus. Mike.
-
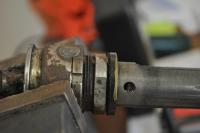
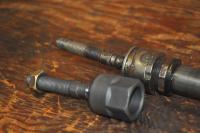
Captain, I'm the original owner so I know this is the way it came from the factory. I do not have any record or recall any service to the rack that would have removed whatever might have been there. I wish I could have replaced those bronze bushings but I could not find them anywhere and did not want to go to the lengths of trying to find something that would fit. They looked pretty unique with the grease slot in the middle, so I didn't think they would be easy to find. All I did was clean everything out really well, re-greased it with good grease really well, and put it all back together. I have the large adjustment screw in pretty tight, but it operates very smoothly and I cannot feel any play. Mike.
-
Doesn't seem like my pictures showed up so I've posted them again here. Mike.


-
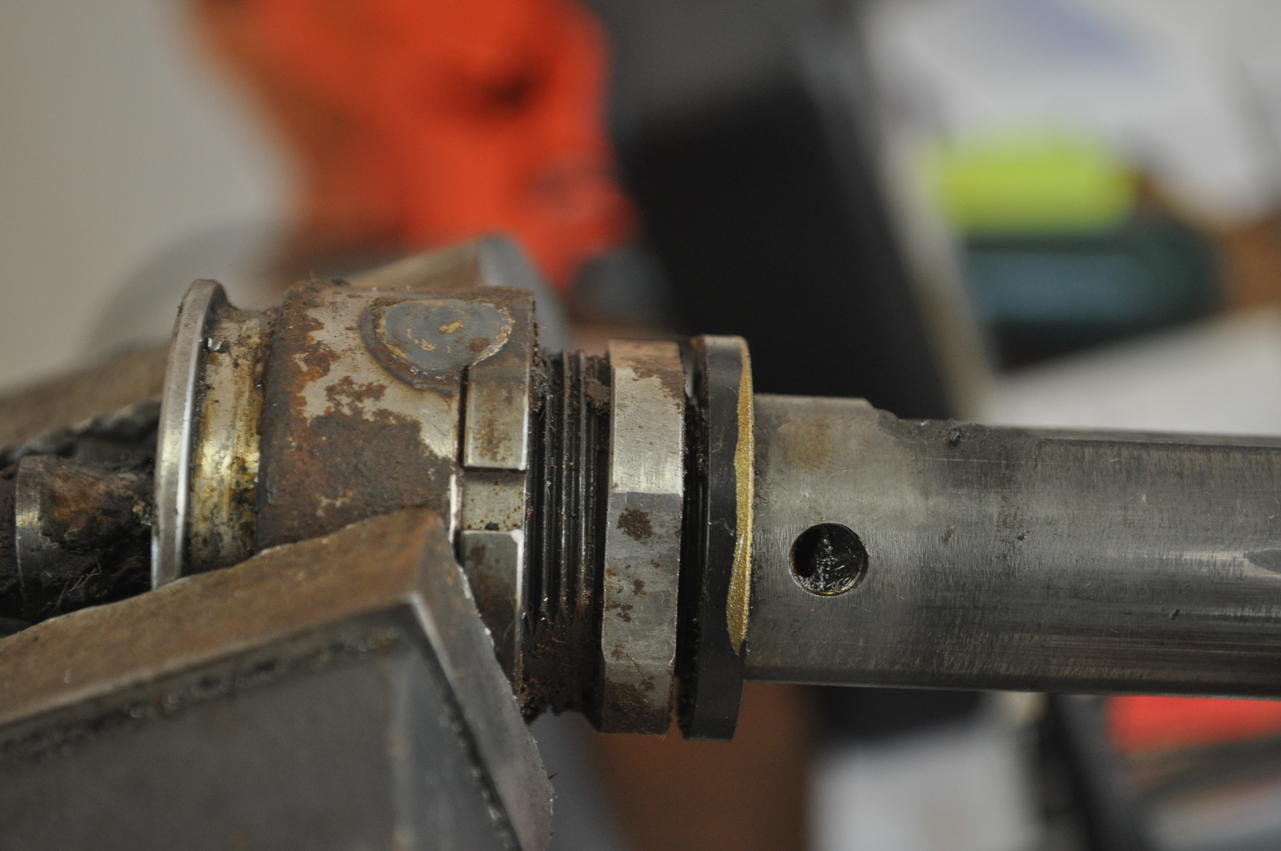
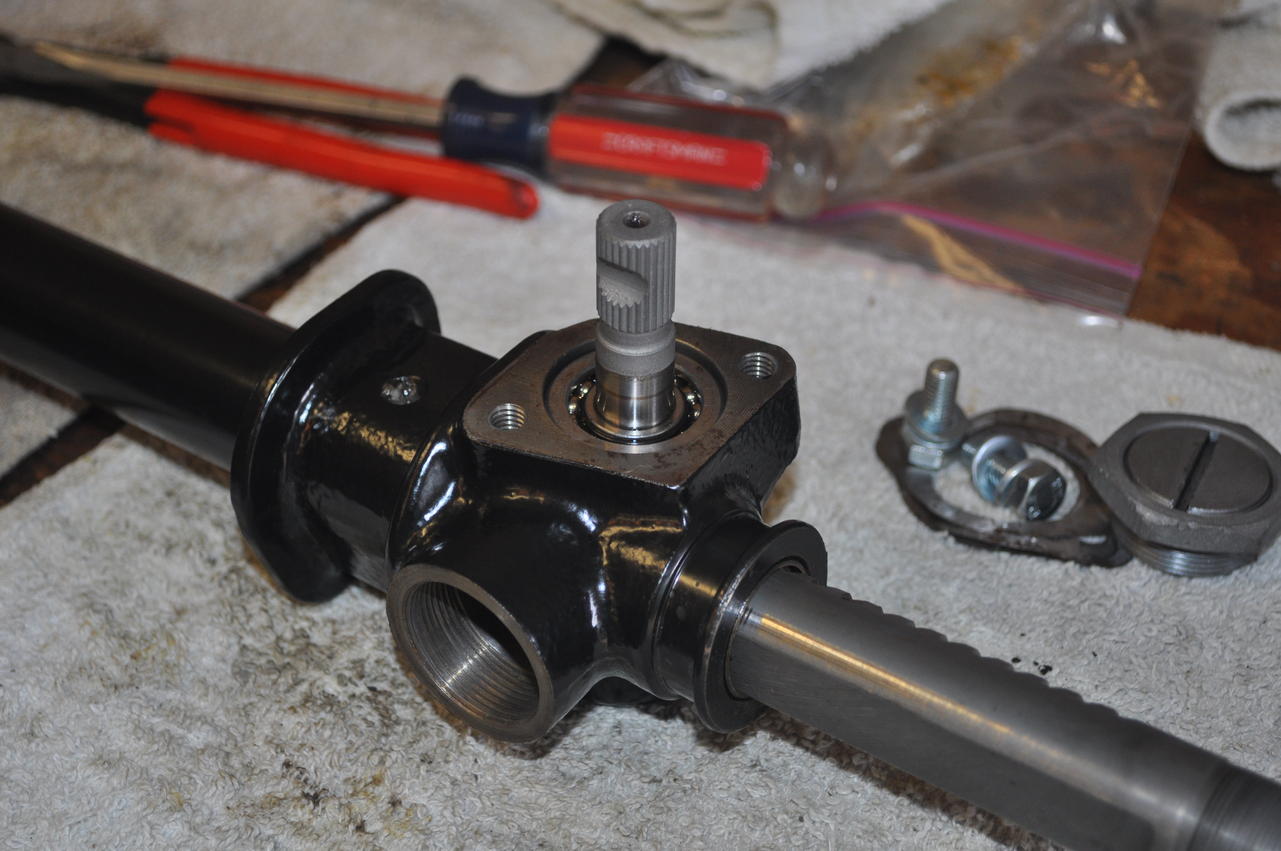
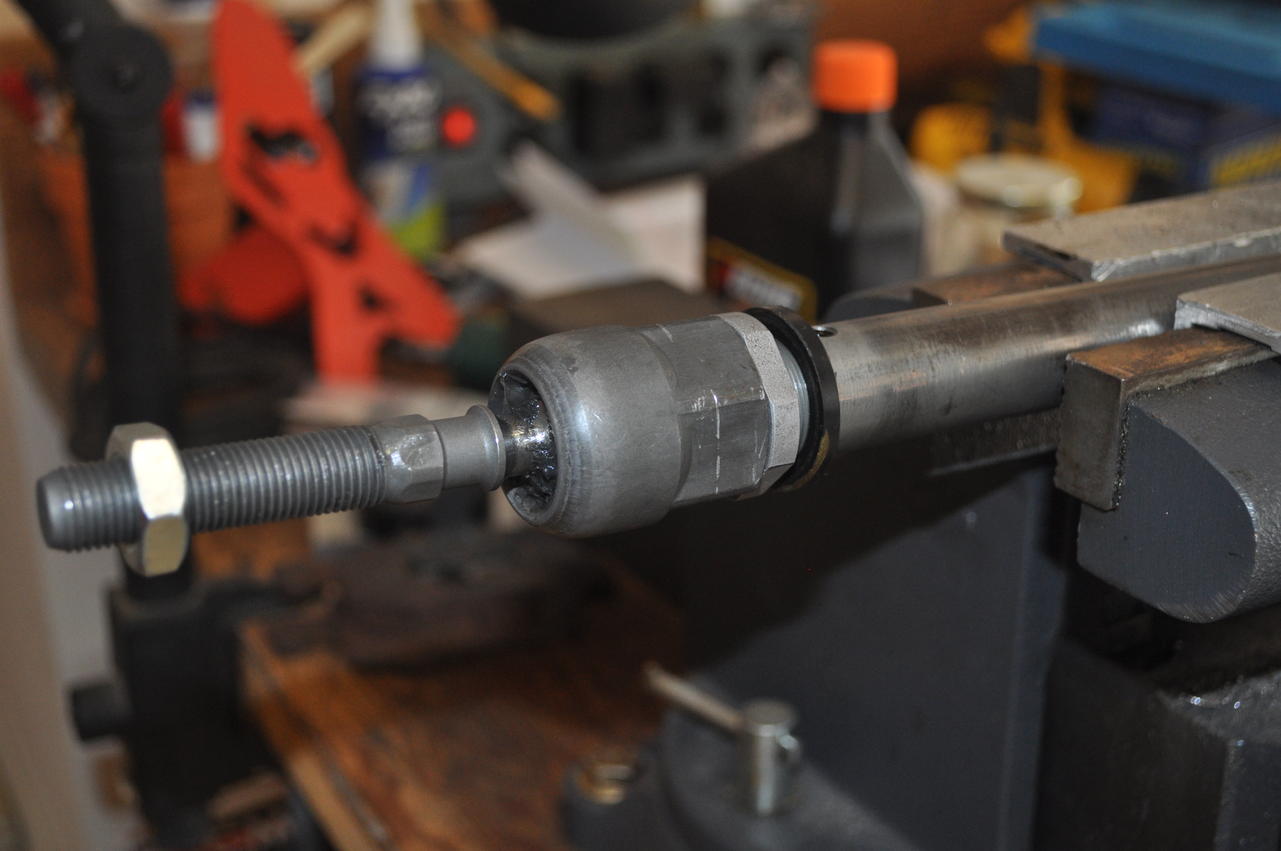
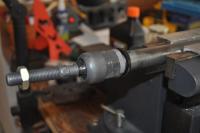
Captain, Really nice job of writing this up. I only wish I had it about 6 months ago when I was planning my rebuild. It would have been very helpful. Hopefully I can add a few more bits of information that will help as well. I finished my rack refurbish and install just recently. I was planning to do this some time back but could not locate some of the critical replacement parts like the inner tie rod ends. I did find a source but they were not available at the time. So I went with a remanufactured one for about $300, which in the limit looked like it was only cleaned up, repainted, new boots, perhaps new grease, and that's about it. Was a definite improvement over my original one with 150+ miles on it and almost 40 years, but it was not what I was expecting. In the course of doing some research, I ran across a rebuild article on the IZCC site: the Z Car Home Page It was contributed by John Downing and apparently those inner rack end bushings were available from Nissan at one point. If you read the article he purchased a "kit" that included these as well as some other critical components. Unfortunately I could locate them and they are NLA from Nissan now. Never the less, the article was very informative otherwise. I gave up on finding the end bushings and decided to replace as much else on my original rack as possible. Went through the exact same process as you outlined in your posts, but I also found that my inner tie rod ends did droop even when full tightened, so finding new ones was going to be critical. Well I did locate them, and although the design is a little different, they have proven to work really well so far. They are made by a company called Rare Parts and you can find the Z steering parts here: http://shop.rareparts.com/smtp/shopdisplaycategories.asp?iyear=1974&imake=0041|NISSAN&imodel=1009|260Z&iproduct=0049|STEERING, GEAR, PUMP & COMPONENTS These are a completely sealed unit but fit perfectly on my rack. They only make one thread configuration so you have to make sure you get the correct outer tie rod ends, and I believe it is the one for the passenger side. In addition, I was able to locate the bushing / grease seal that is on the top of the pinion cover plate. If anyone needs the part number for that I'm sure I can dig it up. Also, I went and looked at some of the pictures I took and I did not have any sort of plugs in the end of the rack. They were just open holes. All of the gears and bearings looked good and so I cleaned everything up, re-greased everything and then re-greased it again, and installed it on the car. The new inners seemed to make a lot of difference and overall the steering was much more stable and responsive than the remanufactured one it replaced. So far very happy with the refurbish. Wish I could have found a new one, but in the absence of that, this was a very acceptable alternative. I've included a few pictures as well. Mike. [ATTACH=CONFIG]69921[/ATTACH] [ATTACH=CONFIG]69922[/ATTACH] [ATTACH=CONFIG]69923[/ATTACH] [ATTACH=CONFIG]69924[/ATTACH] [ATTACH=CONFIG]69925[/ATTACH]
-
Chris, I really think you will like this and I look forward to sharing some of our tuning stories. The people at the company have been great to deal with as well. This is a new market for them and so they seem to be doing all the right things to succeed. Not sure what the rest of your ignition system entails, but if you control / drive your coil directly from your distributor (ie no MSD or equivalent) , you will need to make sure that the primary resistance of the coil you are using is greater than 1 ohm. The folks at 123 were pretty explicit about that and the instructions point it out as well. Let me know if you have any questions during the install. Mike.
-
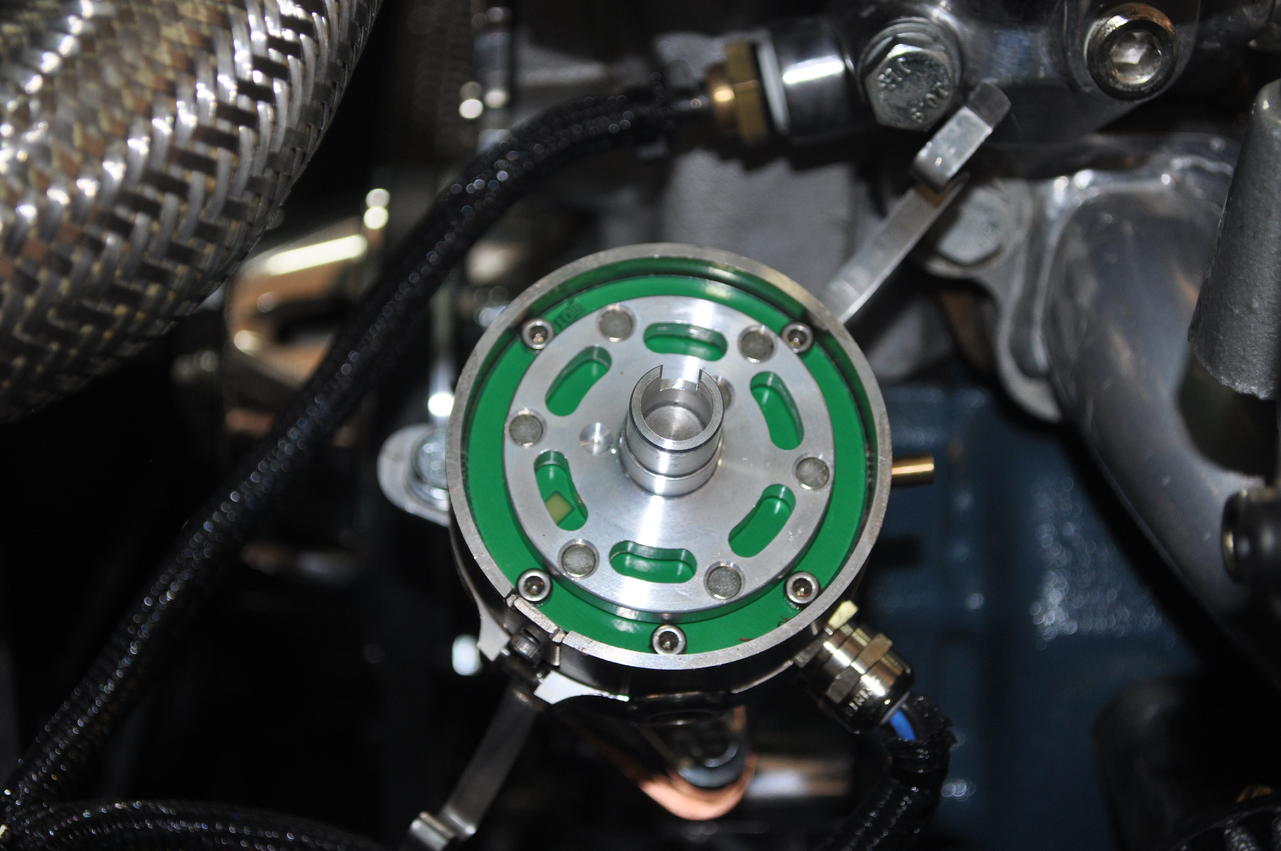
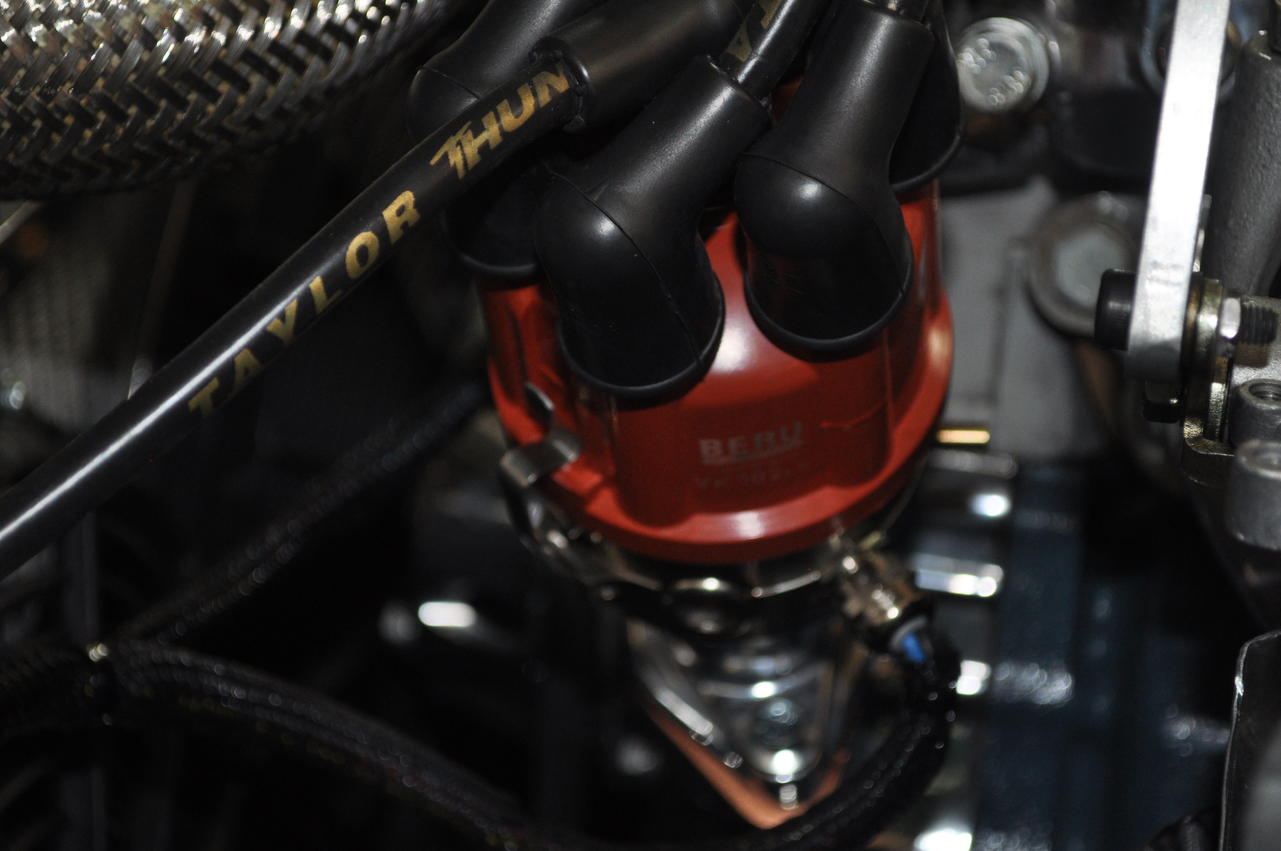
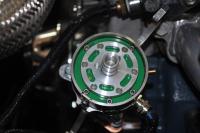
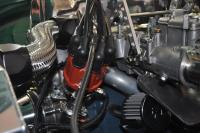
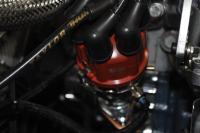
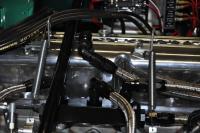
Not much to see under the cap really. There are no weights, no springs, nothing but essentially the electronics. I've included a few pictures so you can see what I mean. I've also included a comparison shot of the 123 cap versus the Unilite cap. You can see how much larger the Unilte is than the 123. Mike.

-
Grannyknot, The issue I see with the switched version is that I do not know what curves will be pre-loaded. As I mentioned earlier, the Datsun version was created by the USA distributor and as far as I can tell, the work that he did was purely mechanical to ensure that the 123 dizzy would mate with our car. Not sure exactly what curves they are planning to use in the switched version. In the end there is only about $35 difference between the full tune model and the swithed version, and so from my perspective it was worth the extra to get all of the flexibility of the Tune model. If you are still interested in the switched I'm sure Ed over at 123 will provide you with the pre-progarmmed curves so you can get some idea on how they will work in your car. Lastly, not sure where the $1200 came from. The whole setup costs about $550, which I admit is not in-expensive, but when it was all said and done, it was not a whole lot more that what the original Mallory set up cost me and I believe that I got a lot more for the $$ with the 123 dizzy. In the limit people make personal decisions about what is important to them in their vehicle and what is not and based on those priorities they choose to spend $$ in specific areas. For me, having this capability has always ranked pretty high and so my choice was to spend the $$$ even if it came at the expense of something else I wanted to do to my car. Enough said. Happy to provide any more detail to anyone that might be interested. Mike.
-
I have read all of the posts that ZedHead references and still decided to pull the trigger. I full agree that the folks on HybridZ were the ones that likely drove the development of this. Thanks to them as I believe they helped to develop a very modern upgrade to our 40+ year old classics. Very interested to hear feedback from any other users. Mike.
-
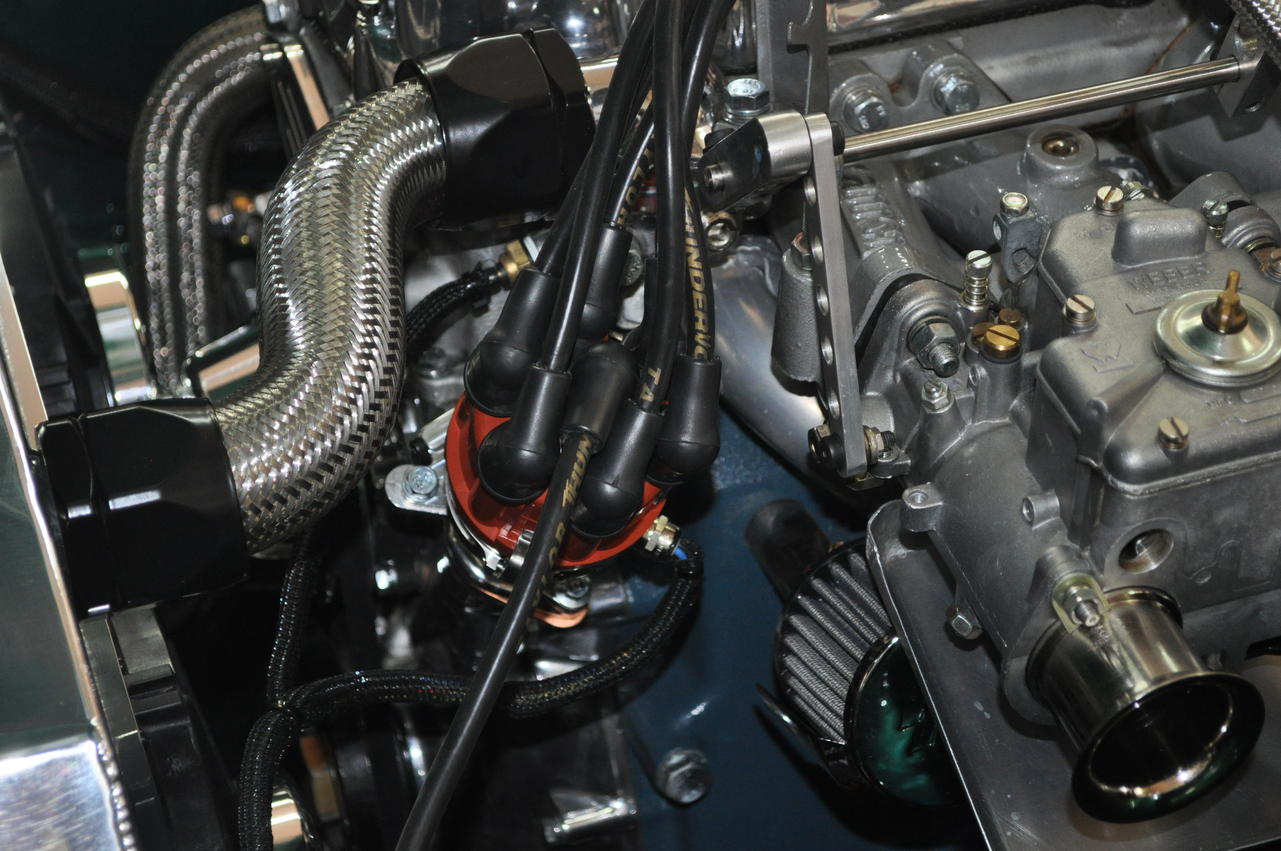
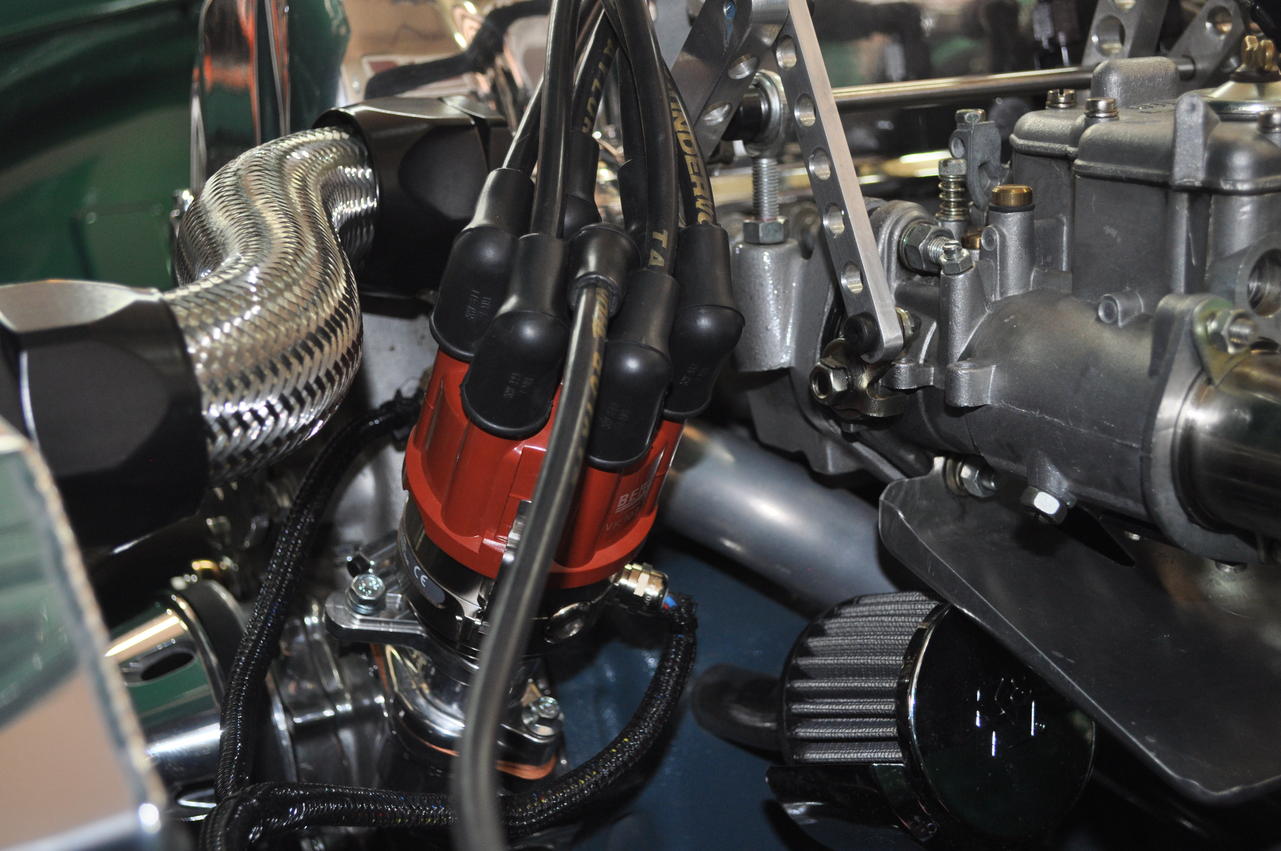
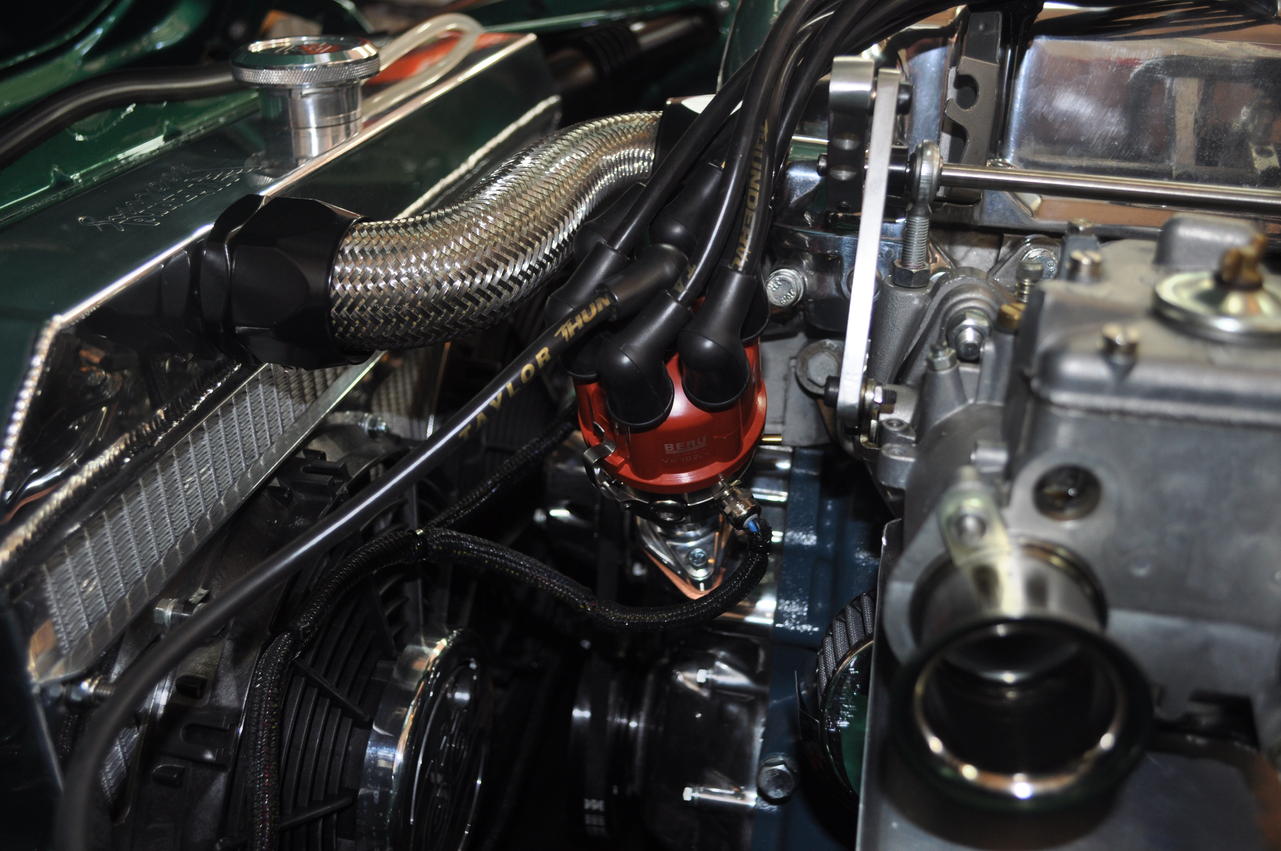
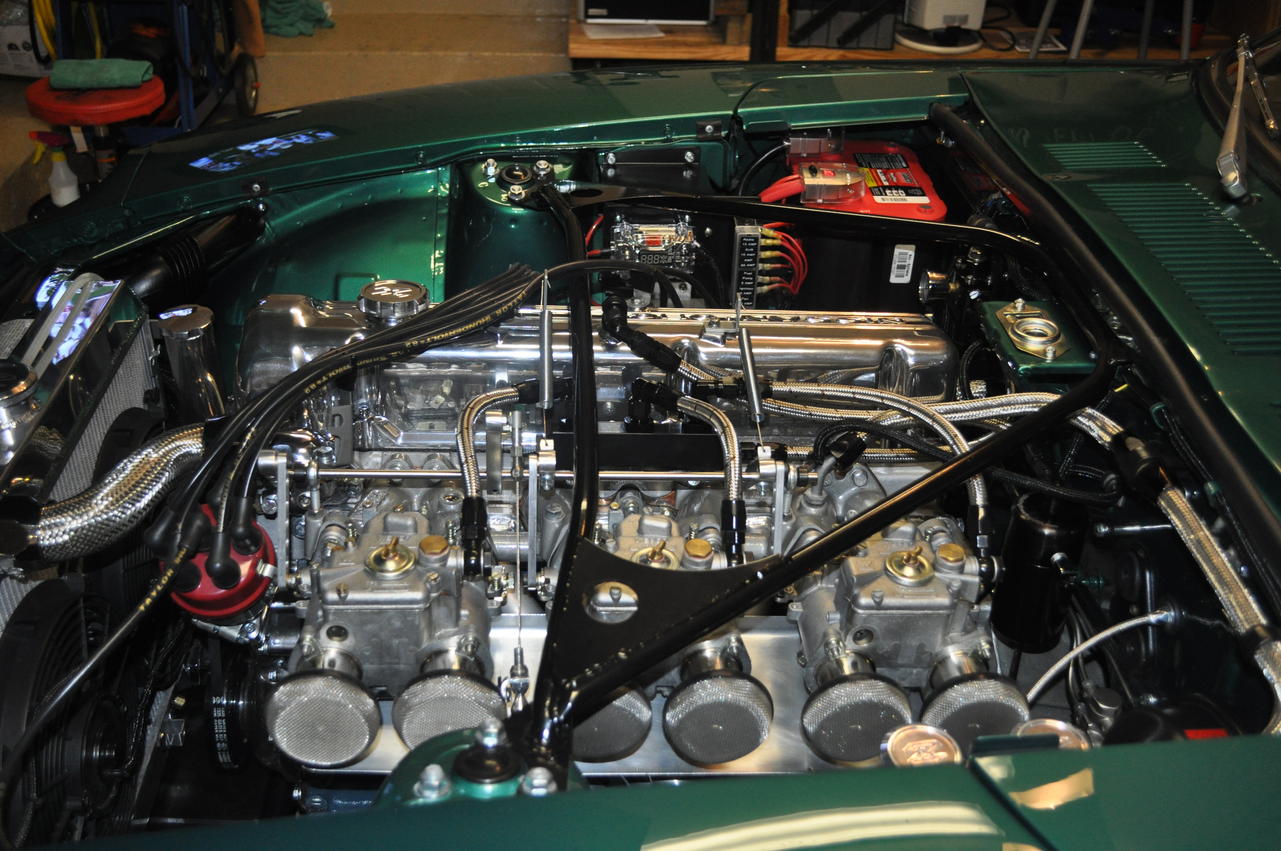
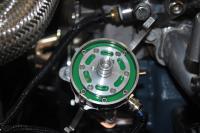
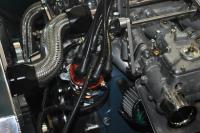
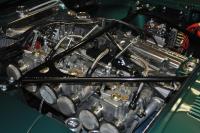
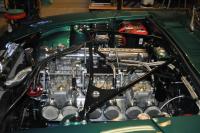
So a little background on my ignition system before I get into this post. I changed my OEM ignition system about 2 years ago and decided to go with the Mallory Unilite distributor (mechanical advance only), as well as an MSD 6AL system. Despite the many reports of the robustness of the Mallory electronic unit, I have never had an issue with mine, although I also installed the recommended "power supply filter" from Mallory as well. Despite that I always did carry a spare electronic unit. I also had to utilize Mallory's Active Tach adapter to get my OEM tach to work correctly over the RPM range. All in all I was pretty happy with this setup, and my car ran very well, but one of the primary reasons I purchased the Unilite was the ability to change timing advance curves. Getting timing optimized on our cars, especially with triple Webers, was very fundamental, and so I wanted the ability to try and fine tune my ignition timing and optimize it for my car / setup. As a result I also purchased the Advance Timing Curve Kit from Mallory, which was essentially a set of springs and clips that could be used to adjust the overall advance curve of the dizzy. However the task to changes these springs turned out to be pretty involved and so I never took the time to do the fine tuning and just accepted the performance of the car with the stock Unilite springs, which was actually quite good. Fast forward to last weekend when I attended a local car gathering. Met a guy who had just purchased a Triumph TR6. He saw my Weber setup and asked if I could help him tune his car, so we went over to check out his car. In the course of discussion he tells me about a number of upgrades the PO has completed including a 123 Ignition. So I ask "what is a 123 Ignition"? He tells me that "it is this totally electronic distributor where you can tune any advance curve desired through USB. There are no weights, springs, etc and the unit can control both centrifugal as well as vacuum advance. You can even adjust timing dynamically as you are diving the car by using their PC application. It was developed in Europe primarily for European cars. Not likely you will find one for the Z." Sounded pretty cool so I checked them out when I returned home. Turns the out unit was developed in the Netherlands by a company called 123 Ignition and they also have a US distributor of the product. Their European site had no mention of Datsun or Nissan, but when I checked out the US site, lo and behold there was a link for Datsun. The link showed one of their dizzys as well as a billet locking plate and adapter necessary to mate to the top of the Datsun oil pump shaft. Called them the next morning and talked to the owner of the US operation named Ed. Was very informative on the ignition product and in fact uses one on his own classic. Turns out it was Ed who developed the version for the Datsun Z cars. Apparently he had received sufficient interest to get a Datsun version in the market. I believe that he used an existing 123 dizzy and adapted it to fit the Z cars. Also needed to have a mounting bracket that would wok as well. Ed informed me about a lot of the capability of the 123 Ignition and some of his own personal experiences. Everything was sounding great until he mentioned that he was not sure if the 123 would work with an MSD 6AL. He told me to contact their chief engineer in the Netherlands and he could confirm, one way or another. I sent a mail with the MSD question as well as a few others, and received a response the next morning. Turns out MSD is not a problem at all and he gave me the correct hook up directions. Also answered my other questions, so I pulled the trigger and purchased one. Received it on Thursday and took the day off on Friday to complete the install. Install was very straight forward, but I left the existing Unilite wiring in place until I was able to start and run my car with the 123 dizzy. I downloaded and installed the 123 Tune application and started it up. I loaded a curve into the new dizzy that was based on a reference to the "2 orange spring" curve for the Mallory dizzy which I believed to be closest to my existing setup. Completed the wiring and it started right up. Drove very well but this was with a curve that I believed to be very close to my existing setup. So I really wanted to see what tuning my timing could do. So over the course of the next few hours, I tried out about 4 different curves. Each was a modification of the last, based on RPM areas where I thought additional advance would result in performance gains, or alternatively too much advance was resulting in ping. Also the software is very intuitive and easy to use. Very simple to make changes. The tune that I am running now definitely seems to pull harder in the mid RPM's and gives better overall drivability. Admittedly this is only with a butt dyno, but I've spent enough time in the car where I think I can tell a difference. I also had the opportunity to take the car out on a 150 miles drive yesterday for our local Z club monthly drive, and can definitely feel more pull and generally just more power. I still have more tweaking to do, but this really seems to provide the capability to zero in on an optimal timing curve specific to the setup of your car. Dyno sessions now seem to make more sense to me as making these changes is very very easy. The car ran well enough where I completed the install by removing the old ballast resistor as well as the Mallory power supply filter. This had the side benefit of cleaning up my engine bay further and the wiring to the new dizzy was very straight forward. Worked perfectly with the MSD 6AL and my tach did not have issues. About the only issue I had with the install was mechanically mating the 123 dizzy to the Z mount / oil spindle key. Turns out that I had to do some dremeling to slightly enlarge the hole that would allow the top of the spindle to fit properly. I have informed Ed at the USA 123 distributor of this issue and has already made the appropriate changes to his engineering diagrams to reflect this. It's only been a few days since this install, but so far I am very happy. I still have more tweaking to do, but it is so easy I feel a lot more motivation to zero in on the most optimal curve for my car. Still have a put a lot more miles on this to build confidence on the reliability of the unit, but this company has apparently been in business for quite some time so perhaps that is a reflection of their quality. Finally, the unit was a little on the expensive side, but not a lot different from a new Unilite in addition to the power supply filter. If all goes well, I will have my old Unilite up for sale soon, so let me know if you might be interested! If you are looking for more information on this product you can check out the following sites: Datsun Conversion | 123IgnitionUSA.com What is 123Ignition about? - Perfect Timing - w/ "Formula" Technology | Ed 123ignition electronic ignition systems for classic cars I've included a few pictures of my install. The 123 dizzy is about 1/2 the size of the Unilite and smaller than the Datsun OEM one as well. If anyone has any additional questions just let me know. I'll try to keep you posted on my ongoing tuning sessions. Mike.

-
Yes. You can still get these from Nissan. I purchased a pair recently from Courtesy Nissan and they fit perfectly. They are a bit on the expensive side, but I guess you get what you pay for. If you need the part numbers let me know and I will post them for you. Hope this helps. Mike.
-
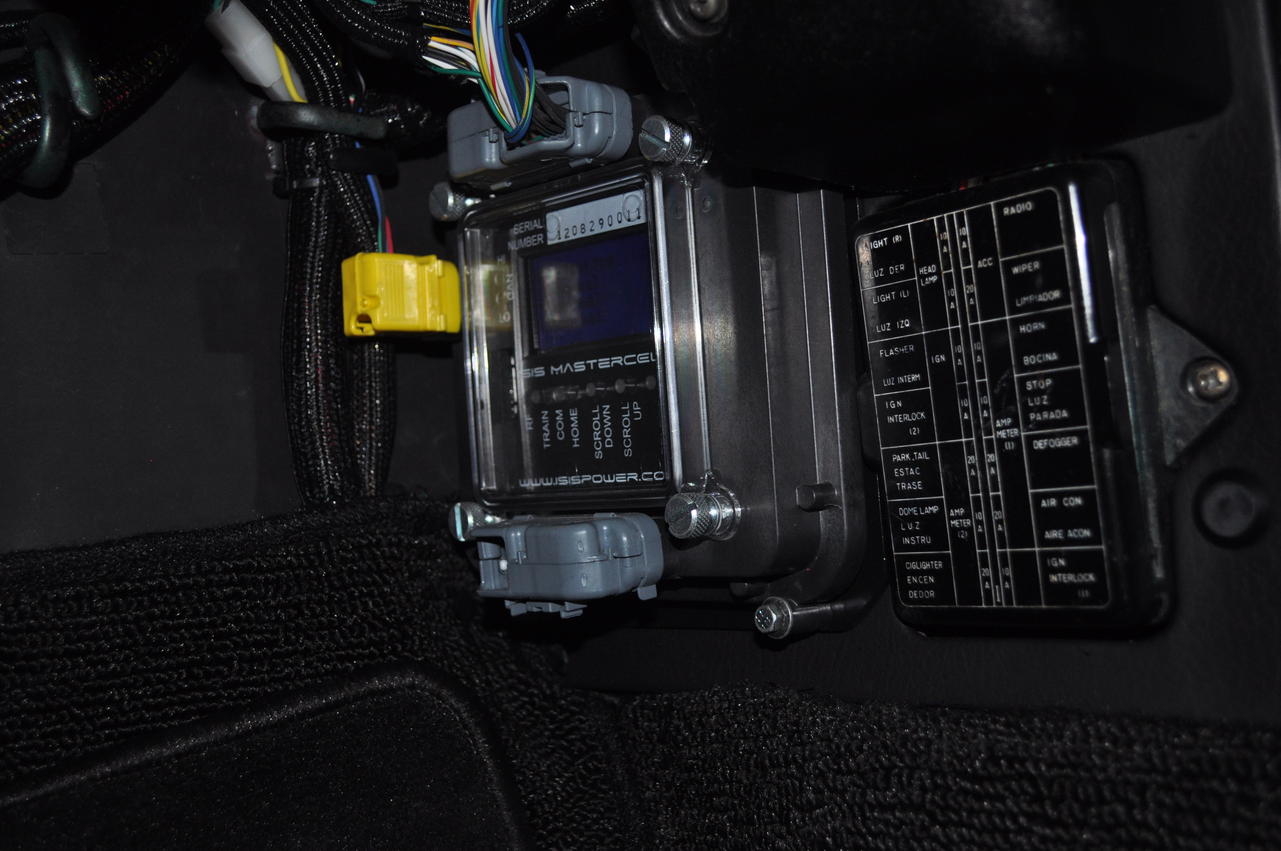
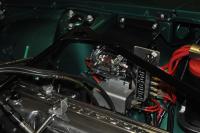
So before I ended up installing the Isis Intelligent Multiplex System in my Z (perhaps one of 2/3 Z owners on earth who have done this), I utilized a fuse block that I purchased from wiringproducts.com that was quite inexpensive yet did exactly what I needed in a very small space. You can find a link to the product here: 6 Circuit Raised Ganged ATO/ATC Fuse Block - WiringProducts I used it for ignition, stereo amp, stereo sub, cooling fan, fuel pump and it worked fine. I built a small bracket that attached to the fusible link bracket which is where I mounted the fuse block. Worked really well, especially for $25. I must admit, had I known about the marine versions that were discussed earlier, I would have gone that route, but this made for a very easy install and provided the power distribution that I needed. I've included a couple of pictures of the wiring products fuse block as it was installed in my car at the time. I've also included a few shots of the Isis install, in case anyone is interested.


-
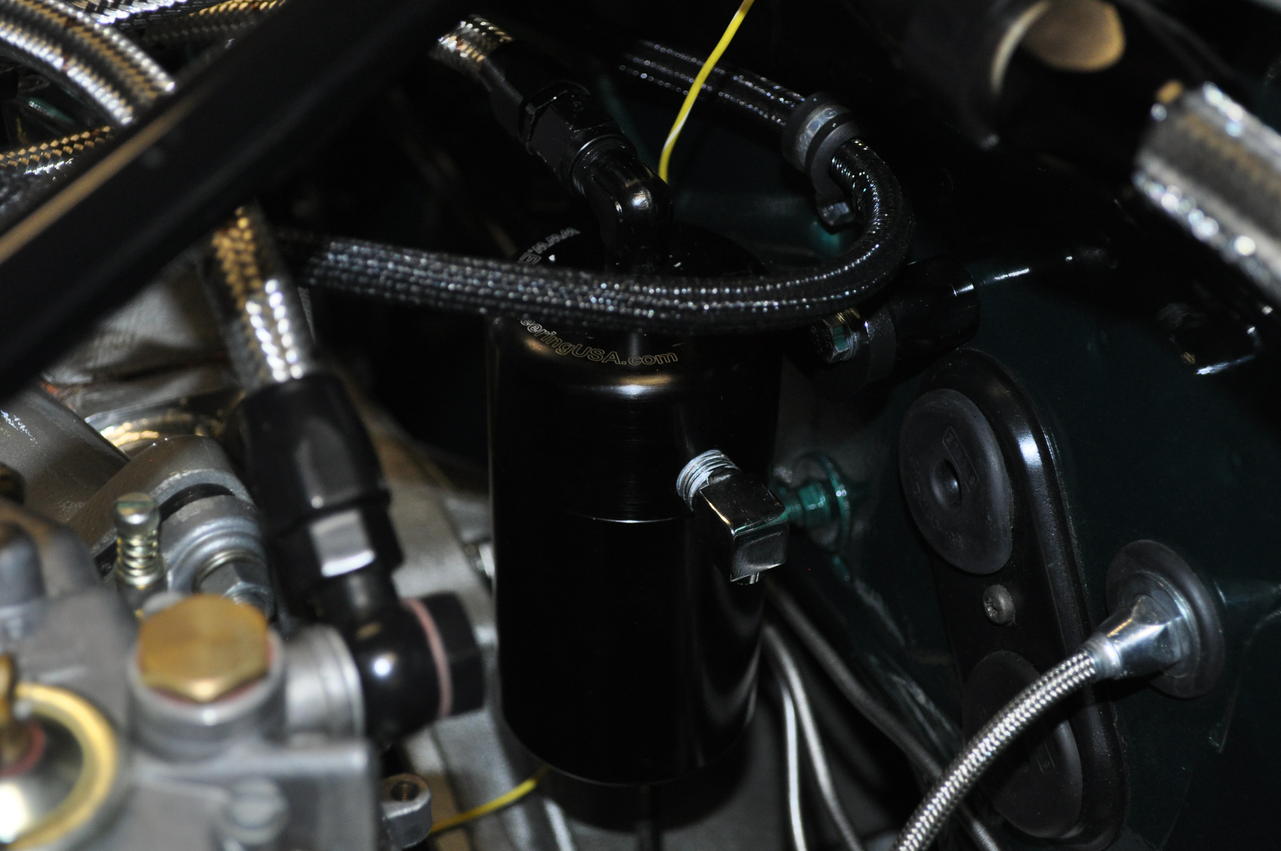
Grannyknot, To answer your question. I only have the valve cover breather going to the catch can. For the block breather I use a large K&N breather that seems to work well. I don't seem to get any residue from the block so I have left this one alone. Let me know if you need anything else. Mike.
-
I used to use a medium size K&N breather that I attached directly to the right angle fitting on the valve cover, but I found over time that as they got "saturated" I would get an oily residue around the area of the breather. It wasn't terrible, but it was definitely a PITA to clean up. So to remedy this once and for all, I installed a catch can, which has been a great replacement to the old breather. This particular one was actually a gift from my son and was designed to be installed in a 99 C5 Corvette that I had at the time. I never got around to installing it in the vette so decided to re-purpose it for the Z. Turned out that it fit perfectly on the firewall and in fact I was able to even re-use the bracket that came with it for the Corvette. I decide to use AN fittings and SS braided line to plumb the catch can and this required that I re-tap the hole in the valve cover to mate with the AN fitting that I chose. I've attached some pictures so you can take a look. I've never had a residue problem since and I simply empty the few tablespoons of liquid that accumulate in the catch can each time that I change the oil. I'm happy to provide the details of the company that makes the catch can if anyone is interested. Mike.

-
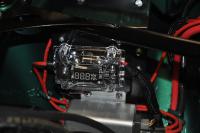
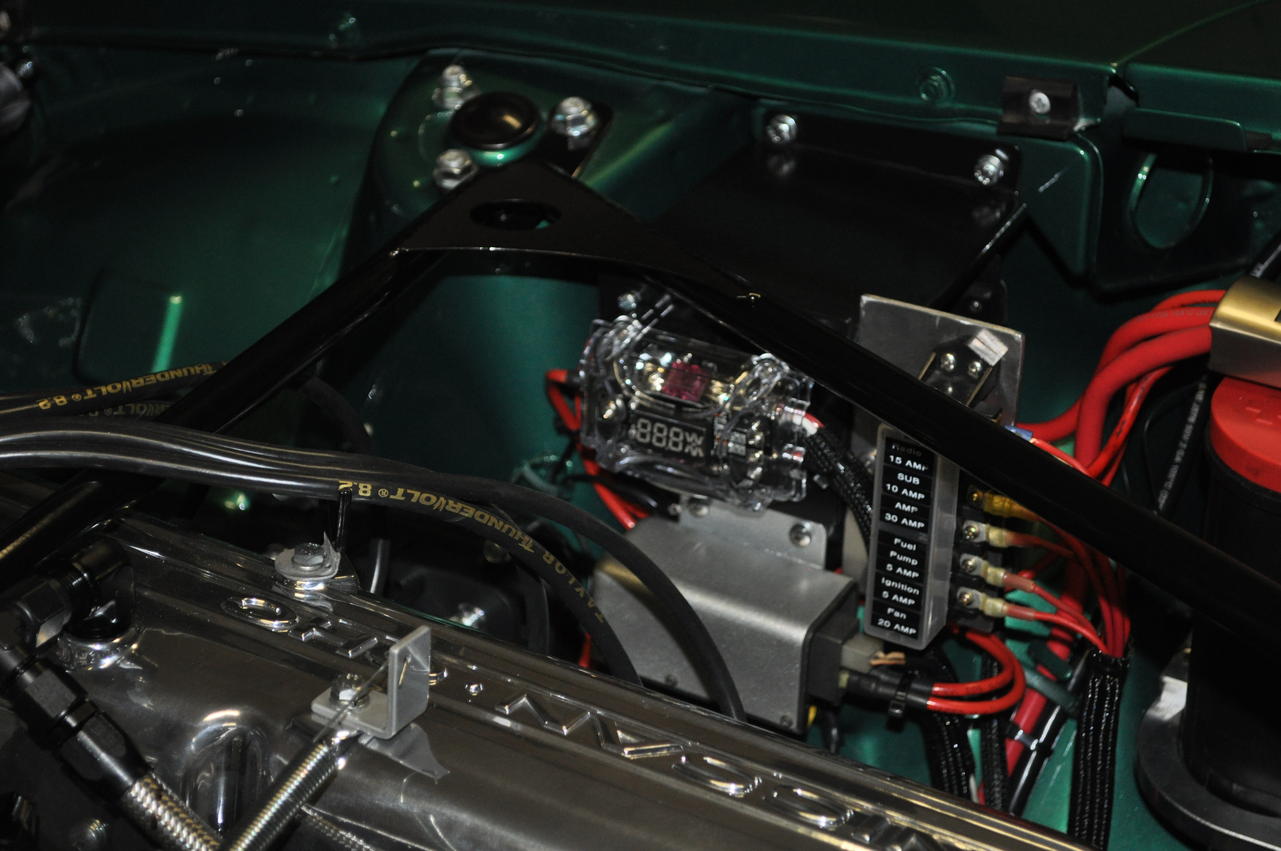
Bob, The part is made by DB Link / Strandflex and the part number is SFANLFB12DA. It uses mini ANL fuses and is very well made. I am happy with the product as well as the upgrade. You can get it am Amazon here: Amazon.com: DB Link SFANLFB12DA Strandflex 2-Position Digital Mini ANL Fuse Holder: Car Electronics Not bad for $32. A few other comments on the ammeter / shunt as well. I believe that Nissan changed the size and location of the shunt over time. I recall that in the early Z cars the shunt was actually located behind the gauge itself, while in later years (not sure exactly when this started), the shunt was moved to the engine bay and the physical size of it grew significantly. I suspect that this had to do with the ever increasing electrical capacity in the car and the need for a much heftier shunt resistor to measure current for the meter. I also suspect that this is why they ultimately moved to a volt meter (like in Sarah's car and the later 280's). In any case you can see most of the shunt in the picture I included above with the new fuse block. It is the large silver box just below the fuse block and it houses a very large resistor / shunt that is capable of passing all of the current that the car requires. Mike.
-
Hypertek, I do not think that edit is correct as the original fusible links were powered separately and each link protected a certain part of the electrical wiring system. At least that is how my car was originally wired and I spent an inordinate amount of time trying to get these diagrams correct. However, with the replacement fuse block that I used, the input feeds are ganged together and so there is only a single supply source that I use with the new fuse block. That is why you see them connected together in the "new" wiring diagram. Let me know if you have any other questions on this and I'd be happy to help you out. From my experience, this looked like it was going to be a lot more complex than it actually turned out to be. A couple of other points as well. 1. Your car still has the "shunt" which is used to drive the ammeter in the car. You will need to hook this up correctly so you still get accurate readings for charge / discharge on your ammeter. 2. Not shown in my diagrams is an alternator upgrade that I also completed as a part of this. It simplified the wiring significantly as I used a "one wire" alternator that is internally regulated so I was able to remove the old mechanical voltage regulator as well as associated wiring, and the new alternator wiring was simply a single wire from the charge output to the battery. Couldn't have been easier and the improvement in the performance of the electrical system is like night and day. Went from a 60 amp output to 140 amp so I have plenty of available charging power if I need it. Happy to give you the details of this if / when you need it. Sarah, Yes the fuse block I chose is very cool and adds a nice look to the engine bay. On top of that, you are 100% correct that it will also display both voltage as well as current (alternates between the two) and this can be very handy at times when trying to troubleshoot an electrical issue. I am happy to get you the details of this block (manufacturer, etc) if you are interested. I spent a lot of time looking for something like this but this is the product I ended up with. Very happy with it so far and certainly a vast improvement over the worn out fusible link system that was in my car. Hope that helps. Mike.
-
I have done this on a 260Z, but also bear in mind that mine is a very late version (typically known as 74 1/2) and so there may be some differences. Having said that, the wiring diagram I used from the FSM was from a 74 so there should be good correlation. I have attached a PDF showing a simplified version of how it was wired from the factory as well as how I rewired it with a new external fuse block. I've also included a picture of the fuse block install as well. Hope this helps. Fusible Link Replacement OEM Wiring.pdf Fusible Link Replacement New Wiring.pdf