Mike W
Free Member
-
Joined
-
Last visited
Everything posted by Mike W
-
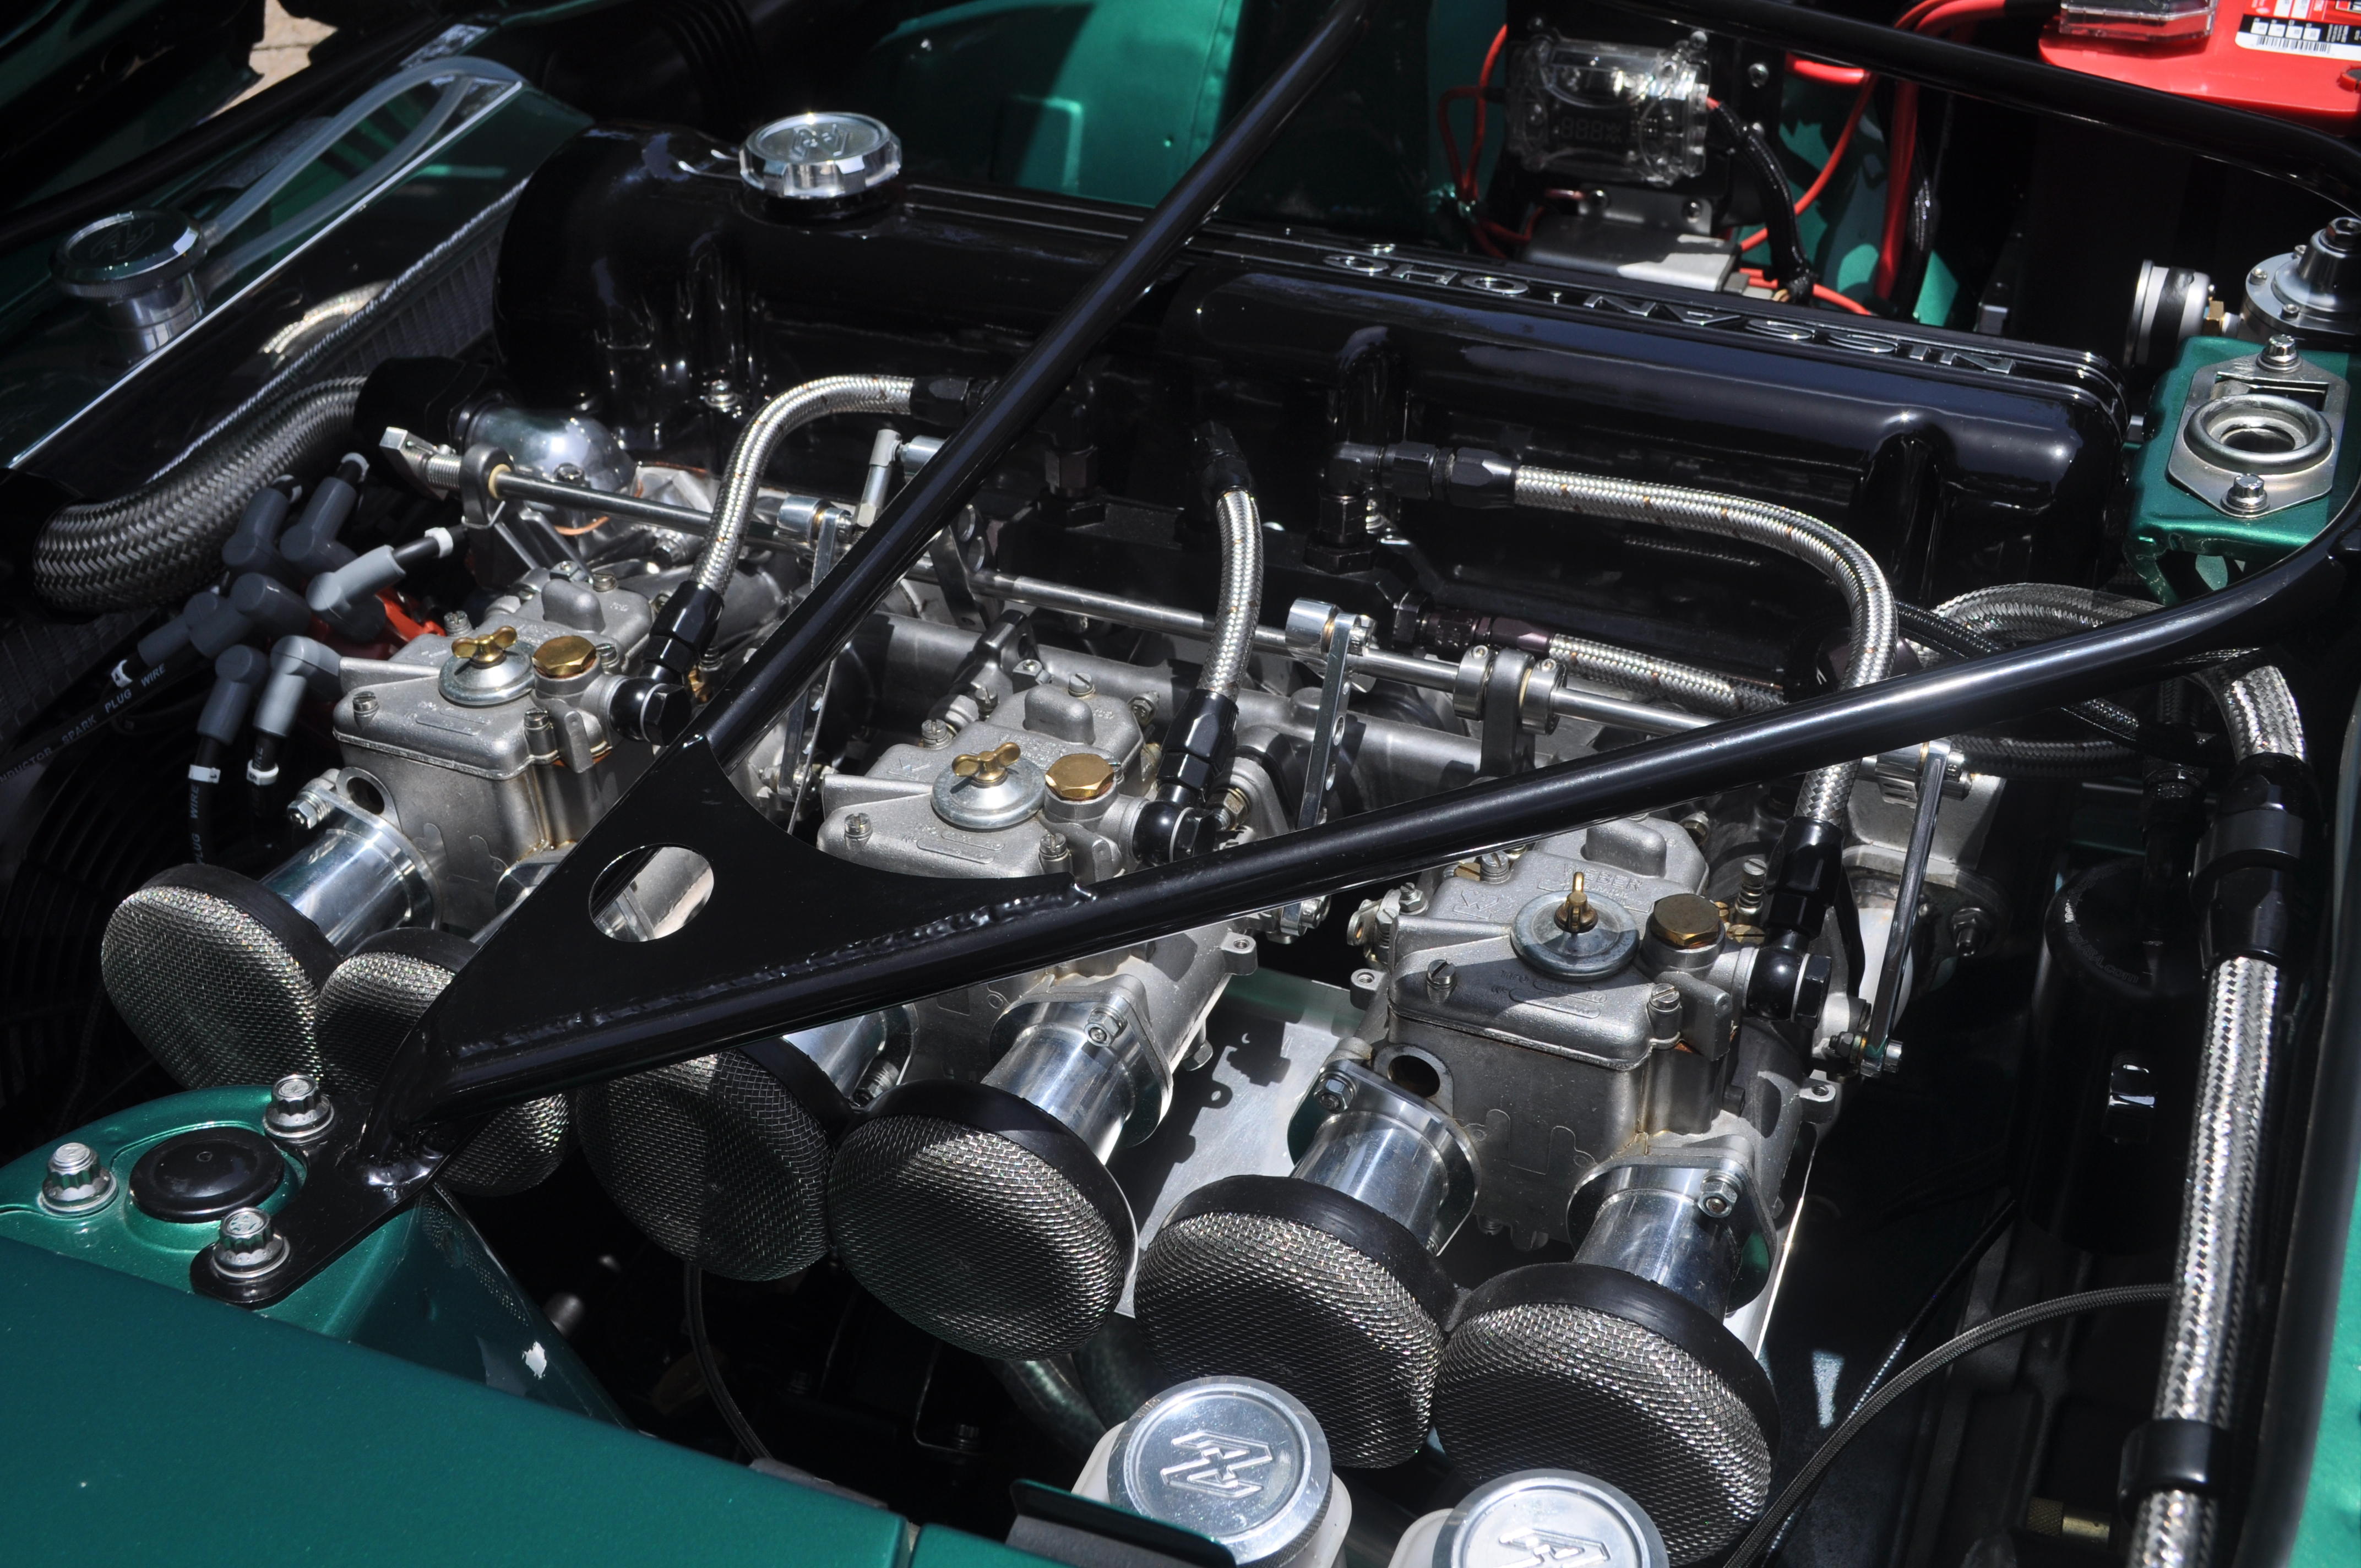
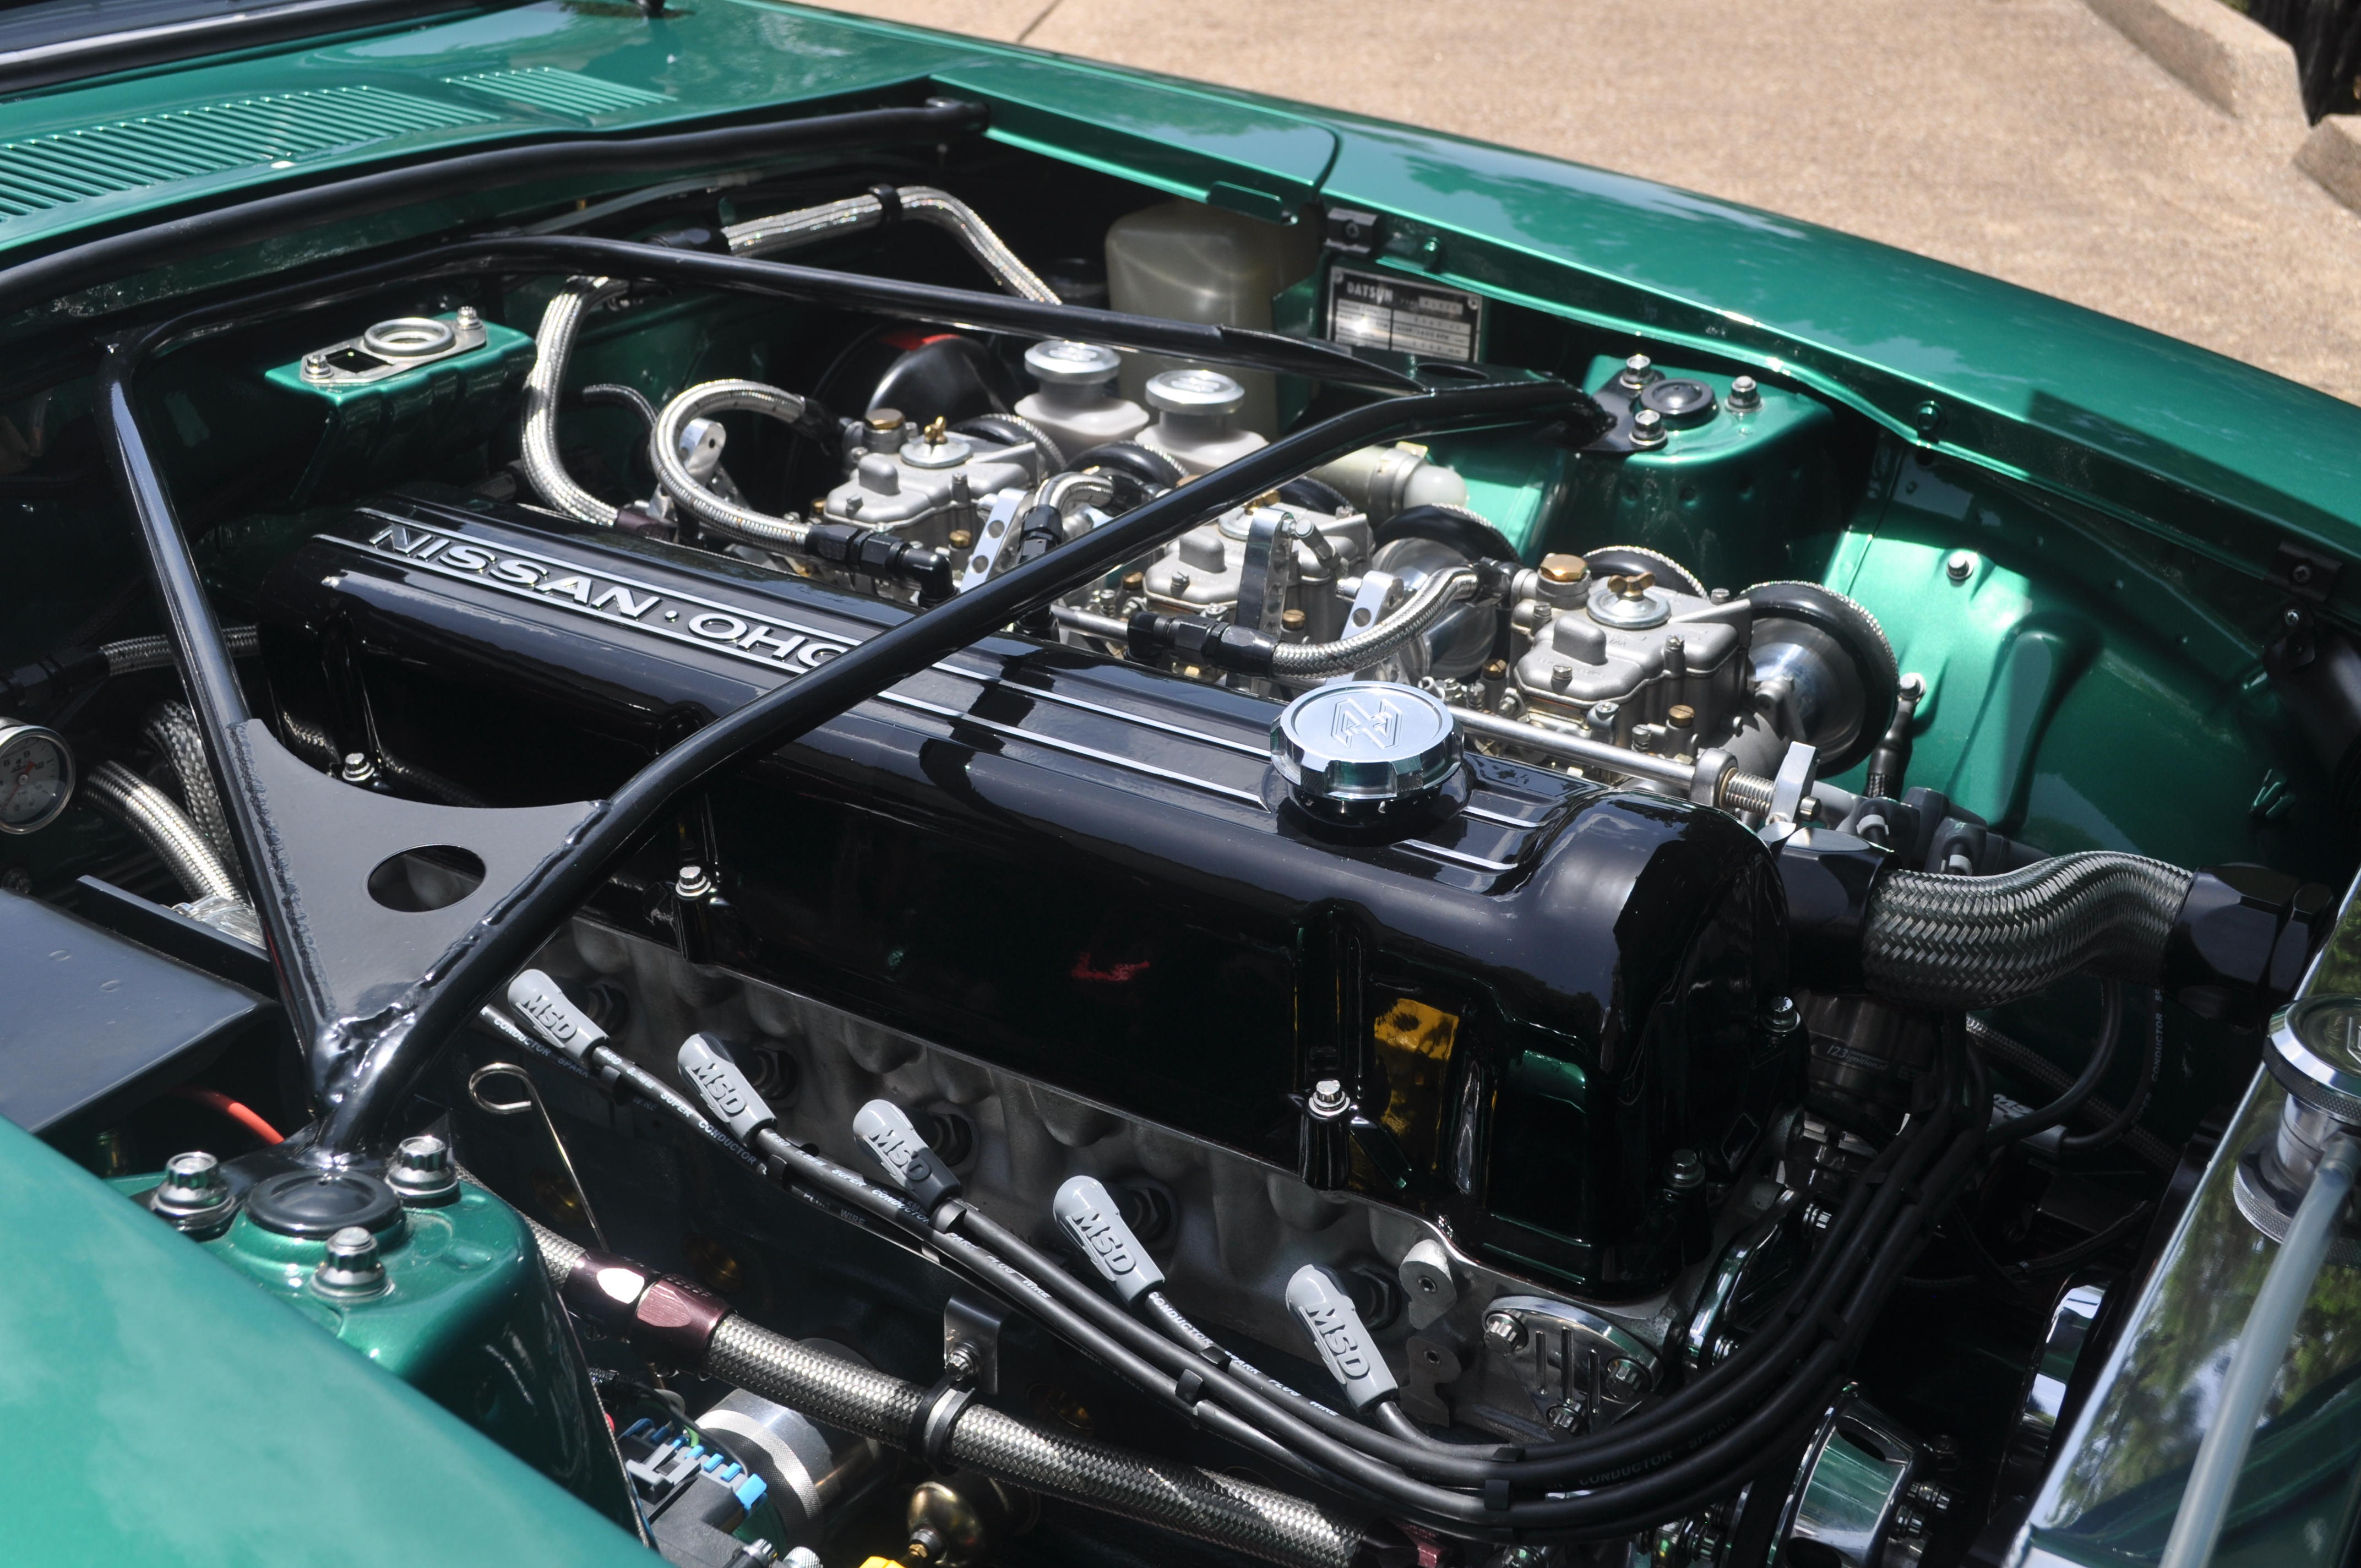
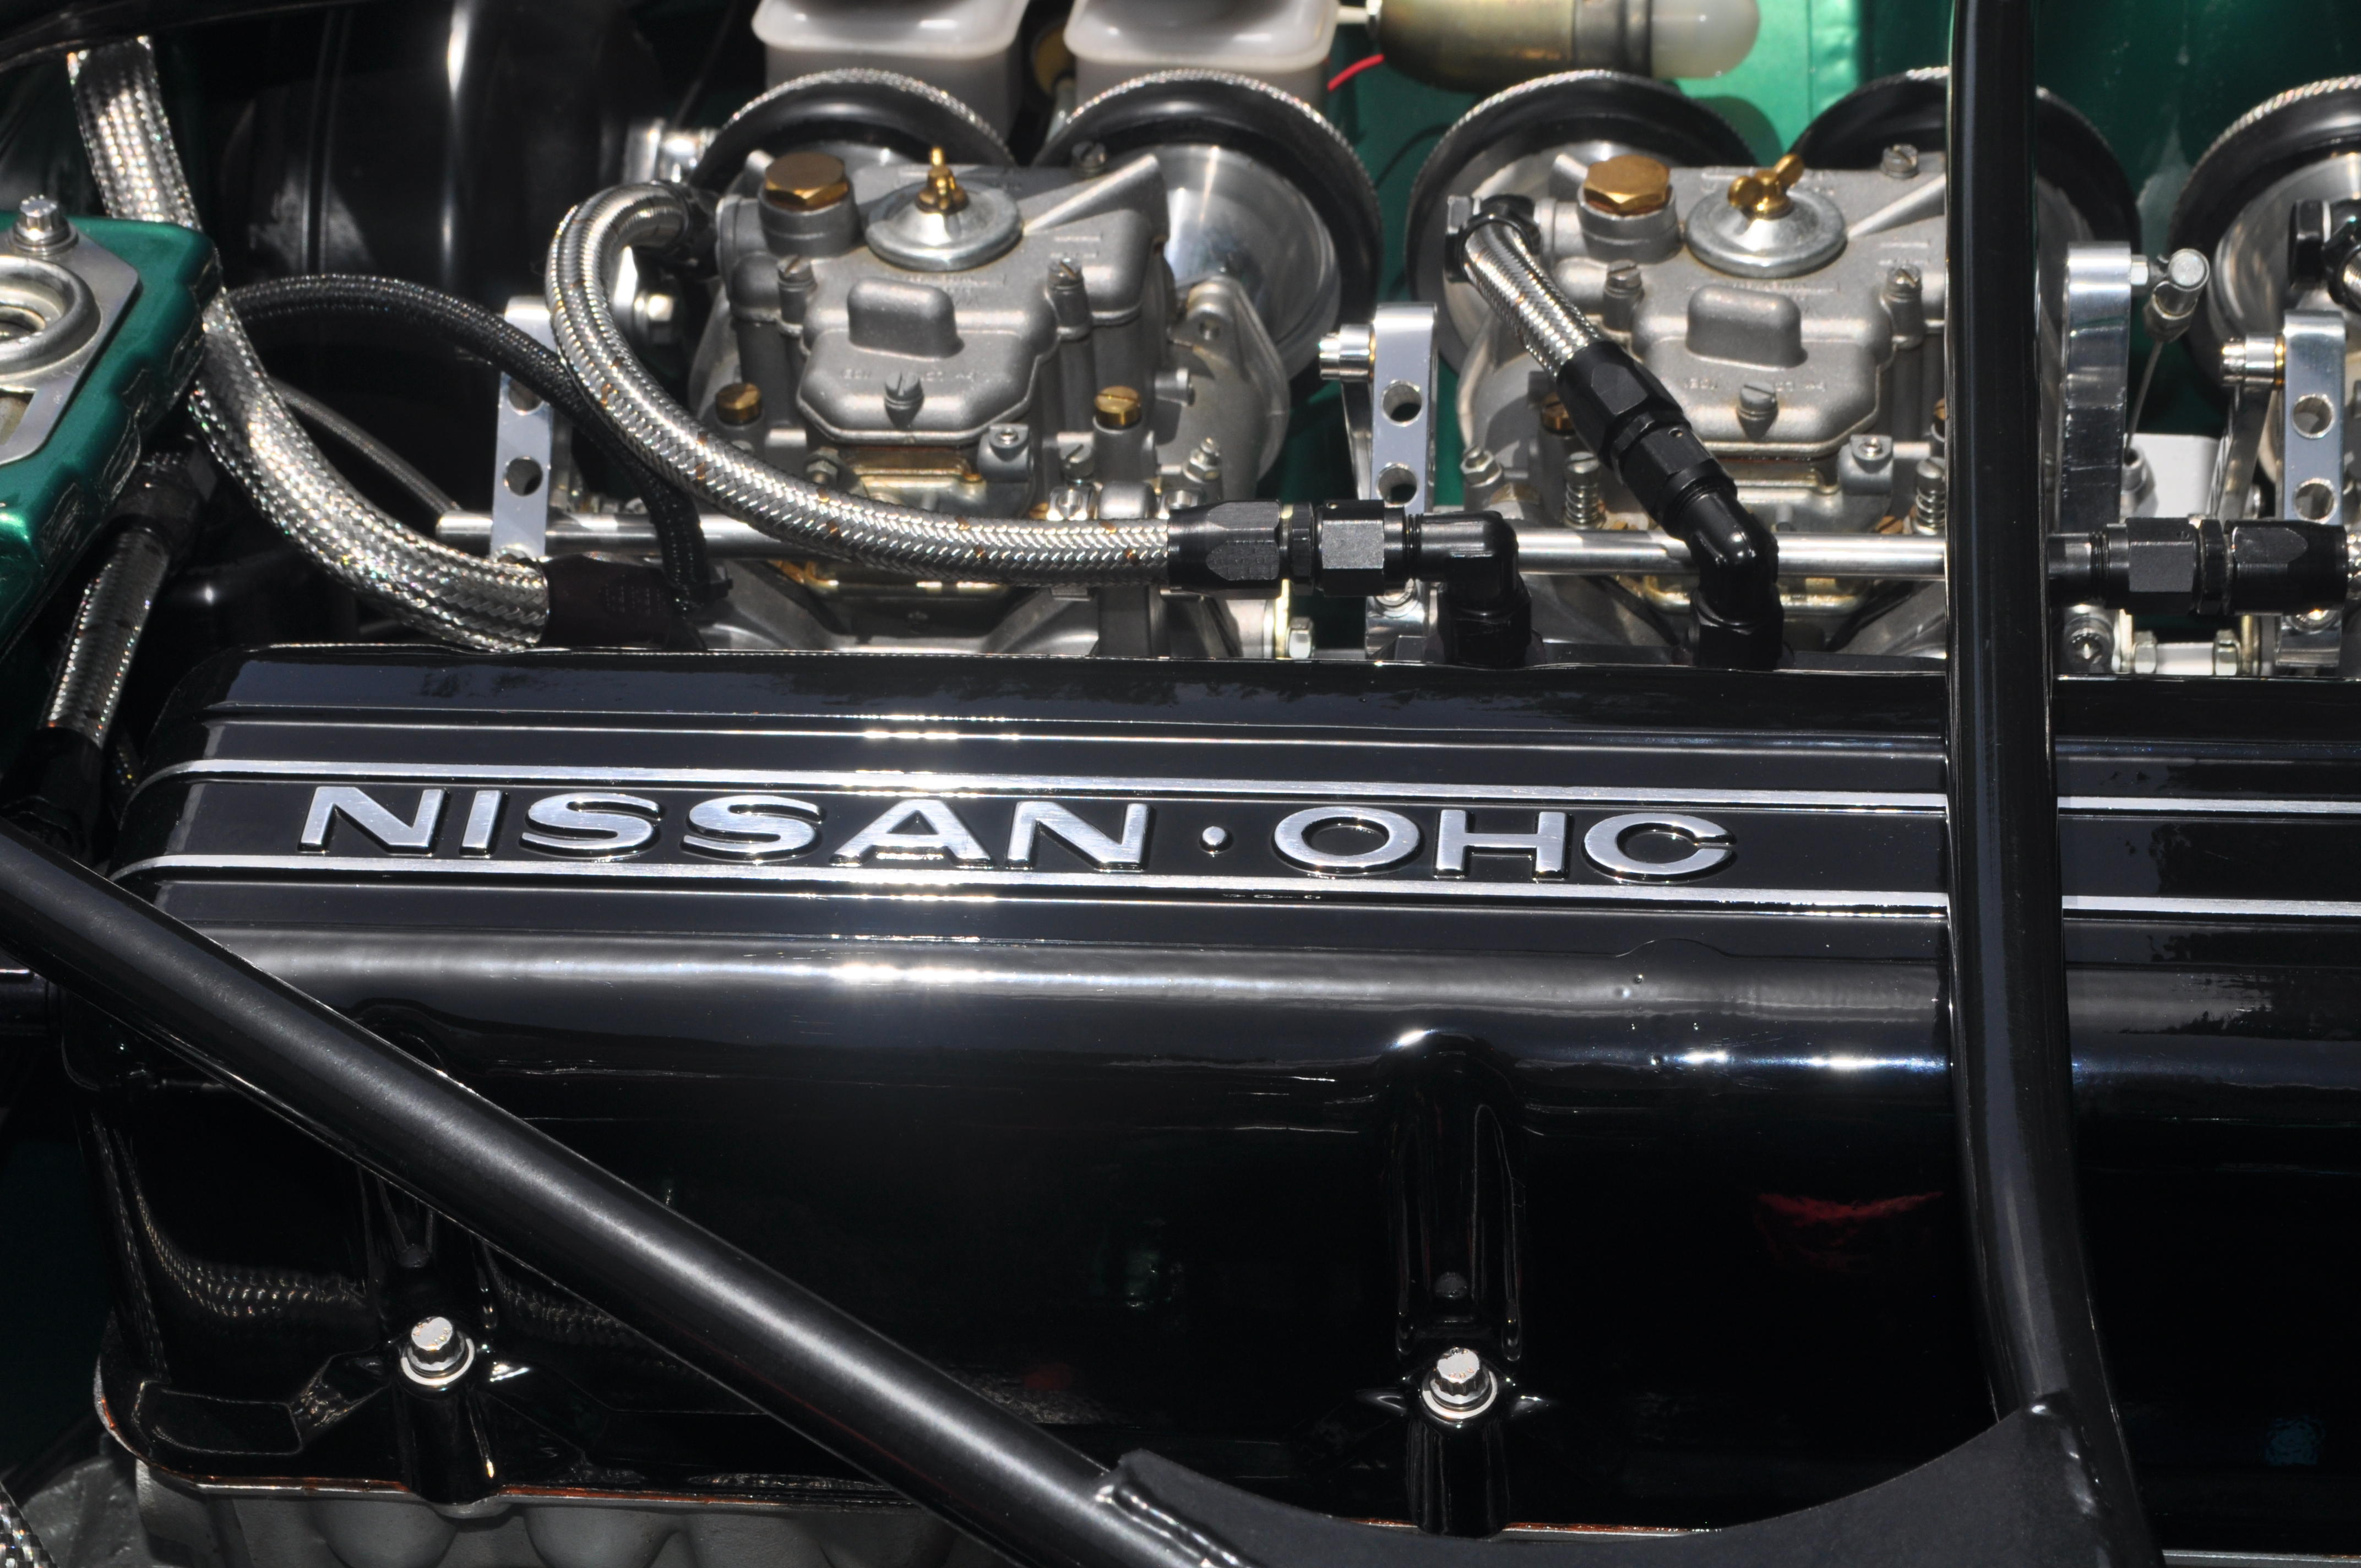
 I went AN throughout my fuel system all the way back to the pump at the tank, although that is not how I started off. I knew little about these when I started the install but this site provided a ton of information on the fittings, how to assemble, etc. So if you haven't been here yet I recommend it highly. They also sell all of the parts as well: https://www.anplumbing.com/adapters/aluminum-adapters.html I'm running triples and so my install is a little different. However, when I originally started down this path, I did not want to go all the way to the tank and so I ended up cutting and flaring the OEM fuel hard line so that I could make the conversion from hard line to AN. I found this hard line adapter on the site listed above. They also make banjo fittings for AN but I believe you can also get a direct thread in to the carbs from an AN as well. Check the site above. One last thing. I hope you have deep pockets. Although I would do it again in an instant, it is not an inexpensive proposition. Just a heads up. Here's a few pictures of my install. If you have any other questions, just let me know. Mike.


-
Charles, I agree that this stuff can be a little messy to use if you are not careful. What I typically do is apply adhesive to both the weatherstrip and body where it will be secured and let it dry for a couple of minutes until it is tacky. Then I put the 2 pieces together and normally get a good tight seal. Yes the adhesive remover can help to remove the adhesive both during application as well as removing old, dried up adhesive if you are replacing old weatherstripping. Here's a link to the product that I use: https://www.3m.com/3M/en_US/company-us/all-3m-products/~/3M-General-Purpose-Adhesive-Cleaner/?N=5002385+3293242391&rt=rud Finally, I'm a little surprised that the adhesive is actually softening your paint. I have not had that issue at all and I can also say that the remover does not harm the paint either. I will add that my paint is a 2 stage (base + clear) and so perhaps that is the difference. Hope that helps. Mike.
-
This is what I use: https://shop.advanceautoparts.com/p/3m-super-weatherstrip-adhesive-5-oz-tube-black-08008/7720004-P?searchTerm=weatherstrip I also use the 3M weatherstrip adhesive remover to get rid of the old adhesive. Works really well and does not harm paint. Mike.
-
Those are Appliance mesh mags and were very popular back in the day. I had a set that I bought a year or so after I purchased my Z in 74, had them refurbished locally here in Austin recently and sold them for $1000 with a set of BF Goodrich TA radials. I’m sure someone on this forum would be interested in your wheels. Sent from my iPhone using Classic Zcar Club mobile
-
I used to run the Mallory Unilite but switched to the 123 Ignition setup. A couple of comments about the Unilite / Mallory from my experience: 1. Mallory was acquired by MSD a while back and as a result the Unilite made for the L6 engine is NLA. 2. On my original Mallory setup the part number for the distributor cap was 270 and the rotor was 339. You should be able to still get these through MSD or even Amazon. 3. The electronic module in the Unilite distributor was known for being susceptible to spikes on the 12V line and could go bad as a result. Due to that I always carried a spare with me (never had to use it) and also installed a Mallory power line filter to eliminate any 12V spikes. Hope that helps and good luck with solving your problem. Mike.
-
So I think that I might have been the first Z owner to try the 123 ignition on their car. You can find the write up I did in 2014 here: I still contend that it is one of the best upgrades I have done and definitely makes the job of getting your advance curve optimized extremely easy. Let me know if you have any other questions. Mike.
-
A very similar thing happened to me about a year ago. All of a sudden the car had no power and did not sound right. Traced it down to the #4 cylinder and was hoping for something electrical, but no cigar. Ended up pulling the head only to find the seat on the #4 intake had come loose and was not allowing the valve to fully close. Brought it to my machinist and we ended up replacing all of the seats, many of which were the original brass ones installed at the factory. His theory is that with the ethanol based fuel and the higher burn temps, the brass seats were not designed for this and as a result they loosen over time and eventually fail. There was another one that he found that was about to do the same thing. Replaced them all with steel and so far no problem.
-
Did you ever get anything back from Oliver at Z Specialties or Charlie at Zedd Findings? Mike.
-
I managed to source these for my Z (74 1/2 260 so the same as Jai's as far as the bumpers are concerned) but they were almost impossible to find. I believe that Oliver from Z Specialities sourced a set for me (including the rubber center piece) for the front and Charlie Osborne from Zedd Findings in Canada managed to find the rears. I was told by both when I ordered them that they could not predict when they would arrive and it was possible that they would never show up as supply on this was very limited. This was also back in the 2013 timeframe and so the supply situation is probably worse now. Regardless I would give both of those places a call and see if they might be able to help you out. Hope that helps. Mike.
-
There are actually a couple of these for sale on eBay. One with the same part number that HS30-H mentions in his post: https://www.ebay.com/itm/Datsun-Z-fuel-pump-mount-mounting-bracket-17033-E4200-USED/382363930288?hash=item5906aa8eb0:g:zwQAAOSwkLhaG5cd&vxp=mtr And another that is identical to the one on my late manufacture 260Z: https://www.ebay.com/itm/77-78-Datsun-280Z-fuel-pump-bracket-OEM-used-painted-clean/382374963056?hash=item590752e770:g:RAEAAOSwHNxaTa88&vxp=mtr Ironically both from the same seller. Looks like Nissan changed the design of this over the years. Mike.
-
As I recall when I replaced the U Joints on my half shafts as well as the driveshaft, the C clips are actually installed on the U joints themselves (on the inside of the yoke) and so I don't really understand the need for a groove to be cut. As long as the U Joints are of the same size I believe you should be able to just install new ones. Perhaps I'm missing something but this seems like it would work to me. Does anyone know if the U Joint sizes are the same between the serviceable driveshafts and the newer non-serviceable ones? Mike.
-
Guy, I consider my son and I pretty good mechanics, but installing an LSD and getting all of the preloads and backlash correct is probably out of our element. Not to mention that I probably don't have all of the right tools either. I would definitely have it installed and setup by a pro. And as @7tooZmentions will preserve your warranty as well. Also, and I am far from an expert on this, but there are also different types of LSD's depending on the kind of driving that you are going to do. The Quaife is based on a gear design and is a 1 way LSD meaning that it locks under acceleration and free wheels during braking. This was recommended for basic spirited street driving which is why I went that way. The OS Giken is a clutch based design and can be configured as either 1 way, 1.5 way, or 2 way where the 1.5 and 2 configuration provides either moderate or full lock under braking which is useful for tracking or drifting. On the 180 vs 200 I decided that seeing I was going to change anyway and do have more HP than a stock setup, the 200 made sense and it wasn't really any more money except for the fact that I had to change the mustache bar as well. It in end it was probably a bit of an overkill for my application but I should never have to worry about it again. If you've got more questions on the different types of diffs, etc I'd recommend talking to Mike at Whitehead. He was extremely helpful and informative when I was in the decision process and definitely knows the S30 platform. Hope that helps. Mike.
-
Guy, Not sure yet on ZCON. It's a long drive from Austin especially hauling an enclosed trailer. I'm also waiting to see if my son can get the time off too. Will keep you posted. Tom, I 100% agree with you on the benefits of the LSD. I was fully expecting more traction on acceleration especially moving to 3.9 from stock. But the improvement in handling was a very pleasant side effect. My car handled pretty well with the old 180, but now it just feels totally planted going through the curves. Really happy that I finally did this. Mike.
-
Guy, The person that I worked with directly on this is Mike Hanson. Mike Hanson Manager, Whitehead Performance 416-665-2220 Their website is here: https://whiteheadperformance.com/shop/ They have lots of stuff for our Z's (and other cars). Let me know if you need anything else. Mike.
-
As I said it was not cheap, but the diff was completely rebuilt with new bearings and everything set up correctly. It also included a brand new Quaife LSD, which by itself was $1300. Total shipped to my home in Texas came in around $3K. That did not include the mustache bar setup that I purchased separately from T3. The stock half shafts that I had for my R180 did not have the flanges on the diff end which the R200 requires. Instead they had a spline that slid into the diff and was secured with a bolt that went through the splined shaft and bolted into the diff. The R200 uses a flange attachment as opposed to this spline arrangement and so that needed to be changed on the half shafts. I ended up having a spare set of half shafts that had the correct flanges and I rebuilt those while I was waiting for the diff to arrive. Whitehead included the proper flanges and so if I did not have the spare set I would have had to simply change out the spline attachment to the flange arrangement on my existing half shafts. My primary motivation for doing this was a clunking that I had in the rear end. When I rebuilt the rear end about 5 years ago I replaced the lower diff mount and also installed an RT mount assuming that this would take care of the clunking problem. Unfortunately it did not. I spent hours under the car looking for other culprits but could not locate anything that appeared to be problematic. During this same rebuild I had also rebuilt the half shafts including new U joints and did the same with the drive shaft, all new bushings in the control arms, etc so there really wasn't much else that could have been wrong. I ultimately concluded that the old R180 diff itself, which had over 200K miles on it was simply worn out, so I decided to go with this rebuilt one from Whitehead. Clunk completely gone! Let me know if you need any other info. I will say that if you do decide to go the T3 route, we ran into a few install issues with this setup because of some confusion with the parts they supplied with the kit. I won't go into all of the details here, but if anyone needs to know this info I'll be glad to elaborate. Mike.
-
I recently purchased a fully rebuilt R200 3.90 with Quaife LSD from Whitehead Performance in Canada and all I can say is that it is an awesome upgrade from the R180 that I had. The people at Whitehead were also great to work with and provided me with all of the info I needed to complete the install. I also went with the T3 mustache bar setup. Not the least expensive way to go but very happy with this upgrade. Wish I had done it when I rebuilt the rear end on my car a number of years ago. Hope that helps. Mike.
-
When I had the unilite installed (along with the MSD ignition box) I also used the recommended Mallory coil - part number 29440. It was a part of their ProMaster line of coils. I have not had any issues with this coil and contiue to use it with my 123 dizzy and the MSD box. Seems to be a pretty good combination. Given that MSD has now acquired Mallory, I do not believe this coil is available any longer. However, I do have a spare so if Jeff gets to a point where he wants to try a different coil I would be happy to lend him the spare that I have. Mike.
-
Chickenman. Thanks for that explanation. Makes sense. I love this forum. I learn something new every day. Jeff - FWIW, I run resistor plugs. Mike.
-
Jeff - Sounds like a very interesting problem and I hope that I can get involved and help you get to the bottom of this. A couple of thoughts. First, before you start changing anything I would get a baseline on your timing. As you know I also run triples (Webers, not Dellortos) and I have found that they seem to like a lot of advance at idle. If it were me, I would get a baseline on where your timing sits at idle and also understand at what RPM you are "all in". This way at least you know where you sit. In my setup, and admittedly they all tend to be a little different based on engine and ignition configuration, I run about 12 degrees advance at idle and am all in at around 3200 RPM with an advance of about 32 degrees. The Unilite has the capability of changing your advance curve but the process to do it is tedious and trial and error at best (ask me how I know). This was one of the main reasons I went with the 123 Ignition dizzy. Regardless, getting this information I believe is critical to understanding where to really look for the problem. I also run an E88 head and it was one of the last ones used I believe prior to the intro of the 280. Mine came with the larger exhaust valves and I recently upgraded the head to larger intakes as well. So I do believe that the E88 is capable of producing good power and so even though that might be a limiting factor, to me it doesn't feel like that should be the first place to start looking. Admittedly I also run with a stage 3 Isky cam and I know that has definitely helped on the power side. Finally, I am not really understanding the relationship between spark plug gap and the unilite output. When I had the unilite installed I also ran with an MSD ignition box so we are not comparing apples to apples, but in my mind the dizzy is providing a trigger to the coil and it is the job of the coil to provide a high voltage output to the plugs. As long as the dizzy has the ability to drive a low resistance coil, it should be the capability of the coil that determines plug gap, not the dizzy itself. Perhaps I have this wrong and I might be missing something, but I'm having a hard time wrapping my head around this one. Maybe someone can straighten me out if I'm out of line here. Hope some of this helps. Let me know if you want to hook up and spend some time on this. I'd be happy to try and help out. Mike.
-
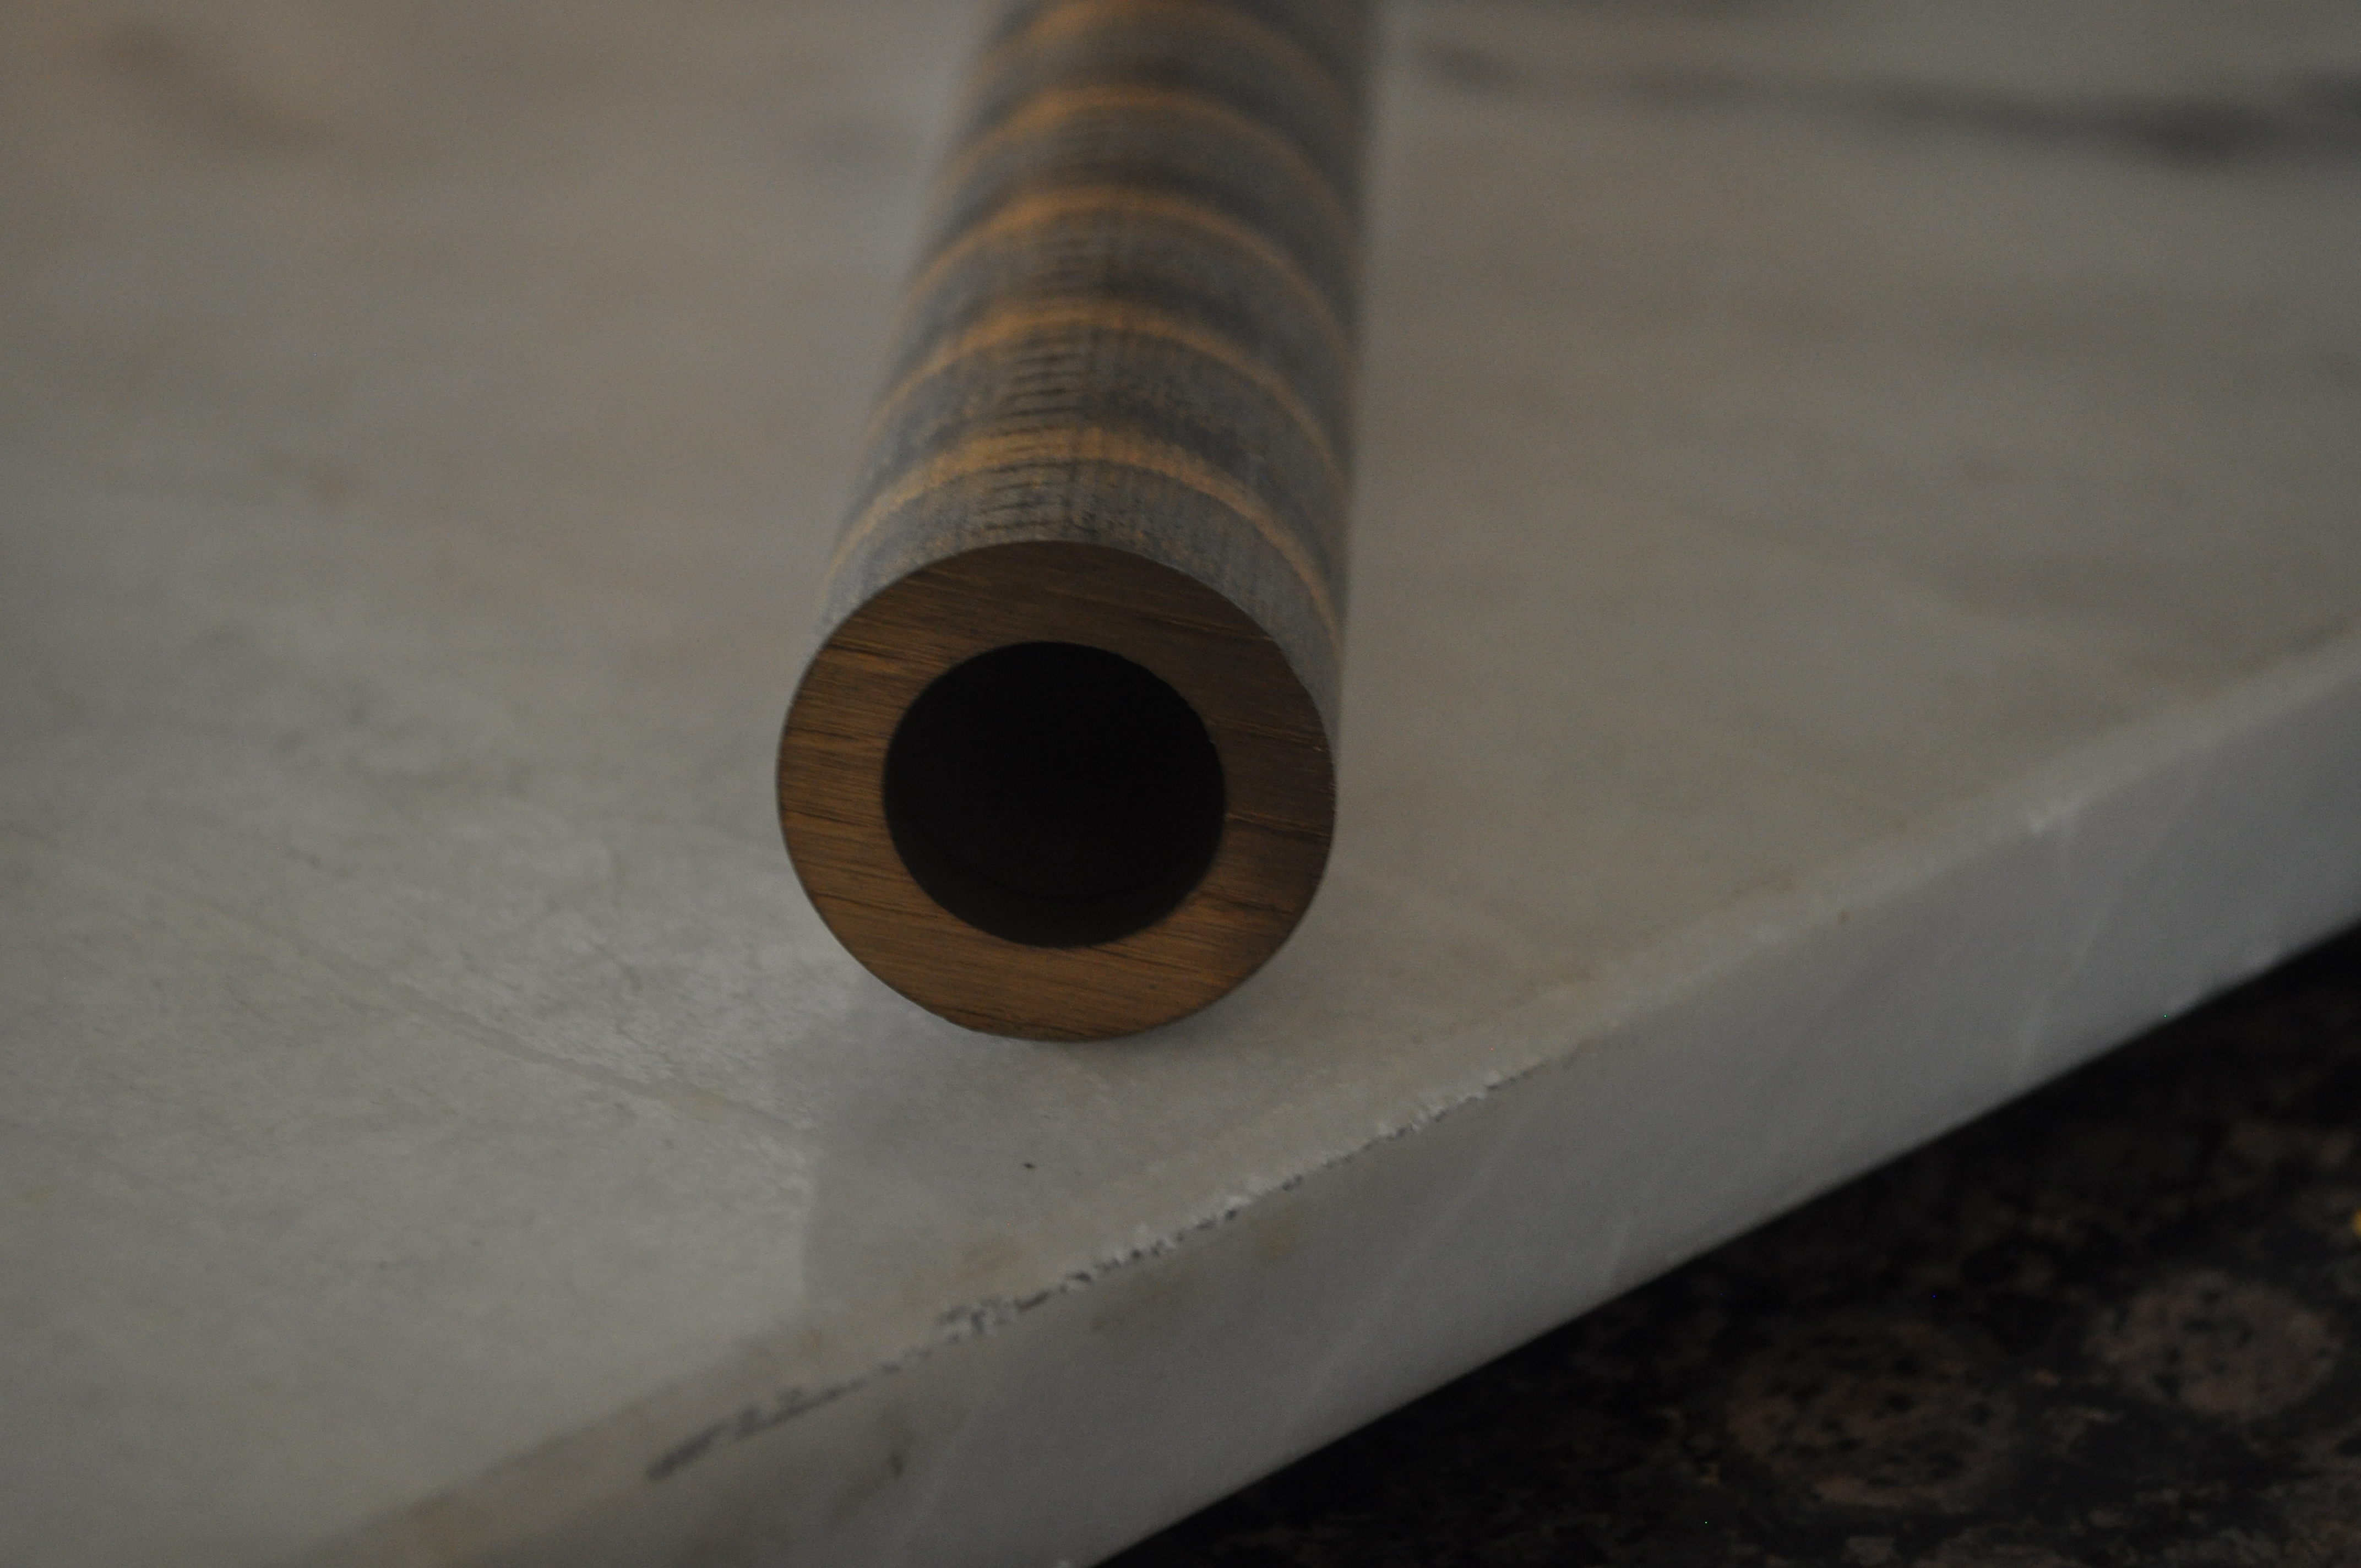
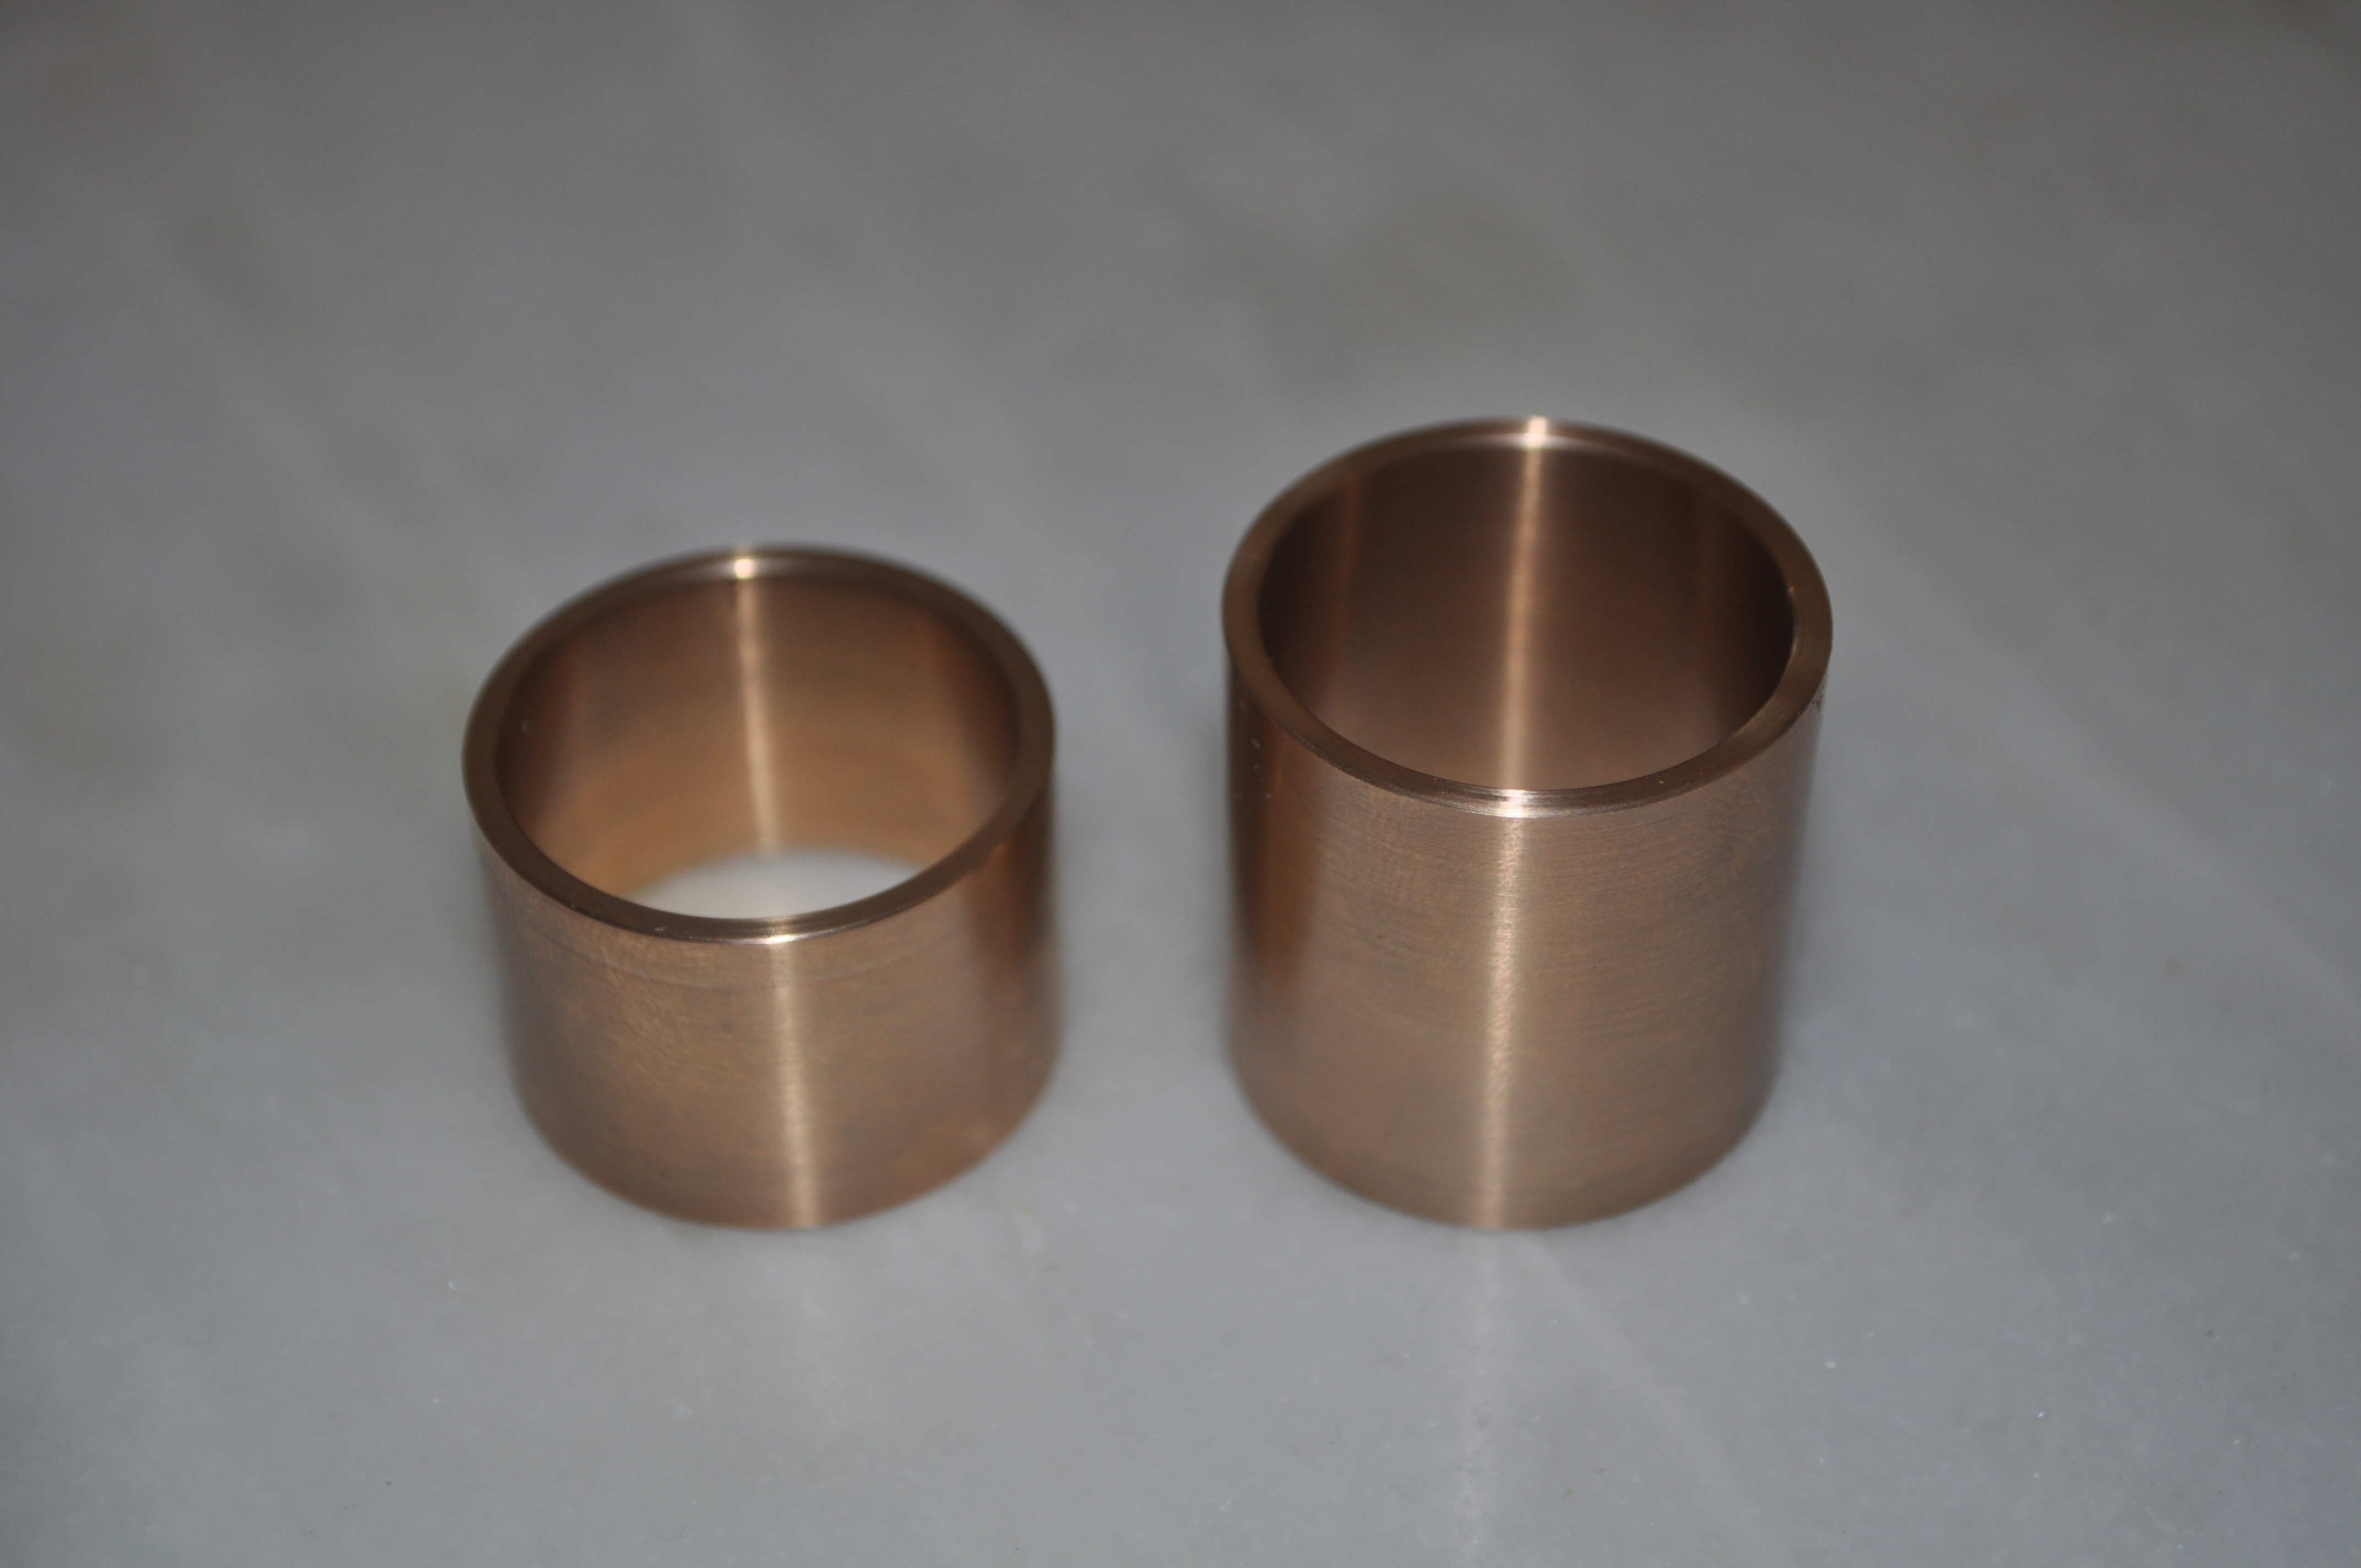
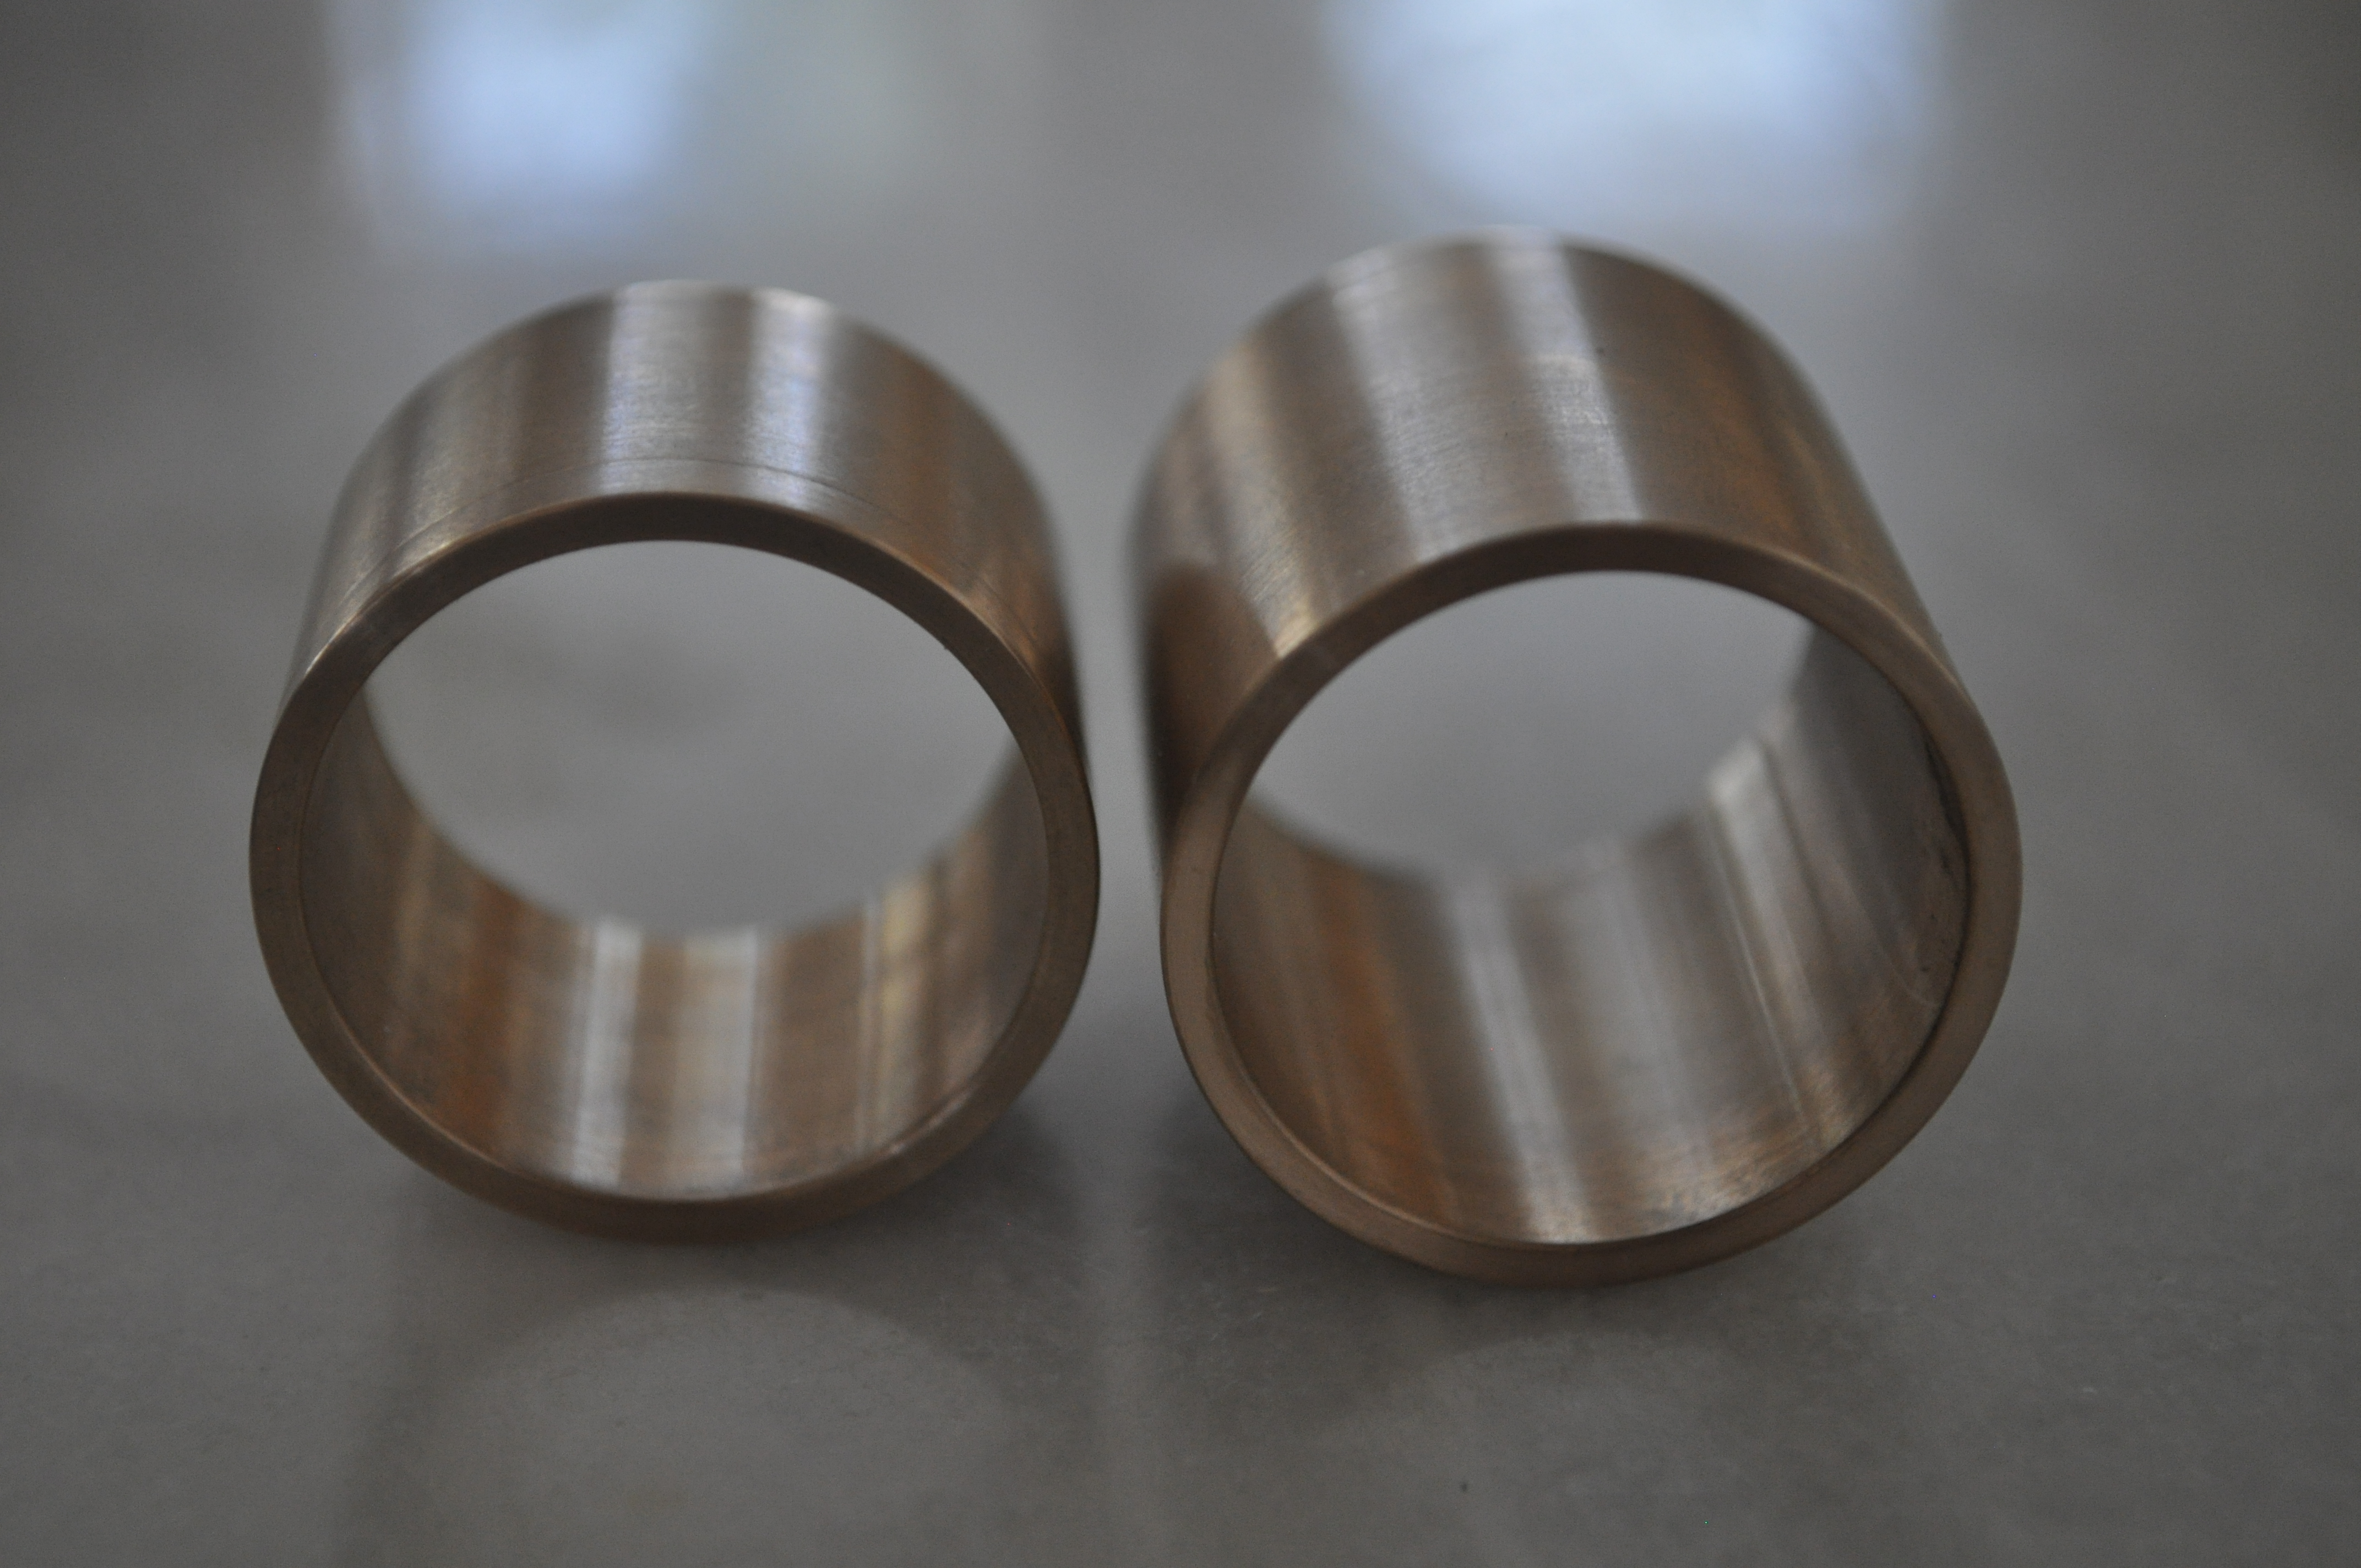
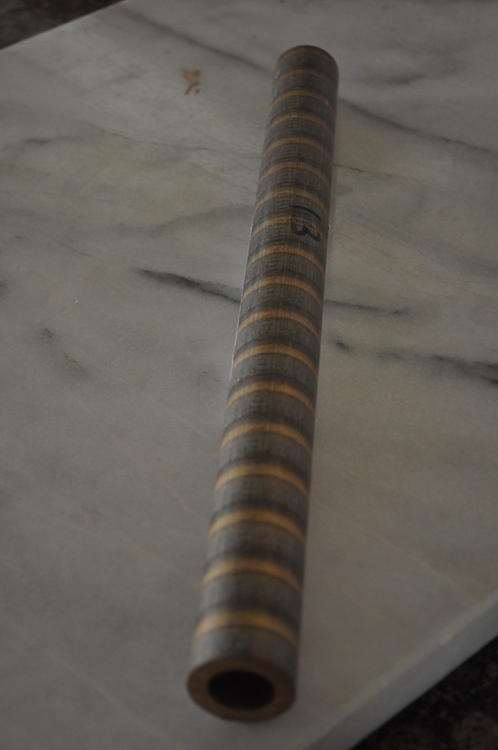
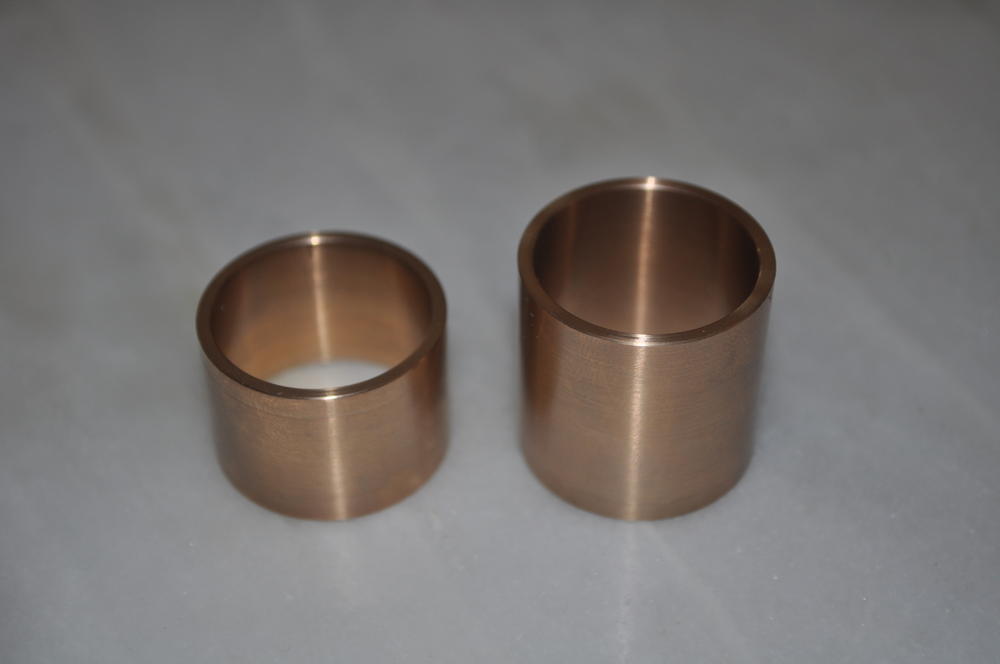
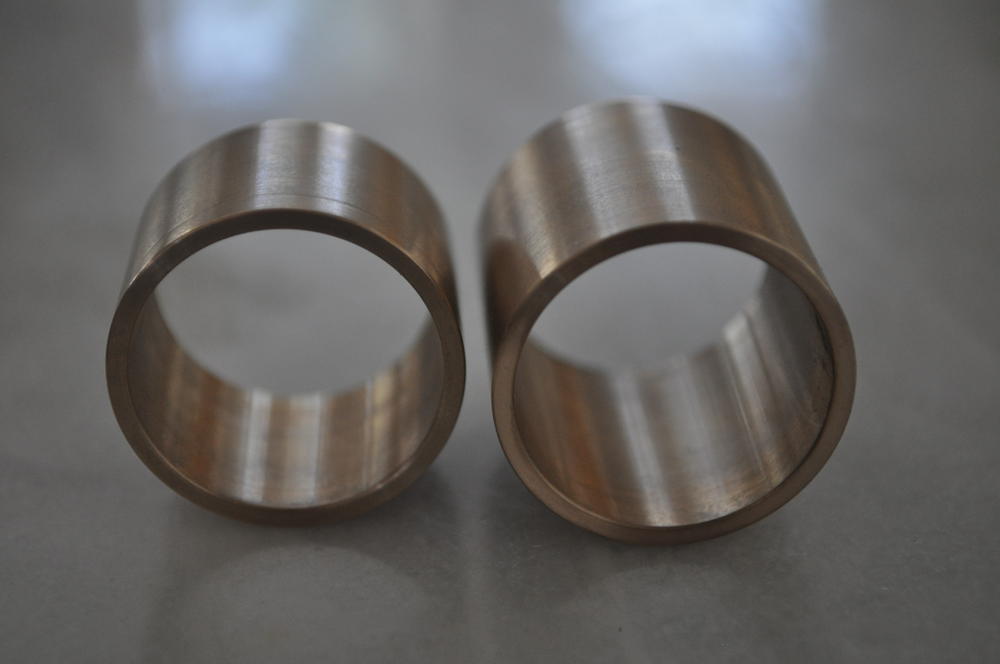
OK. I promised to post the dimensions of the end bushings and so here you go. Before I do, some general info about the bushings first: 1. The bushings are different lengths. The shorter one goes into the end closest to the pinion. 2. The dimensions are extremely strange. There seems to be a strange mix of both SAE and metric. The machinist that made the ones I had machined locally did not believe the measurements that I provided and would only do the job if he could measure both the rack as well as the housing. In the end my measurements were correct. 3. These are kind of a PITA to remove from the housing. I tried using a modified blind puller and was successful in getting the shorter ones out on a couple of different racks. However, I had to cut the other ends out to remove them. Not difficult, just tedious. 4. My local machinist cut the ID of the bushings so they were very slightly undersized (from the diameter of the rack itself). This way I was able to hone out the ID to try and match the diameter of the rack and make up for any weaR. Now to dimensions: ID - 24.98mm (diameter of rack overall is 25mm) OD - 1.125 " ( 1 1/8") or 28.55mm Shorter length - 20mm Longer length - 28mm Finally, I will tell you that I looked high and low for these and to no avail. If you feel compelled to try and find them do not even waste your time at McMaster, ASB (American Sleeve Bearing) or any of the other online sources. I spent over $100 trying to find these off the shelf and it was a waste. I did have ASB provide me a quote for a custom one (with the inner grease channel) but it was prohibitively expensive at almost $100 each. If there was enough interest I'm sure I could have my local machinist fabricate a a bunch of these at a more reasonable cost, assuming there was enough volume demand. I've included some pictures of the new bushings. Let me know if you need anything else. Mike.


-
I used to run a Mallory Unilite but used the 45 series which eliminated the vacuum advance. The 47 series had adjustable vacuum advance along with mechanical. Here's a quick description of the 47 series from the 2010 Mallory catalog: I have also included the installation instructions I have for the unilite series in general. Unfortunately it does not describe how to adjust either the vacuum or the mechanical advance. I do know that on the 45 series the mechanical advance curve could be changed by changing out the springs in the dizzy itself. I actually bought the kit to do that but found that to change them you needed to: 1. remove the dizzy from the car 2. disassemble to get to the springs which were underneath the main plate 3. change the springs to different ones and cross your fingers 4. reassemble 5. reinstall 6. take it for a drive and hope that you got the curve you wanted In the end this was far too much of an effort and it was all basically trial and error. I ended up selling the unilite and replaced it with a programmable 123 Ignition. With the 123 you simply connect to it with either USB or now Bluetooth and load in the curve that you want. If you want to make a change, simply load a different curve. Simple and easy and in the end the 123 was not any more expensive than the unilite setup. Mallory_Instructions_unilite_distributor_wiring_diagram_test_procedure_1214M_0000[1].pdf Hope this helps. Mike.

-
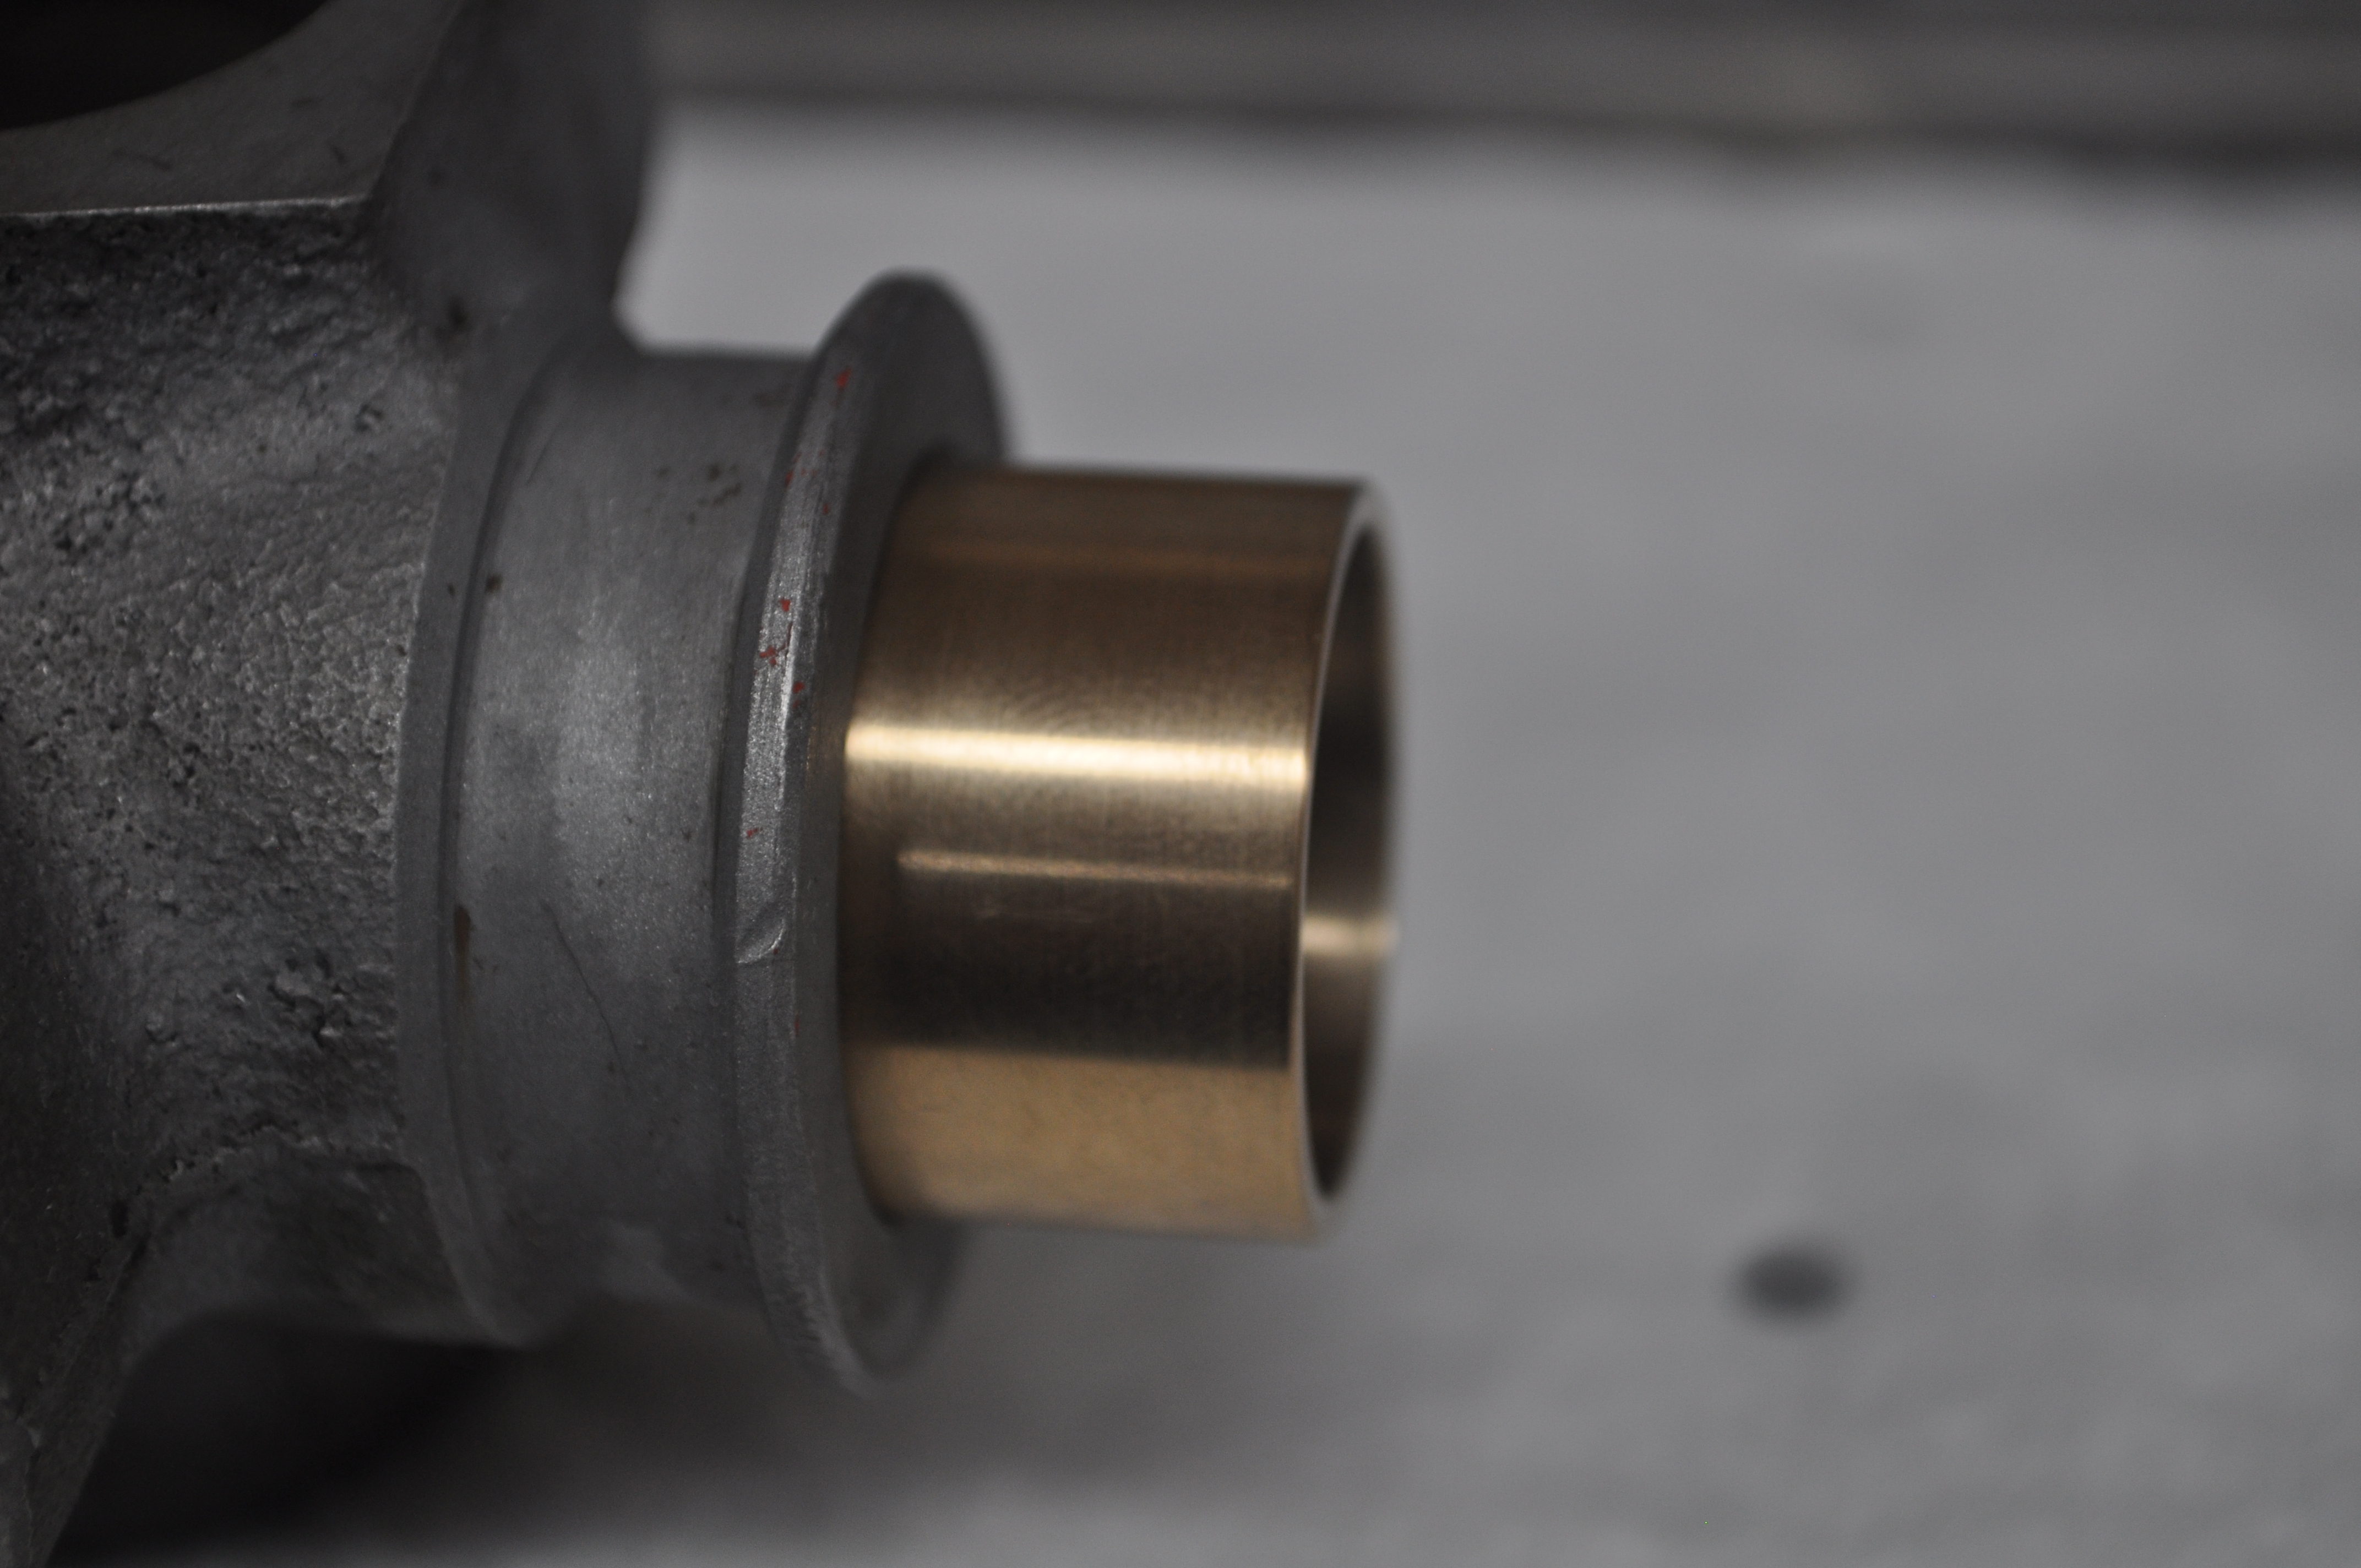
I searched high and low for these and even conferred with @Captain Obviousand they were no where to be found. The ID and OD dimensions are extremely odd and I could not find anything off the shelf that would work. I could get the right OD but the ID was incorrect and vice versa. Adding the grease groove inside made it even more challenging. I ended up buying an uncut piece of bronze bushing material and had them machined at a local machine shop. Even with that the new ones do not have the grease groove inside but they do provide a very nice tight fit now. If you decided to have these machined locally I would be happy to give you the dimensions. Also to note, one of the bearings is slightly longer on one side than the other. Not sure why Nissan did that but that's the way they are. Mike.
-
-
I actually don't know the purpose of the plug that you point out on the rack although I had the same on the racks that I have rebuilt. I guess that it may have been something used in manufacturing for perhaps the initial greasing of the assembly but needed to be plugged for actual use. Having said that I have powder coated multiple racks like this without any issue. I just left the plug in tact during the powder coat process. Mike.
-
Well for some reason the system doesn't seem to like how I am using the @ name convention so I will refrain from using that for now although everything shows up fine on my computer. In any case I'll try again. Perhaps 3rd time is a charm. Here you go. Regardless, I'll try again to fill in the blanks. First is the link to the bushings that I purchased and notice they are the same part number as called out on the sheet that Eurodat posted - 7.10102. https://www.amazon.com/gp/product/B000MWAO66/ref=oh_aui_search_detailpage?ie=UTF8&psc=1 A couple of other comments. The Sentra wheel that you have does not look like the one I purchased. The one I have is definitely deeper. I will try and get a picture this weekend so you can see. Also, I have the same billet hubs from TTT and at the time I purchased them they were listed as being applicable to all versions of the S30. I should have known better. However, when I went to install them on my late 260Z, I ran into the same offset problem. I ended up working with the Arizona Z folks to exchange my brackets to the earlier 240 ones and they worked fine with the TTT hubs. I informed Gabe about this when I ran into the problem and he acknowledged they needed to have a different setup for the late 260/ 280Z. I know they now list them separately but I assumed they machined a different hub rather than supplying the 240 version with a spacer. Also, even though the spare wheel I purchased was deep enough to get over the Wilwoods (which look to be the same ones that Wheee! is using), the center hole was not large enough to get over the bigger center of the TTT billet hubs. So I ended up purchasing a spacer from Z Car Depot (it's about 3/8" thick) that I can use between the wheel and the hub to make up the difference. Hope that helps. Let me know if this one is readable. Mike.