Mike W
Free Member
-
Joined
-
Last visited
Everything posted by Mike W
-
 Here's a sneak preview of some of the merchandise that we will have available at the ZCON convention store this year. You have to be here to get them so don't forget to register at zcon.org.

-
Zedy, Really looking forward to seeing you at ZCON. I actually do run a 160 thermostat in my Z and the Webers don't seem to mind the lower temp at all. Having said that, I can't say that I've run them at a higher temp for any significant period of time so perhaps I should try going higher as well. Regardless, with the 160 thermostat, the Wizard Cooling radiator, dual 11" Spal fans (which sound like turbines when they turn on), I can sit in 110 degree temps at a stop light in Austin in the summer and never see my temp gauge go past 1/2 way. Very pleased with this system. See you in June. Mike,
-
I tried the MSA original loop carpet and it was OK but required quite a bit of fitting. Second time around went with Chester and Herod in So Cal. My car is a transition year car and so it took some time to get it right but in the limit they stood by their product and I ultimately got what I wanted. It was also not without some fitment issues but minor in comparison to the MSA set that I had purchased earlier. They also (supposedly) provided carpet kits for many of the early models that came from the factory without carpet and so have quite a history. They were also great people to work with. Hope that helps. Mike.
-
Also could have been used for fog lights if they were installed at some point in time. I added them to my car in the early days and used a switch pretty much in that same location to trigger a relay which energized the lights. I agree that tracing the wire would provide a lot more information. Mike.
-
Zedy, I was going to make the same suggestion as Madkaw did. Turns out that after I changed my manifold to the Harada, I tried a set of 34's and no matter what I did with the jetting my engine just didn't like them. I could never get it to run properly and I had to use such large idle jets that it was always running way too rich. I went back to 32's and it was very happy again so I am convinced, at least for my setup, that this is the correct configuration for me. Now you are an l28 and I'm and l26 so you do have more displacement so your experience could be different, although I believe that we are both running mild / stage 2 cams. If you would like to try my 34's I'd be happy to send them to you for a try. If you like them you can get a set of your own. If not just bring them with you when you come to ZCON. Let me know. Mike.
-
It still looks to me as if your oil pump shaft is in the wrong position. As Philip and others have pointed out, the tang on the top of the shaft should be in approx the 11:30 position while yours looks to be at around 1:00. I think you may be off by one tooth on the oil pump gear. Can you reposition the oil pump gear so it is at 11:30? Mike.
-
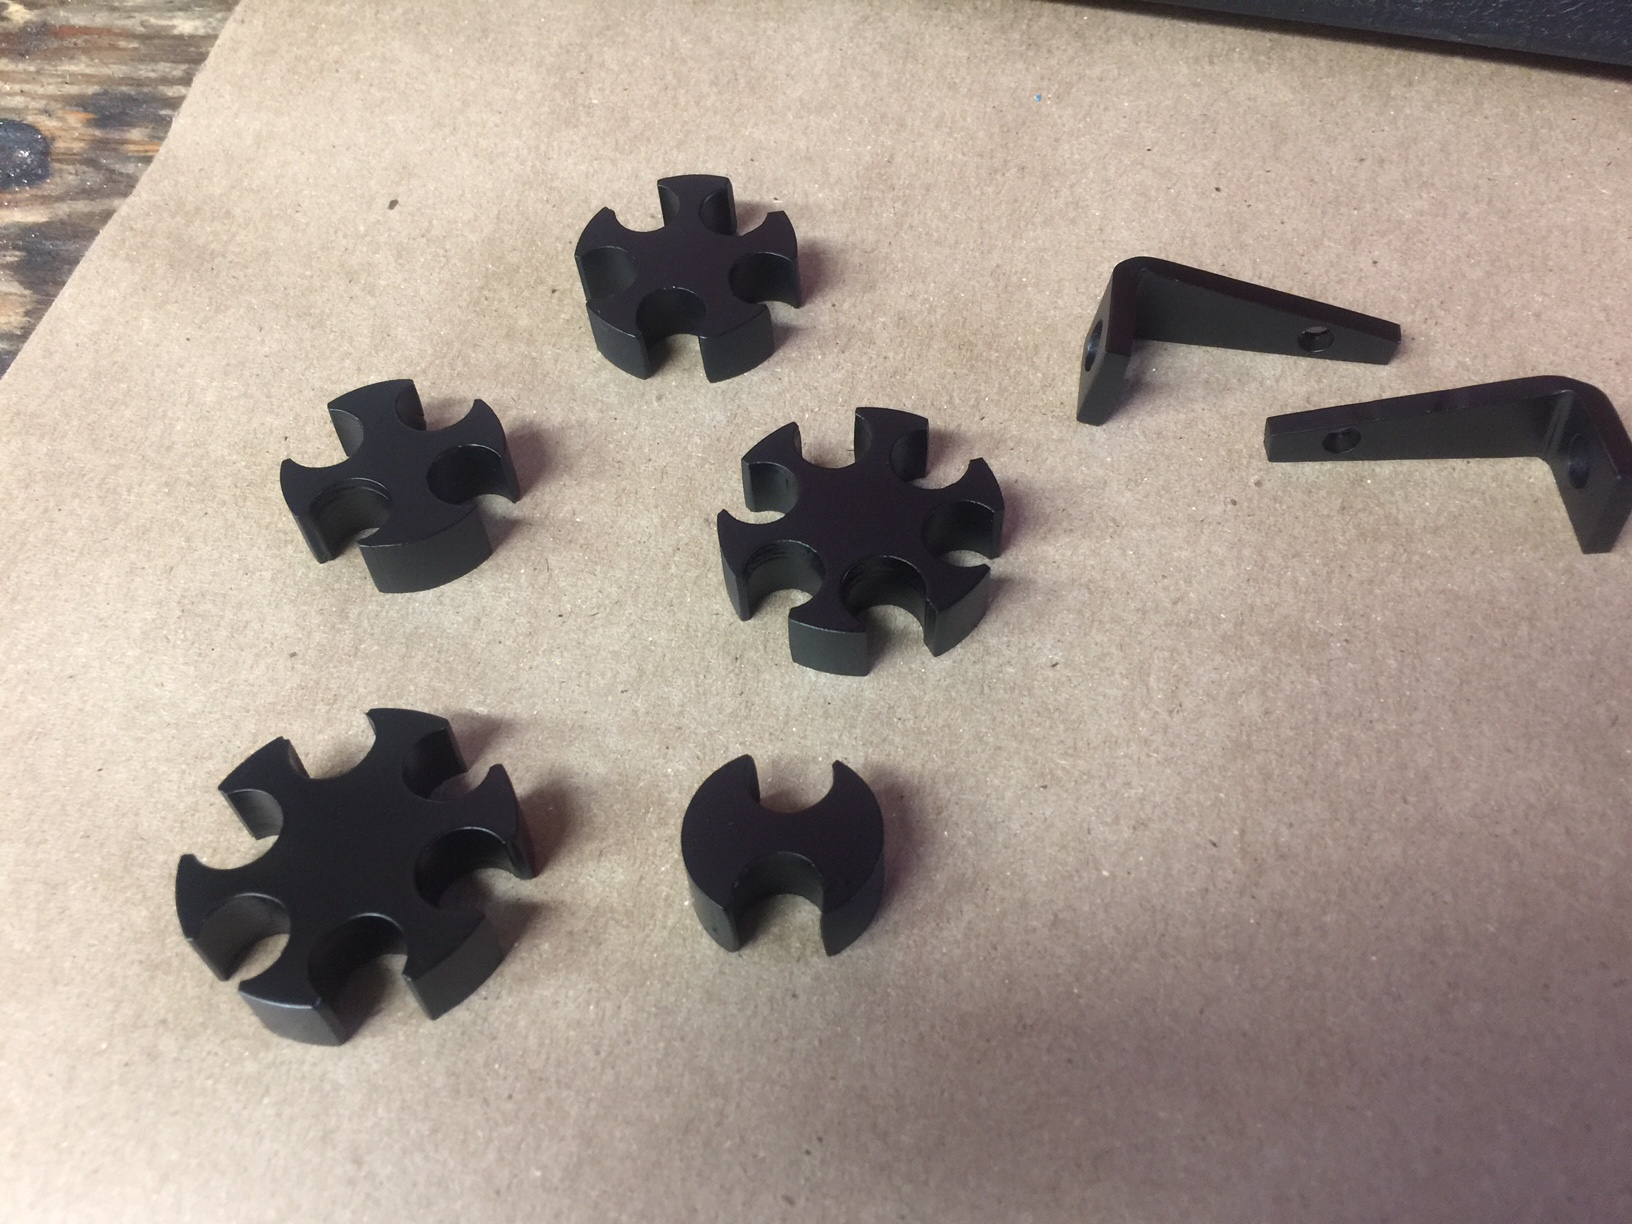
Yes they are machined from aluminum but have been painted using Eastwood rust encapsulator. They are not anodized. Mike.
-
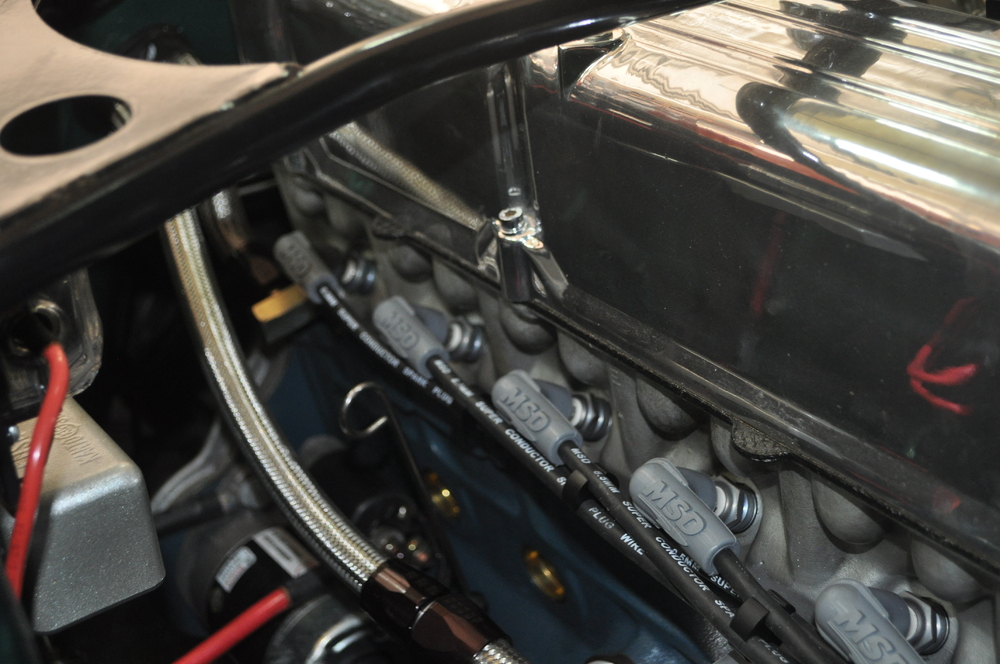
So this is the best picture I have of just the brackets and wire holders but does not include the ones on the front of the engine as well as the "3" wire holder. The ones on front hold all six wires but have a larger piece of material between two of the holes to allow space for the L bracket. The center is drilled and tapped so it can attach to the L brackets, which are pictured. Mike.

-
I custom made the wire set myself from bulk MSD 8.5mm wire as well as their boots and terminals. It was the best I could find and reviews on it online were excellent. If there is sufficient interest in this I might be interested in making it available to others on the forum as well. Mike.
-
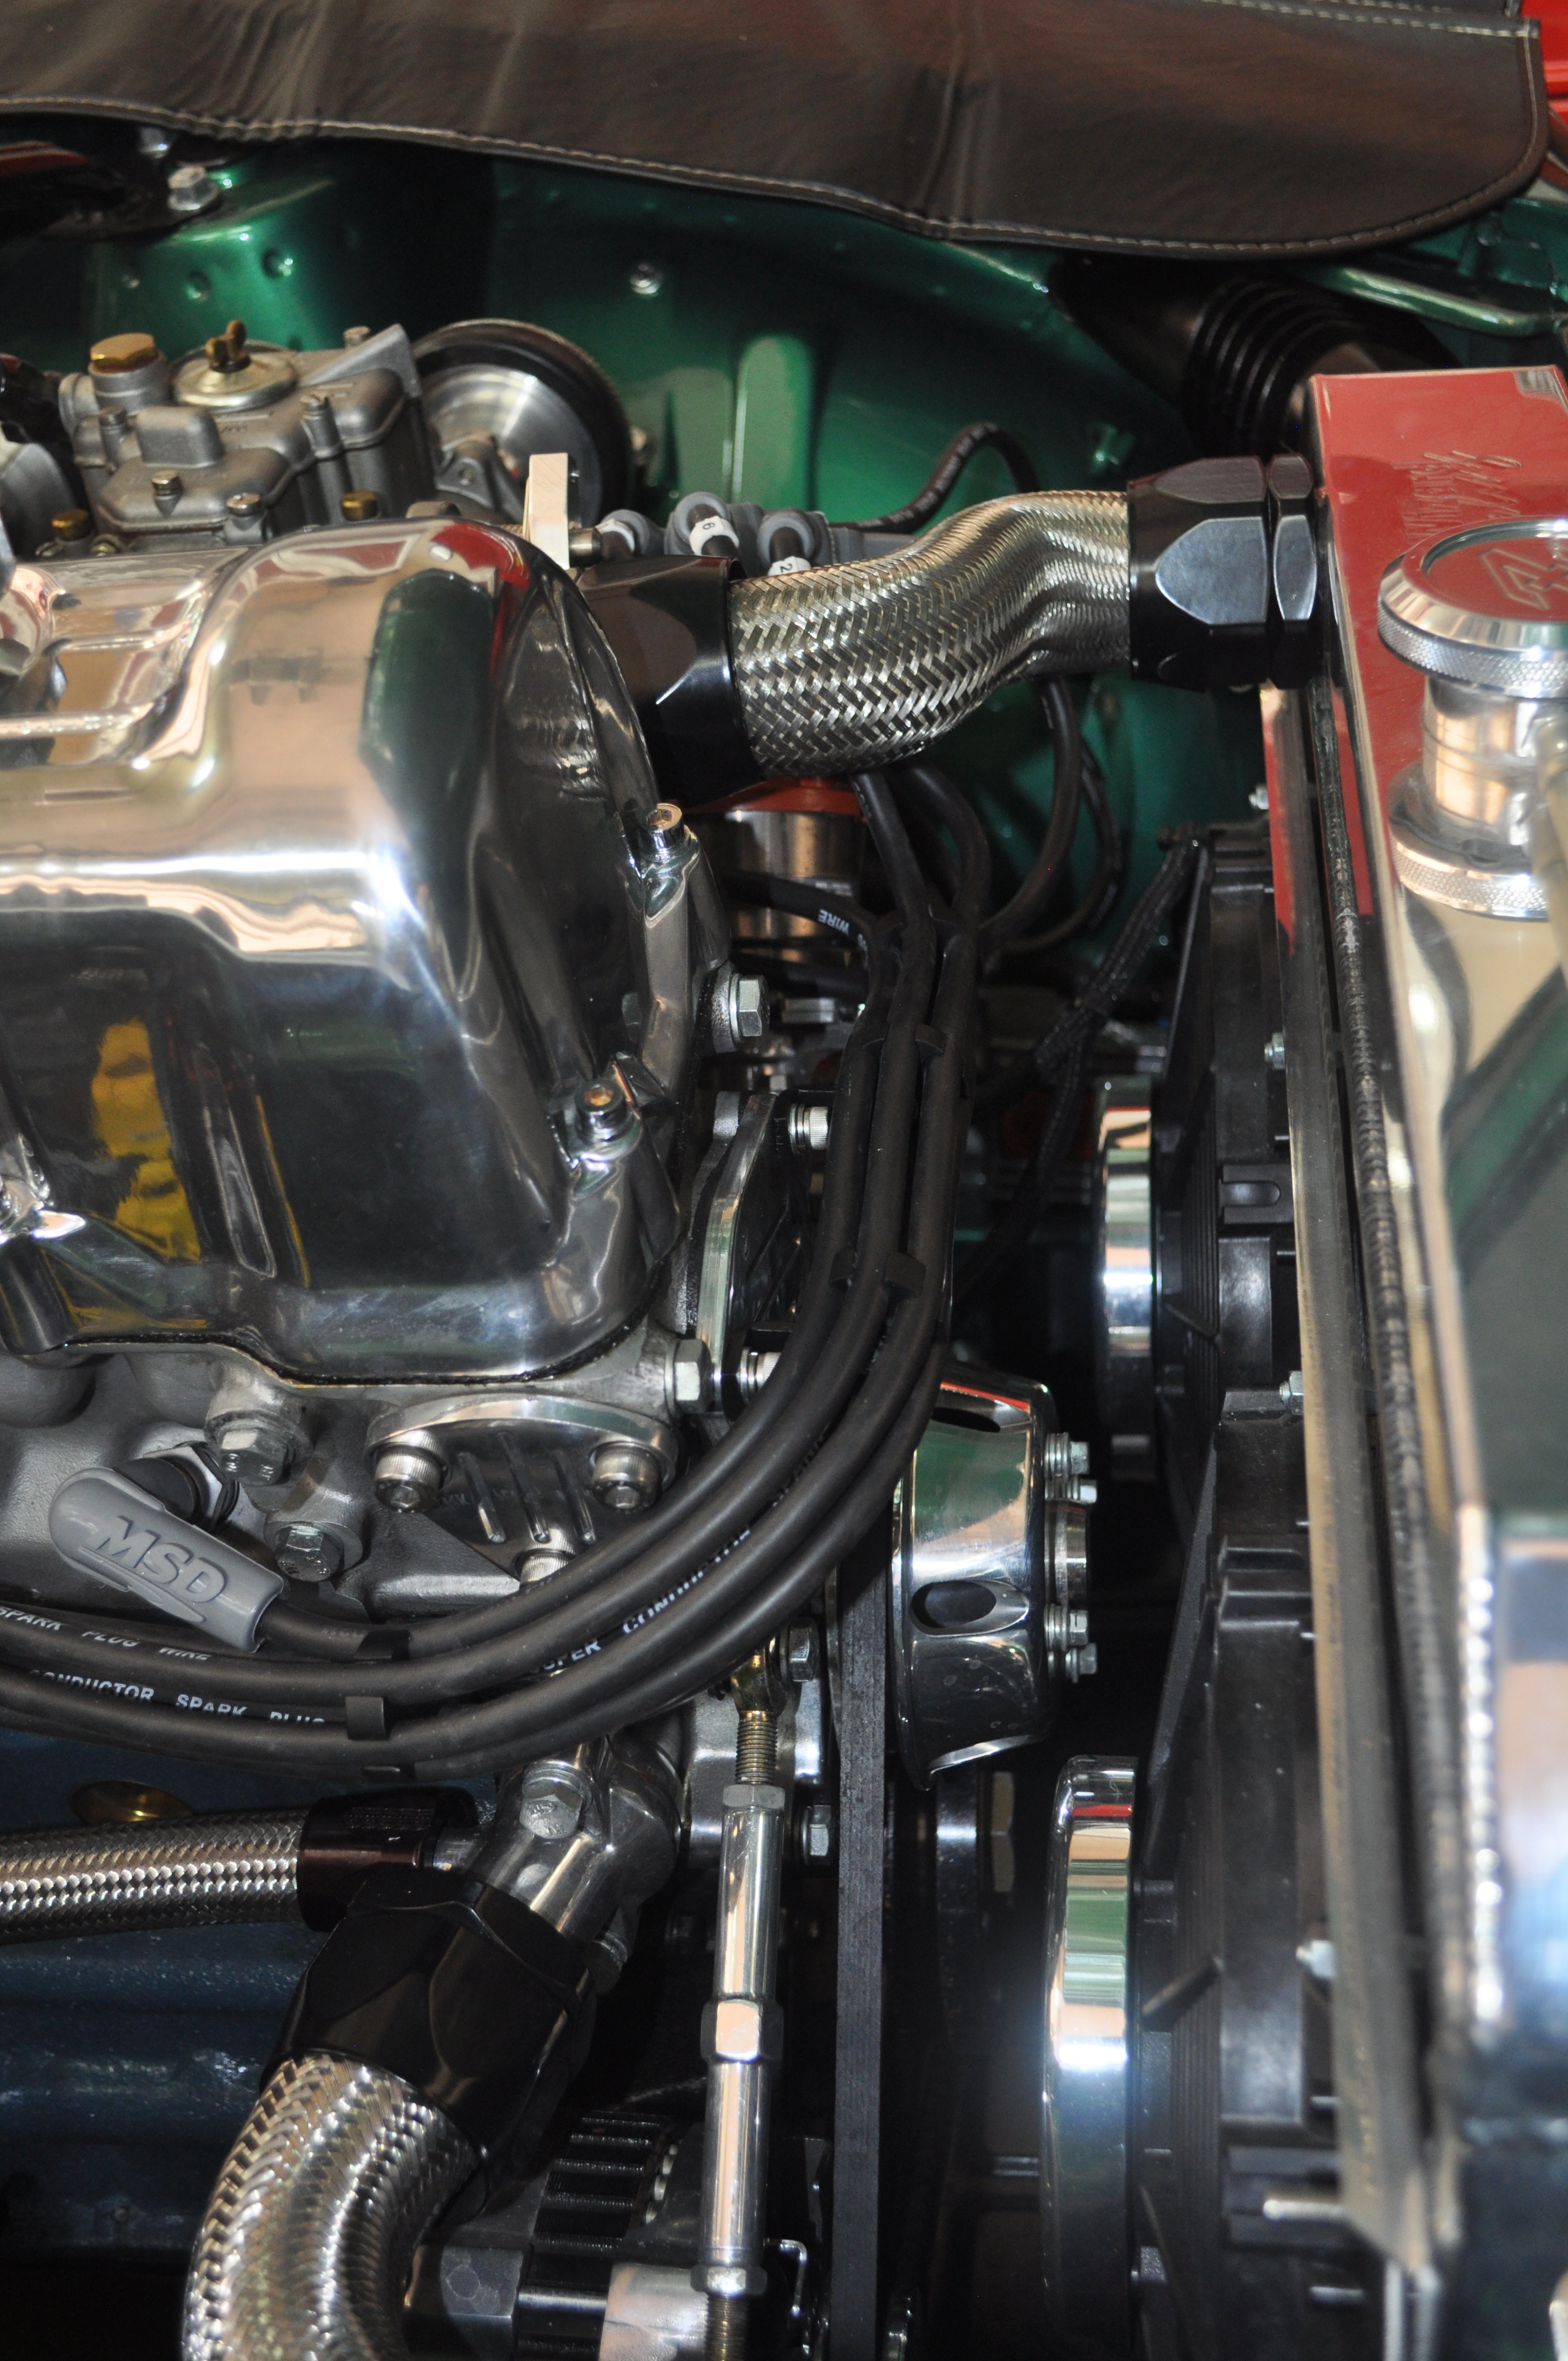
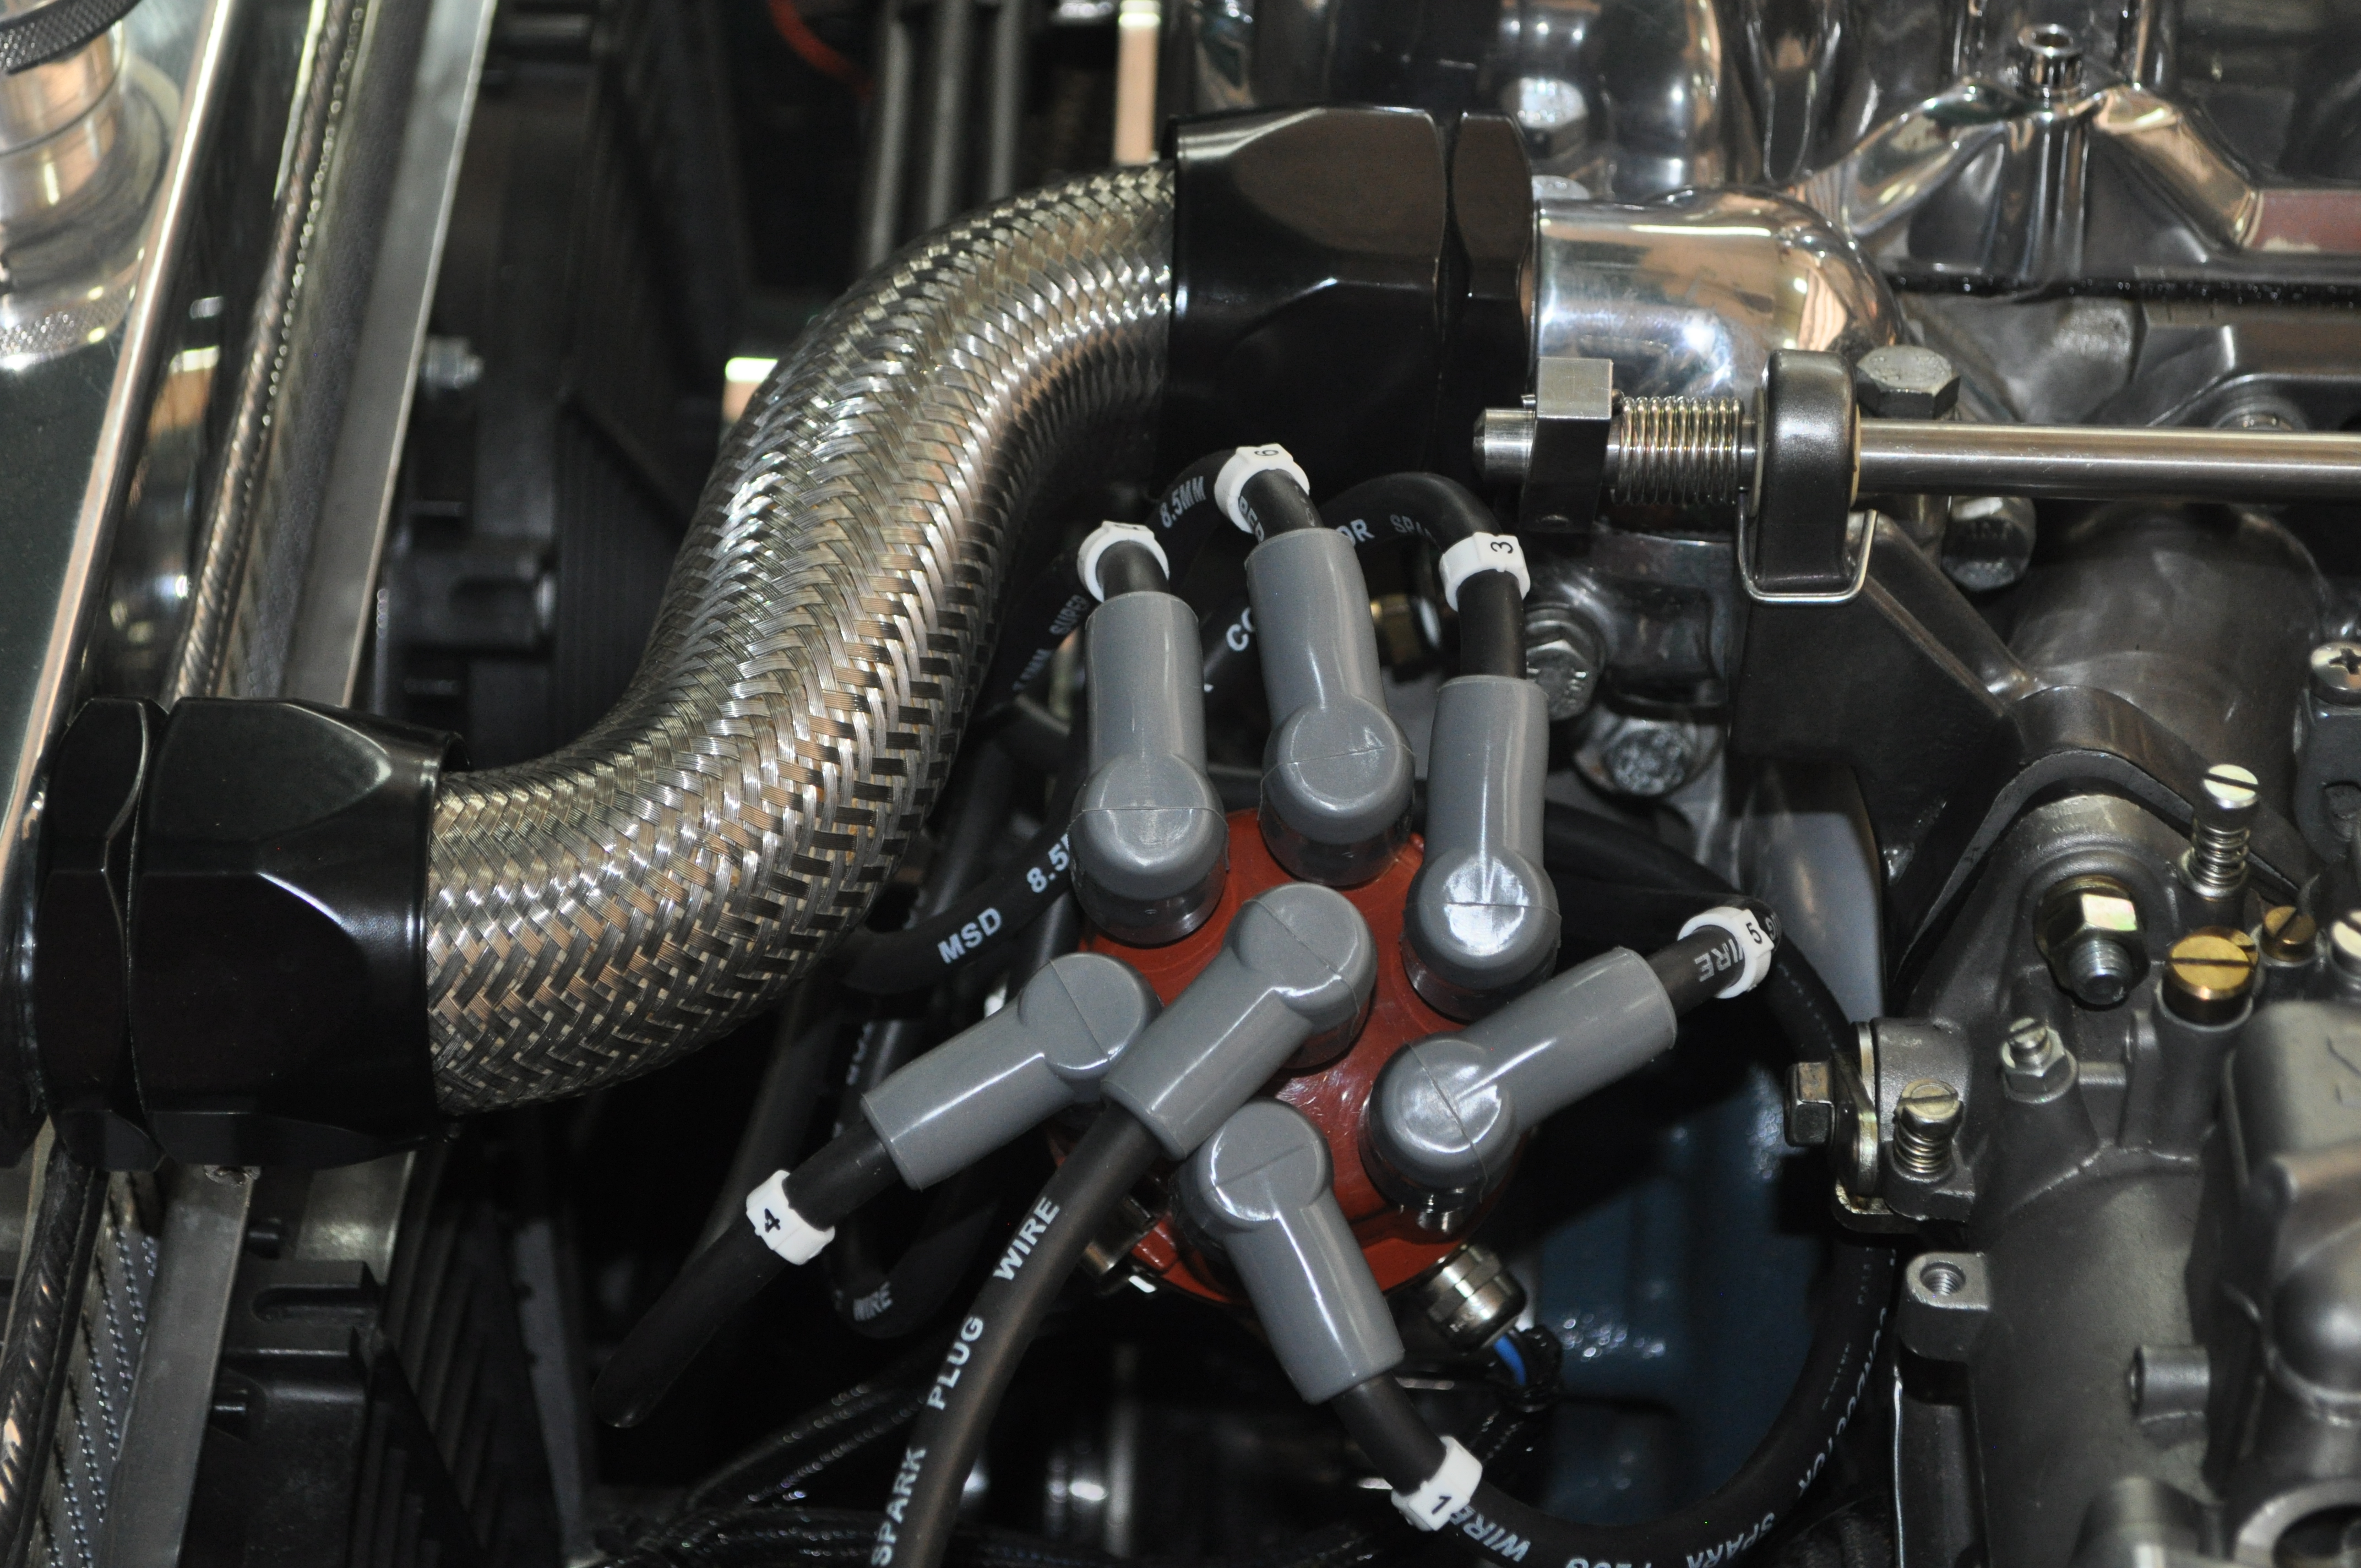
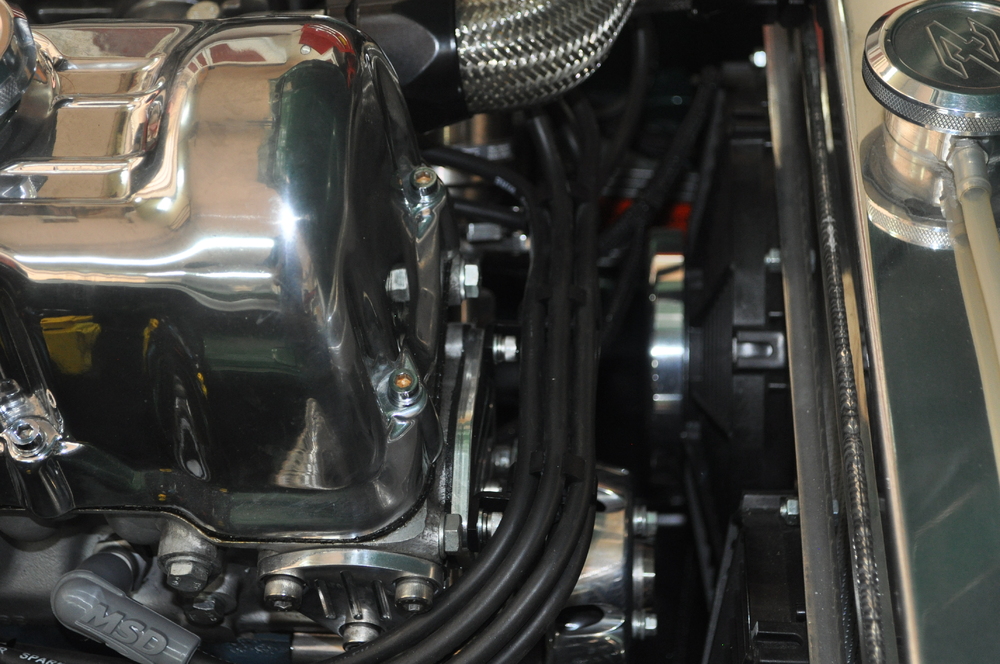
For some time now I've been wanting to re-route my spark plug wires around the front of the engine area so it cleaned up the top of the valve cover and provided an overall cleaner look in my engine bay. However, all of the installations that I have seen essentially use tie wraps to hold the wire bundle together as it is routed along the passenger side of the block and around the front to the distributor. Typically there is also some sort of clamp in the front part of the engine that holds the bundle to either the valve cover or the front cover plate. The notion of using tie wraps for this application just didn't sit well with me mainly from an aesthetics standpoint, but I also did not like the idea of the wires being held tightly together and the possibility of crosstalk between wires (although I suspect this is pretty rare these days given the quality and size of the plug wire used in modern applications). So I did a ton of research to look for aftermarket solutions that would provide a clean look and keep the wires separated to some level. I even purchased a couple of options to try them out on my car, but they were just not delivering the look I was searching for. Unfortunately most of these solutions are designed for V type engines and they just don't lend themselves very well to our straight line sixes. So I spent some time with my son Alex (a mechanical engineer) discussing the problem and he devised what looked to be a pretty interesting solution. So I purchased some aluminum stock and set about machining the pieces he designed. I also made a couple of small brackets for the front part of the engine so that I can ensure that the bundle stays tight and close to the block. Given that the bundle runs under the top radiator hose I also needed to make sure that there was ample clearance between the wire bundle and the hose itself. I just finished this today and thought I would share it with the forum so you can see what we did and also get any feedback on our implementation. All in all I am very happy with how it came out and it met all of my criteria both from an aesthetics and performance viewpoint. Here's a few pictures so you can see how we implemented this. Look forward to your feedback. Mike.


-
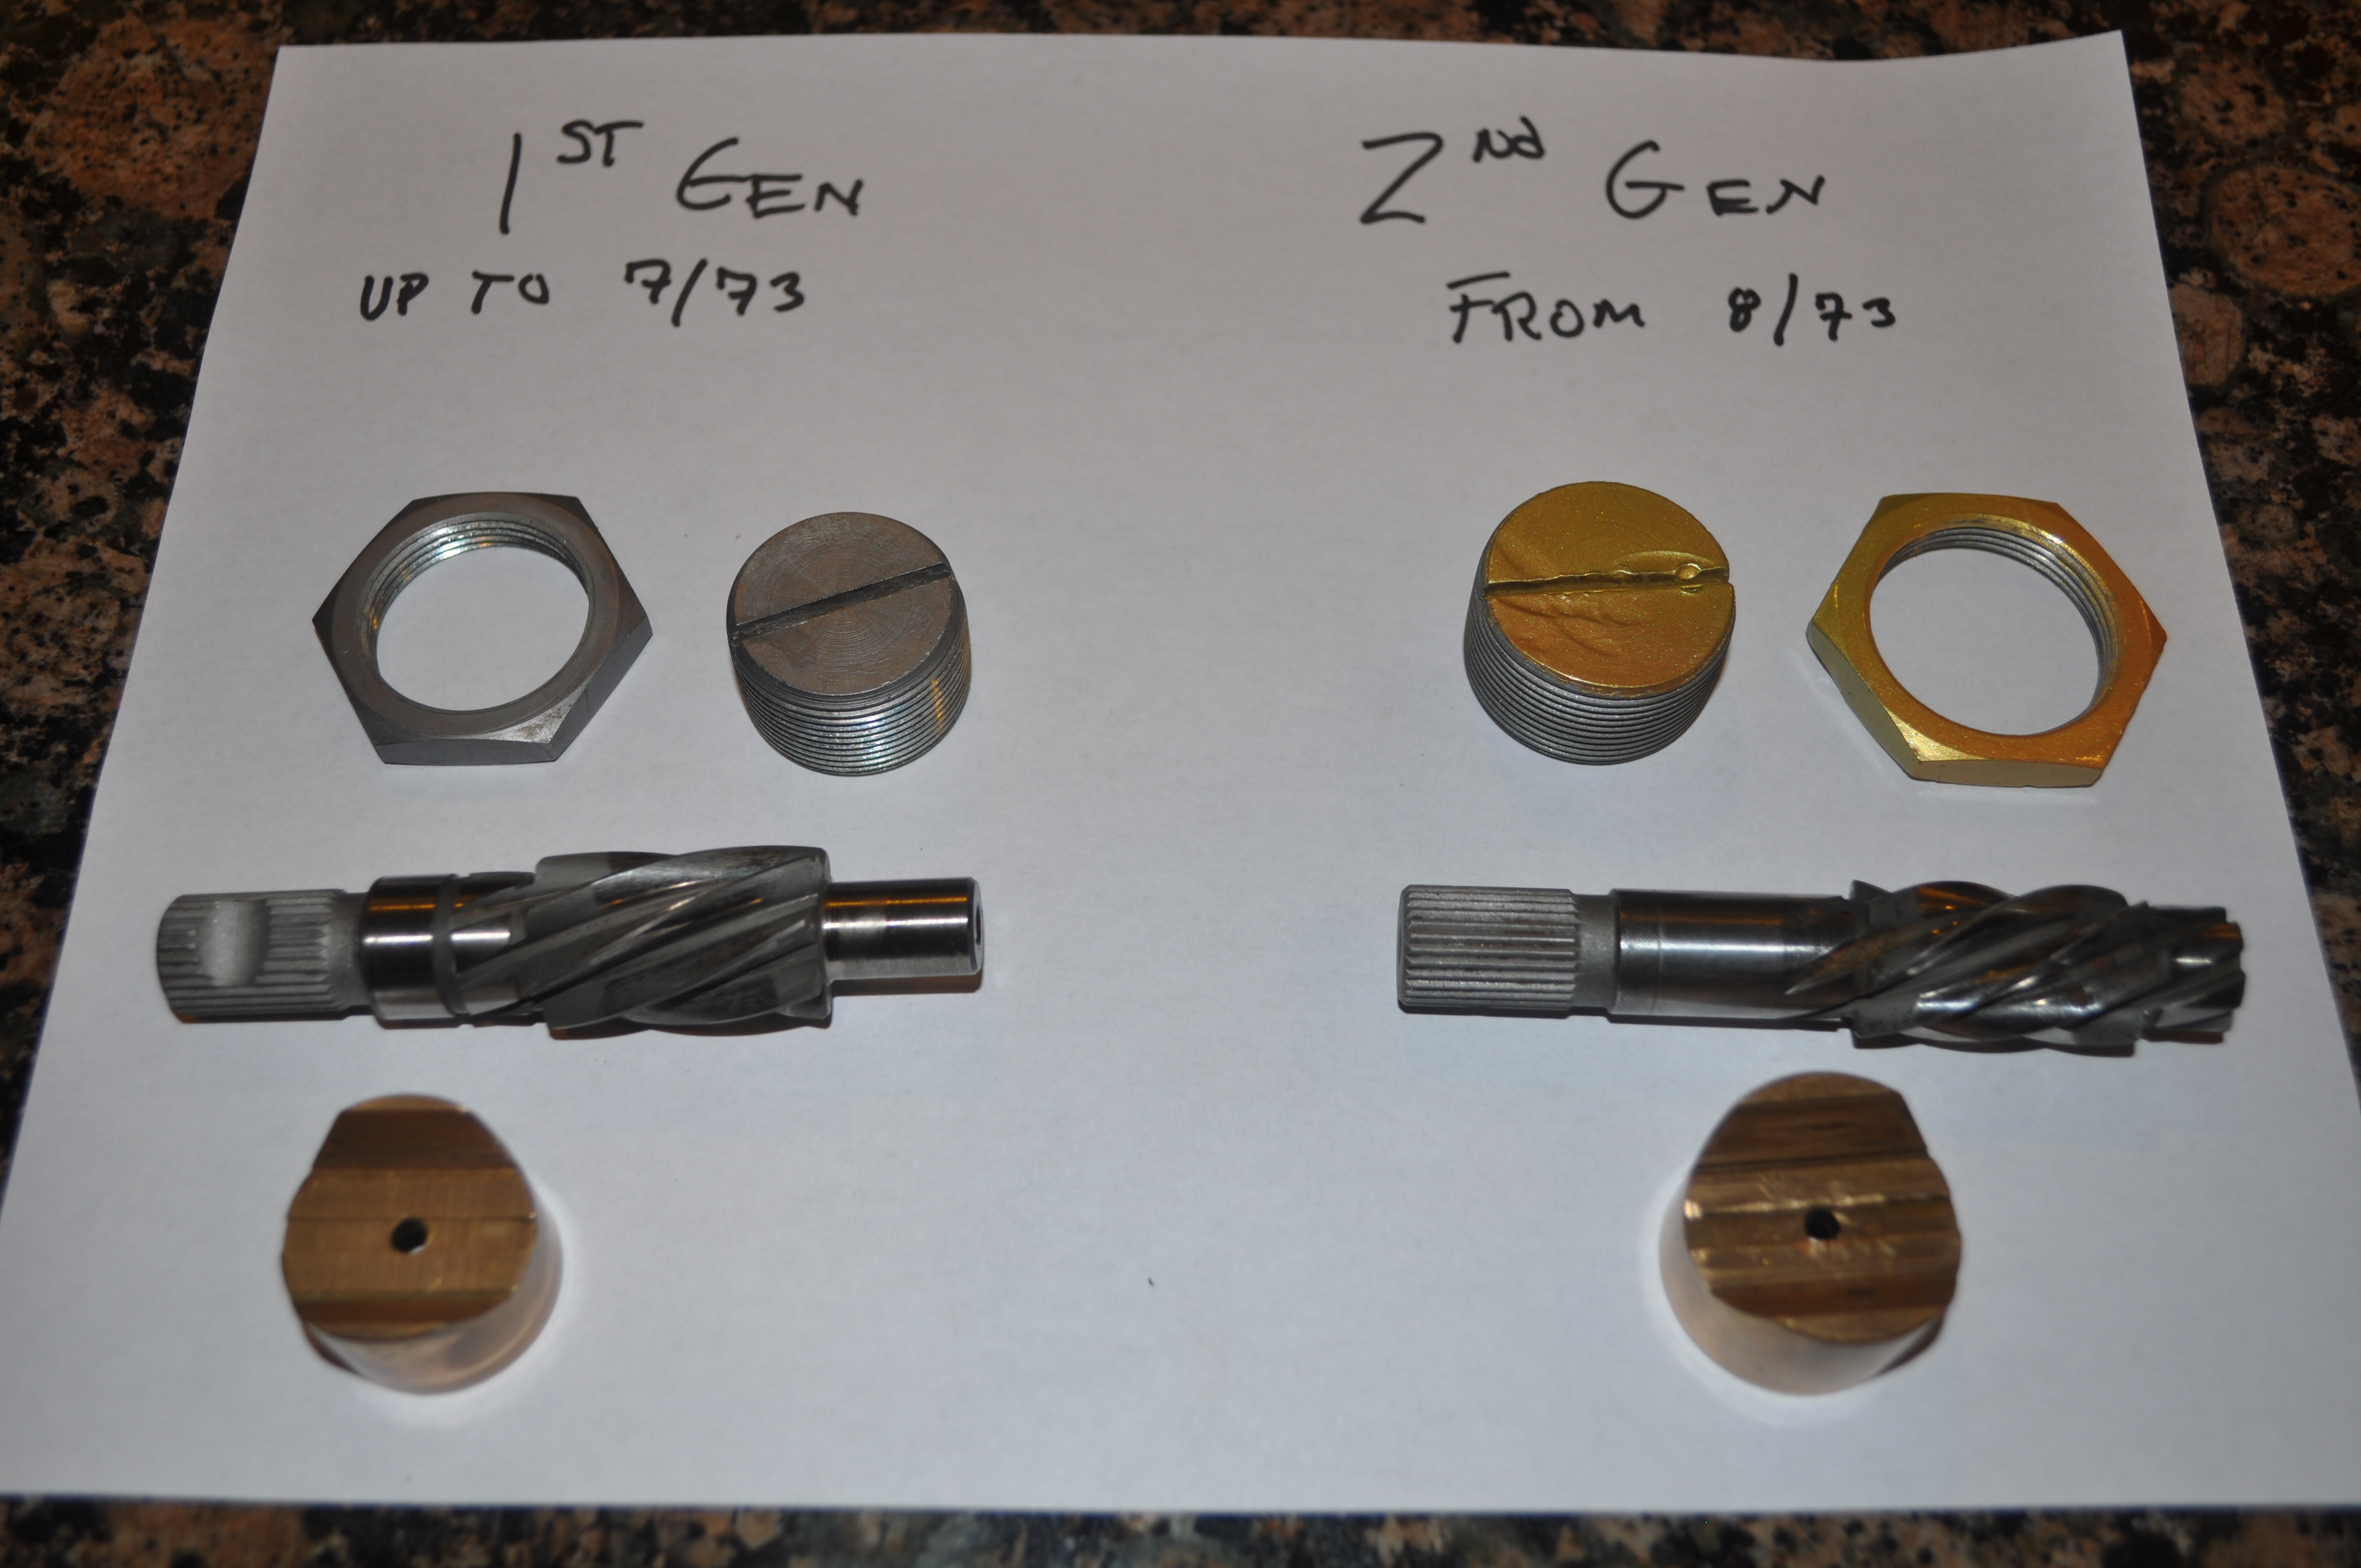
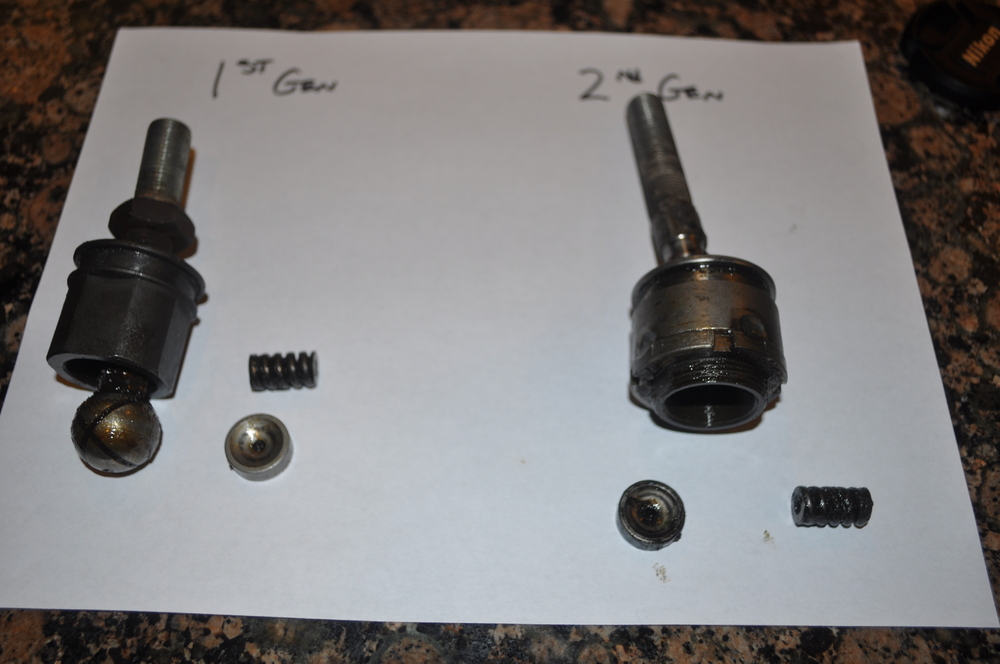
So here's an update from my last post on the similarities / differences between the different steering racks that were used over the course of the S30 series. 1. The racks themselves are the same across both generations of steering systems. The dimensions between the two are identical (25mm rack OD) and as such the bronze sleeve bushings used on each of the rack housing are the same across all models. I can confirm that these bushings fit in either an early rack housing (manufactured up to July of 73) or a late rack housing (manufactured from August of 73 on). I have pressed bushings in both housings and they are the same. 2. There were two styles of inner tie rod ends but these do not seem to correspond to the timing of the different generation racks. I have a rack in my possession that uses the newer style inner tie rod end but was a part of the early rack generation. These later units were the ones that were welded together and not serviceable (although I do believe that Eurodat has successfully dismantled one of these and refurbished them). The earlier style inners could physically come apart although it is not clear to me what you could actually service other than cleaning it out and applying new grease. I have included a photo at the end of this post showing the 2 different generations of inner tie rod ends. 3. As I stated in my last post, the most significant difference between the two generations of racks was in the design and implementation of the pinion. The early pinion design used only a single ball bearing at the top of the pinion which was pressed onto the pinion shaft and held in place with a C clip. The bottom of the pinion rode in a bronze sleeve that is pressed into the bottom of the rack housing. As near as I can tell this sleeve bushing cannot be removed and therefore is not serviceable. This corresponds with the statement in the FSM which indicates that if there is excessive play between the bushing and the pinion, the entire housing needs to be replaced. The pinion diameter (where the ball bearing sits) is also physically bigger on the early generation (17mm versus 15mm for the later generation). The second generation pinion uses two angular contact bearings, one at the top and one at the bottom. The bottom one is actually pressed into the rack housing but can be removed with a blind bearing puller. Therefore both of these are serviceable. 4. The pinions are also secured into the rack housing differently. In the early generation, the pinion is held in the housing with a large C clip. On the newer generations the pinion is held in place with a "cover" that goes over the pinion shaft and bolts into the rack housing. 5. There are also differences in the rack adjustment system as well. The early generation uses a smaller bronze / brass "slug" (which rides on the rack) than the later generation. As a result, the adjustment screw and lock nut are smaller on the earlier racks as compared to the later ones. I have included a picture below which will highlight all of these differences. So that's it for now. If I discover anything additional, I will provide an update to this post.

-
So what I can tell you so far based on my rebuild is the following: 1. The 2 racks are different. According to the parts fiche that I have the original 240 rack was obsoleted in July of 73 which is when the newer racks started to be used in manufacturing. So I suspect some late manufacture 240's even had the newer rack. 2. Also the very original rack had a "grease reservoir" on the passenger end and this was supposed used to ensure that the rack was properly lubricated over time. However at some point before they switched to the newer rack they eliminated the grease reservoir and plugged it. Everything else remained the same as far as I can tell. 3. According to the parts fiche again, the end housing bushings have the same part number between the two racks so I presume from that that the rack and housing, at least dimensionally, are the same. I have just recently dismantled one of the early racks but have not yet had a chance to remove the end bushings to verify that the dimensions are the same between the two. 4. The big difference between the two different versions is in the pinion design. The original rack has a larger diameter pinion (gearing is the same) and only uses a ball bearing on the top side. The bottom end of the pinion rides in a brass sleeve bearing, which as near as I can tell is not serviceable. The FSM states that if there is excessive play in the brass pinion sleeve, the entire rack housing assembly needs to be replaced. I have not attempted to remove the brass sleeve bearing from the 240 rack that I have just dismantled, but I do plan to take a look and see if that is possible. The later rack uses 2 angular contact bearings, one on the top and the other on the bottom and both are serviceable. 5. The other major difference in the pinion area is the method in which the pinions are secured to the rack housing. In the case of the original rack, the pinion is held in place with a large C clip in the pinion housing itself. It then uses a large oil seal over the end of the pinion gear that is pressed into the pinion housing. On the later rack, the C clip is eliminated and they utilize an oval shaped bracket which goes over the end of the pinion (with spacers to ensure proper preload) and is secured to the rack housing with two bolts. All in all I believe that newer rack is an upgrade to the original as more of the internals are serviceable. 6. Finally, the rubber or poly rack bushings are different sizes between the two racks. That's what I know so far. As I learn more from the rebuild of the newer rack and the dismantling of the older one I will post updates. Mike.
-
Plucker, Awesome writeup so far and very timely as I have been working on the exact same project (in conjunction with Captain Obvious who has been a great help on this). My plan was to finish this up and do a similar writeup on the original thread that he started, but it looks like you might have beat me to the punch! In any case, a couple of questions for you. I too could not find appropriately sized end rack bushing sleeves and after numerous tries with units from McMaster and ASB, I ended up purchasing some raw bushing stock and had them machined by a local machine shop here in Austin (unfortunately I do not have my own lathe). However, I looked at the same bushing that you purchased from ASB (Z90-2530) but according to their specs the OD is 28mm which appeared to be too small for the OD of the rack housing which I measured to be approx 1.125" or 28.575mm (which seems to coincide with your measurements). But in your writeup, you indicated that the OD of the bushings you purchased were measured to be 1.185 inches which equates more to about 30mm. So was the bushing you purchased that oversized? Could you please elaborate? In addition, if you haven't already discovered, the bushing on the drivers side is actually shorter than the one on the passenger side. I believe this is the case so that the drivers side bushing does not interfere with the pinion mechanism once installed. As I recall 30 mm was too long so you may want to check this as well. Also I could not find the correct pinion bearing with the appropriate thickness. The best I could do was an 11mm think angular contact bearing that I purchased from VXB bearings (they have a great selection at prices that are much better than McMaster). I also stumbled on a rebuild thread on Hybrid Z from many years ago, and a number of posters ran into the same issues with these bearings. Turns out that one poster had discovered that an L6 valve spring seat was the exact size needed to provide the appropriate shim width and so I did some research and was able to purchase some from Nissan and sure enough they are correct and should work, although I am not yet at that part of the rebuild. In any case, look forward to your continued writeup as well as some clarification on the bearing you purchased from ASB. Mike.
-
ZPAT, I'm in Austin and spend a lot of time in Lakeway (on the lake). You should consider coming to our next local club meeting and hooking up with a lot of the local Z guys (and gals). And definitely consider attending ZCON as Zedy mentioned above. The judged show is going to be at the Oasis and should be a great event along with the others we have planned at Harris Hill Raceway as well as COTA. It's also a great time to meet other fellow Z lovers. I guarantee you will make friends for life. We also usually put together a monthly drive as well as attend Cars and Coffee, so you should consider joining us on one of those as well. Finally if you need any additional help on your car, just let me know. I am also the owner of an S30 and so we already have something in common. You can find out more about the local Capital Z of Texas club on our Facebook page. https://www.facebook.com/groups/CapitalZofTexas Hope to meet you at one of our upcoming events. Mike.
-
It's the 20th through the 24th of June. You can find out a lot more about the event as well as register at the following site: zcon.org Hope to see you and your Z in Austin this summer. Mike.
-
So I received a reply from our club member who has been the primary interface with the hotel and as I suspected he also said this is not possible as there are definitely rooms still available. I will send you a PM with his contact info so you can get in touch with him directly and he will make sure this gets resolved. Mike.
-
This doesn't make any sense. In our planning meeting tonight we covered the hotel bookings so far and there were definitely a number of rooms left at the Hilton. I'll look into this tomorrow and see what's up and will let you know. Mike.
-
Yes!! The OP referred to them as valve spring shims, but in fact Nissan actually calls them spring seats. So at least for this thread they are one in the same. Mike.
-
So we had our weekly ZCON planning meeting this PM and I've confirmed that parking at the hotel is included in the room charge. There should be no additional charge for parking at the hotel. Mike.
-
The one that Steve J referenced is the one that I have. An invaluable tool when you are looking to find original OEM parts and part numbers. Mike.
-
So a quick update on this thread. I ended up ordering the OEM valve spring seats from Courtesy Parts and they arrived today. These are the original ones called out for the OEM L6 engine that I was able to locate in the Datsun / Nissan digitized parts diagram CD. I listed the part numbers in an earlier post. Here are the exact dimensions for each of the shims / seats: Outer - 35mm OD, 25.25mm ID, and 1mm thick. (This is exactly what I need for the rack rebuild that I referenced earlier). Inner - 24.5mm OD, 12.3mm ID, 1mm thick. You can still get these from Nissan but the outer ones are apparently in very limited supply. Hope that helps. Mike.
-
Just trying to keep everyone updated on the latest with ZCON 2017 in Austin, TX. Don't Forget! ZCON 2017 in Austin, Texas is just over three months away (June 20-24th)! We have several exciting developments regarding this years event: Early Bird pricing expires on April 1st, 2017. Register today! Hotel Rooms are filling up fast! Be sure to reserve your room today! We will update our website with overflow information as it becomes available. Harris Hill Road (our HPDE venue), has recently been repaved, this smooth as silk surface is ready for your Z when it arrives in June! Speaking of H2R, limited HPDE spots are still available. Get them while they're hot! You can register any time, day or night, at www.ZCON.org, and feel free to shoot us an email with any questions or concerns to info@zcon.org!
-
If you mean to Courtesy Parts, here it is: http://www.courtesyparts.com/ Just go there and type in the parts numbers I provided above and you should them. Mike.
-
SB, I am assuming that you are looking for these for an L Series engine. If so, I looked up the part numbers for the shims (Nissan calls them spring seats) and there are 2 per spring, one outer and one inner. The part numbers are as follows: Valve Spring Seat Outer - 13205-14600 Valve Spring Seat Inner - 13206-23000 Courtesy Parts shows them as being available albeit with new part numbers that supersede the ones I listed above. They were pretty cheap so I ordered a couple to see if they will work in my rack rebuild application. You may want to check them out. Also very interested in getting your measurements once you pull out the shims. Mike.
-
Very interesting that you are asking this question now. It turns out that I have been working on a complete rebuild of a 280Z steering rack and the pinion bearings have an ID of 15mm, OD of 35mm, and are 12mm thick. So what might this have to do with valve spring shims you might ask?? Well the only bearing that I could find with the correct ID and OD dimensions are 11mm thick and so I happened to run across an old thread on the Hybrid Z forum where a member was trying to do the same thing as I and ran into the same mismatch of thickness problem. You can find the thread here: http://forums.hybridz.org/topic/45520-steering-rack-rebuild/ Well if you read down a couple of threads, a different member solved the problem by using a Nissan (I assume from a Z engine) valve spring shim to make up the difference on the bearing. He indicates that the dimensions were exactly what was required and so from that I deduce that these shims have an OD of 35mm, ID of 15mm and are 1mm thick. I have also been trying to find a source for these but no luck so far. If you are able to locate some please post with your findings. Hope that helps. Mike.