Mike W
Free Member
-
Joined
-
Last visited
Everything posted by Mike W
-
 Steve, I'm very happy that you have finally seen the light!! I know you would have regretted this forever. Also, before you go for the Kameari intake, take a look at the one from Harada. I purchased a new one from eBay and couldn't be happier. The throttle rod is almost double the size of the standard Cannon setup and even bigger than the upgraded one you installed. Also it comes with an integral return spring and I was able to eliminate the 2 long external springs I had been using. Now my idle returns to normal EVERY time without having to kick the accelerator. Finally, the rod ends are an integral part of the design (not threaded like the Cannon) and they use teflon bushings for really smooth and flawless operation. As I recall it was also less expensive than the Kameari. Take a look here: http://www.ebay.com/itm/Datsun-240Z-260z-280z-Harada-Intake-manifold-for-triple-Mikuni-Webers-/281834634194?hash=item419ea73bd2:g:bY0AAOSw14xWJ1HZ&vxp=mtr I did spend some time smoothing out some of the casting marks as well as polishing up the insides of the runners and finally had it powder coated. I am very happy with the results and would never go back to the Cannon. Hope all is well with you and the family. Mike.
 -
I've been meaning to post about this topic and just haven't had the time to get to it until now. Hopefully this is not too late to help you out. First, I have been down this path multiple times with Champion radiators and electric fans. My first implementation used an adjustable temp control module that required a probe to be inserted into the fins of the radiator. Although this setup was fully functional and provided the ability to select the temp at which the fans turned on, I never particularly like the idea of the probe going through the fins of the radiator itself, so I searched for a more elegant solution. I found a really neat product from a company called Dakota Digital, which is essentially a digital fan controller that is highly programmable. You can set fan on temp, fan off temp, have the fans run for X minutes after the car has been shut off, etc. They also provide a temp sensor specifically made for this unit which I also used. I ended up removing the coolant drain plug on the drivers side of the engine block and replaced it with the sensor, although I did need a thread adapter to make this work. The setup works flawlessly and I have had no issues with it what so ever. You can find more about it here: http://www.dakotadigital.com/index.cfm/page/ptype=product/product_id=852/category_id=403/mode=prod/prd852.htm I ended up mounting it in the glove box so the controls and display are easily accessible from the interior of the car. I also found that the generic type fans that came with the Champion radiators were marginal at best. In the hot summer weather here in Texas I found that the combination of the Champion radiator and the generic fans could not keep up with a high heat situation in traffic. I would find in this situation that my temp would continue to go up while sitting at a stop light and this was not an acceptable solution to me. So I ended up changing out both the radiator as well as the fans. Went with a radiator from a company in New York called Wizard Cooling. These guys were unbelievable in the service they provided to me and their product (all made in the good old USA) was far superior to the Champion both in terms of build quality as well as cooling performance. They even designed and made a custom fan mount for me which was a significant upgrade to the "tie wrap" approach that the generic fans used. For the fans I went with two 12 inch Spal fans. Although a lot more expensive than the generic type, these things are unbelievable. They sound like a turbine engine when they start up and their cooling capability, along with the Wizard radiator is nothing short of spectacular. I can be sitting in traffic in 110 degree weather in Austin and my temp will begin dropping as soon as the fans kick in. Never had any sort of overheating problem since I made this change. You can find more about Wizard cooling here: http://www.wizardcooling.com/Datsun-s/1826.htm I don't have access to my picture files now, but if anyone would like pictures of my setup I'll be happy to post those when I get home this evening. Just let me know. Hope this helps and is not too late. Mike.
-
-
-
Those plugs are a PITA to get in. I tore a few of them trying different methods only to have them break and fall out again. The best way that I found is to use some sort of lubricant (silicone should be OK) and then use something like a chopstick to try and work it in. I actually use orangewood sticks that I got from my wife. She uses them for doing nails and they are great for chores like this as well as cleaning. They are very soft so they will not damage your paint either and they are also tapered at then ends so helpful in this type of job. You can get a bag of 100 orangewood sticks at normal beauty supply places for a couple of dollars. Hope that helps. Mike.
-
Well done Jim!! Really enjoyed the video and for some reason it had all of the background music when I played it as well. Mike.
-
No retired by requirement. The only ZCCA events that Jim's car and my car can now compete in is the People's Choice award. The rules say that if you do receive one of the Cup awards, you have achieved the highest level possible and so they retire your car from competing because there is nothing further to achieve. I don't know if this is unique to ZCCA or common among other national car clubs, but that's the rule. Mike.
-
So here's how the judging works as I understand it. Most of this came from a fellow CZOT member who has judged and been judged at other ZCCA sponsored events. 1. There are two potential rounds of judging depending on the scores of the first round. 2. During the first round all cars are judged according to the class they are in (ie 240Z, 260Z etc) as well as the category (stock, street modified, etc). Three judges are used with each focused on a particular area, ie interior, exterior, and engine bay. There are a total of 100 points possible per area for a total perfect score of 300. 3. Cars that achieve a first round score of 280 or higher are eligible for a second round of judging. These scores are used to determine potential winners of the Gold and Medallion cups. I have been told that the second round judges that are used are the more experienced ones because at this point the car is vying for what is considered to be the pinnacle of achievement. 4. The first round scores are used for the class awards (ie 240Z, etc) as well as the "Best Of" awards. 5. Second round scores must achieve a minimum of 290 points to be considered for a Gold or Medallion cup award. 6. In the event of a tie, the award will go to the older car as that is considered to be more difficult to restore and maintain. At this last ZCON there were apparently no stock class vehicles that either met the first round minimum, or perhaps failed to achieve the second round minimum of 290 to score the Gold Medallion award. That is why we did not see an award for stock class cars. Jim's score of 298 in the first round was used for the class award as well as the "Best Of" awards. His second round score of 290 dropped 8 points from the first round for some reason and perhaps this was a result of the more experienced judges. In my case, my first round score was 290 (the judges disclosed this to me after they finished the first round) and my second round score went up 2 points for some reason. However, in the end, both Jim's car and mine scored 290 or higher in the second round and that resulted in Gold cup awards for both of us. I also understand that we will receive our judging sheets at some point in the near future so we can actually get an understanding of where and why the judges took points off. I will also say that this is the first show I have ever been to where the judges actually talked to you after they were finished. This was extremely helpful in understanding what they look for and how they score. As an example, I was told after the first round that I lost a point for my interior due to a cobweb being found. Ironically it was under the front of the passenger seat and it was not there the day before, so I determined that I had a spider somewhere in my car who caused me to lose a point due to the spider web that he made!! Just amazing the level of detail the judges were looking for. Hope that helps. I'm anxious to get my judging sheet at some point, but in the case of both Jim's car and mine, they are now retired from competing at ZCCA events, so getting this info will not be all that useful with respect to the cars we entered at this past ZCON. I'm already trying to figure out my next build so I suspect this information will be very useful in the future. Mike.
-
Jim, That is an awesome photo and a very creative narrative as well!! I need to figure out a way to exchange pictures with you as I know that some of my local club members got some shots of us as well. This was my first ZCON but it won't be my last. I had the chance to rekindle some past relationships, make some new ones, strengthen some existing, and have some very cool time with my son. He has been a huge part of the direction and implementation of the things we have done to our car, so it was awesome for me to have him at this event. My only regret is that I didn't have a chance to meet everyone on the list that Blue sent out. That is what I originally set out to do, but before I knew it the week was gone. Guess I'll have to wait until the next ZCON. The Z community is really awesome!! Mike.
-
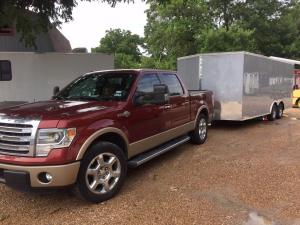
Jeff, I'll know a lot more about the question you ask in a few days. I'm towing my Z to Memphis for ZCON and just purchased a new 20 foot enclosed trailer by Continental Cargo. Purchased it up in Waco and brought it down to Austin about 2 weeks ago. I am not an expert on trailering but am learning fast. A couple of data points that I have so far. My tow vehicle is a 2014 2WD F150 with the 5.0L V8. Has the complete towing package which includes electric brake controllers. I believe that total towing capacity for the truck is around 10000 lbs. Curb weight of the trailer is about 3400 lbs. I purchased the upgraded axles to 5200 lbs as well as went with torsion axles instead of leaf springs. You can get the full specs of the trailer here if you are interested: http://www.continentalcargotrailer.com/default.asp?page=models&unit=valueauto&choice=specs&series=ValueAuto My trailer model is VHW8520TA3. On my way up to Waco to pick up the trailer I was averaging around 70 - 75 MPH and got around 19-20 MPG. On the return trip with an empty trailer, averaging around 65 - 70, I got around 12 - 13 MPG. I guess there are going to be a lot of gas stops between here and Memphis!! Will also have to learn how to keep my speed closer to 55 as well! Having said that I also don't think my trailer and tow vehicle were optimally set up. Since picking up the trailer a friend whom I consider more an an expert on this topic strongly advised that I have a weight distribution system / anti sway system installed. This ensures an optimal loading of the tow vehicle from front to back as well as optimal tongue weight. I ended up having one installed last weekend (made by Curt Manufacturing) and in the short distance I have driven the rig, I can already tell a difference. The truck seemed to labor a whole lot less and was much more stable on the road. Like I said, I'll have a lot more for you in a couple of weeks. I've included a picture of my truck and the trailer taken on the day I picked it up. Mike.

-
My son and I should be there by mid to late Monday afternoon. If all goes well we should be right behind Jim. Looking forward to finally meeting everyone face to face. Travel safe. Mike.
-
Picked up my trailer yesterday as it had just finished the manufacturing process. This is going to be my Z's new mobile home. First trip - Memphis!! Looking forward to seeing all of you guys there. Mike.
-
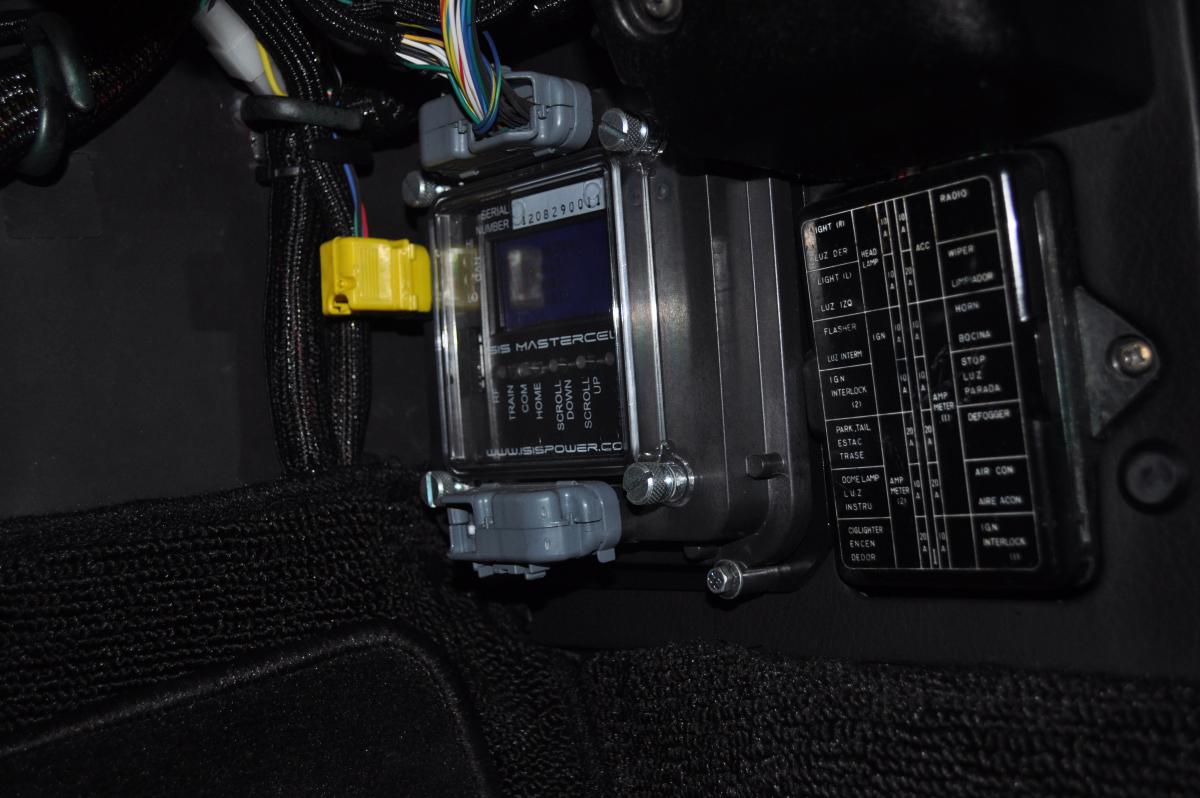
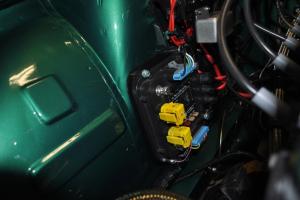
When I completed the restore of my car, I spent a lot of time removing brackets, clips, and other miscellaneous parts within the engine bay in order to give it a cleaner and better organized look. Actually, this was my son's idea, so I can't take credit for it, but it really did clean up the look of the engine bay nicely. However, as I was contemplating all of the upgrades for the electrical system, I realized I was going to need a slew of new relays for headlights, cooling fans, etc and I just didn't like the idea of cluttering up the engine bay that I just got done cleaning up. On top of that relays are mechanical in nature and as such can fail over time, so I really wanted something a little more elegant as well as reliable. Well I did find something and I'm probably the only Z person in our universe who has done this. I purchased a system from a company called Isis Power. They produce a product that is essentially an integrated power control system that uses solid state FET transistors to switch power to the desired loads. Zero relays and totally programmable. They are apparently pretty popular with the hot rod crowd as well as folks doing a lot of ground up restorations. In addition, they also provide a remote key fob and receiver that allows you to completely disable the ignition of the car (assuming you have your ignition wired into the Isis system) making it difficult if not impossible to jump start the car. I will add that it is also expensive, especially as compared to the relay alternative, so I thought long and hard before deciding to do this. Well it was an adventure to get it all working and took quite some time, but in the end I have an extremely reliable modern day system that not only provides power control but a slew of other features only available in more modern cars. Having said that, it really took some time for me to fully understand the way in which the system operates and all of the capabilities it has, but the fundamental premise of operation is that the system needs to see a switch closure to ground which serves as a signal to activate a specific load attached to the system. As a result of that, I had to do a lot of rewiring as pretty much all of the switched circuits in our Z, switch power, not ground. The system comes as 2 units, a Master Cell and a Power Cell. The master cell is the intelligence of the system and is the termination point for all of the switched circuits that you want to control. The power cell actually provides the power to the desired load. The master cell "talks" to the power cell over a 5 wire CAN (car area network) bus and will basically tell it when to turn on / off any specific load. I mounted the master cell on the passenger side kick panel where my old transistor ignition module used to be. The power cell is mounted in the engine bay on the passenger side tucked away down by the frame rail. I also decided to only use the Isis system for the highest power devices in the car or ones that I wanted better control of. So the system controls headlights (including Hi / Low beam), ignition, fuel pump, wipers, cooling fans, stereo, stereo amp and subwoofers. The other circuits remain as they were although my original fuse box is highly depopulated now. For the install, I also added circuits gradually so I could better understand the way in which the system operated and ensure that each circuit behaved as expected. I've included a few pictures of the install. I've also left out a lot of details on the ins and outs of the install but happy to answer any questions.

-
I agree with all that has been said so far about focusing on those things that will improve the basic operation of the car. Suspension, electrical, etc are all candidates and you should be able to figure out the priority once you get the vehicle and have some time with it. A quick comment on the rear brake upgrade that you are considering. I just competed a 4 wheel upgrade using the Arizona Z kit. It is very high quality and even though I thought the OEM brakes were more than sufficient, the stopping power I have now is definitely a cut above OEM. Probably was not a necessity for me as most of my driving is street oriented (albeit spirited at that), but I do like having the improved braking capability. However, this upgrade was not without its challenges. First, if you go with the discs on the rear, you will likely lose the hand brake capability that you have now. This is somewhat dependent on the setup that you use, but for sure the Arizona Z kit does away with the OEM hand brake setup. However Dave from Arizona Z does sell a nicely designed "mechanical" caliper and also provides the brackets to mount it, but the installation of the cable and other hardware necessary to make it work will essentially be up to you. I ended up having to design some custom brackets for an aftermarket Lokar universal hand brake cable and it was a very elegant design in the end, but I had to figure this all out myself. On top of that, you will also need to change your proportioning valve so as to get the correct bias between front and rear. The stock valve is attached to the firewall near the booster, but it is fixed. You will need to either replace the OEM one or augment it with an adjustable one. The Arizona Z kit does come with a nice Wilwood valve but it is big and bulky and you have to find a place to mount it as well. I ended up going a different route with a much smaller valve but it required the fabrication of a few brake lines and some other bracket design work. Should you decide to go this route in the future, I'd be happy to post some pictures and provide more details on exactly what I did to make this work, but it is not as simple as just bolting on a set of calipers in the rear, and "you're done". Hope that helps. Mike.
-
Are you just changing the fronts to 4 caliper pistons or are you also going discs in the rear as well? If you are planning for discs in the rear you will have to find an alternative to the stock proportioning valve and use one that will give you some adjustability so you can get the front / rear bias correct. I just got done doing this and came up with a pretty clever way to add a small adjustable proportioning valve in pretty much the same location as the OEM one. If you are not planning on discs for the rear you can likely get away with the fixed stock valve. If you need a replacement for yours, I do not believe they are available any longer, but I have a used one that I will not likely have use for any longer and could work something out with you. Let me know. Mike.
-
Yes it is a complete kit. although I did not use the supplied linkage as I have a custom made billet set of arms and actuators. It does come with the complete linkage assembly, mounting plates and gaskets, studs, nuts, and washers for the carb mounting, and even a new intake / exhaust manifold gasket. It is a little on the expensive side but frankly no more than what you would pay for a new Cannon setup and in my opinion this is a cut above the Cannon system. Hope that helps. I can supply more pictures of the Harada system if anyone needs them. Mike.
-
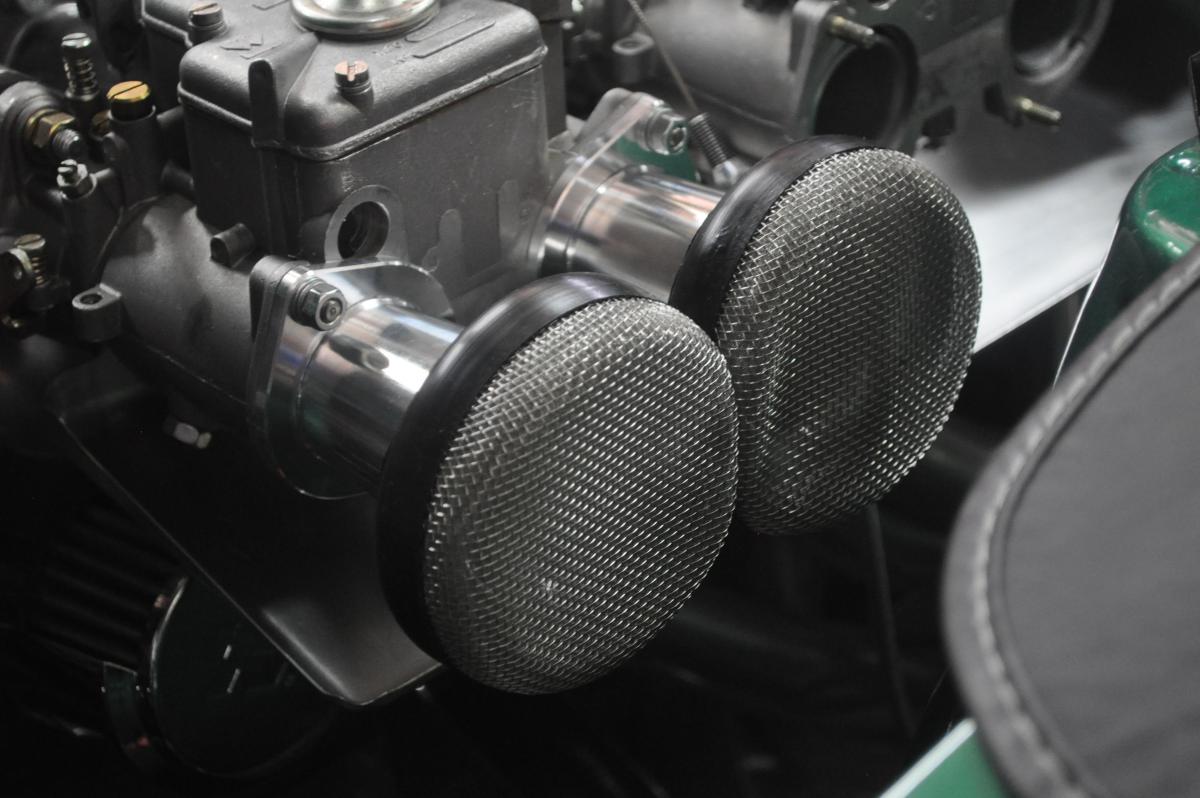
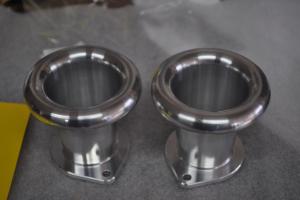
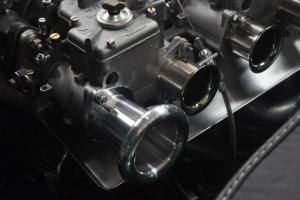
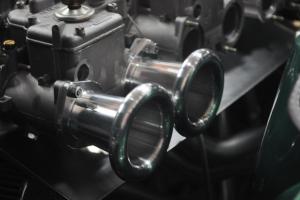
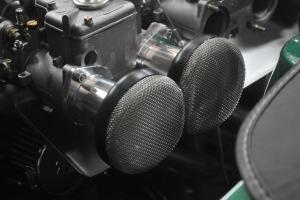
Chris, Thanks for the compliments. I am very happy with how everything turned out and even got some unexpected positive surprises at the end. Charles, I purchased the manifold from eBay. The seller I purchased from is selling an exact replica right now. You can find it here: http://www.ebay.com/itm/Datsun-240Z-260z-280z-Harada-Intake-manifold-for-triple-Mikuni-Webers-/281695592902?hash=item41965da1c6&vxp=mtr He was great on communication as I had some questions for him before I pulled the trigger and his shipping was as if the item was across the street. I think from payment to arrival at my door was about 4 days. Japan to Texas!! The air horns were hard to find and were not inexpensive but they are works of art. I was trying to get them originally from Techno Toy Tuning but they did not have stock and it was going to be a few months before they completed another run. Instead I went with Borla Induction (formally TWM Induction) and they were great to work with. The filters come from Bills B Racing. He made the ones I used on my old horns and knew exactly what I needed for the Borla trumpets. In fact it was Bill who steered me to a specific person at Borla who ultimately helped me out with my order. You can find Bill's site here: http://www.bbrfilters.com/ I've gotten a lot of flak about running these filters and the potential wear on my engine. I've run these now for about 3 years (and perhaps 6000 + miles) and completed a recent inspection of my cam, etc and it all looked perfect. I don't know if I would use these on a dirt track, but for normal street driving that I do they work great and look really nice as well. Hope this helps. Let me know if you need anything else. Mike.
-
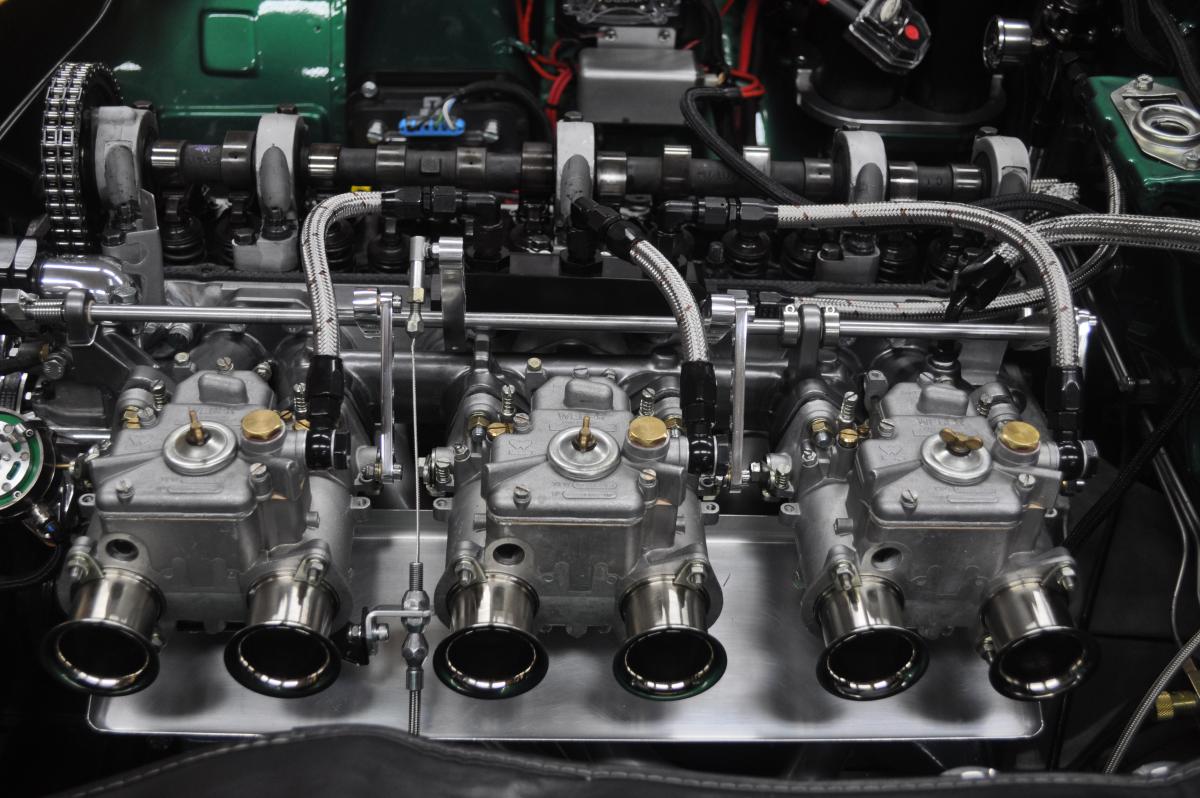
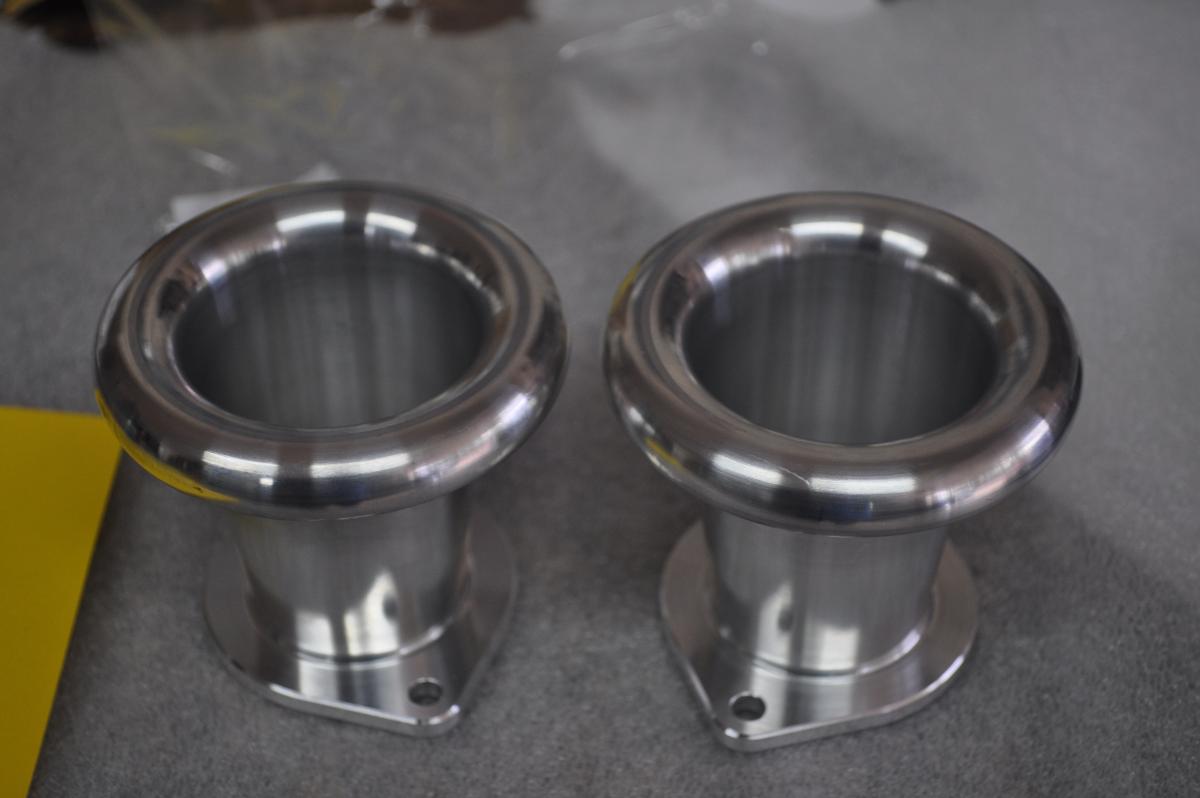
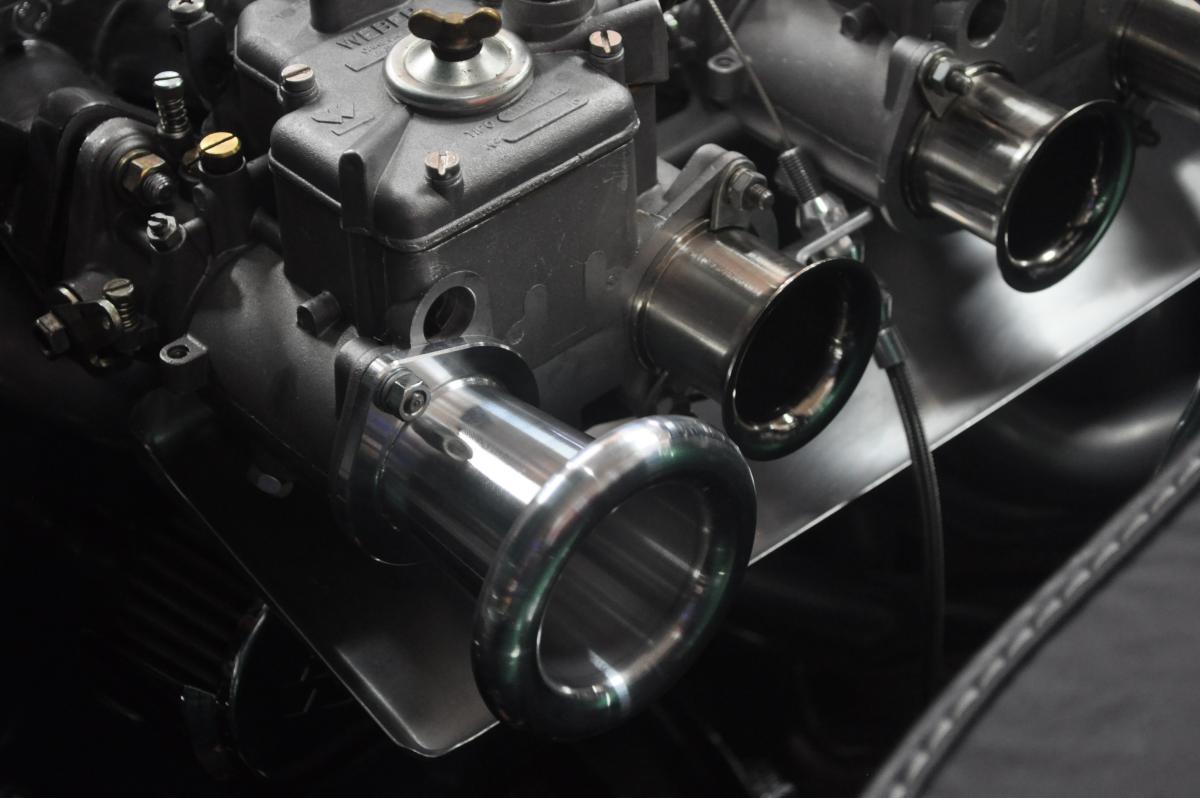
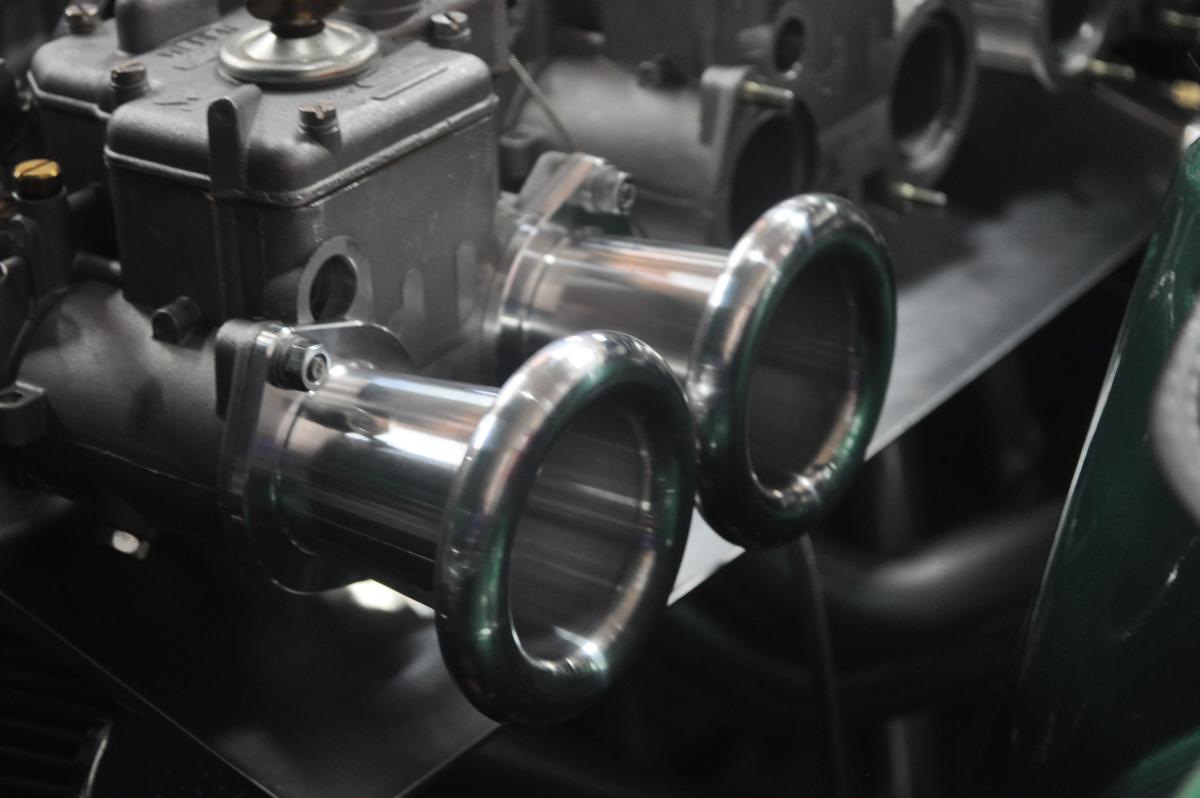
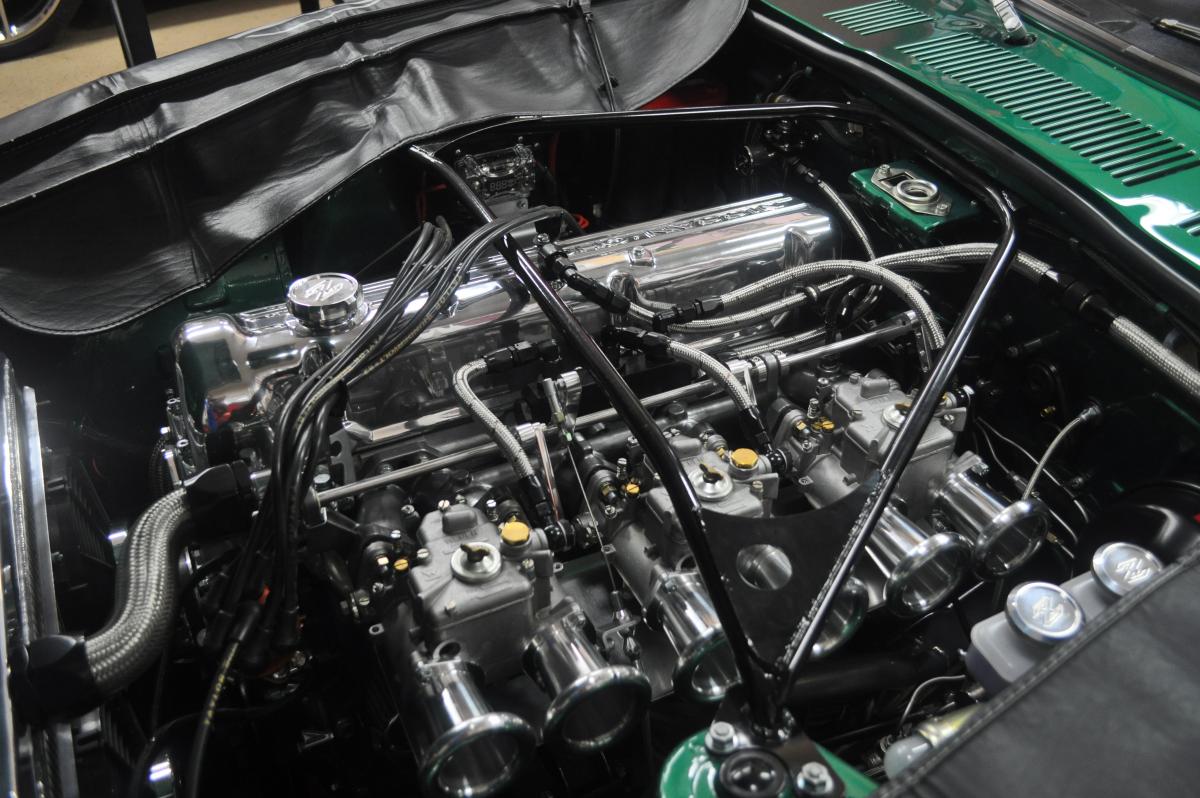
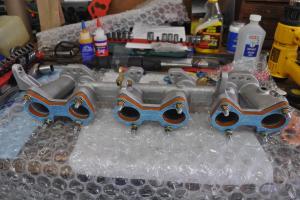
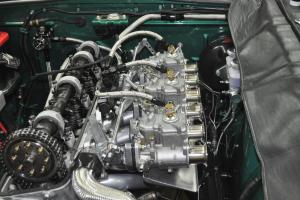
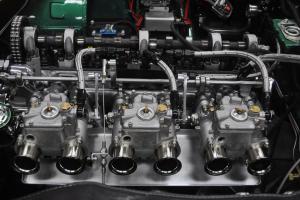
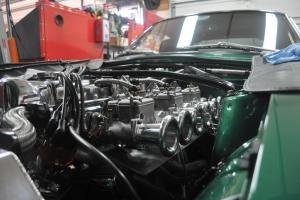
So I have never been particularly happy with my Cannon manifold for the triple Webers that I run. As many of you know, the alignment of the rod ends that are tapped into the manifold and not particularly accurate and as a result it has been necessary to remove the middle rod end so as to minimize binding of the throttle rod. I have always had issues with this setup in terms of "return to idle" and this misalignment exacerbated the whole setup. I have also had to use external return springs which just add more clutter to the engine bay as well. So the primary motivation I had for this upgrade was to achieve a smooth return to idle regardless of whether I was successful in eliminating the return springs or not. For some time I had been contemplating an upgrade to a beefier throttle rod with the existing Cannon manifold, but this would have also required larger tapped holes in the manifold due to the necessity of having to use larger rod ends as well. Also was never clear if doing this would potentially eliminate the external return springs that I was using. In the end, I opted for a brand new Harada manifold that I purchased on eBay from a seller in Japan. It received very good reviews and I know that a few folks on this forum have used them as well. The transaction was flawless and the shipping from Japan was like lightening. I received this unit faster than some things that I have purchased domestically!! In any case, I thought that I would share my install and the results that I have achieved. First a few notes about the Harada. The throttle rod "arms" are actually built into the manifold as opposed to the threaded approach with rod ends that the Cannon took. There are only 2 arms and so the alignment by definition is perfect. The manifold does provide for a "middle" arm but I chose not to use it as it interfered with one of my throttle arms to the middle carb. Also, given that the Harada uses a 10mm throttle rod (which I actually replaced with a high strength stainless steel version that I purchased from McMaster) the rod is definitely beefy enough that you can do without the middle support arm. In addition, the Harada includes a built in return spring that I was hoping would be beefy enough so as to eliminate the external ones that I had been using with the Cannon. Finally, the Harada is about an inch shorter than the Cannon and although I definitely welcomed the increased room it gave me in the engine bay, I did not anticipate the improvement in engine performance that I ultimately achieved. More on that later. Upon receipt, I noticed that the casting on the manifold was a little rough (although significantly better than the Cannon) and so I proceeded to clean up all of the casting marks and also did my best to polish up the runners as well. Once this was complete I had the manifold powder coated in a gun metal grey which really complimented the rest of my engine bay. Now for the install itself. On my old Cannon setup, I used the front or forward facing throttle mechanisms on the carbs themselves, but given the layout of the Harada and the positioning of the arms and return spring, I was forced to move to the rear most throttle mechanisms on each carb. This was actually an easy swap and worked out well with no interference. I also had to fabricate a new bracket to hold my throttle cable mechanism to as to avoid any interference with the new positioning of the throttle arms. Everything worked out perfectly. While I was at it I also rebuilt each of the Webers with new gaskets, needle valves, etc., and upgraded to the heavier internal return springs so as to increase my chances of being able to remove the external return springs. I kept all of my jetting the same based on the belief at the time that the small change in manifold size would not really make that much of a difference. For reference, my primary jetting specs were as follows: Choke - 32mm Idle jet - Keith Franck / Hypojet equivalent of 60F9 Main jet - 130 Emulsion tube - Keith Franck equivalent of F11 Car started right up but was running a little rough and seemed very rich. Went through a complete balance as well as setup of the idle mixture, but car still ran very rich at this point. However, I had no stumbling issues or the dreaded off idle stumble and the car ran great especially at higher RPM's with the exception of the richness. So I ended up backing off on my idle jets to a 55F9 and also increased my choke size to 34mm. I had tried the 34's with the Cannon setup in the past and could never get it to run properly no matter what I did to the jetting. Well the Harada was a whole new experience. Once I finally got everything in sync and I properly adjusted my idle mixture, the overall performance of the car was like never before. Acceleration is smooth with no signs of an off idle stumble. No coughing, no backfiring, just smooth acceleration and great pulling power. And best of all a perfect return to idle without having to use the external return springs!! For good measure I also did add some longer velocity stacks that had a more rounded lip than the stock ones that came with the Webers. They do look cool and I also believe the design of them helps quite a bit with the air flow into the carb bodies. I have not messed with my ignition timing yet but so far have no pinging even under the most severe loads. I suspect that I may be able to add a little more advance and see if I can eek out a little more power as well. It's very easy to do with the 123 Igniton system I have so I will probably be tweaking that this week. Other than that and the possibility of going to a slightly smaller main jet, I am very happy with the upgrade. This is definitely a cut above the old Cannon manifold both in terms of performance as well as drivability. Wish I had made the change years ago. I've attached a few pictures so you can see the install progress. Mike.

-
Yes its seems strange but that is the correct configuration. Guess it was for cost savings as they got to use a single part for both sides, just one flipped over. Anxious to hear how the spring / strut change impacts your ride height as well as drivability. Mike.
-
I did a complete rear suspension upgrade about 2 years ago and for some reason never even thought about changing out the rear bearings. So just recently I did a rear disc brake upgrade, which required that I remove the rear strut assembly, and decided to do the bearings while I was at it. Glad that I did. I've owned the car since day one and so I know they were never changed before. Two of the bearings were so dry of grease that the balls actually rattled within the bearing race. I guess I should be happy that they were still in reasonable condition after 40+ years of use. I replaced them with genuine Nissan parts. Figured if the first ones lasted 40+ years, I would never have to worry about this again. It is a much easier task if the strut is off the car and if you have a press as well as a split bearing puller. There are alternative ways of doing this (see the write up on Atlantic Z from Blue) but if you are at the point of disassembling the rear for a suspension upgrade, you should definitely do the bearings especially if they have not been done before. Mike.
-
Jeff, I had the same problem with my Webers. They would tend to go dry after a few weeks of standing still and the mechanical pump would take forever to get them primed again. I went with an electric pump (I used a Facet / Purolater) that fit perfectly in the OEM mounting location and totally eliminated the mechanical pump. I rewired the electric pump so that it will turn on when the ignition switch is either in the "on" position or the "start" position and this allows me to quickly prime the carbs after sitting. System works great. You will still need a FPR and I also added a gauge to mine so I can get an idea of the pressure. I also added an impact switch to the circuit so that power will be cut to the pump in the case of an accident or rollover. Other people have used the signal from the oil pressure sending unit to accomplish the same thing. Good luck with your install and let me know if I can be of any other help. Mike.
-
So to answer some of Zed's earlier questions. The guidance from Isky on oil is primarily for break in. I continue to use it based on positive experience and the cost delta based on the frequency of changes is insignificant to me. The cam itself is an Isky grind and not a regrind of an OEM Datsun / Nissan cam. It uses stock springs as well as rockers. I've attached a PDF of the motor oil warning that came with my cam so you can see exactly what they are saying. Mike. 103836.PDF
-
So when I did my rebuild about 2 1/2 years ago, I upgraded to an Isky Stage II cam. They only recommended 2 oils to use. One was Brad Penn and the other was Valvoline Racing. The primary reason was the inclusion of zinc. I started using the Brad Penn ever since and couldn't be happier. Just this past weekend I completed an upgrade to my intake manifold and "while I was at it", I decided to also change out my head gasket as I was starting to observe some minor "weeping" of coolant on the passenger side of the block. As a result of this effort, I was able to inspect my head as well as the cylinders in the block, and everything looks as it was when it was first put together about 2 1/2 years ago (and probably 5000 - 6000 miles) In that time I believe that I changed my oil twice at about 3000 mile increments. Admittedly I did not take measurements of any of the components and so this was all visual, but there was nothing that I observed that gave any indication of unusual wear. I am sold on Brad Penn (it even feels different than normal oil) and from my recent teardown, will continue using it even though its a little difficult to source (I get mine on Amazon) and more expensive than regular oil. There's a good reason that this is only one of two oils that Isky recommends. My 2 cents. Mike.
-
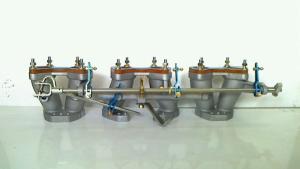
So I just purchased a brand new Harada intake from the same person on eBay who is selling the used ones from Sanyo for $230. The new Harada was $450, came with all of the linkage, gaskets, etc. His shipping was incredibly fast. I received it from Japan in about 5 days and I live in Austin, TX. That was faster than some of the stuff I have purchased on ebay that was coming to me from other places in the US. The seller was also great at communicating as I had some initial questions for him before I made the purchase. One of the things I really like about this manifold, as compared to the Cannon that I am using now, is the built in return spring mechanism. Hopefully this will let me eliminate the external ones I am using now. The throttle rod is also massive as compared to the one on the Cannon. The Cannon rod is 5/16" / .31" while the one on the Harada is 10mm (or .394 inches). I am also hopeful that this beefier rod will help the throttle action and also provide a smoother return to idle. It's out being powdercoated now but I will pick it up later today and begin the fitting process. Here's a picture from the ebay ad. Mike.
-
This is what I use on all of my cars. It is microfiber but has a 5 mil sponge laminated in between the microfiber. So you get the absorption of a sponge but with a delicate micro fiber outside so as to avoid scratches. I get mine from Autogeek and you can find more detail here: http://www.autogeek.net/cobra-guzzler-hd-towel.html About $20 for a large one. Highly recommended. Hope this helps. Mike.