FastWoman
Community Member
-
Joined
-
Last visited
Everything posted by FastWoman
-
Hey Pat, NO NEED FOR THE CAPS LOCK KEY! WE'LL HELP YOU EVEN IN lower case (which is easier on the eyes)! I assume you have points ignition. It's not a very complicated system. You could start with the standard major tune-up items, which need periodic replacement anyway: plugs wires points condensor distributor cap rotor If that doesn't do it, you might also need a new coil and/or drop resistor.
-
Darn! If that had been available not very long ago, I'd have bought one. However, my injectors are in, my engine is "finished" for the time being, and so it will stay. Your questions: It looks nicely made. If it leaks at all, it would be simple to unscrew the leaky fitting, tape it, and seal the leak. I doubt it leaks, though. Personally I'd mount it with some support. I'd machine a few threads in it to attach it to a stand-off, so as to keep the mount rigid. You're going to need to find some way to mount up your fuel pressure regulator. If I were you, I'd see if there's some way to mandrel-bend some stainless steel tubing to run to and from the thing. Regarding horsepower: It will neither help nor hurt. I do think a linear design is going to do a better job of purging air from the rail. On the other hand the 1/2" ID of the rail is probably a bad idea in this regard. Hard to say. You might end up holding a big air bubble for several minutes, during which time your fuel pressure regulation would get really sloppy, possibly leaning you out whenever the rail needs to reaccumulate pressure. (Note: These things do get air pockets in them, opinions to the contrary.) Note that there's no barb for your cold start injector. I suppose you could connect that to a T fitting off of your fuel supply line.
-
Try this: Connect a 12V light bulb across the terminals on your coil, and crank the engine. Does the light flash on and off? If so, then you've confirmed you're delivering current to the coil and that you SHOULD BE getting a spark out of it. If you're not getting a spark, even when the bulb is flashing, then you've got a bad coil.
-
Well, if it smells like burning rubber or plastic, you've got a problem somewhere and should stop the engine. If it smells like burning oil, then it should look remarkably better after a few minutes and then burn off completely after a while (an hour?). If it doesn't burn off, then you might have a leak. Obviously while you've got a smoking engine, run it outside, not in the garage. There is nothing so horrible as seeing your engine catch on fire and realizing your home is over it. (That happened to me once when a fuel filter split open on my Mustang.) Keep a fire extinguisher close at hand, just in case!
-
Well, yes, there are ways to lean out the mix electronically. Although Atlantic Z shows how to adjust the AFM spring tension to alter the mix, I personally don't think this is a good approach. A better approach is to keep the AFM's mechanical response correct (per the "beer can" calibration procedures on Atlantic Z) and then the do other adjustments as needed. But first, you should ask why you're running rich. These are a few common things to check first: *Bad coolant temp sensor or faulty connection *Bad air temp sensor or faulty connection *Stuck cold start valve *Bent AFM vane ('75 problem only. As there was no backfire relief valve, the vane could be bent from backfire.) If you've ruled those out, and if you're sure everything else on the engine is in proper working order (and especially no vacuum leaks, correct valve lash, correct timing), then you can lean out the mixture by adding resistance in parallel with the coolant temperature sensor. As you have an adjustable FPR, you can also lower the fuel pressure -- but I wouldn't think any lower than maybe 20 psi. But first, check the above. I bet you'll find something out of whack. These EFI systems tend to drift lean, rather than rich.
-
It would be a pity to walk away. These old cars usually take quite a bit of effort to get them running right, because they usually have a neglected past. But once you work through the problems, they're the picture of reliability. You have only to keep up with the maintenance the way the PO should have done. Re-read my post #9. There may be differences between my n/a Z and your turbo ZX, but I bet I'm right about how your ECU is triggered. The common link between your tach and fuel delivery by the ECU is that branched connection off of the coil. But of course you'd be wise to download a free copy of your ZX Factory Service Manual (assume it's available) to check the schematic. I bet it works that way, though.
-
I bet it's oil somewhere on your exhaust. When I reworked my intake and exhaust, having sprayed PBlaster and WD-40 here and there, having handled parts with greasy hands, the same thing happened. When I first fired up the engine, it looked like I had built a small fire under the hood. The smoke cleared off after about 15 min.
-
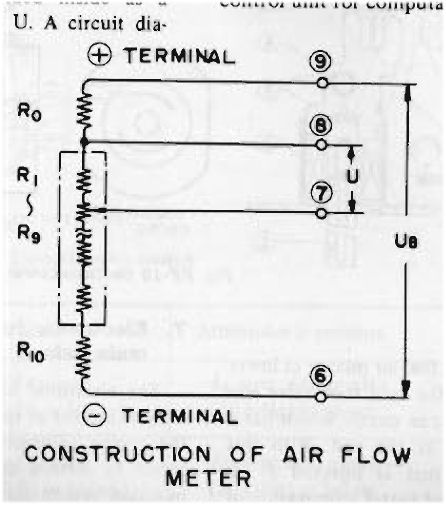
Jenny, I had assumed you'd have a schematic in the '76 manual, but anyway here's one from my '78 manual (see thumbnail). There may be minor differences between our AFMs, but I bet the boards are largely the same. If you've had E&M and a bit of EE, then I'll trust you know how to read the schematic and sum the resistances. But as you can see, it's all in series. Another contact you might not have considered is the one between the wiper assembly and the little contact point that hovers over the assembly. I don't know if that's clear. I honestly missed that one myself and didn't think about it until today. But again, I can't stress enough, it's the voltages, not the resistances. I bet the ECU's input impedance for this circuit is at least 10-20k, if not higher. I doubt any added contact resistance on the wiper assembly amounts to a hill of beans. Anyway, if your AFM is off, but the potentiometer is still reading smoothly, you can fix it very easily by changing the resistance between 8 and 9. You can either add resistance between the board and the #9 terminal to diminish the U/Ub ratio, or you can add resistance in parallel to increase the ratio. Food for thought. I'll shut up now. Good luck with it, whatever you do.
-
I think I can actually make out a few parts of the original 280Z! Seriously, the side pipes look nice.
-
Oh, and I forgot, to do the test, you will need some test leads from Radio shack. You will probably need some test leads with alligator clips. You might need to make your own. Just get some wire and a bag of small clips. You'll also need a soldering iron and some solder. This is a great opportunity to learn to solder. (Very easy.) I'd make myself 4 leads with clips on both ends, just for general purpose (to have in the future). You'd have one from the #6 to your battery's (+) (might need a bigger clip), one from #9 to ground (I might have #6 and #9 backwards from what the FSM says, but it really doesn't matter for this test), one for the #7 to one of your test probes, and one for the #8 to the other test probe. Or you can save a test lead (3 total) and just hook the (-) test probe lead to your car's ground. (You'll get different voltage readings, but all you want to know is whether the variation is smooth from bottom to top.) OR... Maybe you could do this test in situ: Plug your AFM in. Hook the (-) probe of your mechanical meter to a chassis ground. Turn the ignition on, but don't start the car. Touch the (+) probe to the wiper assembly (the contact that hovers out over the top, and then observe the voltage as you move the vain. It might be tight, but you might have enough length on your harness to do it.
-
It might also be that there's some extra resistance between the potentiometer wiper and the surface of the carbon trace. In other words, that contact might not be completely clean. In fact it might just be the nature of the beast that there will often be a bit of random resistance between the carbon trace and the wiper, so that measurement might be somewhat meaningless (the reason they don't tell you to take resistance measurements off of the #7 contact in the FSM). Again, and I can't stress this enough, it's the voltage that matters, not the resistances. The AFM inputs to the ECU are probably very high impedance, so that the wiper-to-carbon-trace resistance wouldn't matter very much at all. They probably have the #7 pin of the AFM wired directly to the input of a voltage follower circuit on one of the ECU's boards. So if you follow the FSM procedures, you would confirm the 6-8 and 8-9 resistances (and check your work by ensuring that your 6-9 measurement is the sum of the two) and then hook the AFM up to power to see if you have smooth voltage fluctuation from bottom to top as you move the vane. To do this, I'm pretty sure you will need a new multimeter, as I think you would have a digital one. You in fact need a crappy needle-type meter (e.g. Radio Shack for $15) like they had back in the 70's. The crappier the better (as crappier meters don't have damping in the movement). Then move the vane slowly and see if the needle moves slowly (as it should) or whether it has points where the needle jumps (indicating a faulty wiper-to-carbon-trace contact or (theoretically possible, but never seen it) breaks/gaps in the carbon trace. The crappy meter won't be a waste of money. Throw it in the glove compartment for roadside emergencies. Trust me. Please.
-
Jenny, all I can tell you is that the resistance of two resistances in series is the sum of those resistances. This is the gospel according to Ohm. Praise be to Ohm. Seriously, I am dead certain on this. I couldn't be more certain. It's as basic as the question of how many money you would have if I gave you $3 and Eric gave you $2. You wouldn't have $6. Although I'm a neurobiologist by training, electronics has been a lifelong hobby. Furthermore, I went to a very prestigious college (in the company of thousands of other nerds like myself), and I sailed through freshman physics (where this was covered) easily within the top half a percent of the class. Electricity and magnitism was one of my favorite subjects. So I'm really, really quite certain! I promise! Ah, but people on the internet can blow hot air. Lemme find something more authoritative for you... Here you go.... From Wikipedia... http://en.wikipedia.org/wiki/Series_resistance#Resistors So if you believe me (and you really should), there's an error somewhere in your measurements. It might have to do with the measurement point. It could be, for instance, that there is extra resistance from corrosion in some internal connection in the AFM, perhaps from the potentiometer board to the backside of the connector (if that's where you're taking your measurements). Wherever it is, there's an error. That might be the source of your metering problems too, ya' know! I'm just trying to save you some serious money.
-
Hmmmm.... FAIW, the tach and ECU have something in common. (I'm assuming your ZX is similar to my '78 Z, which I think it is.) The ignition module drives the (-) post of the ignition coil, grounding it to generate a spark. The (-) post then has a wire leading to both the tach and the #1 pin of the ECU. The input to the ECU is used to time injector pulses. If there's no signal, then no fuel is delivered. I suppose it's possible the ECU could detect a no-run condition by sensing no spark, at which time it could kill the fuel pump relay. The '78 doesn't work that way, but your ZX might. Dunno. Only speculation. But I think you should trace out the mutual ignition coil (-), tach signal, ECU trigger connection, which I believe might be a crimp connection embedded somewhere in the wiring harness. Oddly, the crimp would be wrapped in black electrical tape. (That's how branch lines were done at the factory.) I bet that's where your problem lies.
-
Cool! Glad you could find them in stock.
-
Ah, the kick test! (Why else would they name that the kick panel?) Seriously, you might undo that big connector on the ECU and clean the terminals. If that doesn't solve the problem, you might try re-flowing all the solder connections on the ECU circuitry boards. ZTrain had an ECU with some solder joints that had fractured and gone cold.
-
PS I saw you blog at hungry4power.com. Any relation to smokingwheels? http://www.classiczcars.com/forums/showthread.php?t=18631 It's just unusual for a California car to be in such bad shape that you'd have so much rotten rubber ripping and flying on the same drive. I'd think it wouldn't have passed inspection in the first place.
-
If I were you, I'd replace ALL my belts and hoses, so that this doesn't happen again. As pointed out, heater hoses are generic. You can get the formed radiator hoses from your local auto supply. They can look them up on their computers. Just remember to tell them it's a NISSAN 280Z, as their computers won't have "Datsun." They might have to order the hoses in. It should take a day or two. They can also look up your belts, and they should have those in stock. BTW, if you have an AutoZone in your area, you can use their website to find parts. You can register your car at www.autozone.com, and then when you do a parts search, you'll find parts specific to your car. Most auto parts stores can get you most routine items for your car. Just tell them year/make/model, and they'll find almost anything you need.
-
Jenny, your big drop in RPM might have something to do with the cold start valve shutting off. I don't know how long it stays on, but it's an on/off sort of thing (and not gradual). You might try unplugging the heater on your air regulator and see if you still get that big drop at approximately the same time. If I'm right about your cold start valve being the doodad that's changing your idle, that would be another check mark in the "lean running" column. Jenny, I've had a look at my 1978 FSM. There may be differences between our models, but the AFM and ECU should work approximately the same. Our FSMs also might be a bit different in the explanation given for how the AFM constructs the signal for the ECU. Mine says, "...the angle of rotation of the flap is monitored by a potentiometer provided inside as a potential difference U. A circuit diagram of the potentiometer is shown in Figure EF-13. When the flap deflects along with a change in the intake air flow rate, the terminal 7 mounted ot the flap shaft slides on the variable resistor R from R1 to R9, causing the voltage across terminals 7 and 8 to change. A constant voltage Ub (battery voltage) is applied across terminals 6 and 9. Then the air flow rate is converted into the voltage ratio signal U/Ub, which in turn is sent to the control unit for computation." Anyway, given this explanation, it's indeed voltage ratios that are important to the ECU, not resistances. Then I had a look at the mini-schematic of the AFM and your resistance measurements. You measure 74 Ohms resistance from 6-7, 200 Ohms from 7-8, and 226 Ohms from 6-8. The good news is that you're WRONG! Your measurements don't add up right. Your resistance from 6-8 should be the sum of your resistances from 6-7 and 7-8. And in fact you're reading on the high side. Soo how would your measurements have come out this way? My guess is that you didn't get clean contact between your meter's probes and the terminals on your AFM, so you would have gotten added resistance at the junction between your probes and the terminals they were touching. This is a common problem for lower resistance readings. When you touch those terminals, you have to touch them very firmly. In fact most probes have pointed tips, and you should try to poke the point firmly into the metal, usually with the same pressure that you could apply to a #2 pencil point without breaking the lead. (That's not always possible.) The other possibilities are that your meter is inaccurate or your probes are bad. When you touch the probe tips together, you should read zero Ohms. If you read some resistance above that, you can subtract that resistance off of any of your readings. Anyway, I'm going to bet that you'll find something very different if you re-take your measurements with more pressure on the probes and/or cleaner contact points. As for what you would NEED for your AFM to work properly.... Hmmmm.... The FSM only cites two measurements -- from 6-8 (180 Ohms) and from 8-9 (100 Ohms). If I were laying out Nissan's diagnostic procedures, I think I would have used different measurement points. I'd have used the resistance values corresponding to U and Ub, namely 7-8 and 6-9, respectively. One can infer 6-9 as being 280 Ohms (an easy number to remember!). Then normal values could be established for 7-8 with the flap fully closed and fully open -- and even for points inbetween, marked on the potentiometer board itself. That would have been great. But that's not how they did it. ANYWAY, what you need to compare to others is the ratio of your resistance from 7-8 and the resistance from 6-9 (which would correspond to the ratio of voltages U/Ub, which the ECU uses). Taking your measurements at face value, you've got 200 Ohms from 7-8 and 626 Ohms from 6-9. The resistance from 6-9 is (or should be) the sum of 6-8 and 8-9, which would be 352 Ohms. Your measured ratio is therefore 200/352 = 0.57. Taking your 7-8 of 200, against the ideal total resistance of 280 Ohms, this ratio would be 200/280 = 0.71. However, again, your resistances don't add up correctly. Anyway, the up-shot is that you might want to compare 7-8 with 6-9 on a known, correctly running AFM. I'd help you if I could, but my AFM might not be correct. (I've realigned the wiper position just a bit.) You need measurements off of a completely unmolested AFM on an engine known to run correctly -- probably from one of our friends in California or another emissions state (since those cars actually get sniffers shoved up their tailpipes). And again, you need to re-take your measurements! They should all add up, give or take. So if you add up 6-7, 7-8, and 8-9, that should be the same as 6-9. If your margin of error is 5%, I'd say you're probably good. Well, I HOPE that's good news. ;-)
-
The first magnet valve doesn't make much sense. That valve is broken on my car, with apparently no replacement available, and I had this exact conversation some time ago. I couldn't figure out any real need for it, and neither could anyone else. My system works fine without it. That said, I do believe the accumulator (football thing) and the check valve are probably necessary. Your engine vacuum goes up and down. If you were to climb a long, steep hill at WOT, for instance, your vacuum would be quite low, and without the football and check valve, all of your actuated heater doors and whatnot would relax. That certainly wouldn't be the end of the world, but it would make more sense functionally to have the football and check valve to give you a very high vacuum approximately on a continuous basis.
-
Jan, by "HVAC vacuum control port" I mean the fitting that would be in your intake manifold if you didn't have the hole plugged. On my '78, there's a vacuum line that controls the air handler inside the dash. It runs to the mode switch (AC, vent, heat, bi-level, def, whatever) and opens and closes doors, stopcocks, etc. as needed. The mode switch is simply a complicated air valve that diverts vacuum where it's needed. Your air handler might be controlled differently. I don't know. If you can move the mode lever while the engine is off and hear/feel doors and parts moving around, then perhaps it's controlled somehow by wire, and not by vacuum.
-
Well, I guess I should have said you could take it to my locksmith. These are approximately the prices I paid.
-
You should have told him, "That's not a Corvette! That's an RX-7!"
-
^^ What Steve said. Jan, it's interesting that your HVAC vaccum control port is also plugged. It's the plug in the intake manifold maybe an inch from the vacuum line to your brake booster. I forget on the '76 (I used to have a '75) whether the air handler is controlled by vacuum. Do you have hot air from your heater?
-
Marshall's suggestion sounds good, but if your ignition lock is doing this, it's probably in pretty bad shape anyway. Heck, you could start many of our old Z's with a house key, screwdriver, or perhaps even a popsicle stick. It would probably be a good investment to have new locks all around. You can take your lock to a locksmith and have it fitted with a new tumbler for about $45. It will be like a new lock. There was also a recent thread (perhaps a month ago) in which there was a link to a brand new, complete ignition lock (including switch) for maybe $60. That's a fantastic deal, and if you can find it, I'd jump on that one. Whatever you do for the ignition lock, you can get a locksmith to rekey some door locks and a hatch lock for you, so that you have the same key all around. I think I bought a Nissan hatch lock (somewhat over $100), two Taiwanese door locks off Ebay (The locksmith told me all locks tend to be Taiwanese anyway) and a new Taiwanese ignition tumbler for a bit more than $200. I think he kept the hatch original, keyed the ignition to it, and rekeyed the doors to it. Money well spent! Then juice your locks with WD-40 at least everytime you change the oil, to keep them in good condition.
-
There's no need to check two other places, but if you feel inclined, you can pull that little looped line towards the back end of your intake manifold, just next to the larger brake booster vacuum line. That's where I hook in my gauge. That's the vacuum supply to your heater/ac controls, so the engine won't run incorrectly with that hose disconnected (as long as you have something else on the nipple, like your vacuum gauge).