Everything posted by Joseph@TheZStore
-
KONI Sports for Classic Z's
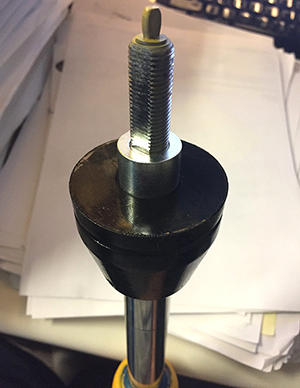
Zed, we respect that, but we're talking about a custom setup, and it would be 100% the same regardless of whether they use a Koni or any other strut cartridge. There are many different custom mount options and types we've seen, and most of them would require their own separate solution. And on many, like those with rubber at the top, or camber movement, the washer-type solutions wouldn't work at all. We'll talk to those custom mount manufacturers we know about options for their products. For most, simply holding the shaft gently has been successful, since the torque spec needed isn't much. Of course Koni has to stress that if you're not extremely cautious, you can damage the shaft. For instance, many I've read after simply suggest using pliers and a rag, which is strongly not recommended at all, as it is too easy for the teeth to get right through the rag and cause damage. The rubber used should be solid and fairly thick to completely protect the shaft from damage. On many of the custom mount options we've seen, a crows foot would not work as there would be no room to drop it down to where the nut is (like our street camber plates). However on those where the nut stays near the top and is accessible, then yes, that would be a great option, thanks for suggesting it.
-
KONI Sports for Classic Z's
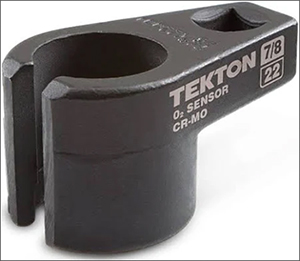
While these Koni's were designed for the stock equipment at the top, Koni is progressive when it comes to performance items, like lowering springs, and custom top mounts, and always try to find a way to make it work, unlike some other companies. If you have chosen to use a custom mount (pillowball, camber plate, etc.), then hopefully these suggestions will help. One of the Koni techs had a chance to respond this morning: "The idea of using an impact is never recommended. Doing so over the strut nut is essentially a guarantee to destroy the strut internals, or at very least the threads. Using a layer of rubber to protect the rod and set of pliers or vice grips is another option but extreme caution also needs to be taken to ensure the rod is not damaged or marred. If using this method it would also be a good item to hold the shaft at the highest point possible near the upper mount. Try to grab at an area on the rod that less likely to pass through the guide seal during normal compression stroke." Other thoughts: jonbill said "make a washer with a D shape hole and bond/weld it in to the top of the top mount." This could be a great idea, depending on what tops you are using, especially if you may need to remove them often for racing or some other reason. For those skilled in welding, you might even take your custom top mounts, and weld a small piece of metal at the opposite of the D shape. But since the torque spec is so light, even a simple bonding as suggested would be enough to hit the necessary torque figure. Using pliers and some form of rubber or protection is a time-honored method. Great suggestions we've heard include what AK260 said (cutting a rubber hose from the valve cover breather/etc.); or using an old serpentine belt from the family sedan; or a good rubber hose section or two. Another option, completely depending on the configuration of the custom mount you are using, might be tools like an oxygen sensor "wrench", if you can find one in a matching size and height that you need. If so, you can use it to torque the nut, and above it either use two nuts to lock the shaft using a wrench, or perhaps the rubber-in-pliers method at the top, not going anywhere near the lower part of the shaft. Many setups won't have room for this option. For all of these, just keep in mind that if you are using a custom mount setup, it is still your responsibility to ensure the shaft isn't damaged, so always use extreme caution.
-
KONI Sports for Classic Z's
Hello JagoBlitz, while Lee is currently unavailable, he did get the Koni engineers to confirm. They said if you are using some coil over or other custom top or replacement for the mounting insulator, which does not have the "D" shape, if it has room for two additional nuts at the top, you can "lock" those together to hold the shaft, and use special wrenches to tighten the nut below them. However we would add that since many or most custom setups won't have enough room for 3 nuts, then jonbill's suggestion is a good one. We also know of some who have used strong hands and gloves to simply "hold" the shaft in place. Many have tried a "protected" pipe wrench, which is not recommended.
-
KONI Sports for Classic Z's
Thank you Kent. By the way you described it, and with the springs you mentioned, I believe you'll be very happy with the range on these cartridges. Be extra cautious in regards to overheating the struts, and if you've not done anything similar before, it might be worth checking with a technician or machine shop who has. The key things are a sharp wheel, level cuts, and cooling it down often. Heat could really screw up what is in that cartridge just a few mm away. Let us know if you have any issues.
-
KONI Sports for Classic Z's
Hello Kent. Those are the correct strut cartridges for a stock 240Z front strut housing/hardware. Unfortunately they are not designed for Ground Control coil over kits. GC sells specific cartridges to fit in their kits, and whatever cartridges they are labeling as "Koni Yellow" are not the same as our Koni Sport (Yellow) struts, so they are either a different type of Koni strut (not Koni Sports), or they are from another application entirely (BZ3038, for instance, were for 280ZX front). Even though they do not section the strut housing to shorten it for lowering the car (assuming that is what you meant), that doesn't mean the whole kit hardware is designed for "stock" 240Z strut cartridges. In addition to the height of the cartridge, the cartridge you need is also dependent on the strength of springs you will be using with the coil over kit. Do you know the springs that are on the second hand kit you purchased? I'm not sure if anybody who has ordered the Ground Control kit can tell you what number of Koni strut cartridge they were sent from GC, but they are not 240Z front Koni Sport Yellows as we sell. If you are not racing this car, and want to use these with your Ground Control front coil over setup, and your measurements indicate that removing part of the "nub" would be enough height, then it is possible, although not recommended, and one would need to be very careful. The warranty would be void for modifications, just like it is for racing applications, so consider carefully if you decide to use these for a custom setup. Here is what a qualified technician said: Again, if this is a race car, or you have a specific level of "race" type performance in mind, Ground Control has strut options designed to match the "race" strength of the springs, AND fit with their specific hardware/camber plates/etc. Let us know what you decide and how we can help.
-
Putting in a replacement L-28
Zed, as far as we're concerned, we always appreciate you looping us in. Thank you for doing so. We'll always try to come up with the best option as far as shipping and delayed items are concerned. With all the supplier issues it has been much more prevalent and difficult than usual these past two years. On more orders than people might think, where we've screwed up and had to reship something, we often end up losing money on those orders. It is part of doing business, but Greg is working hard, every day, to get parts here from literally all over the world to ship out, and we're working on making certain everybody knows all of their shipping options. Thanks again for alerting us. As a side note, James is unfortunately no longer with the company, I'll be asking Mike to remove that account to alleviate confusion.
-
Putting in a replacement L-28
Sorry for taking so long to respond. There is no excuse for what you've reported, all we can offer is our apologies. Getting quality shipping staff has been a struggle for many years. Unfortunately, the pandemic has only made it worse. We're training a new person now, and hope such packing errors are a thing of the past. With millions of possible combinations of parts, training is a long term effort. None of this helps or excuses what we did to you of course, and what you've described should be simple common sense, but it is something we continue to work on. As far as the email contact, I can see the email that we did send on June 15th, in the (failed) attempt to let you know about the 2 items that we hadn't received. If you do ever choose to give us another chance in the future, when you don't see an order confirmation email in your inbox or spam folder, after you place your order, please let us know. As far as the older order you mentioned, your account we have now only goes back to 2020, so we assume we had you at a different address before, and duped your account by accident. If you're willing to help me find that order, please pm me. Sorry again for the inexcusable shipping problems, and thanks for all the orders you've made. Hopefully we'll get a shot to help you in the future.
-
Putting in a replacement L-28
Sorry to respond so late, and muddy the current thread discussion. Things have been quite overwhelming here, we're trying to dig out. First of all, nice job on the Z so far, and it sounds great! Thank you for your patience with us. The email issues have affected many companies. Places like Yahoo flag a domain as spam, with no explanation, and no recourse. We did send you an email on October 13th (that obviously went to spam or disappeared into cyber-oblivion), that the intake and boot were delayed from the manufacturers, and that we would ship it all together when all items arrived. So our apologies as we should have followed up with you when we didn't see an email reply. Sorry about that. It is definitely something Greg is working on as we get new sales team members up to speed, and hopefully (soon) find a few more, so they aren't overwhelmed all day long. We have also recently been trying to call, in addition to sending emails, which can be tricky as many don't want to be bothered with phone calls. Unfortunately we're still waiting for the other items you ordered. Just call our sales team anytime for the latest we've heard from the manufacturers (side note: Your most recent order left yesterday, just in case you're not getting the tracking emails either. If you didn't, if you can help us out, please check your spam folder and let me know if our emails aren't in there). As far as successfully getting out of our old systems and into new ones where inventory can be shown, that has been the most difficult of all, a long story, and that one is on me. I will say that we have what we hope is a great new company working on things now, and are very hopeful that they can get it all figured out relatively soon. Thank you for all of your orders, kind words, and for having mercy on us.
-
KONI Sports for Classic Z's
I can't speak for the Koni engineers (and I'm certainly not one, lol), but as best as we understand it: The strut insulator does not impact on the Koni sleeve either way it is installed. The insulator impacts on the strut bearing in the front (or the strut spacer in the rear), and they in turn impact on the top of the spring seat. The Koni sleeve sits slightly under the top of the bearing or spacer (otherwise it would grind when you make a turn), and is not impacted. The bump stops were originally bonded to the underside of the spring seat. If you bottom out, the bump stop takes the impact between the strut body (Gland nut) and the upper spring seat, the Koni sleeve is in-between and isn't impacted either way. As far as damage to the bump stop, that is an engineer question for sure, but it *seems* like the only time there is pressure on the bump stop is when it bottoms out, and then all the stress is between the top of the bump stop and the spring seat, and the bottom of the bump stop and the Gland nut. I'll try to get this discussion seen by those engineers to get their corrections/thoughts.
-
KONI Sports for Classic Z's
You are exactly right, sorry about that, I had forgotten all about posting that previously. I blame 2020, lol... Koni made this setup with the sleeve because that is the way they did it back in the early days. So for these struts, they copied that same setup. Koni told us that originally it was done that way as some coil over kits would not work with the diameter of the shaft, and they therefore chose the sleeve design so it could be optional if necessary for custom setups/coil overs/etc. (Koni always tries to think of racers as well as enthusiasts whenever possible). When the image on the left was posted, we had queried Koni and they agreed that was a proper way to set it up, and will work fine that way. When our drafting-talented customer made the image on the right, we queried Koni again about it. They had the engineers (i.e. smart guys) go through it all again, and their final determination was that once the weight of the car is down on the setup, it matters not which direction the sleeve is placed, as it ends up functioning exactly the same while in actual use. So if you install/installed them with the "flange/ledge" at the bottom, all is well. If you install/installed them with the flange/ledge at the top, all is well. The smartest guys in the room determined that it makes no difference. I'm sure people will add their own thoughts, which is part of what forums are great for. In our own non-engineering minds, having it with the ledge at the bottom might hold the bump stop (at least our urethane bump stops, which we recommend with these struts) in a bit more favorable position. At the same time, having the ledge at the top might work better with different bump stops, and to be extremely non-technical, "looks" better and more natural to us, and might make initial installing slightly easier due to the pre-compression height of the parts while installing (possibly useful if you have stubby fingers like I have). But literally, direct from the Koni engineers, when it comes to how the strut assembly functions, the "ledge/flange" part of the sleeve is irrelevant as to position. Both are Koni engineer approved.
-
KONI Sports for Classic Z's
John, let us know when you're back, and we'll go from there for Gland Nut measurements, and/or getting them back here. As far as the ones you used, as long as the ID of the inner opening that seats down on the strut matches extremely close to the top of the KONI, we would assume you'd be ok, but there may be factors we're not thinking of. If there is any movement at all, the damage could grow over time. We'll figure it out.
-
KONI Sports for Classic Z's
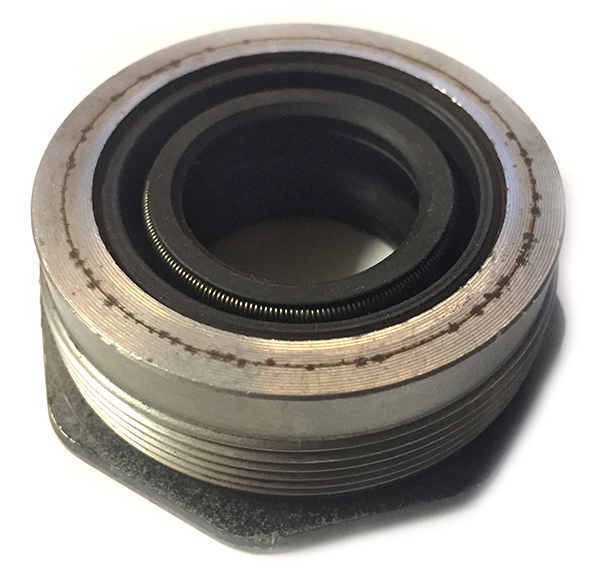
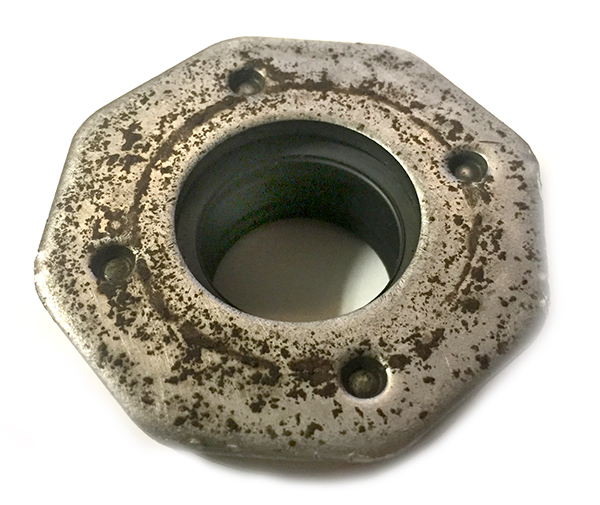
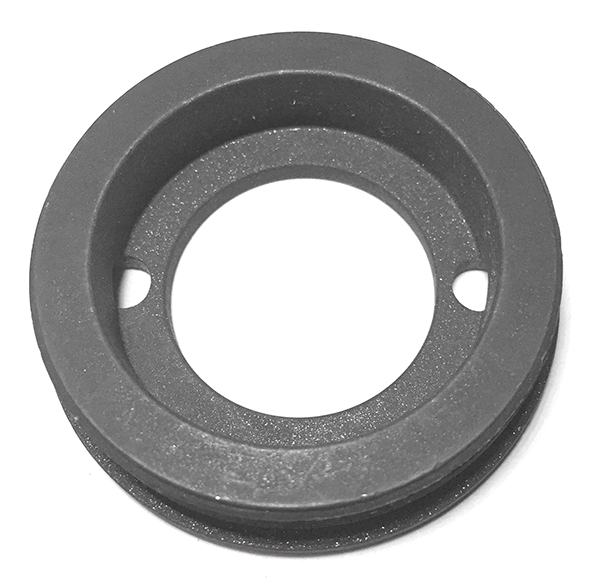
Sorry you’ve had trouble. One manufacturer’s Strut Cartridges should not be used with another manufacturer’s Gland Nuts, so let’s see what we can figure out. Which Gland Nut you used there doesn’t necessarily matter to what we’re trying to figure out here, but to cover all the bases, the one shown in your video is not an original Nissan 280Z Gland Nut. The original nuts had seals to keep the oil fill inside the shaft where the plunger rod was, and it would not fit down properly on top of the strut cartridge body (I was curious to see if we had an original Gland Nut here, and found one, so included images in case others wanted to see them). When manufacturers started making physical strut cartridges to replace the original non-cartridge setup, they all included their own specific Gland Nuts, as they needed to match the shape of the top of the strut body. Just like with Koni, that Gland Nut is the exact inverse of the top of the strut body. Depending on what strut cartridge manufacturer made that Gland Nut, it may or may not be fitting well on top of the Koni strut body; which, if not, could allow strut cartridge movement and damage. The only way that a Gland Nut could slip when tightening would be if they somehow were incorrect nuts (difficult to imagine, but not completely impossible that some random Koni application has Gland Nuts that are nearly identical but just slightly smaller, and were mistakenly put in the box), or if the threads are damaged on one side or the other (which you said the threads weren’t), or there is damage to one part or the other (even stress/wear/cracks/stretching/damage to the strut housing tube itself). Also, in your video the top of the housing seems to be shiny clean as if machined somehow. It may not be relevant, but do you know what was done to the top of the housing tube there? As far as the Gland Nuts you received, if you are able to measure them for us, knowing the exact dimensions and thread pitch/details would help us try to figure it out. Otherwise we could also just get those back here from you and confirm if they are correct. Since the Koni Gland Nut is the exact proper fit for the Koni Strut, then we should see what can be solved so that you can use Gland Nuts that hold the Strut Cartridge in the proper position. Let us know. (the first two images are of an original Nissan Gland Nut (with seal), and the third is the underside of the Koni Gland Nut shaped to fit the top of the Koni cartridge exactly)
-
Reproduction E-Brake Cable failure -70-78 Z
That is the one from Thailand I was referring to in my email discussion with you. Unfortunately he doesn't sell wholesale or bulk. We hope to have some additional options (much less expensive than the actual reproduction version we currently sell) available soon.
-
Reproduction E-Brake Cable failure -70-78 Z
No product failure is ever welcomed, and we will certainly be talking to the manufacturer about this one, and continue to monitor them. We're of course very sorry that both of your products had obvious issues. We have sold over 180 of them since 2016, and these are the first two alerts we know of concerning this issue (possibly 3 assuming the one from Hybrid was the same manufacturer, which is hard to tell for sure, since there have been a few similar options on Ebay over the past couple of years, some of which are no longer around). Hopefully it is not more than 2-3 out of 180 and not indicative of a mass or new problem, we'll certainly look carefully at the next batch we receive. As far as we know the rest of the 180 that were installed are working fine to this day. If other members have had the same issue with this style, please let us know. Certainly Greg and this company have not stayed in business for over 40 years by ignoring reports like this, they are all taken seriously, and again, we'll make sure the manufacturer is aware of it. We do apologize, Madkaw, for the delays. Being severely short-handed for over a year now, Greg himself is having to take care of all the returns, along with a number of other missing staff positions, and we have been quite overwhelmed and behind. Sorry that it took extra time to get everything processed. We're working as hard as we can, and working hard to find more team members at the same time. We of course responded personally to zKars, and are processing his refund now. As a side note, unfortunately James has been on a leave of absence since mid last year, so if you have, or do, try to message him, unfortunately he won't see it. We're also hopeful that James might be able to return at some point.
-
KONI Sports for Classic Z's
Thanks Zed, always appreciate you looping us in. Lee already knew, as Koni has been conversing with this customer directly this week. Lee himself will be in soon with a direct response. James is on a leave of absence, which is why there haven't been any responses from him for a while. Thanks again!
-
KONI Sports for Classic Z's
Lee from KONI has been made aware of these things. He is getting caught up (I'll never complain about my flooded inbox again, since he said his had around a thousand messages, sheesh!) and will be coming in soon for the following: 1. He has a simple something-or-other for those who for some reason need a longer adjuster knob. As far as we know, for the many hundreds that have sold so far, only two Z-Cars have had the issue of not being able to reach with the knob for some reason. We honestly don't know why at this time, but hope to research it and find out. Lee was gathering the information he had on his fix, and will share that soon. If anybody else has this issue, please let us know at (800)633-6331 or info@motorsportauto.com. 2. Lee and his engineers are looking at Madkaw's situation. Since that is miles above my pay grade, I'll leave that to Lee and his engineers, and look forward to what they have to say. He may have some other things to address, but those are the highlights. As far as what you said Madkaw, yes, we sent them O.E. 240Z, 280Z, and 280ZX strut housings, just to confirm everything. They already had the proper sizing from all the years they did the Reds, and this was just to confirm, which they did. As far as grinding the inside of the strut tubes, that was a misunderstanding on us. We should have been more clear that we've heard of many struts (and have some here in the building) where there is a hardened gunk buildup at the bottom from years of oil and such. That is often needed to be cleaned out, often by "grinding" with something to break off the gunk. However, grinding of the metal at the bottom of the inside is not something anybody should do and not what we intended to convey. Again, our apologies that we "muddied" that up, pun intended. Thank you for your patience on this Madkaw.
-
KONI Sports for Classic Z's
Man, Koni has a lot of events! Lee had to go back on the road to another one before he could finish catching up on all requests and so forth. I believe he gets back mid next week, but I gave the impression here that he was back and soon to be jumping in, which was inaccurate. My fault, sorry for the confusion.
-
KONI Sports for Classic Z's
Definitely not 4mm in my image. Just made that to be clear and confirm to everybody what the measurement was supposed to be measured from and to. I think Lee may be back but I'm sure is trying to unbury himself. I hope to get some confirmation before the end of the day (I'll try anyway).
-
KONI Sports for Classic Z's
Sorry if whom you spoke to sounded as you describe. We're all a bit hair-on-fire trying to keep up with short staff, but that isn't an excuse. 1. Please private message me about who you spoke to here. 2. Before I (and/or Lee) respond to the rest, I need to confirm that the image you included is torqued down; and using the diagram I included below, you're saying on that strut the same gap is 6mm? It is hard (for me anyway) to tell from your image. 3. Well over 90% of the 240Z's, including many 70-71's, have been within the 4mm gap tolerance with the original gland nut. So far, of the very few single digit numbers of anomalies we've heard of, the modified KONI gland nut has brought the gap back into their prescribed tolerance of 4mm just fine. Yours would be the first to not be solved. 4. Please do not grind anything until I (and/or Lee) get back to you. Thank you for your patience.
-
KONI Sports for Classic Z's
Sorry folks, you may have seen the note we put up in our store, this Covid thing has forced a couple more guys to step down to take care of family, including James temporarily, and we were already short on warm bodies, so we've been a bit overwhelmed, but still standing and swinging. We have a couple of new guys starting soon, both of them Z owners, so if we've missed any of your emails or messages know we're working hard to get caught up. I was able to check in with Lee between his recent business trips. He is traveling (again), and having log-in issues, but I mentioned the Stainless issue to him and he said that the hardware is chromed steel, not stainless. Now that discussion is above my pay grade, lol, so I'll let Lee pick up any further questions when he gets back. It has already been answered previously, but that disc is completely there just to avoid possible air damage to the seal, by giving paths for the air to move freely if the bump stop comes all the way down. I guess they used to see it happen way back and thus came up with the disc as a simple yet fully effective solution. One of the projects that has suffered with the current situations is making a picture-gram of how the pieces go together on the strut just to add clarity. The sleeve and the bump stop go together like this image I took. I believe this was also described early on in this thread, but I never made it to making that diagram/image. Sorry about that. I'll make a real one soon with all the pieces. Then instructions are also something Lee is looking into, but those wheels turn pretty slow, especially with our current world. Somebody said it was done like that to make it work for all languages, which is exactly correct. We hate to see that anybody had any trouble with their struts, but it is great to hear from so many who love the performance. Ok, it's nearing 10:30 pm here in SoCal, back to answering more emails!
-
KONI Sports for Classic Z's
Hopefully that takes care of it, just make sure that when you torque them down, there is a 4mm or smaller gap between the housing top and under the gland nut flange. If anything doesn't seem right, just contact us directly. Thanks!
-
KONI Sports for Classic Z's
Hello @fyrst.z, like Zed said, the gland nuts definitely are specific to the struts, and you should use the Koni gland nuts. If you have one side of the front that threads and the other side that doesn't, that definitely could be, also as Zed said, decades of dirt and oil that create a "spacer" down there, so check that as well. The only other options would be non-matching strut cartridge heights, which will be fairly easy to check, or damaged/modified/mismatching strut housings. Struts, whether Tokico, KYB, Koni, are different heights, and they all have different gland nuts to go with them. You show an image of a strut installed with what looks like a KYB gland nut, we assume you are not using those gland nuts on the Koni's. When you're certain there isn't a buildup to scrape out of the bottom of the housing tubes (it isn't easy, unfortunately), and if then using the Koni gland nuts you are not able to torque them down to a 4mm gap, regardless of side, just give our sales technicians a call at (800)633-6331 or (714)639-2620, or email if you prefer at info@motorsportauto.com, and we'll get things figured out.
-
MSA Wheel Bearings?
Sorry for the slow reply. While all brands are always subject to availability, the wheel bearings we've had for a good while now are Koyo (Japan). They have been excellent quality so far. If you have any further questions you can always ask James@thezstore directly for a faster response ?
-
KONI Sports for Classic Z's
Jonbill, another helpful confirmation would be to see if you can get the numbers off of the strut housings, and we'll check from that angle. What else was telling you that the build date might be earlier?
-
Datsun Art Christmas Cards
Most of you know Hector Cademartori, the renowned Automotive & Racing Artist, and have seen his great work. We have many of his creations available on our website. Some may not know that he makes a Classic Datsun Z Christmas Card every year. With all of the same old winter scenes and Christmas trees repeated over and over most years, these cards are a fresh option if your family sends out Christmas Cards. They also make great collector's items. This is the fourth edition Hector has created (these are prints, the original of course was painted by hand). Here is what the Artist had to say: The Christmas cards are the highlight of my year. I produce five or six every year for different clients, all of them involving cars or motorcycles, and I've been doing them for over 25 years. Since Christmas cards don't have a commercial target (beyond their retail price), I have plenty of freedom to come up with situations involving Santa Claus, his helpers and all the elements of a Christmas scene around cars and motorcycles. It's fun to come up with new ideas and enjoy adding elements in the background pertinent to the subject matter. I get comments from the most observant in the audience about a poster on the wall or a little racecar in a dark corner. For instance, in this year's art I included a toy fire truck. It's my friend Dan Banks', a well known Datsun collector and historian from Maryland who owns the real thing. We included some sequences from rough sketch to final art. Thought they'd be of our customers' interest. This is my fourth Datsun Christmas card and I look forward to next year's design. Merry Christmas and Zeason's Greetings! Hector Cademartori Find all 4 different editions here.



 Vendor