FricFrac
Free Member
-
Joined
-
Last visited
-
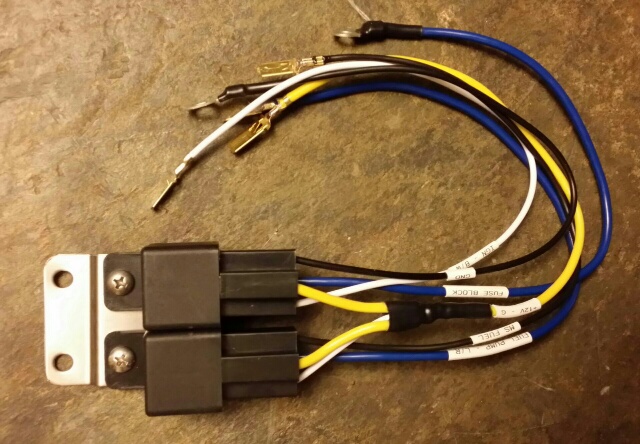
I've designed and built several Mega Squirt harnesses for various Datsun projects. I'm an Electronics Engineering Technologist so I've designed these harnesses for optimal noise immunity with high grade wiring to provide you with a highly reliable backbone for your Mega Squirt EFI system. Electronic noise can cause all sorts of gremlins in your system. To eliminate these issues all harnesses are configured with a robust grounding system as well as shielded cabling for all sensors. The wiring is heat and chemical resistant to provide you with years of trouble free use. EV1 connectors for the injectors use the quick disconnect plugs for ease of installation and removal – no more fighting with wire clips. The basic harness is designed to plug into the stock sensors and injectors found on a stock L28ET engine. This includes the injectors, 82-83 dizzy with optical encoder wheel (allows the use of stock or custom encoder wheels), TPS (after market – stock is a throttle position switch – MS requires a throttle position sensor which is a potentiometer rather than a switch), CHTS, Knock sensor (wired to main connector but not hooked up – MS requires extra hardware for the knock sensor), ignition coil, IAT (after market – stock IAT is built into the AFM but should be removed due to air restriction – MS uses a MAP sensor so the AFM is not required) and WBO2 sensor and power. Connectors for the IAT, TPS and WBO2 will vary from installation to installation so the buyer can provide their own connectors for installation during the build of the harness or install them on the prepped associated cabling. Spares can be run for extra power, etc as requested. Harness also includes two relays. One will provide power for an ignition enabled fuse panel which will provide fused power for the MS ECU, injectors, ignition coil, WBO2 and fuel pump as well as spares for additional power nearby the ECU. The second relay provides ECU control and powers the fuel pump. This can be configured to plug directly into the stock body wiring harness on the 280ZX and control the stock fuel pump using the stock fuel pump wiring if requested. Optional custom cabling such as COP/CNP distributorless wiring is also available. Typically the connectors will be installed with filter caps in close proximity to the COP/CNP connector to eliminate back EMF from the coil discharge and integrated into the harness. Custom lengths and spacing for connectors can be built to the buyer’s specification. Basic harness is $550 including harness relay system. Basic customization is also included in this price. Additional cost for extra sub harnesses such as the COP/CNP is typically about $150. I can also build and test your MS 2/3/3x ECU and load a base tune but this will be limited to my time schedule and number of custom orders. This will allow the buyer to plug in the harness and ECU and get the car up and running (provided the car is mechanically functioning correctly) with minimal fuss. A proper dyno tune is highly recommended for optimal performance. If you have any questions please feel free to contact me.


-
Just got some new connector kits in. I would like to donate the proceeds from the next two kits sold on this forum (minus $10 shipping) to World Vision - a charity I strongly believe in and have supported since I was a little kid. I would encourage you to consider supporting them as well and/or researching charitable organizations of your choice to make sure the majority of your donations go to those in need (Charity Navigator!).
-
Just an FYI to add to the thread. Great Stuff has a low expansion foam for windows and doors that would probably work better for this particular application.
-
I picked up another WB02 yesterday (didn't want to pull the one out of my 280ZXT MS3 setup). Haven't installed it yet but... I found the problem. The starters have a spring on them between the top plate and bottom plate and a circlip that keeps them from coming up off the shaft under the spring pressure. I made sure to align the tooth that seats onto the inner portion of the starter but the spring was pushing the top of the starter up too much and the tooth was disengaging. I'm getting a solid idle now - thanks guys! Bang on MadKaw! Now to tuning
-
Thanks guys - the wheels are turning now. I think the jetting is fine - it ran fine before I pulled the carbs off for a rebuild. The starters sound like they have the potiential to let significant air in to bring the RPMs up that high. I think a leaky throttle shaft wouldn't be that significant. I was pretty carefull with the linkage but I think I'll disconnect it all to take it out of the equation. I also left the booster hooked up on #6 so I'll disconnect that as well. I don't have a manonmeter but I did build my own with 6 MAP sensors like they use on the Mega Squirt ECUs. I works fine on the bench but when I hooked it up there are too many pulsations on the intake so I need to some averaging to dampen it out a bit.
-
I just rebuilt my triple Mikuni PHH 44s reinstalled and set the pilot screw to it's original setting of 1.25 turns out from bottom. The butter fly valves are completely closed and it will idle around 1000 RPM(ish) then it will idle right up to 2.5 to 3K RPM after a minute or so. That's with the starters turned off. If I play with the butter fly valve opening (idle set screw) and turn in the pilot screw to about 3/4 it seems to run but its rough. I haven't balanced it out yet. I'm trying to understand what's going on so a little direction on my misunderstandings would be great. My understanding is that the pilot screw adjusts the amount of air added to the mixture. Turn it in - less air. Turn it out - more air. So the part that confuses me is if I turn it in to 3/4 and open the butter fly valves it seems to run better. I can understand that the air is metered differently through the pilot screw adjustment than the butter fly valve but that would be at various RPMs. Shouldn't it be the same at idle? I rebuilt the carbs completely but I was told not to mess with the throttle plates and shafts so I never replaced the shaft seals. I'm assuming air could be leaking past the shaft but it never did before and I would think it would have to be a significant leak to go from 1000 RPM to 3000 RPM. Thanks guys any help is always appreciated! I'm dying to get this back on the road. The plan was to have it ready at the begining of the summer but I kept doing the "while I'm at it" .
-
-
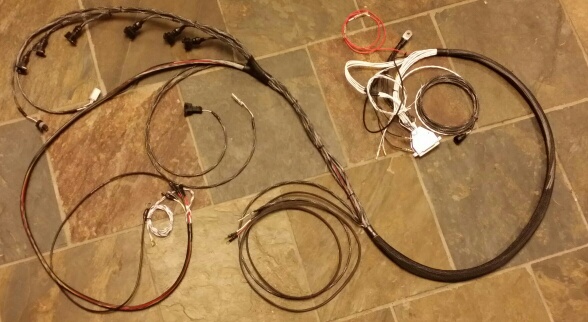
I'm pretty close to a finished product with the S130 harness. I'll get to the S30 harness when I get a chance and keep you guys posted. For those waiting on backordered kits I have the S30/S130 kits in and I'll be doing an Z31 kit as well for those of you who have the Z31 ECU swap (or a Z31 ).
-
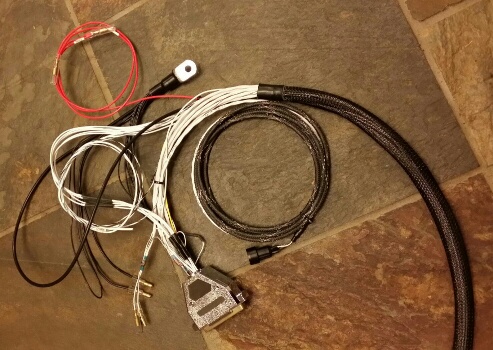
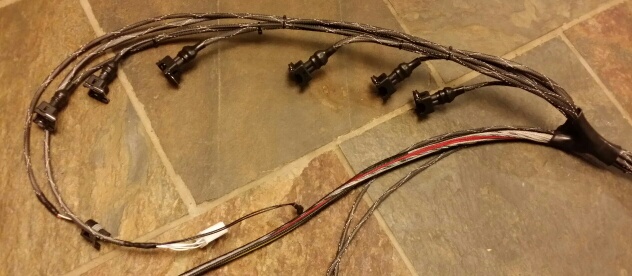
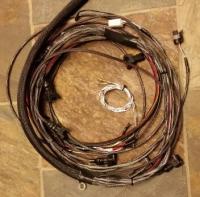
I am currently building a custom MegaSquirt harness for my Mega Squirt III setup on my car. I build an adapter to interface into the stock harness to get everything up and running as close to stock as possible. Once I had that working well I pulled all the stock harness out and I'm just about done building a new harness to directly plug into the MS3 ECU with MS3X for sequential injection and distributorless ignition. It interfaces directly with the stock body harness so you don't need to cut your harness up and can easily return the car to it's stock form. The stock engine harness is basically garbage. I have yet to see an original one where the shielding on the Dizzy side is still in good condition but given that it's exposed to the elements it's not fair to expect it too be. There is basically no shielding on anything other than the O2, the fuel pump control (don't care with MS) and the dizzy. An auto engine bay is full of EMI that can cause problems with any electronic fuel injection system. Look at a 240SX wiring diagram and you'll see that the manufacture shields almost all of the sensors. I've been researching a few other after market engine harnesses for other engines to see what the other guys have. The 2JZ, etc have a lot of after market stuff and they boast Raychem this and MIL spec that but only bits and pieces are they way they should be. I've seen a lot of "quality" harnesses that boast MIL spec and yet the sensor signals travel over a single vinyl coated wire. So again out of frustration we are left to do it ourselves. Fortunately this is my area of expertise and I'm currently developing a EMI hardened engine harness for the S130 and will be designing one for the S30 chassis. The basic design will allow for a plug and play to the stock body harness (on the S130 at this point in time - haven't done my homework on the S30 yet) to control the stock fuel pump relay and fuel pump circuit (the S30 harness will have it's own fuel pump control). It will have its own fuse system and relays. The main intent is performance first (EMI hardened and the highest quality cabling, etc) and asthetics as an important secondary. You should be able to pull out your stock S130 harness and plug this harness in with an excellent fit and finish. If you ever want to go back to a stock setup simply unplug the aftermarket and plug in the new harness - no cutting into anything. Currently the design has all sensors shielded and cabling for your Wideband 02 with fused power and shielded input. The knock sensor and CHTS are not used with MS3 but are included (shielded of course) in the harness should you wish to use them. There is the capability to unplug the injectors from a built in adapter to go from batch fire to plug directly into the 3X board for sequential injection. An optional crank fire or distributorless ignition harness is also being developed. Since each configuration may have slight variances as to where sensors are located each harness can be built for the particular application. Working on a custom car can be frustrating under normal circumstances but trying to chase electronic gremlins can be a nightmare even for an Electronics Engineer. The purpose here is to have a harness that starts you off from a solid base so you aren't chasing your tail and you can concentrate on the rest of your build. Let me know what you guys think and what you would like to see from a properly engineered quality custom harness.
-
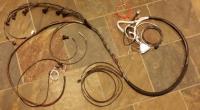
The stock engine harness is basically garbage. I have yet to see an original one where the shielding on the Dizzy side is still in good condition but given that it's exposed to the elements it's not fair to expect it too be. There is basically no shielding on anything other than the O2, the fuel pump control (don't care with MS) and the dizzy. An auto engine bay is full of EMI that can cause problems with any electronic fuel injection system. Look at a 240SX wiring diagram and you'll see that the manufacture shields almost all of the sensors. I've been researching a few other after market engine harnesses for other engines to see what the other guys have. The 2JZ, etc have a lot of after market stuff and they boast Raychem this and MIL spec that but only bits and pieces are they way they should be. I've seen a lot of "quality" harnesses that boast MIL spec and yet the sensor signals travel over a single vinyl coated wire. So again out of frustration we are left to do it ourselves. Fortunately this is my area of expertise and I'm currently developing a EMI hardened engine harness for the S130 and will be designing one for the S30 chassis. The basic design will allow for a plug and play to the stock body harness (on the S130 at this point in time - haven't done my homework on the S30 yet) to control the stock fuel pump relay and fuel pump circuit (the S30 harness will have it's own fuel pump control). It will have its own fuse system and relays. The main intent is performance first (EMI hardened and the highest quality cabling, etc) and asthetics as an important secondary. You should be able to pull out your stock S130 harness and plug this harness in with an excellent fit and finish. If you ever want to go back to a stock setup simply unplug the aftermarket and plug in the new harness - no cutting into anything. Currently the design has all sensors shielded and cabling for your Wideband 02 with fused power and shielded input. The knock sensor and CHTS are not used with MS3 if you have an L28ET swap but are included (shielded of course) in the harness should you wish to use them. There is the capability to unplug the injectors from a built in adapter to go from batch fire to plug directly into the 3X board for sequential injection. An optional crank fire or distributorless ignition harness is also being developed. Since each configuration may have slight variances as to where sensors are located each harness can be built for the particular application. Working on a custom car can be frustrating under normal circumstances but trying to chase electronic gremlins can be a nightmare even for an Electronics Engineer. The purpose here is to have a harness that starts you off from a solid base so you aren't chasing your tail and you can concentrate on the rest of your build. Let me know what you guys think and what you would like to see from a properly engineered quality custom harness. The early S30's didn't have a fuel pump relay so that will be included. For the 280Z the relay will drive the stock relay and invert the logic as the stock one requires +12V to turn on rather than grounding one side which is what the MegaSquirt does.
-
Haha - of that $80K $56K is for climate controled storage - the guy says the previous owner drove it home and parked it in his garage for 21 years. I guess he was charging himself $150 a month for 21 years. Must work for the Government to come up with numbers like that. I'd rather have the Porn Star Red or the hideous Blue interior than that brown. That's one lesson we learned from the 80's. If it was a turbo then he might have something ;P
-
I can definately do harness repair. I would think shipping back and forth would be expensive though. Right now I'm making a custom wiring harness for S130 for plug and play MegaSquirt setup then I'll be developing an S30 kit as well.
-
*** Please note I've had to make some minor adjustments to the kit pricing unfortunatly. The kit will increase from $50 to $55 to cover Paypal fees and Air postage which cuts shipping time in half or less as well as insurance. In addition I've had a few requests for some other options with the kit. For those who would like a trackable insured shipment there is an additional $15 fee (and I believe shipping time is reduced to 4-6 days). If you don't feel comfortable soldering pin to wire I can add pigtails (a six inch piece of wire coming out of the connector) so you can solder wire to wire for an additional $10. The pig tails take about 45 minutes to do. These are professionaly fabricated (crimped and soldered) and populated into your connector ready to go. I highly recomend water proof heat shrink (heat shrink with a meltable inner jacket). I can supply it for $5 per kit (24 pieces) for as long as my current stock remains then I may need to adjust the price. You will only need the heat shrink if you are using pig tails and need to water proof your solder joints. You should be able to get water proof heat shrink as well at your local electronics supplier.
-
I'll make a video on how to wire in the pig tails and water proof those but it will be a little while before I can get to that. I'm getting everyone's orders ready to mail out as my number one priority.
-
Ok I made a little video up to give you some pointers on repairing your wiring harness. I did the AFM which is the most complicated of the ones we'll be replacing. It's a little embarasing because I messed up the connector trying to keep the video time short but I left it in. It's a good reminder to make sure you've got everything in place before you solder or crimp your connector on. I do this sort of work all the time and I should know better - shows you what happens when you rush. Anyhow if you have any questions the video doesn't answer feel free to ask!