pwd
Free Member
-
Joined
-
Last visited
Everything posted by pwd
-
Find a friend with a 110V MIG welder with gas attachment and that will be sufficient to fill sheet metal holes if you back them up with a copper spoon (available at Harbor Freight). I've also used body solder with some copper foil as a backing backing metal. You can do this with a Propane torch and avoid warping metal.
-
I'm fairly certain you got Masonite at HD. While Masonite works OK for flat surfaces, the material you really want is "chipboard", available at automotive upholstery shops. It's available in a couple of different thicknesses and you'd obviously want the thickest. You'd need to make front and back molds of the original panels using something rigid, like fiberglass, urethane foam, or plaster. You'd then dampen the chipboard, sandwich it in the mold, allow it to dry compressed, and then cut the various openings/outline. Good luck.
-
MIG welding, using small "tack" beads spaced around the work to prevent heat distortion, is the best way to weld in sheet metal patches. Another method, not mentioned, is bronze brazing. It uses less heat than oxy-acetylene torch welding, therefore less distortion to the surrounding metal, and is plenty strong for non-critical repairs.
-
http://www.streetwires.com/products/default.aspx?grp=67 http://www.wiringproducts.com/contents/en-us/d234.html Just make sure you have the Alternator output to drive the added load.
-
-
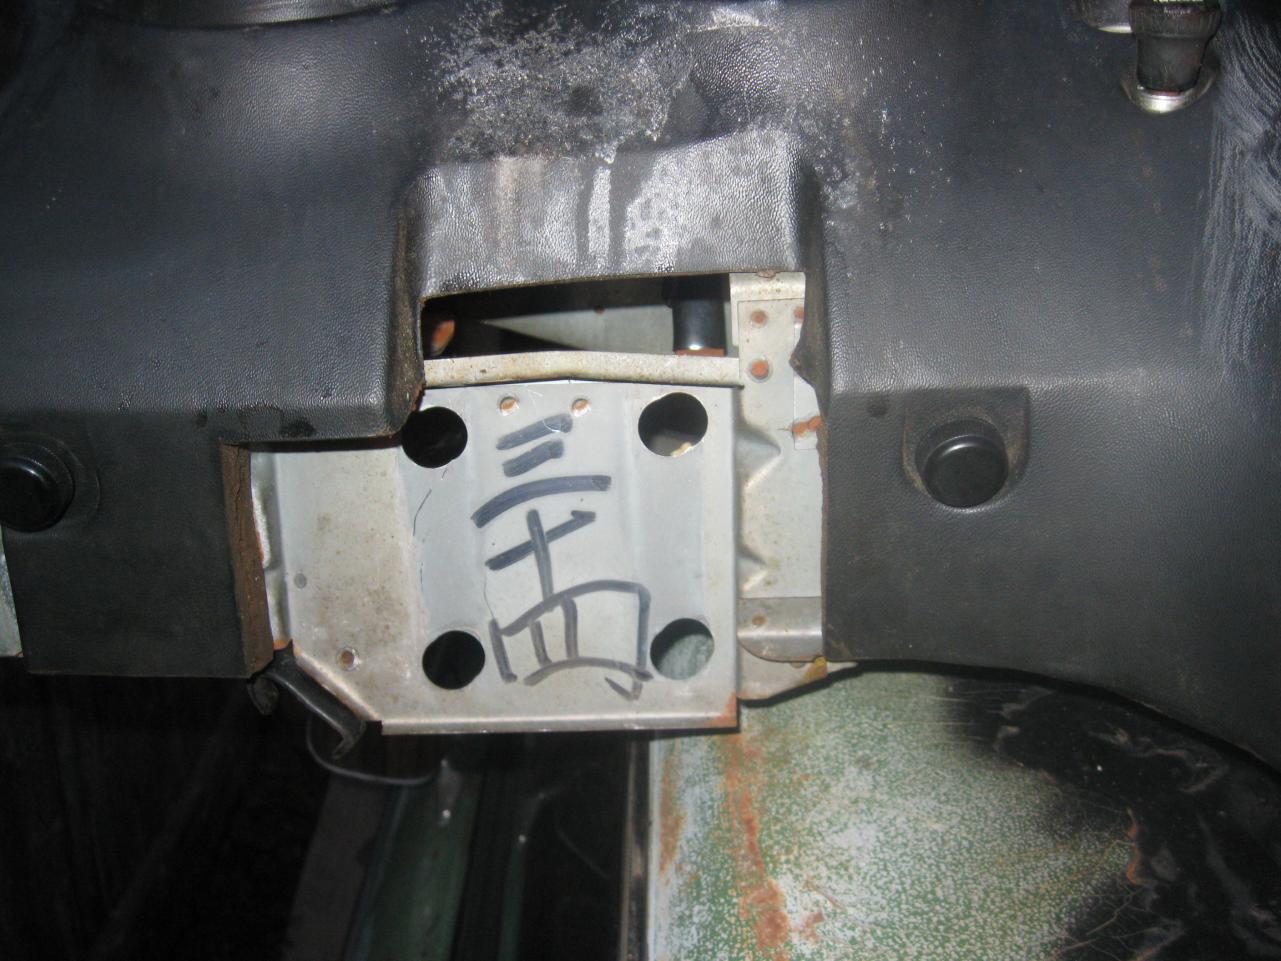
Would it be possible that these numbers might represent production line numbers for a week, or month?
-
The 240Z Values from a few years ago on Gold Book: 1971 DATSUN 240Z Fair - $3,800 Good - $9,000 Exc - $15,000 Show - $20,000 Loan - $8,000
-
Thanks, Konish!
-
My '73 has a character under the steering column support as well, but it looks totally different from the others posted above. If anyone can translate this it would be much appreciated.

-
You can get them here too, and cheaper (Item GF-13) http://www.zzxdatsun.com/catRubber.php
-
As I understand, Just Dashes did the restoration work on Nissan's 1998 240Z restoration program. Of course at that time they were probably the only game in town. Be careful when their ad says they "replace the foam", since that probably only applies to specific cars they do. In fact, I spoke with the guy at Just Dashes not long ago and he said they didn't have the mold to make the foam dash for the 240Z. Actually, it wouldn't be hard to make one... but that will be the subject of a future thread. Having inspected my recently removed, but much cracked dash, I can see that only the surface foam (except for the cracks) is deteriorated from heat. That's why they shave it back and layer it with closed cell "Landau" foam. Closed cell foam will actually provide a much more stable base for the "hair cell" PVC skin than the original open cell foam. I'll be experimenting on re-skinning a "donor" dash with a highly stretchable (50% in both directions) vinyl known as "Allsport" by Morbern. I purchased some for another project and test fit it on the 240Z dash with promising results. It will be applied with heat, stretching, and glue just like they do with the hot PVC sheet, but I shouldn't need a vacuum press if enough "hands" available. It won't be "original", but should look the same. In fact, the "Allsport" grain pattern is closer to the finer original texture than the PVC sample I received from Dashboard Restorations. However, "Allsport" will be more flexible than the original PVC, and much more so than the thicker PVC used by the current dash restorers out there today.
-
Was it this guy? http://tiny.cc/low54 Here's all I need to see to avoid someone on eBay nosms (Feedback Score Of 1484) 96.3% Positive feedback Look at their feedback and see if you can detect a pattern to explain their poor score.
-
But if it isn't the culprit and you don't use a proper tool to remove it you may pull the hub from the center section and damage it. If that wasn't the problem it is one now and an additional expense. If you rent the puller you get the installation tool. O'Reilly's and AutoZone have free tool rental, so it's no big deal.
-
I've had the vibration damper rubber on the pulley get old and break causing the hub on which the belts ride to move in and out Buy/rent a vibration damper puller at the local parts store to remove and replace it. Don't use 3 jaw pullers, or makeshift means to remove it and don't use a hammer to install the new one. Use the proper tool, otherwise you might damage the new one.
-
Dave, thanks for the great info. By the way, PPG bought the company that made the Omni line and introduced an upgrade about 6 months ago called "Omni Plus." This may have some promise for cars that will fall between "driver" and near "show" status.
-
Chevrolet used cast iron drums on the Corvette back when they had a disc/drum combo. They were more than a little concerned about performance and understood the principle of unsprung weight. They also knew about Aluminum drums, which were on some GM cars at the time. Aluminum is preferred for fast heat dissipation more than weight reduction. Brake fade is a much bigger problem in course racing than unsprung weight. I seriously doubt if Rock Auto is offering Aluminum drums. No one seems to have them.
-
Probably just spray can undercoating. If you want to use undercoating for sound deadening you need something with more body than what can come from an aerosol can. You need to use 3M Body Schutz, and put it on thick. Alternatively, I use a product called eDead 80 from Elemental Designs. It's 80 mil thick aluminum foil backed butyl rubber, cheaper than Dynamat, and just as good. I did a lot of research on various paint/pour systems and foil backed variety and chose eDead.
-
You might consider putting it on eBay. Cars always go for more there than they're really worth. Just beware of the Nigerian guy who wants to set up a bank account with your name on it for payment.
-
Sounds like that carpenter who bragged he still used his grandfather's hammer, but replaced the handle twice and the head once. There's not much left of that old A/C! As far as the York compressor, make it a boat anchor. The Sanden rotary compressor is the only way to go. My '73 had one mounted on the driver's side by the Smog Pump on a cheesy steel bracket, but it's original. One problem with that setup is the run of refrigerant lines to the evaporator and back.
-
There are so much better aftermarket systems available today that I seriously doubt if I'm going to re-install the dealer installed A/C in my all original, one owner '73, even if it is allowed by judging rules, whereas new ones aren't. It just won't work as well as the new ones, and that's important when you plan on driving the car much more than you show it. So to answer your question, it's probably not worth all that much as a whole, but the piece parts might have some eBay value.
-
Take it to a reputable frame alignment shop in your area and get an estimate. Putting a couple hundred into it might gain you a few thousand if you do decide to sell it. A properly repaired car is worth a lot more than a junker. It looks salvageable to me.
-
Your best bet is to go to the Hybrid Z web-site.
-
Fuses are to protect the wire, not the load. Size the wire to the nominal load current, then fuse it. In the event of a chaffed/shorted wire, the fuse blows instead of melting the wire and causing a fire.
-
From the standpoint of electrical noise, it's always a good idea to incorporate a "star" ground. That means gathering all the current return lines into one ground stud aka "the golden spike". That way the variable resistance from corrosion and painted surfaces encountered while carrying the return current through the frame, body shell, etc. is removed. Have you ever heard a click or pop over the radio speaker when you turn on the headlights, or turn signals, or a hum from the ignition coil? This will be eliminated with the star ground, though it takes more wire, adding cost and weight. It should be placed as close to the negative terminal of the battery as possible.
-
To remove the speed-nut on the trim strip center post, I use a 1/16" drill bit and drill into it as close to the rod as possible. This makes it a bit easier to get a dental pick in to lift back one of the speed-nut spring fingers. Once one finger is back the others are easier to access. For the lens post speed-nuts, if you can lift the edge enough to get some tin-snips underneath, they're pretty brittle and will break with the first cutting action. If you do snap a trim strip post, JB Weld works very well for the repair and can be sanded to shape. To clean the old yellowed sealant off the lens edge, I use Naptha (not lacquer thinner!). The Naptha does not attack the plastic (or is much less agressive than thinner) and after repeated wipings will remove all the old sealant and clean the lens. To repair the warped housing, sandwich the edge between two small pieces of steel flat iron and use small metal C-Clamps to hold it in place (use your imagination on this). Apply a heat gun about 8-10 inches from the warp being very careful to only do enough to "relax" the material. It is possible to get it too hot and melt the "lip" of the housing. Move along one warp at a time until it's complete. I recommend against putting the housing in an oven, as you'll probably get movements you didn't want. On my original set of tail lights the Back Up Lamp compartments are badly deteriorated from heat (PO must have had a bad backup switch at one time). I'm considering laminating pieces of 1/8" white ABS plastic to provide strength and enhance reflectivity. At the same time, I'll add it to the tops and bottoms of the other chambers, while polishing up the reflectors. Might do LED bulb replacements, not sure yet. Good luck!