


Zed Head
Free Member
-
Joined
-
Last visited
Everything posted by Zed Head
-
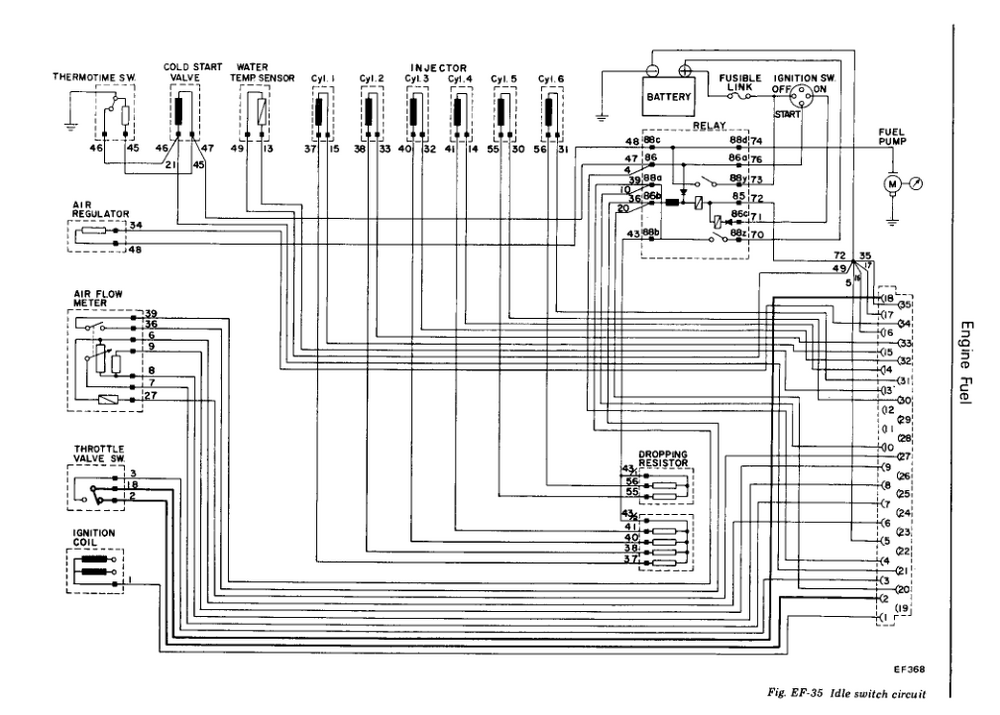
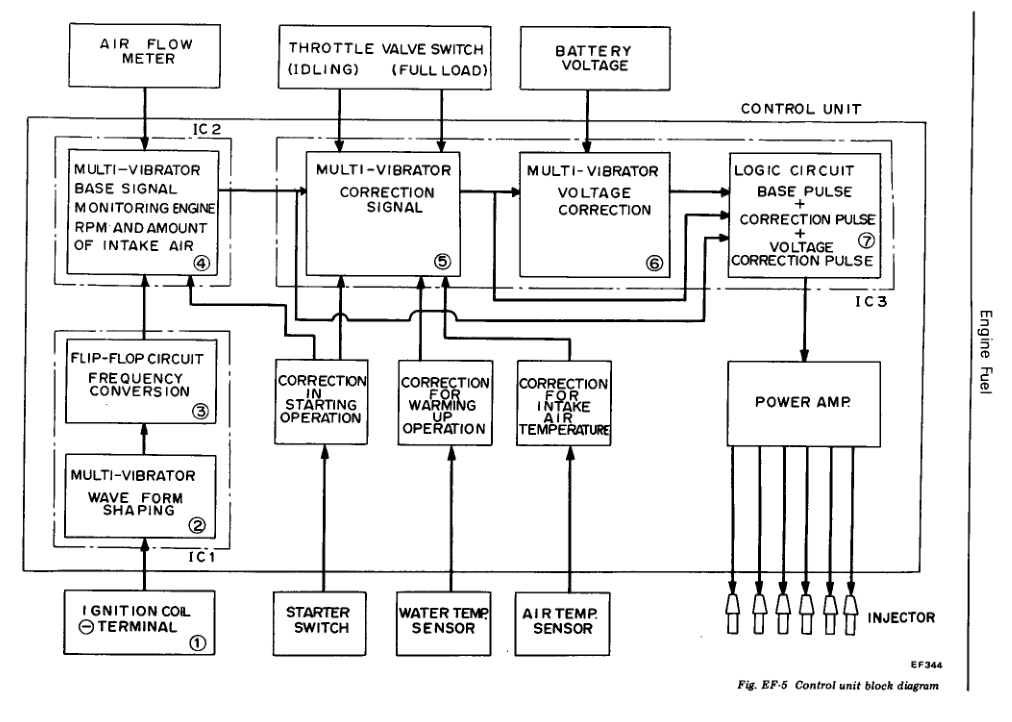
 It might be fun to run with the ECU cover off. When you kick the case all of the components feel it. With the cover off you can pick the one you want to test. Hit it with a hammer, wiggle it, whatever. It is odd though that two ECU's would have identical failure characteristics. Might be worth the tme to do a pin drag test on the active pins in the connector that CO shows in his diagram. Maybe you have a loose one.
What ignition system are you using? The ECU uses the coil voltage pulse to trigger injection. Maybe the problem is actually in the ignition module. The coincidence with the tapping on the ECU might be imaginary. No offense, the human brain can rationalize itself in to knots. I had thought of this earlier - if the problem is repeatable and you can make it happen while you're in gear and moving, the tachometer should still show RPM if it's the ECU crapping out. If it's spark related the tach will drop like a rock.
Ball joint failure is a real thing. It usually causes major damage and loss of control. So the calculation is about how close a person wants to get to that catastrophe. Which also endangers other people on the road. But in this case, Nissan has given an inspection procedure. If it meets spec. why replace? What's odd is that they say that the ball joint cannot be disassembled, when, obviously, it can be.
Sometimes I take a best guess, no matter what the depth of my knowledge on a subject, and just try something. Then hope my brain will take the results and come up with something better. In retrospect, I doubt that the transistor(s) was/were the cause of the problem. I imagine that almost any open circuit or short inside the ECU could cause it to malfunction. Your situation is unusual in that it seems so repeatable that it's almost controllable and is the same for two different ECU's. Maybe you're just losing a connection at one of the pins. Probably one of the multi-vibrator functions! 🥴
It might be fun to run with the ECU cover off. When you kick the case all of the components feel it. With the cover off you can pick the one you want to test. Hit it with a hammer, wiggle it, whatever. It is odd though that two ECU's would have identical failure characteristics. Might be worth the tme to do a pin drag test on the active pins in the connector that CO shows in his diagram. Maybe you have a loose one.
What ignition system are you using? The ECU uses the coil voltage pulse to trigger injection. Maybe the problem is actually in the ignition module. The coincidence with the tapping on the ECU might be imaginary. No offense, the human brain can rationalize itself in to knots. I had thought of this earlier - if the problem is repeatable and you can make it happen while you're in gear and moving, the tachometer should still show RPM if it's the ECU crapping out. If it's spark related the tach will drop like a rock.
Ball joint failure is a real thing. It usually causes major damage and loss of control. So the calculation is about how close a person wants to get to that catastrophe. Which also endangers other people on the road. But in this case, Nissan has given an inspection procedure. If it meets spec. why replace? What's odd is that they say that the ball joint cannot be disassembled, when, obviously, it can be.
Sometimes I take a best guess, no matter what the depth of my knowledge on a subject, and just try something. Then hope my brain will take the results and come up with something better. In retrospect, I doubt that the transistor(s) was/were the cause of the problem. I imagine that almost any open circuit or short inside the ECU could cause it to malfunction. Your situation is unusual in that it seems so repeatable that it's almost controllable and is the same for two different ECU's. Maybe you're just losing a connection at one of the pins. Probably one of the multi-vibrator functions! 🥴
 Looks like the NA 280ZX engine might be 79 or 80. Can't see the cylinder head temperature sensor. But that's USA only, seller might be in Canada or Europe or Australia. N42 block, N47 head, probably. They all look complete. Even the fan belts and motor mounts are still attached. Shipping could be expensive.
If I was trying to sell them I'd supply mileage when removed, how well they ran, and the price. I assume that maybe you're just looking for offers? Good luck.
Aside from replacing a part that meets Nissan specs, another factor to consider might be that used Nissan is probably better than new aftermarket.
How much? Did you see them run or are you passing on information?
Sample size cannot get any smaller. I doubt that that's why they come out since the the space between the rocker arm and the valve/pad assembly would have to open up enough to allow the lash pad to pop out. No logical reason for the divot to stop that from happening. Besides the fact that many people have had that happen when they restart old factory stock engines that have been sitting for a while. Most people think it's caused by sticking valves. Maybe your guy sets his guide clearances too tight. But, he's the builder. Good luck.
Also should note that it's called several different things around the internet. Valve guide, Guide - Rocker Valve, lash pad. Might help for searching. The part number works well though.
Here's some stuff. Not sure if they're showing the -Y7000 pads (Replaced By:) or the original part number. https://www.carpartsmanual.com/datsun/Z-1969-1978/engine-280z/camshaft-valve-mechanism/25 https://www.nissanpartsdeal.com/parts/nissan-valve-guide~13218-a3501.html
Looks like the NA 280ZX engine might be 79 or 80. Can't see the cylinder head temperature sensor. But that's USA only, seller might be in Canada or Europe or Australia. N42 block, N47 head, probably. They all look complete. Even the fan belts and motor mounts are still attached. Shipping could be expensive.
If I was trying to sell them I'd supply mileage when removed, how well they ran, and the price. I assume that maybe you're just looking for offers? Good luck.
Aside from replacing a part that meets Nissan specs, another factor to consider might be that used Nissan is probably better than new aftermarket.
How much? Did you see them run or are you passing on information?
Sample size cannot get any smaller. I doubt that that's why they come out since the the space between the rocker arm and the valve/pad assembly would have to open up enough to allow the lash pad to pop out. No logical reason for the divot to stop that from happening. Besides the fact that many people have had that happen when they restart old factory stock engines that have been sitting for a while. Most people think it's caused by sticking valves. Maybe your guy sets his guide clearances too tight. But, he's the builder. Good luck.
Also should note that it's called several different things around the internet. Valve guide, Guide - Rocker Valve, lash pad. Might help for searching. The part number works well though.
Here's some stuff. Not sure if they're showing the -Y7000 pads (Replaced By:) or the original part number. https://www.carpartsmanual.com/datsun/Z-1969-1978/engine-280z/camshaft-valve-mechanism/25 https://www.nissanpartsdeal.com/parts/nissan-valve-guide~13218-a3501.html Like these? What kind of problems has your machinist had with the flat bottomed pads? Not sure that the dimpled ones are actually "stock type" for an L28. Don't know. https://jdm-car-parts.com/products/kameari-performance-valve-lash-pads-for-nissan-l-engine https://datnissparts.com/stock-thickness-120-lash-pads-datsun-nissan-l4-l6-l16-l18-l20a-l20b-l24-l26-l28-13218-y7000/
 Not bad for 1976 280Z survivor. Still has the splash shield and exhaust pipe heat shields. https://bringatrailer.com/listing/1976-datsun-280z-106/
 So many new things pop up on the internet now it's a surprise they haven't interviewed his coworkers who saw it happen. I just read a different article yesterday about him where he said he thought he should have switched to being a normal right-handed player. He started playing leftie, like Jimi Hendrix, and didn't think he could relearn everything so he just improvised with those prosthetic finger tips. I worked with a guy years ago, after his own accident, who did similar but cut off about half of all four. Said he didn't feel a thing, they were just gone. Metal shears are dangerous.
Might as well do the whole album. Had it on cassette (high tech for cars!) back in high school. Did not help my studies...
No reserve 10/70 1971 240Z project in Texas. https://bringatrailer.com/listing/1972-datsun-240z-359/
So many new things pop up on the internet now it's a surprise they haven't interviewed his coworkers who saw it happen. I just read a different article yesterday about him where he said he thought he should have switched to being a normal right-handed player. He started playing leftie, like Jimi Hendrix, and didn't think he could relearn everything so he just improvised with those prosthetic finger tips. I worked with a guy years ago, after his own accident, who did similar but cut off about half of all four. Said he didn't feel a thing, they were just gone. Metal shears are dangerous.
Might as well do the whole album. Had it on cassette (high tech for cars!) back in high school. Did not help my studies...
No reserve 10/70 1971 240Z project in Texas. https://bringatrailer.com/listing/1972-datsun-240z-359/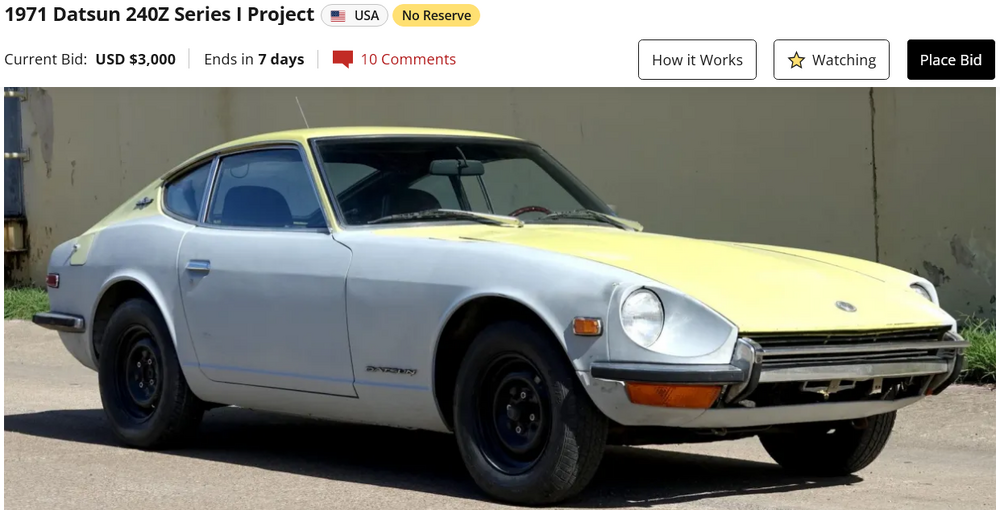 Well, this is a bummer for the day. https://apnews.com/article/ozzy-osbourne-dies-adff88b55f1d3b0bace5705d58d3cdde
I never realized that David Cassidy turned in to a global phenom.
Interesting beetle frenzy mania going on. Almost like a whole different brand of car. https://bringatrailer.com/listing/1973-datsun-240z-290/
Well, this is a bummer for the day. https://apnews.com/article/ozzy-osbourne-dies-adff88b55f1d3b0bace5705d58d3cdde
I never realized that David Cassidy turned in to a global phenom.
Interesting beetle frenzy mania going on. Almost like a whole different brand of car. https://bringatrailer.com/listing/1973-datsun-240z-290/ Spooky scary Saturday night space music.
I got curious so I looked in the GI pages of the FSM's. 1972 seems to be the first time they describe the stamping of the identification number on the firewall (cowl). 1970 and 71 don't mention it, that I can find. 1970
Spooky scary Saturday night space music.
I got curious so I looked in the GI pages of the FSM's. 1972 seems to be the first time they describe the stamping of the identification number on the firewall (cowl). 1970 and 71 don't mention it, that I can find. 1970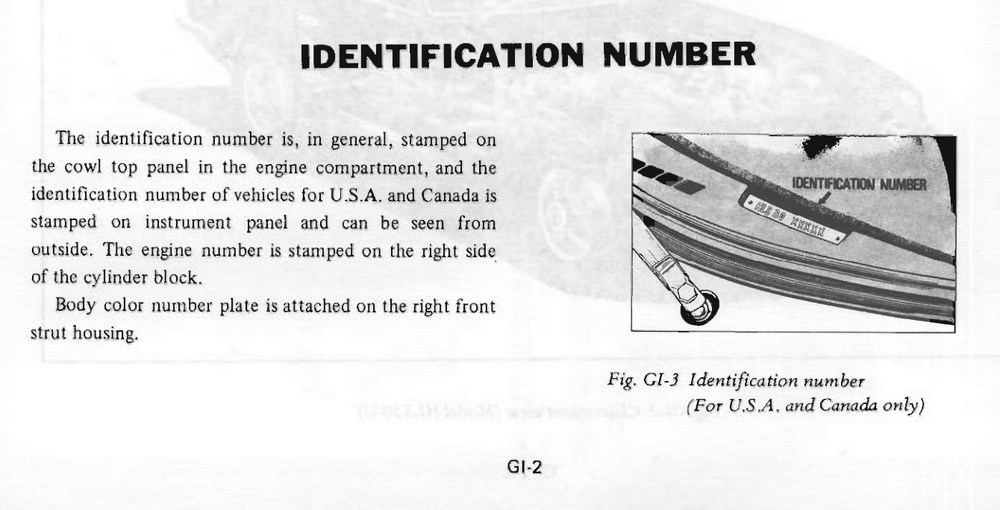
 It seems reasonable that Nissan might have started with engraving then moved to stamping. Or maybe somebody can show or explain why the engraving looks like stamping. That would be the most helpful. For people who have actually seen both and understand the processes. Engraving removes metal. Stamping displaces it.
I've wondered about the stamping/engraving. As somebody who has worked with both stamping and engraving, it's incredible to me how Nissan was able to make engraving look like stamping back in the 70's. I assume that they used a pantograph to get the precision. No way that it was done free hand. Also odd that a pantograph can't hold a straight line. It would be very cool to see some of the tools they used back then. https://www.hotrod.com/how-to/where-is-the-vin-number-on-a-car
It seems reasonable that Nissan might have started with engraving then moved to stamping. Or maybe somebody can show or explain why the engraving looks like stamping. That would be the most helpful. For people who have actually seen both and understand the processes. Engraving removes metal. Stamping displaces it.
I've wondered about the stamping/engraving. As somebody who has worked with both stamping and engraving, it's incredible to me how Nissan was able to make engraving look like stamping back in the 70's. I assume that they used a pantograph to get the precision. No way that it was done free hand. Also odd that a pantograph can't hold a straight line. It would be very cool to see some of the tools they used back then. https://www.hotrod.com/how-to/where-is-the-vin-number-on-a-car


Important Information
By using this site, you agree to our Privacy Policy and Guidelines. We have placed cookies on your device to help make this website better. You can adjust your cookie settings, otherwise we'll assume you're okay to continue.