


Zed Head
Free Member
-
Joined
-
Last visited
Everything posted by Zed Head
-
 You might take it apart and see if it's something simple like a dirty solenoid contact or sticking mechanism. Remove the solenoid and pull it off of the slug. Here's a video. Solenoid removal starts about 5:10.
 -
Nissan started using gear reduction starters in 1978. So that's not really a new thing. If you search "britishstarters.com" on the internet you can find reviews from people that have bought them. Here's one. Kind of what I was afraid of. They don't really describe where they source their motors on their web page. https://www.mgexp.com/forum/mgb-and-gt-forum.1/british-starters-com-my-observations-your.3110642/
-
There would be no "control". You might also flood the intake with vapor as the car sits in the sun. Vaporization and condensation. Engineers spent a lot of time and effort trying to figure out how to handle the vapors in a way that solves and avoids problems. I'm sure that there are people out here who've tried to outthink the engineers and ended up back at their solution after going around in circles. The charcoal canister and its control system is really simple. The hardest part of the Pathfinder mod is probably mounting the canister.
If Dave WM has found a canister from a newer vehicle that works that would probably be the simplest most direct way to go. The concept is the same and Nissan kept stuff that worked around for decades. My 95 Pathfinder had an AAR valve that was essentially the same as a 1975 280Z's (I think, it's sold now, can't double-check). Same basic shape and function.
It's a controlled leak. A small one that is only open when the eninge is off-idle. The vacuum control hose is on a "ported" vacuum souce on the throttle body.
Probably won't fit but it shows the concept. The old days when "PCV" was a tube that exited to the roadway from the valve cover. https://www.tanksinc.com/index.cfm/page/ptype=product/product_id=638/mode=prod/prd638.htm
This would create a large vacuum leak. It might even overpower the valve in the gas cap and pull a vacuum on your tank. That would be bad. If the seal in your canister cap is bad you might have a vacuum leak anyway. Might partially explain your "lean" problems. You could just block the line completely and get a two way vented gas cap. Maybe. Gas caps are hard to find. Although the seal on mine was destroyed and it was two-way anyway. Move the smell to the outside back of the car. Like the old days.
It's not the canister that holds vacuum it's the cap on the top. The canister is completely open on the bottom. It might be that the canister "charcoal/carbon" in the canister is saturated, coated, or clogged. The basic concpet is that the gasoline vapors enter the pores of the carbonaceous material and stick until they are pulled off by air entering through the bottom. But the material does not last forever. https://www.carparts.com/blog/5-signs-youre-due-for-a-charcoal-canister-replacement/
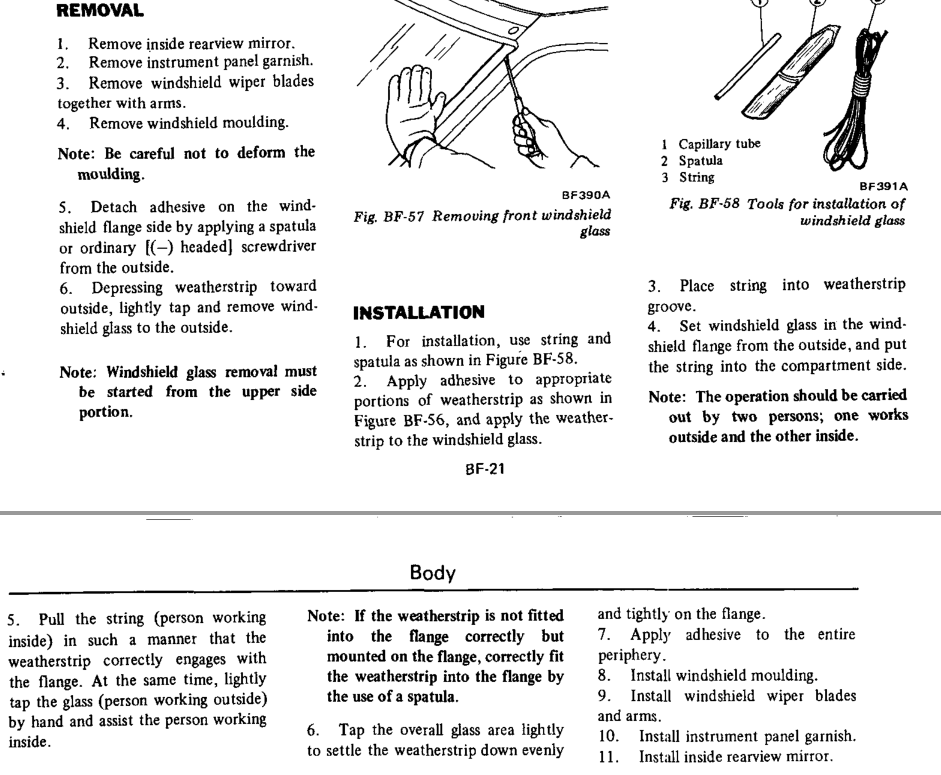
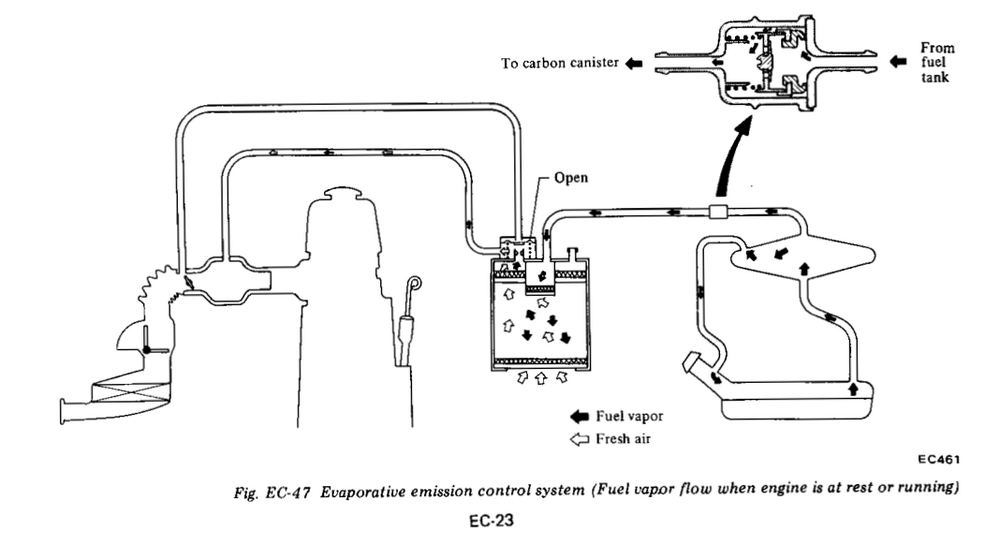 Anybody know what the "capillary tube" is for? They show it but don't talk about it.
 That's one reason the 280Z's are great tools for learning about automotive electrical. Everything on them is at the beginning of today's auto electronics. Not trying to double-down on cgsheen's point but the start for modifying the ignition system would be to understand how the one you have works. Again, no offense intended, but if you had done that you would have looked for the "make and break" device that creates spark. The original ignition module. If the coil primary circuit is not broken, no spark will be created. It's fascinating stuff! I've learned a lot by owning and working on a 280Z. Even though I knew quite a bit before I got mine. https://en.wikipedia.org/wiki/Delco_ignition_system
I was thinking more like the grinding wheel that you used on the CV end. There's room. Grind away, I say.
That's one reason the 280Z's are great tools for learning about automotive electrical. Everything on them is at the beginning of today's auto electronics. Not trying to double-down on cgsheen's point but the start for modifying the ignition system would be to understand how the one you have works. Again, no offense intended, but if you had done that you would have looked for the "make and break" device that creates spark. The original ignition module. If the coil primary circuit is not broken, no spark will be created. It's fascinating stuff! I've learned a lot by owning and working on a 280Z. Even though I knew quite a bit before I got mine. https://en.wikipedia.org/wiki/Delco_ignition_system
I was thinking more like the grinding wheel that you used on the CV end. There's room. Grind away, I say.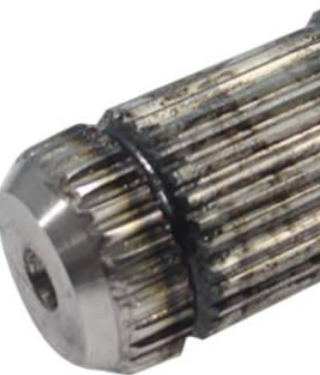 I'd remove any burrs from the end that needs to slip through the circlip. Maybe even smooth the end of the axle down and reshape it a bit so that it slips through the circlip easier. Add some grease. Once the end gets started it should slide easily until the grooves align and the clip drops in. The axle end is probably jamming the circlip against the back of the groove instead of expanding it.
Hope that was it. Here's what mine looked like. I think that the theory is that the insulation breaks down on the coil wiring, causing a weaker magnetic field. A short between wires but not a short directly to ground. Fewer circuits around the core. Can't remember exactly what I was testing or saw with those leads. Should have measured resistance through the coils. But it seemed to be heat-related so hard to reproduce. Probably wouldn't have seen anything. Maybe if I had hit it with a heat gun.
I'd remove any burrs from the end that needs to slip through the circlip. Maybe even smooth the end of the axle down and reshape it a bit so that it slips through the circlip easier. Add some grease. Once the end gets started it should slide easily until the grooves align and the clip drops in. The axle end is probably jamming the circlip against the back of the groove instead of expanding it.
Hope that was it. Here's what mine looked like. I think that the theory is that the insulation breaks down on the coil wiring, causing a weaker magnetic field. A short between wires but not a short directly to ground. Fewer circuits around the core. Can't remember exactly what I was testing or saw with those leads. Should have measured resistance through the coils. But it seemed to be heat-related so hard to reproduce. Probably wouldn't have seen anything. Maybe if I had hit it with a heat gun.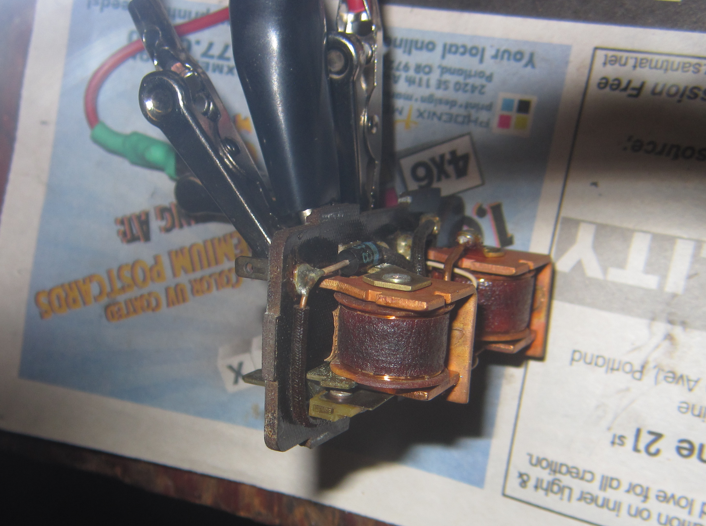 I had a similar problem with mine. It was the fuel pump relay portion of the combined EFI/pump relay. I posted about it long ago and posted a picture too. The solenoid coil looked cooked, I took it apart. It was actually a "spare" that had come with the car, that I had put back in to test. I guess that's why it was out. I was able to get home because I had already installed a relay bypass and power control switch under the dash. Because I didn't trust the old electrical stuff.
Adding to SteveJ's post, re the question above - yes and no. The tachometer is on a branch off of the blue wire to the ignition module. The resistor is in that wire. Reconnect the wire at the coil and disconnect all of the wires at the old ignition module. Megasquirt will probably work but the tachometer might not. But that's a new problem.
Many people switch to the later model spring clip connectors. It's a fun project. If you decide to do it you can get them cheap at any well-stocked salvage yard. 90's GM, Volvo and BMW plus many other brands used them. They're called EV1 style injector connections. Kind of spendy if you buy them new. A piar of crimping pliers and some insulated butt connectors is quick and pretty easy. They look like this -
Another decent driver. 1976 was a good year. Federal model in North Carolina. https://bringatrailer.com/listing/1976-datsun-280z-85/
I had a similar problem with mine. It was the fuel pump relay portion of the combined EFI/pump relay. I posted about it long ago and posted a picture too. The solenoid coil looked cooked, I took it apart. It was actually a "spare" that had come with the car, that I had put back in to test. I guess that's why it was out. I was able to get home because I had already installed a relay bypass and power control switch under the dash. Because I didn't trust the old electrical stuff.
Adding to SteveJ's post, re the question above - yes and no. The tachometer is on a branch off of the blue wire to the ignition module. The resistor is in that wire. Reconnect the wire at the coil and disconnect all of the wires at the old ignition module. Megasquirt will probably work but the tachometer might not. But that's a new problem.
Many people switch to the later model spring clip connectors. It's a fun project. If you decide to do it you can get them cheap at any well-stocked salvage yard. 90's GM, Volvo and BMW plus many other brands used them. They're called EV1 style injector connections. Kind of spendy if you buy them new. A piar of crimping pliers and some insulated butt connectors is quick and pretty easy. They look like this -
Another decent driver. 1976 was a good year. Federal model in North Carolina. https://bringatrailer.com/listing/1976-datsun-280z-85/ How did you get the retaining clips in? The plug has to be firmly seated to get the clip in.
Hazard switch maybe? All of the circuits pass through it.
How did you get the retaining clips in? The plug has to be firmly seated to get the clip in.
Hazard switch maybe? All of the circuits pass through it.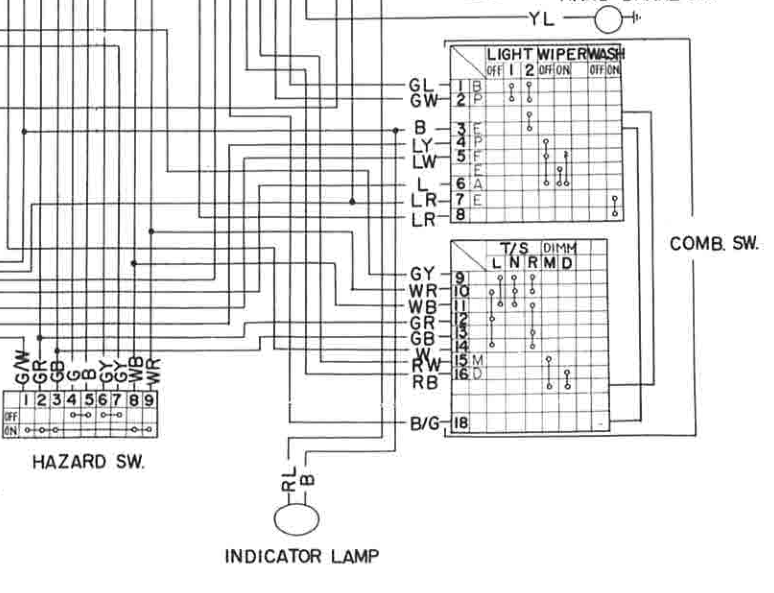 Here's another link. They say that there's a fine screen around the pickup area. I've never seen a clear shot of it. https://forums.hybridz.org/topic/96315-por-15-fuel-tank-repair-question/
There is a "can" or cylinder inside the tank, which has the fuel pickup point inside. That's where the crud would be. There is a screen or "sock" at the end of the tube to block particles from passing in to the pump. If your tank has been sealed in the past it might be that some of the sealant has come free. A borescope might tell you something. You can find quite a few pictures around the internet of the inside of the tank but for some reason people rarely take a picture inside the can where the end of the tube is. It's strange. https://atlanticz.ca/zclub/techtips/fuel/gastank/index.htm
Yarb's suggestion is good. You could make it easier and leave the return line alone though and let the gas flow in to the tank, if you just want to test the pump and tank. If it was mine, I'd disconnect the inlet hose from the tank and stick it in to a can of fuel back by the pump and tank. Measure pressure once. You'll know. Super easy. Your symptoms kind of sound like the "crud in the tank" problem. The crud floats around in the tank and gets sucked on to the inlet pipe sock, clogging it. Then when the pump turns off it floats free. Break your problems in to pieces. And yes, page 79. The higher the resistance the more fuel the ECU adds. Corrosion on the connections can cause excess resistance.
You might be getting distracted with all of the different things you're looking at. You said that you were getting 36 psi. That is the correct pressure. Looks like your fuel supply and control system is working right and you were just running out of gas. If you're getting ~36 psi with the vaccum hose removed from the FPR, or engine off, and it drops to about 28 - 32 psi with the engine running then the FPR and pump are working fine. Move on to other things. I'd measure resistance on the water temperature sensor circuit at the ECU connector. The 1980 EFI book is the best resource for doing that type of work. Go to the electrical section.
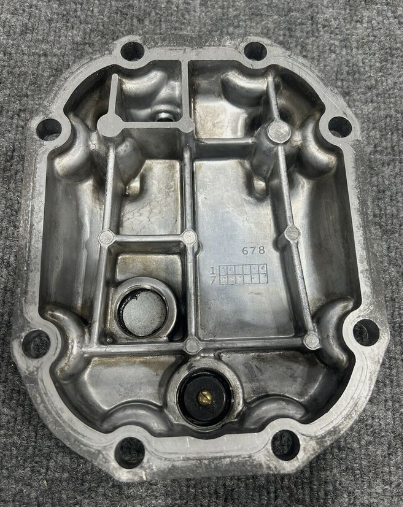
Did you reproduce the original cover dimensions and just add fins to it? I've not really examined a diff cover, let alone an R180's. The one you show looks a lot different than your modified version in post #16. What happened? The factory covers have quite a bit of internal bracing. Here's a Subaru's.
Here's another link. They say that there's a fine screen around the pickup area. I've never seen a clear shot of it. https://forums.hybridz.org/topic/96315-por-15-fuel-tank-repair-question/
There is a "can" or cylinder inside the tank, which has the fuel pickup point inside. That's where the crud would be. There is a screen or "sock" at the end of the tube to block particles from passing in to the pump. If your tank has been sealed in the past it might be that some of the sealant has come free. A borescope might tell you something. You can find quite a few pictures around the internet of the inside of the tank but for some reason people rarely take a picture inside the can where the end of the tube is. It's strange. https://atlanticz.ca/zclub/techtips/fuel/gastank/index.htm
Yarb's suggestion is good. You could make it easier and leave the return line alone though and let the gas flow in to the tank, if you just want to test the pump and tank. If it was mine, I'd disconnect the inlet hose from the tank and stick it in to a can of fuel back by the pump and tank. Measure pressure once. You'll know. Super easy. Your symptoms kind of sound like the "crud in the tank" problem. The crud floats around in the tank and gets sucked on to the inlet pipe sock, clogging it. Then when the pump turns off it floats free. Break your problems in to pieces. And yes, page 79. The higher the resistance the more fuel the ECU adds. Corrosion on the connections can cause excess resistance.
You might be getting distracted with all of the different things you're looking at. You said that you were getting 36 psi. That is the correct pressure. Looks like your fuel supply and control system is working right and you were just running out of gas. If you're getting ~36 psi with the vaccum hose removed from the FPR, or engine off, and it drops to about 28 - 32 psi with the engine running then the FPR and pump are working fine. Move on to other things. I'd measure resistance on the water temperature sensor circuit at the ECU connector. The 1980 EFI book is the best resource for doing that type of work. Go to the electrical section.
Did you reproduce the original cover dimensions and just add fins to it? I've not really examined a diff cover, let alone an R180's. The one you show looks a lot different than your modified version in post #16. What happened? The factory covers have quite a bit of internal bracing. Here's a Subaru's.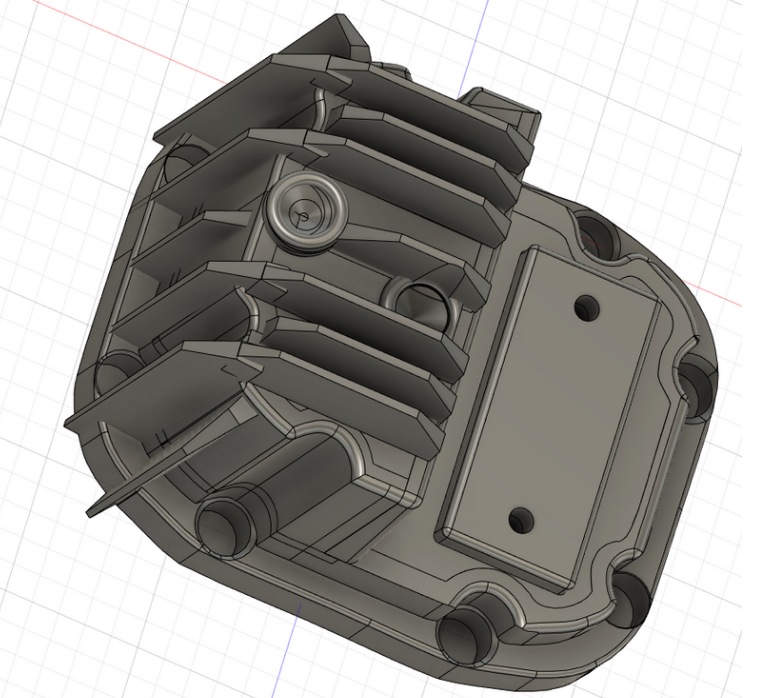


Important Information
By using this site, you agree to our Privacy Policy and Guidelines. We have placed cookies on your device to help make this website better. You can adjust your cookie settings, otherwise we'll assume you're okay to continue.