Zed Head
Free Member
-
Joined
-
Last visited
Everything posted by Zed Head
-
 Turn the engine over by hand and see what the valves do. If a valve stays down you should be able to pop the rocker arm off. Might be able to grab the stem and spring retainer and pull it up. Maybe it's something simple like a broken or weak valve spring. Or a rolled over valve seal. It's odd that you would have oil in the cylinder after sitting overnight unless a valve seal wasn't doing its job. Get #1 up on the compression stroke and that should give the most space between cam lobe and rocker arm. Hoping for damaged valve seal and no bent valve...
 -
Aren't wet and black and black and damp the same thing? If it's running super rich check the FPR vacuum hose for fuel. Maybe the FPR diaphragm failed.
-
Hate to say it but the WOT then problems in the morning kind of hints toward a head gasket problem. Like you got some coolant in some cylinders, overnight. I'd pull some plugs and see how they look.
-
I can't remember the numbers from the capacitor I used. Pretty sure I checked once, but it was more to give my meter a workout and to make sure the capacitor was capacitating. You might compare to the stock Nissan capacitor on the postive side. Just to see if the numbers are similar since an old Nissan capacitor had worked for me. Another factor might be that the Nissan tachometers are kind of finicky. What worked on my tachometer might not work on your tachometer. Nissan tachs die in a variety of ways. The one in my 76 was from a 78 parts car. The 76 unit stopped working when it got hot. But, adding resistance seems like a good idea. I'd guess that stronger spark generates stronger kickback. The factory resistor is something like 2.1 or 2.6 kilo ohms, so add accordingly. You're in the 5's, that might be too much.
-
I completely overlooked what you were saying about the test light on the coil while the engine is running. The test light passes current so would not give a clean "break" of the coil primary circuit. The magnetic field collapse would be messed up. Not sure exactly how. Surprised the engine didn't just stop sparking, actually. Make and break is the key to create spark. p.s. if your Volvo capacitor is passing current it would have a similar effect.
-
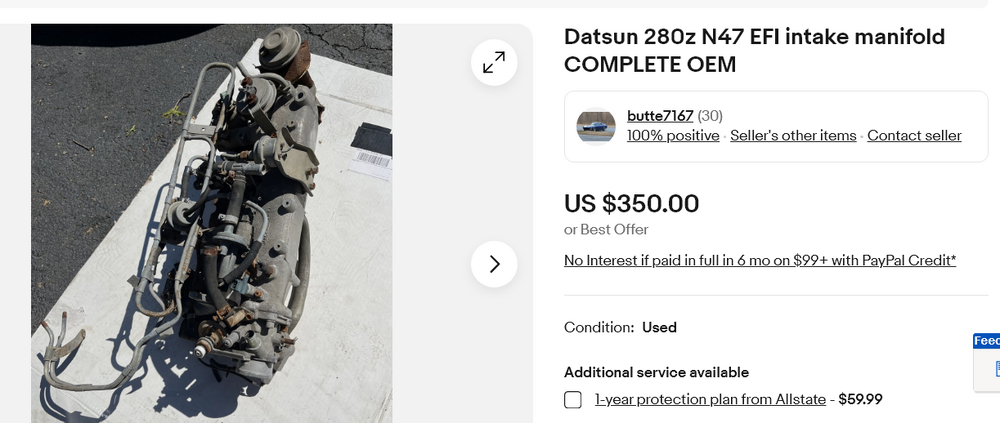
Post up a link to one for sale. That would be helpful and show how easy they are to find. Pick the best of the many that are available and fork out the small change. Edit - I guess I'm saying that they're not as easy to find as you're implying, and when you do find them they're not cheap. The N42 is the most popular of the EFI intake manifolds. Coincidentally, many people think that Nissan added the webbing to the 1978 manifold to combat the heat soak problem. Subject of a current discussion. I'd look for an N47 (I think) 1978 manifold. Still not cheap. $8 for a tube of SteelStik. https://www.ebay.com/itm/385520584919?mkcid=16&mkevt=1&mkrid=711-127632-2357-0&ssspo=So6yfmz_TvS&sssrc=2047675&ssuid=bBzFtXzvTQO&widget_ver=artemis&media=COPY
-
I think that I used one of the typical Nissan postive side capacitors then switched to a typical alternator capacitor when the wire broke on the first one. I just mounted it on the main ground point on the intake manifold. In my case the tach needle would quiver but not move without the cap. That's how I found that the first was broken, when the tach stopped working again. So, two different caps, both solved the problem. Did you check continuity through your Volvo ignition suppression cap? Should be none, of course. Maybe a quick beep as it loads up. Maybe the Volvo unit sucks up too much current and screws up the charge cycle. Could be that the system is finely balanced and I just got lucky.
-
Thanks. It looks like they shaped a slot instead of a circle. You might try compressed air if you have it. But, if you can see the backside of the slot, maybe six gobs of epoxy will seal things up for certain. SteelStik is good stuff. Quick, cheap, easy, rock hard when it cures. https://www.jbweld.com/product/steelstik-epoxy-putty-stick
-
Not sure what went wrong for you but "shorting out the coil" is not possible if the capacitor is intact. Capacitors don't pass current. Any chance you connected it backward and blew it up? Center lead to coil post, body to ground.
-
Don't ruin the entertainment man. The day is long...
-
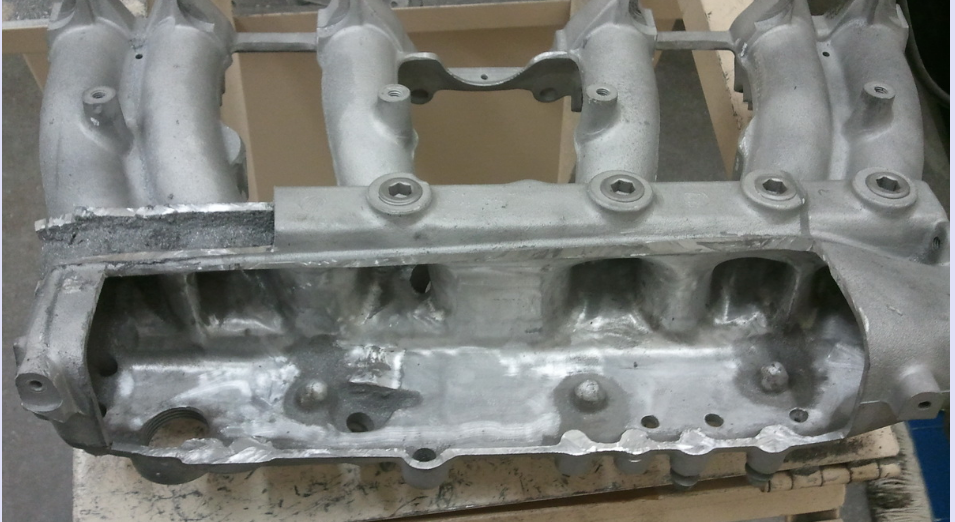
Found a thread about a turbo ZX manifold. The ports seem to be right at the entrance of the runners. Seems like you should be able to see more in yours. https://www.zdriver.com/forums/280zx-s130-forums-77/my-turbo-plenum-32430/
-
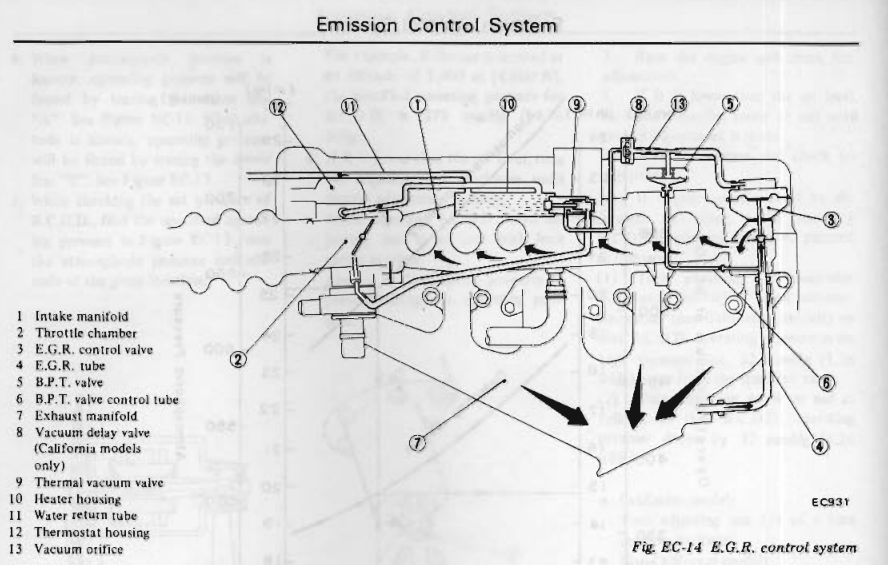
Might be that those aren't access points for the EGR ports but are actually core plugs. Screw-in instead of the typical press-in. I've never examined the inside of an intake runner to see where the exhaust gases are let in. Might tell you something. There has to be holes somewhere. I've seen them on my 2003 vehicle, a Ford. They're known to clog. The FSM is pretty vague with magical arrows. Edit - actually I think that the holes are in the plenum not the runners, I think I knew that but had forgotten. Harder to see. Which I still had my pile of parts to go play with. A borescope view would be fun.
-
I found sandy material in mine also. I thought it might be carbon residue from exhaust gases, but maybe it's actually casting sand. Might be that Nissan found that it doesn't pass through to the intake runners so no need to clean it out. Who knows. Did you poke through to the runner? See if the port is visible.
-
I've removed one of those plugs. It's not too difficult. Heat the metal around the plug before putting the torque to it if it's stuck. Can't remember what I saw but I assume that the hole in to each runner is right below the plug. You could drill and tap each runner port and put a screw in it. Wouldn't be too hard to do. The alternative is more patching and welding or gobs of JB weld.
-
It might be in this thread or one of the others but I had posted some links about Mopar's fix for a similar problem with their Jeep engines. It was a foil heat shield for a certain injector. Apparently keeping the injector body itself cooler helped solve the problem. The L series engines are perfectly set up to overheat the injectors with their position right next to the bulky exhaust manifold.
-
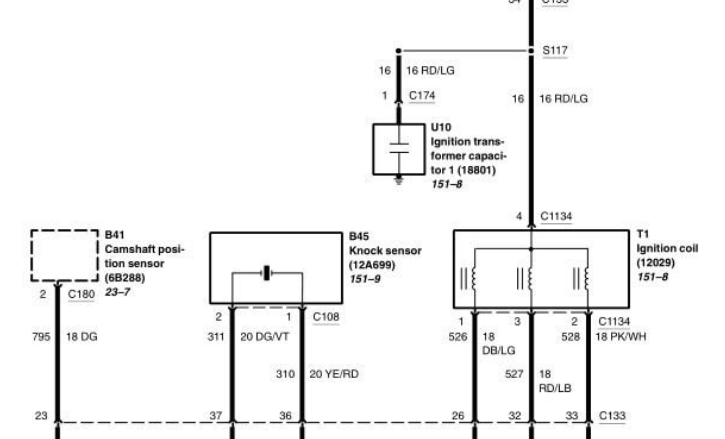
I had a similar problem and found that installing a condenser/capacitor on the negative post of the coil made the tach work. I don't have the knowledge to put any math on it but my theory at the time was that the HEI module created more electrical noise, that affected the tachometer. But over the years I've found more about "kickback" or "flyback" from the coil field collapsing causing electronics problems. So maybe that's part of it. Whatever it is, the capacitor worked. It was just a common alternator radio noise suppression unit. Here's something from a Ford manual describing the kickback. Also an image of their "ignition transformer capacitor". It's one of those odd things that is there in print but very little words are used to describe how it actually functions. This system is controlled by the PCM, not an external module. Short story - a capacitor on the negative post might fix it.

-
Here's the link to the car. Looks like brakes have been addressed, including booster. You might think about double-checking the stuff that's been worked on, like the heads. Head bolts, valve lash, etc. Not clear how many miles were put on it after the work, or the quality of the work, or what shape the car was in in 2018. You never know. I don't recognize the name of the shop. Not criticizing, just saying better safe than sorry. And, inexpensive stuff that might be on last legs, like clutch master and slave cylinders are worth considering. Good luck, looks like a nice one. https://bringatrailer.com/listing/1971-datsun-240z-274/
-
Okay! Carry on...
-
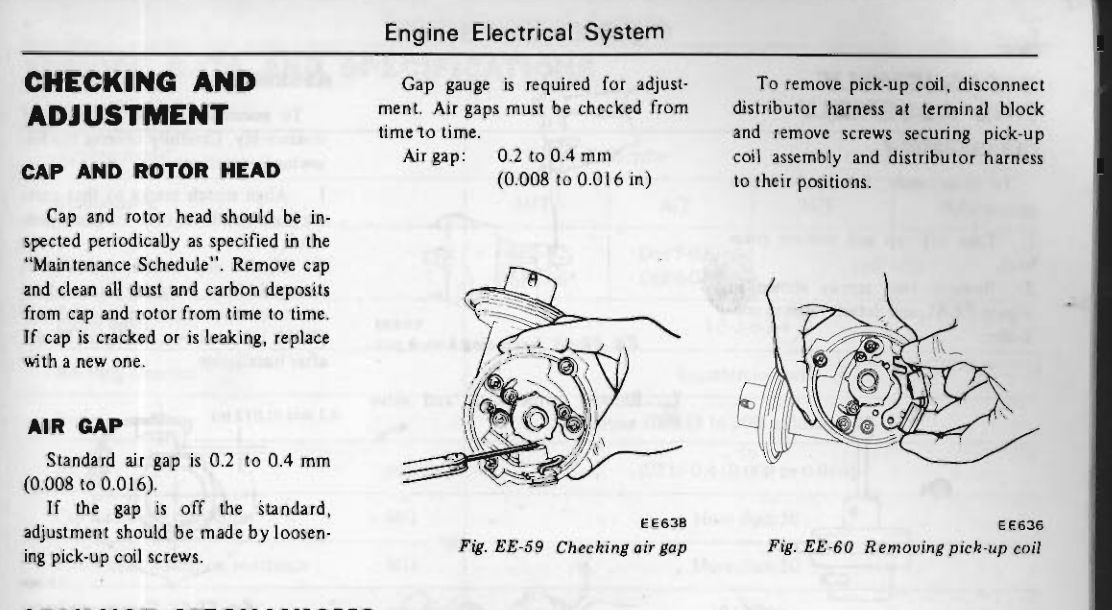
Grab the top of the shaft and see if it has play. The reluctor wheel, the metal star that you're holding, has been known to contact the pickup coil if the bushing gets worn. There's stuff in the FSM about it. This one might be easier to do at the terminal where the red and green wires connect to the harness. But since 1978 has the plug it's actually pretty easy to do inside the car.
-
Rotate the engine, clockwise looking at it from the front to keep the timing chain tight, until the timing mark is at about 10 degrees. Remove the distributor cap. The leading edge of the rotor (it spins counterclockwise) should be pointing at the #1 electrode or the one opposite #1, depending on the stroke of the piston. So #1 or #6. If it's pointing anywhere else then you have a problem.
-
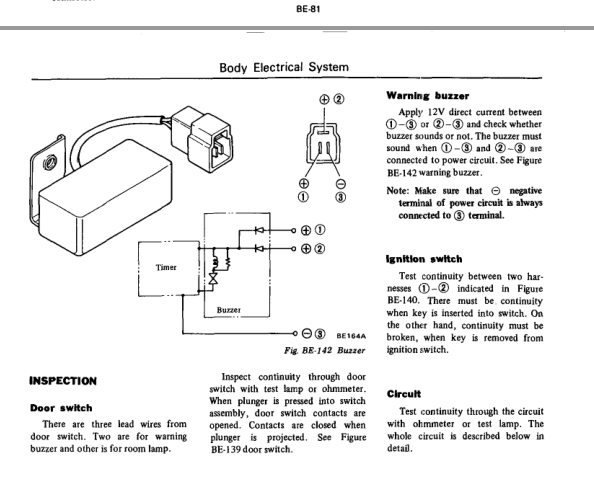
Just realized that I should have wrote "from" or after the headlight switch, not to. Otherwise it would buzz whenever the door was open. Any wire that gets power only when the lights are on.
-
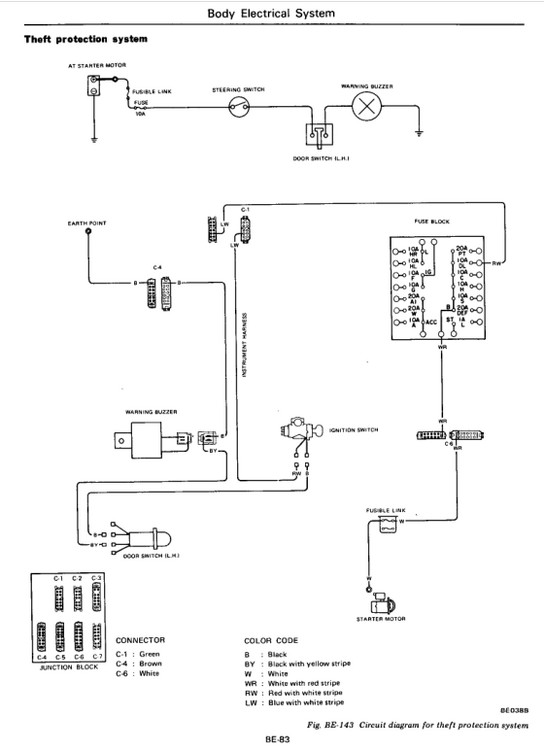
The diagram is way back at the end of the BE chapter. Here's 1976. Here's the description. It does the interior light too.
-
I think that I tapped the power wire to the headlight switch and ran a lead cut the wire to the buzzer power supply side, and replaced it with the new lead. When the door is closed there's no ground so no buzz, when it's open the buzzer gets current if the lights are left on. I drive all of my vehicles with the lights on in the daytime so it was useful.
-
So the basic problem at this time is that the engine does not increase RPM when the throttle is opened. Correct? Have you checked ignition timing? I had an car long ago with timing so retarded the engine would barely respond to throttle. Didn't know what I was doing. I had just learned the time-it-by-ear method, and found that it didn't really work well. Got things all screwed up. It was a carb'ed engine. You might also check your throttle position sensor. I don't know what happens if it gets stuck in the idle position. Maybe it doesn't use the AFM until it's off-idle. It's another at-the-ECU-connector test. In the book.
-
Could be a mouse house in the air inlet system. It happens. No air = no rev.