


Zed Head
Free Member
-
Joined
-
Last visited
Everything posted by Zed Head
-
 MSA is known for packaging problems, and not caring about it. Only game in town, too bad. I started a thread for MSA. Linked this thread. Hope you don't mind, let me know and I can edit it out.
 -
You need to either remove the vacuum hose from the bottom of the regulator, or measure the pressure without the engine running by removing the yellow wire from the starter solenoid and turning the key to Start. The purpose of the vacuum hose is to maintain a constant fuel pressure from one side of the manifold to the other. So if pressure inside the manifold increases (vaucum drops), pressure inside the fuel system increases. You can also convert inches of vacuum to pressure. 17" = 8.3 psi. 28 + 8.3 = 36.3 psi. Looks good.
-
Somebody posted about it on Hybridz also but they moved it to their Tool Shed for some reason. Had some more details. Looks like the old "wire me the money and I'll have the car shipped scam". I felt the draw of one of those way back when I was first looking. Low price, need to sell", in the military (lends respectability), can't communicate directly, etc. All of the signs. http://forums.hybridz.org/topic/123073-scammers-on-z-cara-now/#entry1150782
-
28 is normal for a running engine. There's a hose from the intake manifold to the FPR that adjusts pressure based on manifold vacuum level. Irrelevant to the leak-down but important to know for future work. It does look like your FPR leaks down. The valve in the FPR is just two pieces of steel that press together. A little bit of rust could cause a leak. If "recently" is three years ago, that might be what happened. No recommendations. I've had luck with the factory FPR's and have since installed a modified Bosch regulator. I'd get one from a local store that will take returns. Swap until you find a good one.
-
I ran a new fused wire to the fuel pump power supply, at the harness junction next to the passenger seat. So the relay gets powered with the fuel pump. The relay seemed to be the typical Nissan relay, I think I measured 0.3 amps draw while I was trying to figure out what was draining my battery. More worrisome for me is the fact that high water mark under the passenger seat was about halfway up the relay body. Pretty sure it's been wet. That should really be one of my winter projects. The relay, the parallel L circuit, and cleaning up the wire ends that are still poking out of the harness from where I cut off the regulator plug. They're insulated but hanging in space. Mementos of my first modification.
-
Are you planning a complete restoration and want to get the period (actually VIN range) head on it? A poll of VIN numbers and head ID's might tell the story. If you're doing a restore you might be removing the right head and installing the wrong one. If you're not doing a restore, why replace it?
-
It bolts on to the cross member that the diff mount is bolted to, but not the diff itself. My guess would be that it's mass is meant to damp the clunk from the diff when shifting. Probably makes the cla(u)nk turn in to a thud. My own theory on the clunk is that it happens when the nose of the diff comes back down on to the cross member after getting lifted during acceleration. There are videos out there that show it lifting and falling while driving. If you look closely at the diff mount when it's in place you 'll see that there's only about 1/8 inch of space between the metal plate of the mount and the edge of the cross member. You can also see that Nissan had a little button of rubber molded in between the two plates to stop them hitting when the plates compress. I have two of those dampers and they make nice anvils, and handleless hammers. Also convenient for when I had to dress a cutoff disc down to a smaller diameter. Overall, the system is an odd collection of thoughts and fixes. The RTz mount is much more effective.
-
The discussion is about controllable braking in an emergency. And the misnomer of "emergency brake". It's for parking. You're right though, we could have just told him to hit the gym and recommended some exercises. Pull harder!
-
I don't think that jdmwerks is exclusive. A bit disingenuous. Or jdmwerks and Staggshocks are the same person/company. Here's a link that seems to show where the usage originated. Might get better info there. http://forums.hybridz.org/topic/117631-new-s30-shock-and-spring-option/ Post #4 is the relevant one. Looks like you could save $25. But customer service might be better with jdmwerks.
-
I think that most of us were recommending that your drive (propeller) shaft wouldn't be the cause of the vibration. But, who knows. You're caught in the morass of many changed things, and a problem. Have you had the front end rechecked? Who turns just one rotor?
-
Did you measure the height of the assembled parts. Can't emphasize enough that this will tell the whole story. The slave cylinder and the clutch fork pivot ball have the same relationship on all transmissions, from 71 to 83 for sure, maybe even earlier, because they're both mounted on the transmission case. It's that relationship that determines the fork angle after the transmission is mounted to the engine, and how far the collar and bearing move when the clutch pedal is pressed. I will never install another transmission without verifying that measurement.
-
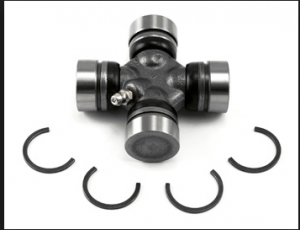
External clip u-joints typically have the groove for the clip machined in to the yoke. The Nissan type, internal, have a flat machined in to the yoke fro the clip to sit on, but the groove is on the u-joint bearing cup. So they're not interchangeable. Stole a picture from the ZStore below. I'm with zKars, I think that your first shop may have sent you off on a wild goose chase. May also have screwed something up. Probably started here - "This was after I reported various noises that started after they installed new front pads and turned one rotor. The noises just got worse after they worked on it again, and the vibration started soon after."
-
I agree, the Datsun hand brake seems really weak,compared to other cars. I remember driving in my friend's new Toyota Celica with another friend who used to enjoy grabbing the parking brake and locking up the back tires while we were driving down the road. And he did this from the passenger seat. He got a lot more enjoyment out of it than the rest of us. Eventually he was extruded from the group (it was high school). I can lock the back wheels on my car but it takes a lot of pull on the lever. Not really conducive to driving it that way.
-
Words can be fun. If you're on a roll, in the flow, might as well keep going. I realized in my sleep last night that I hadn't measured my gauge wires in the way relevant to the issue. If Nissan was going to make a fail-safe gauge L circuit they would have added resistance across those two wires, in parallel to the bulb filament. So I re-measured this morning, in case there was something hidden in the bulb socket, with no bulb in it, and...still nothing. OL.
-
It is working correctly. It's a parking brake not an emergency brake.
-
You wrote all of that, posted it, and didn't need to edit? Maaaan. I'm impressed. I was thinking the same about checking the lights before starting the engine, and often do, but it would be that one busy week that would get me. FastWoman has a 78. Maybe she'll check her circuits for the sake of your sanity. In the meantime, I might just add a second circuit to the L terminal, just for that busy week when I don't check the light. This will also become a recommendation for all future alternator swappers.
-
Yes, I have a setup with 14mm o-ring injectors. Bosch 280 150 901. I only picked them because I was trying to solve the heat-soak problem and wanted a different nozzle style (whole other story). They work just like the originals essentially, although I think mine were a little bit richer than the stock Nissan injectors, but I'm not sure since I was between emissions test, and changed AFM's in between also. Mine are high impedance and may open quicker than the low impedance, causing more fuel at idle. Don't know for sure, just a fine detail. I had to lower the fuel pressure to pass (I have an adjustable FPR). I'm not sure the 188 and 190cc numbers are 100% accurate either. Most of the flow rate numbers come from the same web site - Stan Weiss's for example - and there seems to be some variation between spreadsheets. So, I would recommend an adustable FPR, or to be ready to get an adjustable FPR, in case you do end up on the rich side. Pallnet does good work and will probably send everything you need, or at least recommend what you need. He's sold many. Besides mounting, you have to get the seal right at the manifold. I just stacked two o-rings at the base of mine, because that gave the proper insertion of the nozzle in to the manifold and sealed well. But I built my own rail, and my own mounting system. Otherwise, it's a simple swap, just a few odds and ends that you have to take care of. I think that Pallnet is the one that found the Toyota injectors but I haven't seen that anyone's actually used them. But if the flow rate is close, it should be easy to tune them in. But it may not be a swap and go operation. Looks like they flow 177, so assuming they open and close the same, you might be fine or just need a potentiometer on the coolant circuit to tweak them in. http://users.erols.com/srweiss/tableifc.htm
-
There is another part to the EGR system, the BPT valve, that opens to let intake vacuum open the EGR passage. If that has no EGR valve on the end of it, it would just open to atmosphere. Seeing the remains of your EGR valve though, makes one wonder about the state of the other systems on the intake manifold. Take a good clear picture of the top of your intake manifold and post it for us to ponder. We might see something. A thought on another potential cause - A short circuit on the injector harness. The short opens the injectors full, flooding occurs immediately, backfire from red-hot liners on exhaust ports (N47 head) , shaking opens short, back to normal. It's a flyer, but who knows.
-
Maybe that squiggly is just a generic marking representing all of the other power sources for L. I looked at the 78 diagram and see the fuel pump control relay among several other possible "resistances" all branched with the voltmeter L wire. Wish somebody would do the saridout procedure on 1978. That diagram is hard to read. Edit - forgot about the atlanticz version. Much better - http://www.atlanticz.ca/zclub/techtips/wiringdiagrams/78_280Z_wiring.pdf I think I need to add a circuit to my L wire. Thanks for the warning CO. Edit 2 - I've woven a web of my own comments around your thread CO. See above. Hope they make sense in the end.
-
Now I'm worried, since I relocated my brake check relay power. When my bulb blows I might be running on borrowed time. Maybe, assuming. Looking forward to the solution to this mystery. Edit - The brake check relay doesn't seem to be involved, by the wiring diagram, but the other power sources at the VR do. I'll have to pull my charge bulb some day and see if the alternator still charges. I'm guessing it won't. My battery is relying on one of those old corroded bulbs in the gauge. Edit 2 - after a better look using the atlanticz site diagram it looks like the brake check warning lamp relay is involved, in 1978 anyway. Seems like it may behave in a similar fashion to the charge light also, on when engine's off (alt not charging), off when the engine is running and the alt is charging. Maybe the brake light comes on also for 1978 when the alternator has a problem.
-
Funny, I've never actually looked closely at the charge lamp before. I had assumed that it was some special, high-durability bulb designed for its critical function of notifying the operator of a charging malfunction. But, it's just a plain old bulb, glowing on the back of a piece of red transparent plastic. I looked at my 78 gauge, and there's no need really to measure resistance since you can see the short sections of wire directly from the bulb socket to the connector. But I did anyway to make sure one of them wasn't a magical piece of restrictive wire. Both were plain old copper strands. One was 0.1 ohm higher than the other but I think that was just poor contact from my pointy probe. I'd guess that you could measure from the L connection at the alt back to the gauge bulb socket on an intact harness, and from the gauge bulb to the power source, and learn something. I didn't keep any body harness, just the EFI harness and odds and ends, like gauges and relays. Maybe the brake check warning lamp is involved, I think that it's in parallel with the L wire. It stays on after the swap,on a 76 anyway. Has to be relocated to another power source. Seems reasonable though, that there would be a parallel circuit. Otherwise, a blown bulb leads to a dead battery. Defeats the purpose of the bulb. Back to you...
-
I can't even remember what the problem is. Probably getting carried away. The car runs but dies randomly? Is that it?
-
Considering what you're considering doing, Patcon has many good parts. The extra FPR is for the 78+ fuel rail, and one piece the rail itself is a much better item than the three piece that RedWing is using now. It's a direct swap, everything lines up, except for maybe the cold start valve. They changed that with the ZX I believe. The three piece rail can leak at the hose junctions. They're probably all old and about to split. Be careful, once you start removing parts, the rabbit hole gets deeper. Edit - the FPR design changed with the rail design. Nissan went from two inlet ports to one, as site noted above somewhere.
-
Don't the windings in the alternator play a part also? My 76 doesn't do that,it just goes directly to lamp off. The alternator is an old 1981 junk yard unit that came with a motor I bought. Best one I've had so far. Maybe your alternator is not up to par. Is it a reman? Of course, that's not why you posted, it's the other mystery. I have a 78 voltmeter in the garage. I can measure resistance, for comparison, but someone else will have to do the other gauge. My parts have been working well together and can't be disturbed. I should see lower on the 78, assuming the lamp is the same, if the resistor is in the gauge.
-
I've seen them but it's not been clear which went where or where they came from. Care to share? By nose, you mean the lever at the bottom, with the ball on the end, correct?


