Zed Head
Free Member
-
Joined
-
Last visited
Everything posted by Zed Head
-
 The Megasquirt site is informative - Idle Control Looks like many ways to use a modern valve.
 -
The big hose opens to the air intake tract. Either through he AAR or directly through the AFM hose or both. Are you checking with the engine warmed up or is it still cold? Did you plug the power back in to the AAR? If you didn't, it might not be closing quickly, and you're actually cutting off air through the AAR when you pinch the hose. 1977 had several hose routing possibilities, currently under discussion in other threads.
-
Glad you got some value from it. I have an adjustable Aeromotive regulator that leaks down in seconds. It uses a big ~3/8" diameter steel ball in the diaphragm seated on a hole in the aluminum body of the bottom half. Terrible design for sealing. I even tried to fix it by lapping in a better seat in the aluminum but it's impossible. I'll probably sell it to somebody for use with carbs (it has a low rate spring for carb usage). That's what got me interested though. On your leak-down problem - I have cracked the fuel lines on 280Z's and ZX's in the wrecking yards that I'm sure had sat for months. They were still holding pressure. You might consider buying used Nissan wrecking yard parts. Easy to test the leak-down of the pump check-valve and the FPR with a pair of side-cutters, aka "dikes". Just make sure the cut is pointed the right way, and cover your eyes. Having a system that holds pressure for days, weeks or months is really nice. That's why I never went back to that Aeromotive FPR even though I'd like to have it to do some fine tuning. Too aggravating.
-
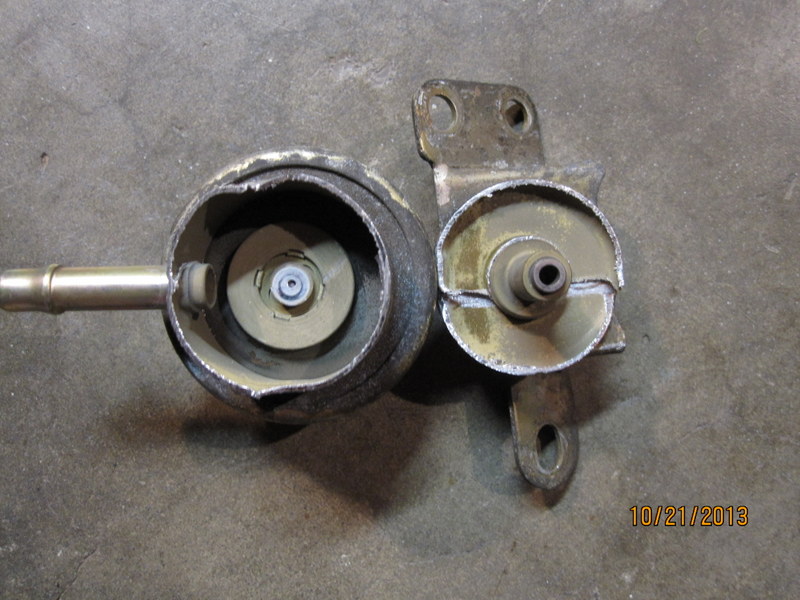
Messing around with things and I cut an FPR open, mainly for the mounting bracket, but also to see what the valve looks like. It's a steel tube mated against a steel disc, both highly polished and very flat. You can see how a little bit of crud or even just a hair could cause it to leak.
-
They don't seem to be called out as separate pieces here - Datsun 240Z Door Lock, Window Regulator & Door Handle (To Jul.-'73) My window would hang outside the rail at times after I got my car. I messed with several things at once but if I remember right the thing that made a big difference was putting the "door glass bumper" (page 2 in the PDF file) back on to the door skin. It hangs/clips on to the door skin near the front of the window opening and pushes the window in as it's rolled up. They seem to break off from flex-fatigue over time as noted in the PDF file. I found the pieces to mine in the bottom of the door. Got a replacement at the wrecking yard. Part #26 here, but hard to see - Datsun 240Z Door Moulding, Finish & Arm Rest (To Jul.-'73) BUT, maybe, if you're lucky, new ones might still be available - STOPPER-RU :: Nissan Parts, NISMO and Nissan Accessories - Courtesyparts.com Check with your local dealer first, using the part number. Note that they are left and right, I don't know which number is which. Your broken rollers might also be leaving their channels and binding. But it looks like you'll have to build your own or replace the whole assembly.
-
The key concept of the EFI system is fuel pressure. The gauge seems expensive but the $40 will probably save you hundreds in parts and whatever your time is worth. If you don't want to buy one, see if a shop will measure it for a small fee, or if you can borrow one. There's no need to "cut in" a fitting for a gauge. The gauges come with a T fitting with the gauge port, a piece of hose and some hose clamps. All you have to do is pull the hose between the fuel rail and the filter and insert the T fitting. If you replaced the filter, you've already had the hose off once. Avoiding the fuel pressure measurement might be the most common (non)action of people new to working on EFI. Fuel squirts from the hose, gas flows, the pump makes noise - none of these tell that fuel pressure is right. If it's not right, the EFI can not work as intended.
-
They moved the BCDD to the bottom of the intake manifold in mid-80 or 81. You could look through the various FSM's, EFEC chapters, to see what's out there. My 95 Pathfinder has an IACV mounted on the throttle body. But it also has throttle control by cable. And don't forget that the TPS is mounted on the throttle body. They went to sensors instead of switches eventually so you might have to rig something up there. And, the AAR heating block needs consideration. Overall, looks kind of complicated to convert. Might be easier just to move it and hide it.
-
Which intake manifold? The intake manifolds changed sometime around 1979 or 80. They actually went to a slightly smaller throat with a different bolt pattern for the 280ZX's. You can't run a 1981 throttle body on a 1978 intake manifold, for example (I have both).
-
Taking the inside panel off is not hard and will let you see inside the door. The hardest part is popping the plastic hold-downs off and removing the plastic sheeting. The Body chapter of the FSM describes taking the door panel off. Do that and read this Technical Article,or vice-versa. Looks like something broke, maybe one of the bolts on the top of the front of the door. Classic Zcar Club - S30 Door Window Problems and Troubleshooting Procedures
-
Good luck. Come back with whatever you find out. Word is that you won't find anyone at Tokico to talk to since they're under new ownership and don't have their distribution figured out yet. John Coffey probably knows but may be tired of talking about Tokico. They're messed up.
-
Forgot about that part. Good detective work. According to the FSM, the BCDD is not repairable and has to be replaced as a unit. Many people remove it, but I think it helps with the gas smell on deceleration so the car might smell a little more if you do. You might try running carb cleaner through the various passages, it might just be stuck. There's some springs, and a diaphragm and several passages inside. The diagram is in the Emissions chapter of the FSM, along with troubleshooting. Any year from 75-79, I think they're the same. There is also a solenoid inside, but I can't remember what happens if it loses power. Power is controlled by a speed sensor on the speedometer, through the black wire on the bottom of the BCDD. You might check that, maybe the power is stuck on or off.
-
That is my understanding. I have a used set, and underneath the 3012 and 3013 part number decals is what looks like the original Tokico part number 3038. One of the press-fit spacers fell off also, that's how I know they're not permanent. Since the gland nut is part of the package specific to the car, I think that Tokico takes 3038 shocks from their stock, presses a spacer on to the 3013 shocks, then puts the proper gland nut in the box and the package becomes either a 3012 or 3013 stock number. The 3012 or 3013 decal goes on the shock tube to avoid consumer confusion. Take a look at your rear shocks and see if they're still using a decal. Look for 3038 underneath. That would be one more verification of what I've seen.
-
The fronts are just the rears without the spacer. The spacer is a press-fit (check yours and you'll see).
-
Could be the Auxiliary Air Regulator (AAR) or the throttle shaft sticking due to PCV valve vapor residue (reference Humble's How to Restore book,page 194) . He says Nissan actually issued a Recall Bulletin and kits to fix it around 1977, rerouting the PCV hoses. Pull a hose off one end of the AAR and look inside when the engine is warm. It should be closed. If not, it might be fixable with carb cleaner. Pull up on the throttle when the idle is high and see if the idle drops. I had to hose the inside of my throttle body with carb cleaner and use some Scotchbrite where the blades came close to the body when I had a hanging throttle. It only stuck when it was warm though.
-
The major disconnect is here: "goal is 240rwhp", from your first post. Don't forget drive line power losses. Some say 15%, some say 20. 10% would be conservative, so you'll need ~267 HP at the crankshaft. 95 HP/liter, 1.6 HP/cubic inch. You'll need a lot of etc. to get there. People are just trying to add more reality to your project. Still, for those that follow, keep track of your costs and report back. You'll probably be in the thousands just to get back to like-new with stock power levels, just on the engine, let alone the rest of the car. I'm seriously interested in where you end up. The advantage of Rebello is that his engines are a package deal and the shop is set up to for the work. You'll spend a lot of time educating shops on how to do the work. And there will probably be mistakes made, that add cost.
-
I missed this part. Good luck with it.
-
Give some information on the state of the system before the problem. Did it start and run right before or is this one of those "ran when parked ten years ago" projects? In the mean-time I would pull the spark plugs, spin the engine, and see if any fluids come out. Gas, water, or oil can all cause hydraulic locking.
-
Yeah, when it's not raining you can see some great scenery in the Pacific Northwest. I've never let fuel run from the supply line for 5 seconds or more, but I'm pretty sure that fuel should flow freely until the tank is empty. There is a spring loaded one-way (in) vent in the gas cap that can get stuck though, but you tested with the cap off and still see the problem. People that have sealed their own tanks sometimes clog the screen to the outlet pipe with sealant. I think that I've read of fixing that problem by running some thin wire up the outlet hose to poke the material off of the screen. If you've tried three pumps and none will generate pressure, I would focus on the fuel supply line from the tank. Blue's suggestion will confirm that your pump works if you want to be sure you're not wasting your time.
-
Is the pump mounted in the original location, and is the supply hose a fairly straight shot to the pump? The EFI pumps are typically "push" pumps, they don't pull well at all. In other words if the pump is mounted too high or if there's a loop of hose before the supply inlet to the pump, the pump rotor will just spin air, but won't generate enough suction to prime the pump. How long did the fuel flow freely? Sometimes there are floaters in the tank that let fuel flow then get sucked down on to the outlet from the tank. The power to the pump is controlled by the alternator power OR the oil pressure switch. Either. But it should be fairly easy to hear the pump when it runs. You can test the pump, and the pump power wires, by removing the small wire from the starter solenoid, and turning the key to Start. The starter won't engage but the pump will get power. this will let you test pressure and flow, and take the pressure switch and alternator out of the picture since the Start circuit bypasses those safeties.
-
It looks like original, with the IC Regulator sticker on it. I would have it tested and keep it or sell it. My original, old, worn alternators have all worked better (until they died) at idle speed, than my parts store alternator which suffered brown-out at idle in comparison
-
In the USA the 240Z (S30) and the 280Z (S30) have similar body styles, but the 280ZX (S130) is very different. For instance,the 280ZX does not use a MacPherson strut suspension in the rear, but the 240Z and 280Z do. So there is no need for a rear strut bar in a 280ZX. The 240Z and the 280Z both use MacPherson struts in the rear, but the 280Z uses a longer vertical strut. So the distance between the two struts is different for the 240Z versus the 280Z. The dimensions are shown in the illustrations in the Body chapter of the FSM's (see link below). You'll need to figure out what car you're working with, in Italy. Index of /FSM
-
What did you find inside? Any pictures? Not many people refurbish their starters, although I did take mine apart to figure out an odd noise, which turned out to be the bushing in the nose about to fall out.
-
Curious what your estimates were for this plan. Parts alone, plus machine work, plus assembly, plus tuning. Seriously, it would be a good exercise and give you a much better idea of how much you'll need to spend. I made a comment earlier about nickels and dimes. They really do add up, many people recommend doubling an initial build cost estimate,then hoping nothing goes wrong just to hit the doubled number. Anyway, since you're at the start, it would be a lesson for anyone following if you keep track of and report the costs you incur with whatever you decide.
-
If you thought that you could use the name of a Nazi and SS officer and not get some grief for it, then you have a general, universal, ignorance going for you. Enjoy it. I don't harbor hard feelings for people who do dumb things. I just feel some disappointment that they turned out the way they did. Regarding your logic of "he didn't do anything we didn't do", war crimes by both sides don't make war crimes right, by default. Perhaps the Brits should have been prosecuted also. As for choosing his name because you admire his exploits, your choice shows more specific ignorance and/or insensitivity to those people who are still alive and were affected by the Nazis and the SS, and WWII in general. It's just a selfish or thoughtless, insensitive choice for a screen name.
-
Someone pointed out on zcar.com that "Otto Skorzeny" is the name of an infamous Nazi and SS officer. Otto Skorzeny - Wikipedia, the free encyclopedia I hope this guy is just generally ignorant, and not of the ignorant skin-head type. Something to consider when conversing. He never replied to being called out on it on zcar.com.