Zed Head
Free Member
-
Joined
-
Last visited
Everything posted by Zed Head
-
 I've had four used transmissions in my car and they all make the same bearing noise that goes away when the clutch pedal is pressed. The noise doesn't get worse over miles run though, and it seems to be just a noise, it doesn't affect operation. I've also read an account from one of the more experienced members here (can't remember who for sure) about rebuilding a transmission, installing it and having the noise come back within miles. The bearings used in these transmissions are C3 spec., which is a loose tolerance to allow debris to flush through. Maybe it's normal. The later 71C transmissions, in the 300Zx and the 240SX, used sealed bearings which are probably tighter tolerance (haven't checked), maybe as an attempt to make them quieter.
 -
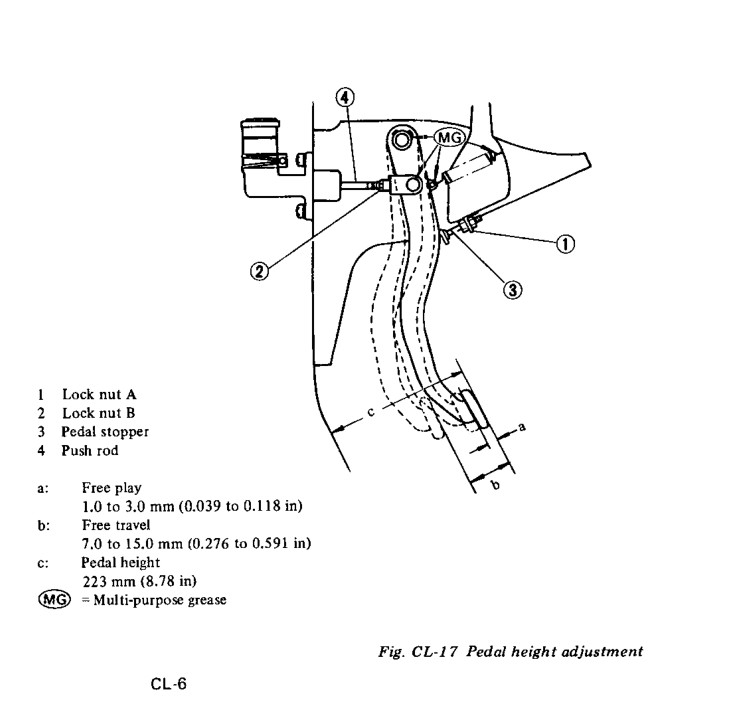
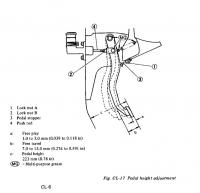
Did you adjust the rod to the master cylinder to make sure that you're getting full travel? You can do it with a pair of pliers and a wrench without removing the rod if you're good at contortions. Loosen #2, and twist #4, in the diagram.
-
The fifth one is in-line in the EFI harness, is green, and consensus seems to be 40 amps. They went to two fusible links in 1978, still in-line. The stock setup is to have the link(s) clipped on to the metal relay bracket by the battery. Forgot to say that they are described in the Body Electrical chapter.
-
It is most likely the dimmer, or high beam/low beam, switch at the base of the turn signal stalk. It's happened to me on two cars. You can spray contact cleaner in to the guts of the switch and work it back and forth and that will probably fix it. It did for me both times. Or you can take it apart and clean it. You might even find that it's stuck and one click will fix it.
-
Your AFM numbers look great, ~100 and 180 ohms. I wouldn't mess with adjusting the AFM at all until you get the ECU connector to read the same as the AFM. From your previous post, it looks like you might have corroded connections between the AFM and the ECU. The ECU connector numbers should match the numbers directly from the AFM within an ohm or two. Until you have the electrical connections between your coolant temp. sensor and the AFM cleaned up, don't touch the insides of the AFM at all. You'll be getting way ahead of yourself.
-
I don't really know if this would make a difference, but it might. The "How to Rebuild..." book by Monroe says to install the rear main cap first. Your statement above suggests that you are installing it last, unless by "last" you mean last in line from front to back.
-
Fusible link? They melt on the inside so it's hard to tell when they've failed (succeeded).
-
This 1976 Service Bulletin sheds a little light - http://www.xenons30.com/files/Datsun280Z_1976Supp.pdf -, page 8. There was either an intermediate, more durable, material used before the N47 intake seats or the change happened sooner than thought. Or maybe the the intake valve was changed before they got to the exhaust valve. They don't really say what the new material is.
-
That's probably just water and carbon. Both combustion byproducts, running a little rich will produce more carbon. No biggy, they all spray a little back gunk after starting a cold engine. $250 is over $40 per injector. Almost 1.5 times the Rock Auto price. Let him keep them if he doesn't stick to the initial quote.
-
Ace Hardware has a good selection of metric screws. You could probably find one that will do the job and replace them later if you want the hex head factory screws. A Phillips head screw isn't going to corrode in place and bind up in a few days.
-
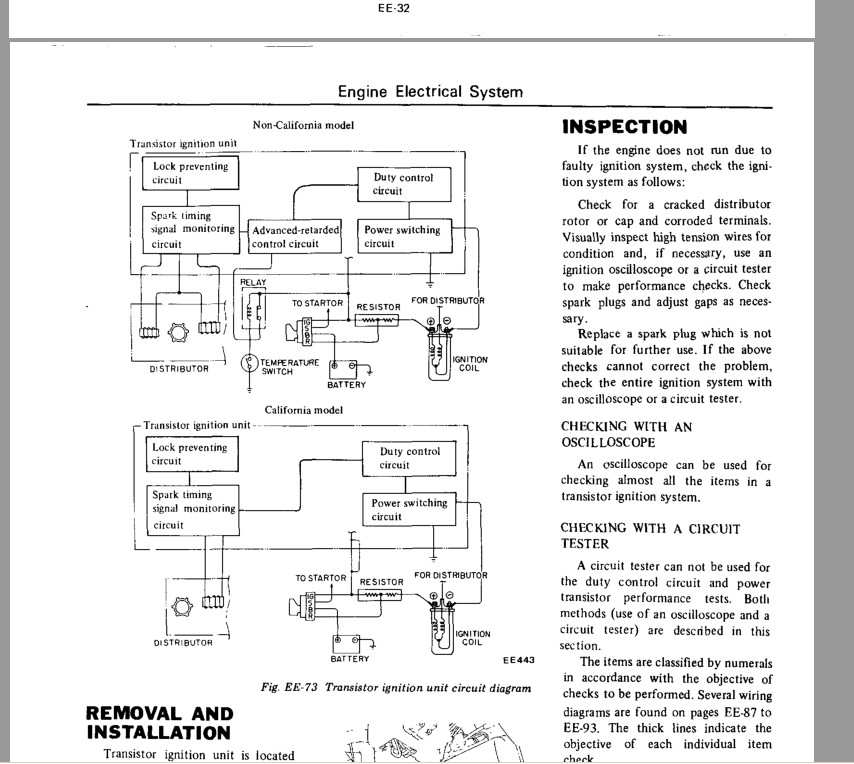
I've never actually tested the ignition module but there is a procedure. Here's a piece. www.xenons30.com/reference
-
Typical mis-matched injectors on an older Z. If they flow at the same rates the mis-match in pintle caps (the plastic cover on the ends) won't matter. How long has the car sat in the past? It doesn't take long to build up gas tank crud and get a little moisture in the injectors. The set that were on my car when I got it had a mis-match in flow rates of about 15-20%. A few of the cylinders were running pretty lean. Only the small seal on the end seals to the intake system. The big one is an insulating mounting gasket. The rubber pieces are cheap and available at most auto parts stores.
-
You can replace the hoses on the injectors. It's even described in the FSM as a standard maintenance practice. The injectors have a specific "one-way" barb style that allows the hose to go on and seal but not come back off. The old hoses have to be cut off. I've used the 5/16" Gates hose and it seals fine. You do need a good tight hose clamp on the rail because the new hose is kind of slippery and will tend to loosen up on the rail barbs over many heat cycles. Check the clamps as regular maintenance. The injector barbs don't leak.
-
There is one fuel rail bracket that's bolted to one of the four big intake manifold bolts across the top of the manifold. Looking down from the driver's side (left side) it's underneath the rail so essentially invisible. That's probably the force. Several of us have been stymied by it.
-
$106 for a "DIODE ASSY". Probably the plate with the three positive diodes installed. At least I have a part number now. (I found a new parts site also: nissan4u.com) - Part #19 - http://nissan4u.com/parts/280zx/us_s130/1978_7/type_2/engine_electrical/alternator_fitting_and_alternator/illustration_2/ You have to insert a dash before the letter in the part number for Courtesy's site to find it - http://www.courtesyparts.com/diode-assy-p-281882.html Edit - I think that this is the right number for 1978. Still $106. The above is for 1979. http://www.courtesyparts.com/diode-p-281880.html
-
Posting for my own amusement now but also to fill in - turns out the sub-diodes are available from good ol' Courtesy Parts. $10 each. Found the number on carpartsmanual, but the main diodes aren't shown. http://www.carpartsmanual.com/datsunS30/DatsunZIndex/Electrical/Alternator/12V60A/tabid/1641/Default.aspx http://www.courtesyparts.com/diode-p-281902.html Edit - Thanks Steve. We posted at the same time. I'll bet Courtesy has them but I would also bet that they aren't cheap. Edit 2 - I wonder if the part is called out on the classiczcar CD that I've heard about. I've not bought it, so don't really know what's on it.
-
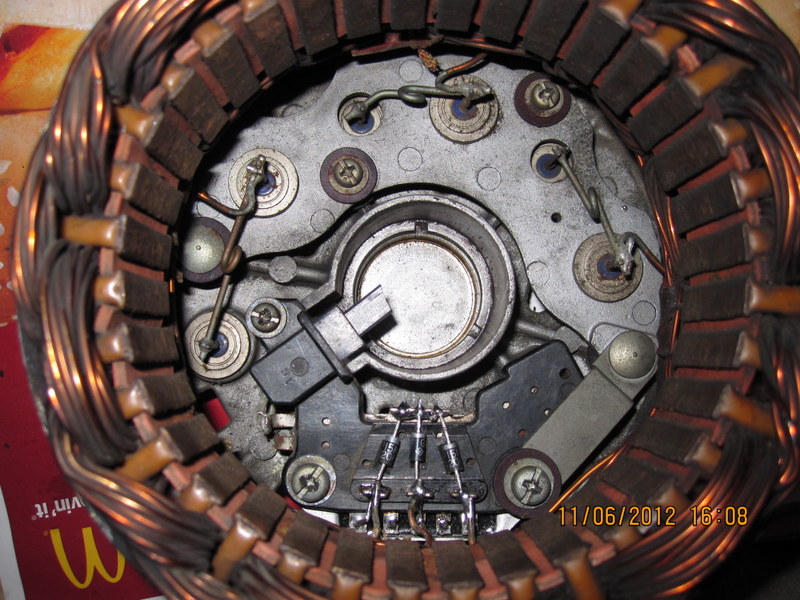
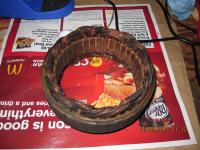
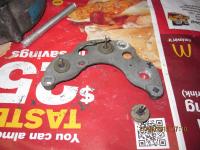
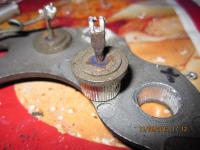
To test the main diodes you have to desolder all of the connections to the stator and at least one to one of the diodes. Then pry the stator (the metal ring with all of the windings) out of the case to get two of the studs out. Pretty much deconstruct the whole thing,just like they show in the FSM. I did find one bad main diode. Now if I could just find a new set. Added pictures just because you don't see these that often. For anyone that's on their third or fourth try with an auto store rebuilt and looking for an alternative. Edit - I guess that there are diodes out there - http://shop.advanceautoparts.com/webapp/wcs/stores/servlet/product_x_5260086-P_x_x?cm_mmc=CSE-_-Shopping-_-VALUE3-_-VALUE4&srccode=cii_13736960&cpncode=32-189062079-2#utm_source=cse&utm_medium=shopping&utm_campaign=value3&utm_content=value4

-
My expedition in to the world of cheap alternator repair is on pause. It must be one of the main diodes that's bad, they did look a little crusty. A fail on the lamp/diode part of the test at Autozone. From what I've read, people used to actually replace these diodes without too much trouble, three are pressed in to the case, and three more or are pressed/mounted on the diode plate. The FSM even says "replace if faulty". I'll probably take them out and test them when I get back in to it. There has to be some old stock out there in a warehouse somewhere.
-
I think that purpose to opening the throttle blade is so that the closed intake manifold vacuum doesn't affect the pressure readings. After one cylinder pulls a vacuum and closes its intake valve, the next cylinder to open its intake valve will be pulling on the previous cylinder's vacuum. Less air to pull in will be less air to compress leading to lower pressure readings. In theory, I haven't practiced it. On an EFI car there won't be any fuel to flood with if the main distributor wire is pulled,or if a remote starter is used. The EFI injects based on pulses from the spark events. No spark, no fuel.
-
Deep and loud implies something with a lot of mass and/or relatively low frequency. Tires and wheels come to mind. What happens if you shift in to 4th at 65, besides the higher RPM? Does the vibration change? Push the clutch in and see if it changes too, this will separate the engine and flywheel from the wheels and drive shafts. Might tell you something.
-
The variety of testers and the various hoses and adapters that come with them can have a large effect on the numbers. I've measured 180 psi without an adapter and 120 psi with. The volume of the gauge and the hose and any fittings "count" as combustion chamber volume when the measurement is taken. More volume results in a lower pressure reading.
-
I'm starting to get it Mike. The diode trio has more functionality than I had thought. I would guess that the specs. for those three diodes are fairly important, so my Radio Shack diodes are unlikely to be long-lasting even if they do work. Still good to know that if I had the right diodes I could get them installed correctly. If the alternator windings are in good shape, rebuilding an alternator is not really very difficult, if you have the parts. I can source all of the parts individually except the diodes. Regulator, brushes, bearings and diodes are about it.
-
I think that I got things back together in the right order. The circuits tested correctly with my meter. But I still don't have a good clue as to what the properties of the right diode would be though. There are hundreds of choices out there, and I don't really understand the specs. I found that my little 12 watt and 20 watt soldering pens wouldn't generate enough heat to solder things back together (the wires are soldered to big flat plates in the brush assembly) so I went and bought a Weller 200/260 watt solder gun (D550PK) which was way overkill for the work, and not really the right tool. I managed to get the right combination of heat sinks to avoid destroying anything and still get good bonds. Learned and relearned a bunch about soldering, more new learning than relearning. The Weller gun broke as I was using it, the lights stopped working so I returned it. It was actually the second gun, the first one I got had the bulb glass broken and laying in the bottom of the case. I would feel bad for using the gun to get the job done and returning it but two poor quality items in one day was too many to stick with the the same product. I did some more research and went to the local Fry's store and bought a Hakko FX-888 soldering station. Plus I browsed their selection of NTE diodes and the NTE catalog and made another guess about what might work if the ones in there don't, and picked up three more diodes. I had a spare rebuilt Motorcraft alternator on the shelf so compared the L circuit resistances. The Motorcraft had 1,700 ohm through L to ground, the three diodes I just installed had 8,000. Could make for a dim charge light, but I did connect a battery through L to ground and the windings did magnetize. So, in theory, I think, it should work. Also discovered that the local auto stores are getting weaker and weaker in knowledge and service. Baxters testing machine was broken and they had no plans to fix it, the guy at OReillys wasn't really sure what he was doing and said it failed but couldn't say why, and the local NAPA store said they didn't have the proper connector for the S and L plug so couldn't test it. OReillys machine may well be right by spec. and the 8000 ohms looks like a broken circuit to their machine. No way to over-ride it though, all they can do is plug it in, hit the test button and do what the machine says. I'm going to try Autozone tomorrow. It's an adventure, but still looks promising. If anyone feels like throwing out some electronics knowledge just for fun, that would be great. In retrospect, considering the failure mode, I wonder if I couldn't have just installed a single diode in the L wire to do the job of the ones that failed. Assuming that is the failure point.
-
I misread your post about the AFM. 400 and 200 aren't good. But I think that you may well be mis-uisng your meter. dc-v Would be a voltage measurement, not resistance. Maybe your 400 and 200 are millivolts, not ohms. And there's no reason to pierce the insulation on any of the measurements, the connectors are pretty easy to remove. I think that it might make a difference also if you don't disconnect the connector. With it connected you're measuring the ECU properties also. The problems with the meter settings might also explain the burnt wires. I would look around for some instructions on how to use the meter and start over. Good luck.
-
The resistance numbers of the AFM look right. 100 and 180. You might be able to figure out the air temp sensor if you have the AFM off. There's not much to it, plus a zero reading would make the engine run leaner, not richer. If you're testing the AFM at the ECU connector and you get bad results, the next step is to take the component off of the engine and test it. I assume that you were applying voltage and measuring but that test is more for fine-tuning the smoothness of acceleration, so probably not too relevant to your problem. The TPS is not complicated either. Take the black cover off of the side and the connector off and retest it at the pins on the TPS. Find out of the TPS itself or the wiring and/or connections are bad. You tested resistance for the AFM and the air temp sensor but reported continuity for the water temp. sensor. Resistance values are most important for the water temp sensor., continuity doesn't tell much. Volvo or GM type EV1 connectors are nice because the spring clip stays on the connector. The others are good but you can lose the clip. You haven't said if the engine runs better or worse than it used to. A "state of the engine" comment or two might give some more clues.