Zed Head
Free Member
-
Joined
-
Last visited
Everything posted by Zed Head
-
 I have a 76 Z, and I haven't even been able to get the two leads off so that I can short them. It seems to be the most difficult component to work on in my car. Can't see any windings, it's all covered, can't reach any mounting screws, can't reach the wires. Might be easier on a 240 without the relays and bracketry in the way.
 -
Isn't the critical dimension across the u-joint itself, from the inner edges of the clip grooves? That's the machined dimension in the yoke that it has to fit. Add the clip widths, both, to get the machined yoke dimension. Cup/cap height can vary.
-
Did you re-use the valves? Sounds like one is sticking open, either bent or galled in the guide area.
-
In the FSM. Engine Mechanical chapter, I believe. XenonS30
-
My point was that the claims about saving fuel are crap. I've read the accounts about stopping hot spots and high performance applications. I think this a case where the company is trying to grow sales by adding BS to their sales pitch. Diminishing the reputation of the company and product in the process. Not uncommon in the business world. It's sad to see. Edit - and I think that propylene glycol antifreeze will probably do the same for less money. Just one of those situations where if you don't have patent protection, people can find ways to get the benefits of your work for cheap. Too bad for Evans Cooling.
-
Pretty sure it's propylene glycol. You can buy it as such in any auto parts store. Without water the heat transfer properties drop and it doesn't cool as effectively as the typical water blend. Leno's either a dummy or getting paid to BS people. Probably the latter. Leno's a shill. Here's some text from the Evans web page,which, to me, confirms it's a bunch of crap. Reciting theory over reality. They probably sell molecular modifiers for gasoline for better mileage also. That would be a pretty noisy, power-sucking fan that reduced mileage by 10%. "Increasing the Operating temperature means the fan does not have to run as much, increasing fuel economy by up to 10%" Home » Engine Cooling Systems
-
The OP is talking about fumes from the tail pipe getting in to the cabin, I believe. It's a big problem with the S30's, maybe not so much with the S130's. It is possible to find all of the various leaks in the back of the car and fix them to keep the fumes out. It take some work though. A big leak area, for my car anyway, seemed to be the vinyl covered access board that covers the bottom of the inside of the hatch. There are small weep holes in the hatch, plus the big holes covered with rubber plugs, that can let fumes in to the internal structure of the hatch, and then through the access cover on the inside to the cabin. I took extra care to seal that with weatherstripping, and also to make sure the hatch itself seals tightly to the body. Other things to look at are the foam seals around the tail-light assembly, the access hole grommets for the various tubes and wires and any rusted out areas, like the bottom of the spare tire well. With the windows open or even just air passing over any holes on the sides of the car, the pressure inside the cabin gets lowered and the fumes that collect behind the car get pushed in through any tiny holes. I don't even smell fumes any more, unless I am stopped and get a whiff through the fresh air vents. The fumes while driving smell is gone. To Wade's point though, a cat with out an O2 sensor will probably not last long.
-
On the control arm bushings - take two thin scrapers or putty knives or similar, grease them up and use them to guide the bushing into place. If they're urethane, they'll compress. If you're using the metal/rubber originals, you might have a little more trouble and have to find thinner steel, but the concept might still work. On your T/C rods, it's much easier to install the T/C rods and bushings with the suspension compressed. You can actually get it all done with the car on the ground, just reaching your arm in from the front and side. The two bolts will drop in with a little wiggling and the car can be pushed around a little to get the rod nut and bushings on. With the wheel hanging it's almost impossible to get it done without torquing and compressing all kinds of things. I did it once that way before I learned.
-
The closer you get the IR gun the tighter the spot measured will be. Many have a diagram of the beam spread in the instructions or on the tool itself. If you're too far away you'll get an average of the hot exhaust and cool intake and other parts.
-
I don't know...it's got a half dash cover.
-
I do have a spare set in the garage for a 280Z. But ~$40 is what the local wrecking yards (PnP around here) charge. I'll bet if you kept an ad on a few CL sites you'd get some offers. People parting out cars looking for an easy sale. Good luck.
-
Exhaust manifold info would be good. Square port N42, round port N47. I think that the exhaust manifolds used in the ZX cars are different from those used in the Z's also, and they also have a round port for the P79 head and a square port for the P90(A). The bolt patterns are the same but the ZX manifold is shorter from top to exhaust pipe flange (can't use the ZX manifold on my Z with a stock Z exhaust pipe). I just measured them the other day, but one was on an engine. The ZX manifolds also have an O2 sensor port. And the N47 head came in the middle of 77, I believe, July maybe. And the F54/P79 came in late 80. I could be wrong on the N47, pretty sure I'm right on the F54/P79. Also my 76 N42 exhaust manifold has an EGR port. I think that the CA models might have had EGR. The Service Bulletin says they all do, but it's not right. The picture has it right though. The xenons30 site has the 1976 Service Bulletin and various Owners Manuals. Looks like a cool resource when it's done, thanks for putting it out here. p.s. The valve seats should be silicon, not silicone. Tiny detail. And, I don't know the fine details, but in the 1976 TSB page 8, it says that the intake valve seat material was changed to something more durable but they don't say what. Maybe the change happened in late 76. I think that TSB's come out after the model is introduced. Groovy~ Edit - Just saw CO's post. I thnk that the N47 head with the CHTS port is actually the (in)famous Maxima N47 head. Used on the Maxima L24E. Smaller combustion chamber and valves.
-
B stands for Battery. The thick white wire with the red stripe goes there. E stands for Earth, also known as ground. The black wire goes there. The T plug plugs in to the same hole as the other alternator, the one with S and L beside it. The thing that looks like a small can, the condenser or capacitor, looks correct in your first picture. That should be it. If you were having over-voltage problems it may be that the original issue was with your external voltage regulator. You'll find out when you get the alternator installed.
-
Maybe you can go halvsies with someone that needs the bushings. $14.39 each. I posted something similar on a different thread - put the price you're wiling to pay for just the washers in your thread. Obviously it's less than $28 for 4. The problem now is that anybody with spares now knows how difficult they are to find separately so may want to hold on to them.
-
Napaonline has the whole kit for $11.99 per side. $23.98 plus shipping. (Edit - NAPA's poor web site says that they charge a flat $7.95 for shipping - $31.93 to your door. Under $35!). One of the Seattle NAPA stores has it for $14.39, "at the warehouse". $28.78 total. Looks like the deal. NAPA AUTO PARTS
-
Engineering specs. are usually set after extensive factory testing and include a safety margin. Tightening up the lash will reduce the safety margin. So it really comes down to how important a quiet engine is to you. You might be able to safely quiet things down with some insulation on the valve cover, or on the bottom of the hood. Or you could get a preheater for your engine block and never run it cold. Just saying that using valve lash to make things quieter could be risky. A thicker oil might get you there with no risk. You would think that you could shave a few thousandths off of the spec. and be okay but it's possible also that the valves will heat up faster than the rest of the parts during warm-up and you'll burn/warp a valve before the engine gets hot and loosens up the lash. So you might be okay cold, and okay hot, but too tight in-between. Just a possibility. By the way, I will not be baring with you or any other classiczcar members (that I know of at this point in time).
-
I've always thought that if people will just say what they will pay instead of looking for a good deal that they would get many more offers. Who wants to haggle over something they didn't intend to sell anyway? How much is being offered?
-
Pick-n-Pull » Check Inventory The stock washers might still be on the Lynnwood car. They're probably pretty grungy but should get you by.
-
Now you're past solving the problem and in to trying to figure out what Nissan or a PO did to the car. Like trying to figure out what Pin 21 does. You have a solution for the problem, you can call it solved. Then spend your extra time on exactly how those wires got crossed. Maybe it's a Monday car.
-
I think he might be talking about FastWoman's theory of "lean mixture drift". Aging electronic components causing a shorter injector open time. Typically fixed by adding resistance to the coolant temperature sensor circuit. If that's the case, then the signs would be slight hesitation and surging during driving. The engine doesn't get enough gas for the amount of air it's pulling in.
-
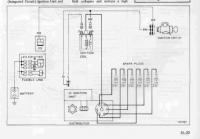
Did you use the ZX distributor mount? Maybe your timing is off. As far as the grounding, I meant that the module transistor needs to sink the current somewhere to charge the coil. Typically it's through the mounting screws or a dedicated ground wire. I can't find it explicitly called out in any diagrams. But the diagram only shows two wires to the module, and implies the red and green wires are connected, but doesn't show them. Doesn't show a 5th ground, wire. For example, the GM HEI module, which is known as "4-pin module" doesn't show the 5th wire either, but it is critical to operation. I think that the simplest ignition module wiring you can have is two wires from the pickup coil, one wire to positive power, one wire to ground the negative side of the coil, and the ground through the module. The module has to have a ground somewhere and it can't ground through any of those first four wires. Therefore, there must be a "hidden" ground. Has to be through the mounting holes or some not-so-obvious contact point. Just trying to add some clarity, with lots of words...
-
The red and green only have voltage when the distributor turns and then it goes +-+-+-+... to trigger the module. The standard test is to measure resistance across green and red, looks like about 400 ohms resistance is right. Page EL-30 in the 1981 FSM shows how to measure voltage with the key turned to Start, maybe that's what you did. The coil, both posts, should have power with the key on and during Start. You do need a good ground through the distributor to get things to work right since the module is now mounted there and grounds the coil through the distributor body, which is what generates the big spark. Weak ground weak spark. Usually the bolts are enough but it's easy to check to be sure. Much fun. Makes you realize the distributor does lot more than just distribute.
-
The blue wire feeds the ignition module, the tachometer and the ECU. It branches off to each one, not serial, so disconnecting the module won't hurt the other two. That might explain why it ran with starting fluid, the ECU wasn't opening the injectors. The module controls the coil grounding, and the tach and ECU "watch" what's happening. That's an important wire. I haven't looked at Blue's page, but I know that the advice there doesn't cover every detail for every model. Usually there's a note about the exact car that was used as an example and the fact that your results may vary. You're probably in to it deep enough now that you could open up the Engine Fuel and the Electrical chapters of the FSM and feel comfortable.
-
I've had a weak ignition module before. Showed spark but wouldn't start the engine without starting fluid. It was GM HEI module though. It would probably help you out to measure voltage to the module and to the coil, with the key On and at Start. Just to verify that the components are getting power when they should. then you can worry about if they're using the power as they should. As for using the power correctly, the ZX distributors use a circular magnet that is easily and often cracked. Have you had the ZX distributor apart to confirm that the parts are good?
-
I originally installed mine to see if I could fix the hot start problem by adding fuel (it helped the engine run better but you still had to wait for the injectors to cool down). Then I installed an AFM with a lean spot at low RPM and ended up using it to get rid of the lean spot. So I tune mine by throttle feel. A lean spot will feel like a lag in response followed by a surge as the AFM vane passes through the area. Not the best fix, since it's probably rich in other areas, but it's a pretty handy band-aid.