Zed Head
Free Member
-
Joined
-
Last visited
Everything posted by Zed Head
-
 You might check the tightness of the damper on the crankshaft snout. People often use the wrong combination of washer and bolt and end up torquing the bolt in to the nose of the crankshaft without actually clamping the damper down. Bolt too long, in effect. The key will keep the damper from spinning but it can still wobble around and cause damage. I think that @Diseazd might have a picture, if my memory is right. And, if you have AC, the AC belt idler pulley bearing is known for going bad and making noise.
 -
The 7.2 volts could mean a grounded circuit, either after the ballast or the coil, maybe at the ignition module or along the way to the module. If you had points I'd say check that your points weren't closed. Edit - p.s. the coil, or the ballast, or wires in the vicinity should be warm if current is flowing, giving that big of a voltage drop. Just spitballing. Hard to get a good grasp on the overall picture.
-
It is. It's a on a branched circuit, and 1978 has a nice protected plug. Just unplug it and let it hang. OR, disconnect the FAST module and reconnect the original one. Not really clear why the FAST module was purchased and installed. Might be a clue there. The 1978 ignition module is pretty good.
-
You need to give more detail on how you tried and what, exactly, happened. Might be you turned the key, heard a click, and quit.
-
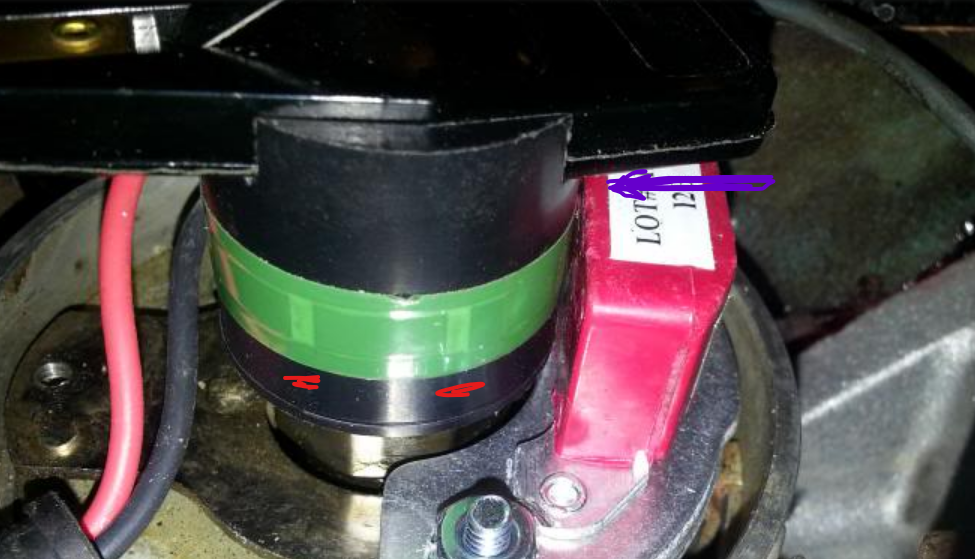
Pretty sure that one of these magnets (red) needs to be in the middle of the sensor (purple). There are other tricks a person can do with wires and voltage and turning the shaft but I think it would be a bit much for this thread. Turn the distributor body until one of those magnets is centered and you will be about as close as you can get for an initial start.
-
Check the trigger on the Pertronix first. I don't know how to do it, but it's important. I did some Google but the instructions are all for people who had a running engine before they swapped points. Can't find any "starting from scratch" instructions. It's probably as simple as lining up some marks on the sensor and magnet but I've never had one so don't know. If you do that you and confirm that the rotor is pointed at #1 plug wire then you'll have everything pointing where it should be pointing and it should start. Assuming...
-
Nissan used both sides on the early cars. I think it had to do with air conditioning. That's about where you want to be. Now you just need to make sure that the Pertronix trigger is just about to trigger. If you had points or a 280Z system it would be pretty simple but Pertronix is a bit different, with the magnet.
-
I found this picture on the Google. (It's from zcar.com but it doesn't exist in the original post, so I won't link it). The picture on the left is of the bottom pulley on the front of your engine. You should be able to see if from the passenger side of the car. Shine a bright light down there and look. Those are your ignition timing marks. The picture on the right is of the distributor base. Nissan put degree marks right on the base of the distributor. Yours will probably be off because you have Pertronix now but they should be close. See if yours is between the A and the center mark. p.s. you don't have to remove anything or turn any bolts except for the screw that locks the distributor body down.

-
The "bunny ears" picture confirms that you are on the compression stroke. The rotor seems to be pointing close to the correct direction. But the distributor body is rotated too far counterclockwise, (compared to site's picture at the top of the page) which would cause the ignition timing to be retarded. Can you get a picture of the timing mark on the damper pulley? It should be at zero or about 10. Then you need to rotate the distributor to get the Pertronix trigger at the right point. The Pertronix guys know how to do that. But, just because you're on the compression stroke doesn't mean you have compression. I can't remember all of the details of what's been done to your engine but the cam lobes look a bit used. Anyway, as far as parts they look pretty close except for your ignition timing. Get your igntion timing adjusted and use some starting fluid and you should get it to start for a few seconds.
-
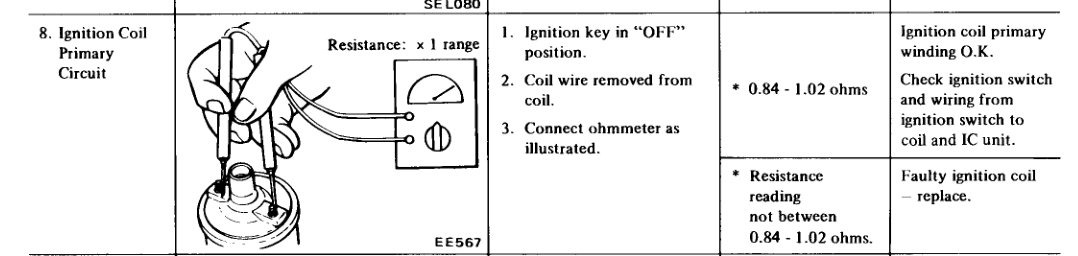
The primary circuit is what you want to match to your ignition module. That's + terminal to the - terminal. And if you got 1.2 ohms (not k-ohms) from the center post to the + on your #2 coil, it's no good.

-
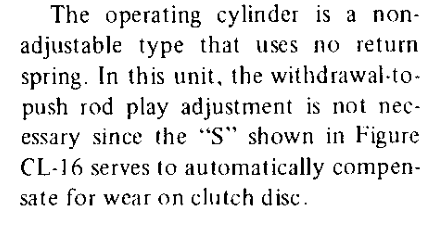
I see your problem now. Wasn't sure what the concern was. But you're kind of at the point of just adjusting based on the principles of operation. You don't have the full set of original parts. I think that what you have is a self-adjusting cylinder with a rod that is meant to fit the clutch for the old adjustable style. So you don't need the spring. The only reason to use the adjustable rod is because the clutch fork won't take the new style of rod, because of the hole. I think that you'll need to study the original procedure and realize that the external spring pulls the piston all the way to the back of the bore on the old style and then they have you loosen up the rod length just a hair so that it gives maximum stroke, but doesn't wear out the TOB. So what you could do is adjust the rod length so that the piston is pushed back all the way then shorten it enough to give you that "S" distance shown on the drawings for the newer style. Or, just match the match the length of the newer non-adjustable rod. If you haven't installed the transmission yet, you could change the fork to the later style and use the non-adjustable rod. It's a judgement call. There is no Nissan procedure for it, I think.
-
They don't make it very clear but the "self-adjusting" slave cylinder has a longer bore (I believe, that's why they call it out and describe the self-adjusting operation) and an internal spring. The "S" that they show is the possible stroke area, not the working stroke. There is actually a lot of information in the drawing if you stare at it long enough. You don't need the external spring and you don't need to adjust it. As long as you have the correct match of throwout bearing sleeve/collar and pressure plate (92 mm). Here is another version from 1976 of the text that EuroDat copied from 1974. Basically what Nissan is saying is "we fixed the slave cylinder so that the risk of poor adjustment is gone". No return spring necessary, no adjustment necessary (because "S" is long enough to take up the disc wear). The match between TOB sleeve and pressure plate is very important though.
-
Ignition module. By the fuse box.
-
It would be in the FSM's for the later year Z's. Maybe 73 and after. Actually, I just looked and 73 and after is the non-adjustable type.
-
Just a look back at the start of the problem. All of the new electrical connections should be examined for correctness. Any one of the three could be the source of the problem. But, if you take your first post literally, then the problem happened with the key at Start. That narrows things down to the circuits involved in starting. It might be though, that the smoking happened when you turned the key on. Whatever it is though, the circuits initiated by the key seem to be involved. Unless the smoking started as soon as you connected the battery terminals. I'm just offering a different way to address the problem. Your first post actually leaves a lot out that could be important. If I had the problem I would disconnect the battery, and check the positive cable resistance to ground with the key in whatever spot it was in when the smoking started. Remove loads until resistance rises to the appropriate level.
-
My basic point is - your ignition system might be bad, or incorrectly wired, despite the fact that i's new and you followed instructions. Disconnect, test, know. Use the process of elimination.
-
Here's the more relevant industry news for Crane. https://www.cpgnation.com/wp-content/uploads/2015/12/FAST-Unveils-New-Ignition-Division.pdf In 2001, FAST® was acquired by the COMP Performance Group™ https://www.aftermarketnews.com/edelbrock-owner-acquires-comp-performance-group/ Industrial Opportunity Partners (IOP), an operations-focused private equity firm based in Evanston, Illinois, and owner of Edelbrock LLC, has announced the acquisition of the COMP Performance Group.
-
It's new and you have a new problem. FAST and Holley and Crane are all just brand names now, supported by big marketing. Many of the names are actually part of the same big corporation. The product manufacturing has all been outsourced to the least expensive contractor. Won't hurt to disconnect it and be sure it's not the source. Trust, but verify. https://en.wikipedia.org/wiki/Holley_Performance_Products Effective June 22, 2010, Holley emerged from bankruptcy protection.[33] In 2012, the private equity firm Monomoy Capital Partners acquired Holley Performance Products.[34] In 2013, Monomoy Capital Partners sold Holley to Lincolnshire Equity Fund IV, L.P.[35] In 2015, Holley acquired the MSD Group which includes MSD Performance, Mr. Gasket, Accel, Superchips, Edge, Racepak, Mallory, Hays, QuickTime, and Lakewood.[36] in 2018, Lincolnshire Equity IV, L.P. sold Holley to Sentinel Partners who merged the company with its Driven Performance Brands
-
Freud? What? 🤒
-
Those are the distributor "trigger" wires to the ignition module. They only have voltage when the distributor is spinning. Edit - actually those must be the wires up to the ignition module in the cabin. So they're dead, no voltage. Nothing obvious in your pictures. "New coil" seems like a possible problem source. I think that it's more than just a coil, it's an ignition system. It has power and ground circuits, one of those misconnected could cause your issue. Instead of going to the fuse box you might disconnect the things that have positive wires connected to them then see if your battery positive cable has a path to ground. Leave the battery disconnected and you can't smoke any wires or fuses. I think that FAST bought Crane's technology. The FAST site is very poor, but Summit has old instructions. https://static.summitracing.com/global/images/instructions/xr700 instructions.pdf
-
IF you highlight the text you want to quote a green box should show up. Click the box and you'll get a reply box with the text inside. Could you describe what is working now and what is not? Lights, ignition, etc. Do you have any of the breakers installed? Also describe or show your battery connections, including the links for the EFI system. The two green fusible links at the battery positive post. Might as well start at the beginning, the battery, and see what you have. Seems like things are pretty messed up.

-
-
Here's a pretty recent thread. He doesn't show the actual prying up of the metal tabs but you can probably figure it out. A small screwdriver, some needle nose, whatever your favorite tools are. Open it over a box top or a surface where you can find the little parts when they get away. Pic 36 is the start, about 2/3 down the page.
-
I forgot the one that I usually remember - 1975 has a different pattern and maybe bolts. It is unique among the Zs.
-
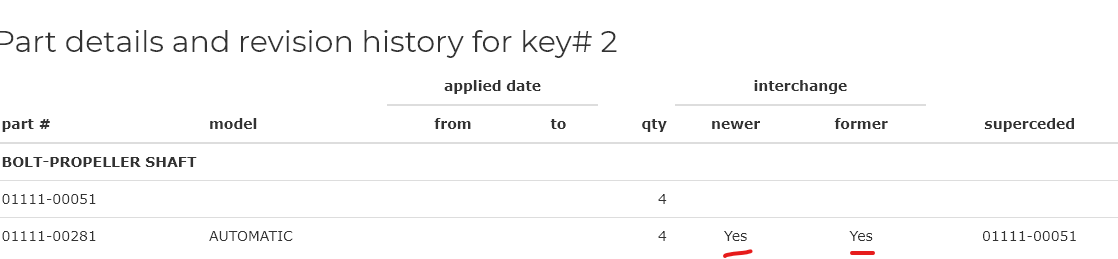
No offense, but this is completely incorrect. The outer shape of the flange changed over the years, there are square and round, but the bolt pattern and size is the same for all of them. It does look like the automatic got a different bolt at some point though. No year is specified. But they do interchange. The same size bolt through the same size hole, through all of the years of the Z. http://www.carpartsmanual.com/datsun/Z-1969-1978/power-train/propeller-shaft/2