


Zed Head
Free Member
-
Joined
-
Last visited
Everything posted by Zed Head
-
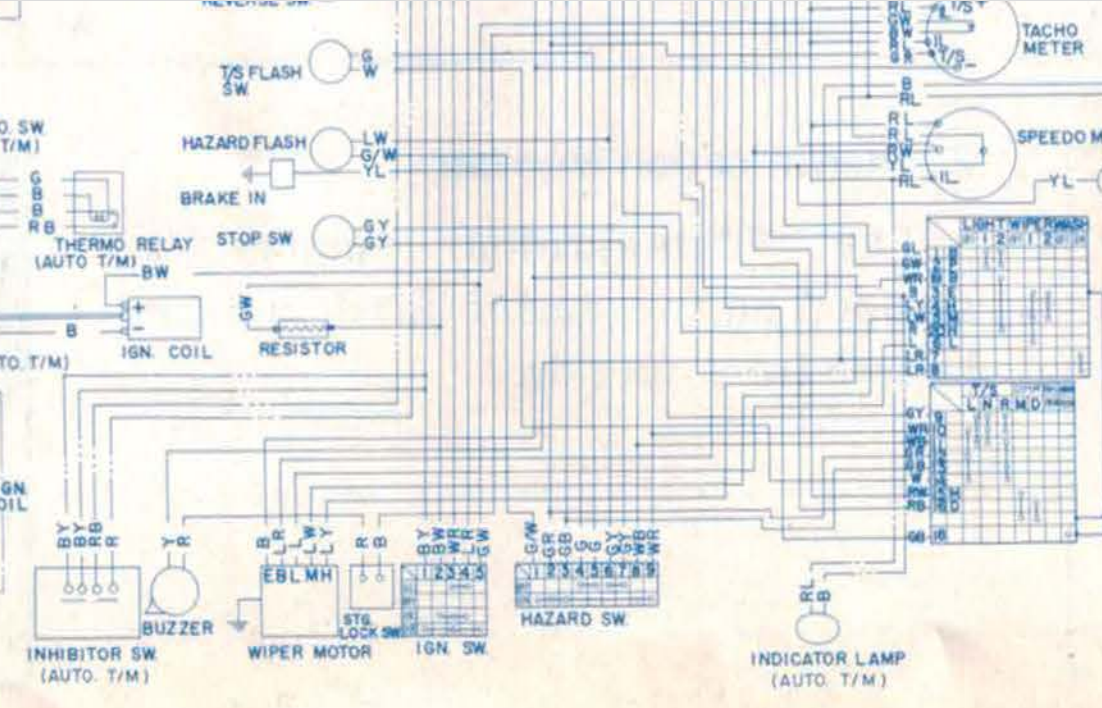
 Nissan's 240Z ignition wiring is kind of confusing. If the diagram is correct it's an odd parallel circuit with two power wires to the tach. One through the resistor and one direct. One must be Start and one must be Run. Anyway, they both end up as Black/white stripe at the coil positive. Green/white stripe at the tach gets powered either through the resistor or directly. The diagram is confusing because Run is Black/white stripe at the switch, then converts to Green/white stripe after the resistor, then is back to Black/white stripe after the tach. So, at the tach Green/white stripe should have power during Start and Run. If you test both and only one works you might find that the junction of the two is no longer joined. I think the above is correct I rewrote it a few times...
 -
Might not even need nine. Get four or five prongs to fit some open spaces. He'd need a good grinder though. A cutoff wheel and a vise would be about right. Of course, the socket could explode when he tries it depending on how tight the nut is. (pssst...SteelStick)
 Popular problem. Might find something in here. https://www.zcar.com/threads/headlight-combination-switch-repair.311982/ https://forums.hybridz.org/topic/103936-my-headlight-fix/ https://woodworkerb.com/home/datsun-240z-rebuild/datsun-240z-multifunction-switches/
Seems like that should work, physically, but also shouldn't work, theft-wise. Kind of defeats the whole purpose of locking lug nuts, and it's faster. Edit - the caliper will need to come off with the assembly, I think, because the rotor is bolted to the hub and the spindle will not let the rotor drop out of the caliper. So, a little more complicated than it seems. Not as quick and easy as I had first thought. Actually I had thought of it initially but convinced myself it wasn't necessary. Wrong, I think. I haven't worked on front brakes for a while. Can the caliper bolts be removed without removing the wheel? Not sure they can. Show stopper... It's the best idea yet. You'll need the key code for Gorilla. Good luck with that https://www.gorilla-auto.com/gorilla-locks
Popular problem. Might find something in here. https://www.zcar.com/threads/headlight-combination-switch-repair.311982/ https://forums.hybridz.org/topic/103936-my-headlight-fix/ https://woodworkerb.com/home/datsun-240z-rebuild/datsun-240z-multifunction-switches/
Seems like that should work, physically, but also shouldn't work, theft-wise. Kind of defeats the whole purpose of locking lug nuts, and it's faster. Edit - the caliper will need to come off with the assembly, I think, because the rotor is bolted to the hub and the spindle will not let the rotor drop out of the caliper. So, a little more complicated than it seems. Not as quick and easy as I had first thought. Actually I had thought of it initially but convinced myself it wasn't necessary. Wrong, I think. I haven't worked on front brakes for a while. Can the caliper bolts be removed without removing the wheel? Not sure they can. Show stopper... It's the best idea yet. You'll need the key code for Gorilla. Good luck with that https://www.gorilla-auto.com/gorilla-locks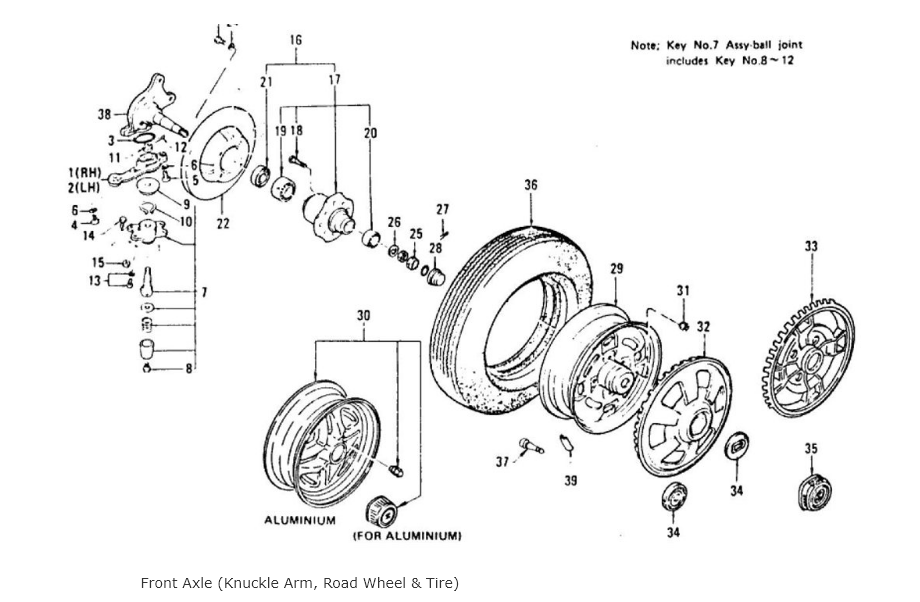 Just remembered that one reason the switch gets so hot and damages the solder joint is because the contacts get pitted and burnt. You really need to take it apart and inspect. I went through a similar situation on my 76. Resoldered them but they eventually fell apart again. Resoldered and added relays and they only see relay current.
A longer cheaper one. The long punch is very useful, I have this set. I still think the SteelStik has a chance. https://www.harborfreight.com/12-piece-punch-and-chisel-set-66337.html
They probably went out of business because the design worked so well that if you lost the key you were screwed until you could get a new key. If you had a long drift (aka drift pin) and were handy with it and the end was shaped right you might be able to turn it that way by pounding on a projection. But, any slips and you're gouging the rim. https://www.grainger.com/product/4RPL7
Just remembered that one reason the switch gets so hot and damages the solder joint is because the contacts get pitted and burnt. You really need to take it apart and inspect. I went through a similar situation on my 76. Resoldered them but they eventually fell apart again. Resoldered and added relays and they only see relay current.
A longer cheaper one. The long punch is very useful, I have this set. I still think the SteelStik has a chance. https://www.harborfreight.com/12-piece-punch-and-chisel-set-66337.html
They probably went out of business because the design worked so well that if you lost the key you were screwed until you could get a new key. If you had a long drift (aka drift pin) and were handy with it and the end was shaped right you might be able to turn it that way by pounding on a projection. But, any slips and you're gouging the rim. https://www.grainger.com/product/4RPL7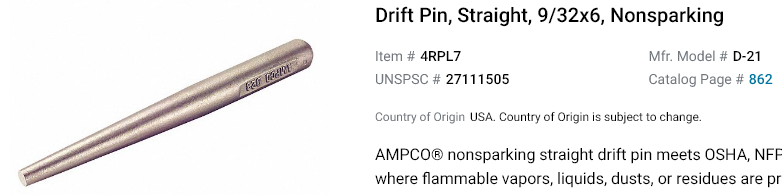 Kind of looks like split steel meant to flare out and grip a nut...
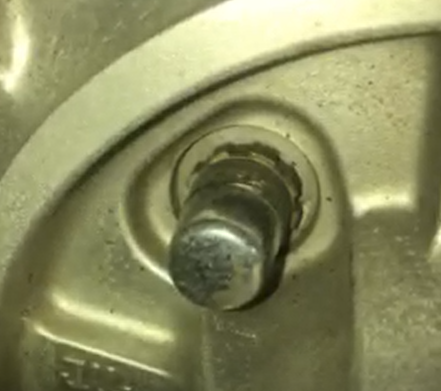
Can you post a picture from the side? A person can see the square shapes at the bottom but they don't look very deep. Sure does look more like a cap on a nut. Have you tried grabbing it with Vise-grips and pulling it off.
Kind of looks like split steel meant to flare out and grip a nut...
Can you post a picture from the side? A person can see the square shapes at the bottom but they don't look very deep. Sure does look more like a cap on a nut. Have you tried grabbing it with Vise-grips and pulling it off.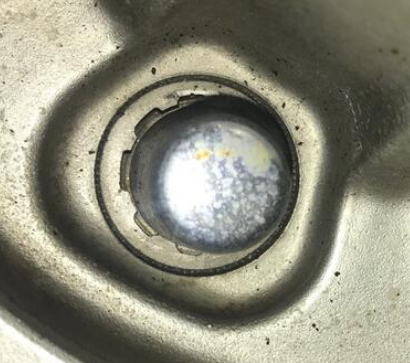 This will work if you give it time to cure to full hardness. Are you sure it's not a 10 spline? https://www.brandsport.com/bmcc-79241-1.html Or 8... https://www.brandsport.com/search-results.html?query=+Spline+Lug+nut+key%2C+Wheel+lock+key+&x=91&y=23
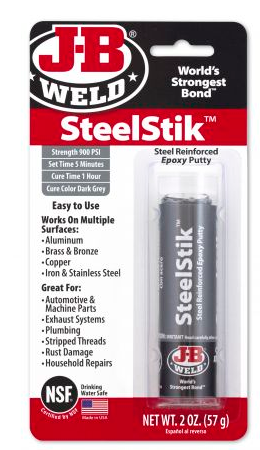 https://www.harborfreight.com/high-visibility-socket-adapter-set-4-pc-62851.html
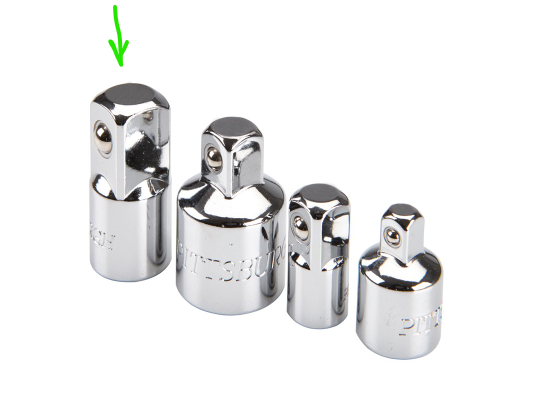 Sometimes the solder joints on top of the switch just break off after a billion heat cycles. It's difficult to get them soldered back on, and be durable to the heat cycling. You can put a relay in front of after the fuse box for the headlights though. You have to find the wire up under the dash for the parking lights to install a relay there. That will take the load off of the switch and it won't see the heat. You'll find more complicated relays setups that also take the load off of the dimmer switch. But the dimmer switch doesn't seem to be bothered by the currant like the switch on the steering column is. Bend these four tabs back and you'll be able to see if the switch can be salvaged. There are loose parts inside so be careful.
 Just a follow-up for confirmation. What's being said is that the two outer holes of each set of three holes on a 240, are equidistant around the perimeter of the flywheel and match the 225 plate bolt pattern. And the locating pins are the same. Has this been confirmed? I had both in my garage and never tried a 225 plate on a 240 flywheel. And, you could even use a 240 pressure plate on a 225 disc and 225 flywheel. The excess pressure plate would just hang over the edge of the disc. And, you could let excess 240 disc hang outside of 225 parts. All these years and turns out all of the parts are interchangeable.
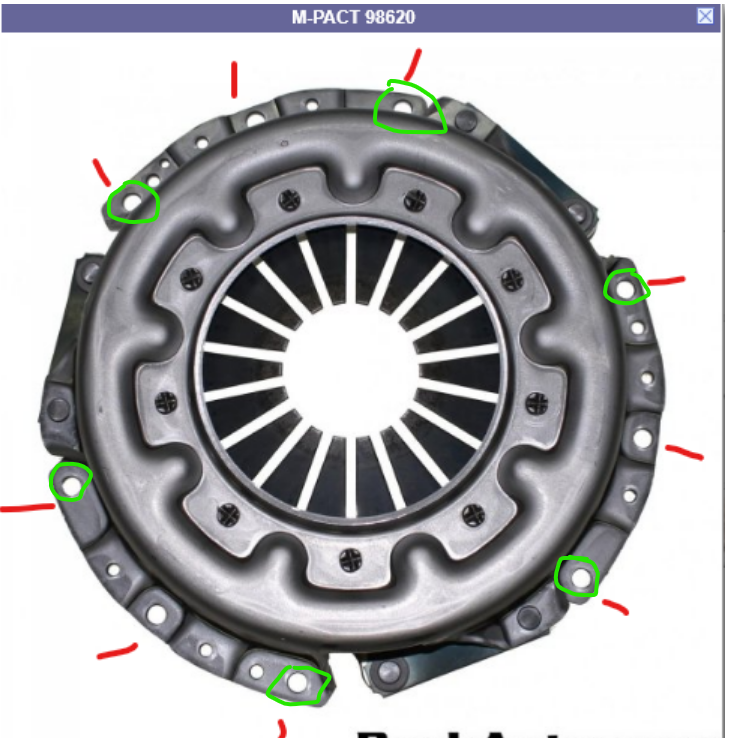 Here's something I tried on a spare tire locking nut that worked. Find a socket that fits over the nut but has a small gap between it and the nut. Fill the socket with a ring or blob of SteelStick, press it over the nut and let it cure. You've just made your own "key". It is amazingly strong stuff. https://www.jbweld.com/product/steelstik-epoxy-putty-stick
Take it apart and flip it.
Here's something I tried on a spare tire locking nut that worked. Find a socket that fits over the nut but has a small gap between it and the nut. Fill the socket with a ring or blob of SteelStick, press it over the nut and let it cure. You've just made your own "key". It is amazingly strong stuff. https://www.jbweld.com/product/steelstik-epoxy-putty-stick
Take it apart and flip it.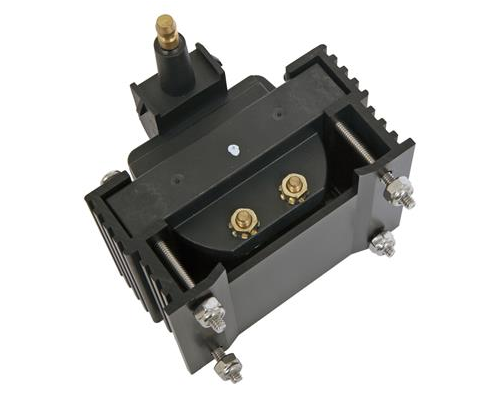 Did the guy's machine measure the direction and position of the rear tires to confirm that they were correct? I know that today's machines can measure all kinds of things but if he saw that the rear wasn't adjustable he might have not measured it. Maybe the rear wheels are set forward and/or back. JMortensen has posted in the past about the early Z's having mis-drilled strut castings, causing the spindle pin to be misaligned, misaligning the transverse link (aka control arm). The Z's were the poor man's sports car. Not of BMW quality level. A shot of the printout from the machine would be interesting.
I did not know this. That, plus the equal weights, would explain why the manufacturers dropped the 225 only flywheel. It's just not necessary. I wonder why even call it a 240 mm flywheel. Seems pointless. 7.5 mm extra friction surface diameter.
Drill down through the middle of the nut to remove the stud. Then replace the stud after you get the wheel off. Even if you start doing this and change your mind or find a better way it won't make the nut harder to remove.
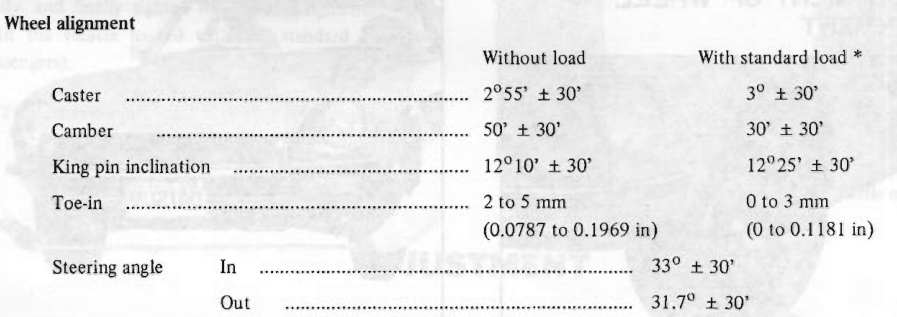
They don't show any in the Body chapter dimensions, see below. If caster is the same then it would have to show in the top strut mount area. Those TC rod bushings are pretty squishy and tend to degrade over time. 1/4" one way on one side and 1/4" the other on the other side and you get 1/2". I think that when you drive the car setback and caster move all over the place. The rear end is suspended in rubber also.
Did the guy's machine measure the direction and position of the rear tires to confirm that they were correct? I know that today's machines can measure all kinds of things but if he saw that the rear wasn't adjustable he might have not measured it. Maybe the rear wheels are set forward and/or back. JMortensen has posted in the past about the early Z's having mis-drilled strut castings, causing the spindle pin to be misaligned, misaligning the transverse link (aka control arm). The Z's were the poor man's sports car. Not of BMW quality level. A shot of the printout from the machine would be interesting.
I did not know this. That, plus the equal weights, would explain why the manufacturers dropped the 225 only flywheel. It's just not necessary. I wonder why even call it a 240 mm flywheel. Seems pointless. 7.5 mm extra friction surface diameter.
Drill down through the middle of the nut to remove the stud. Then replace the stud after you get the wheel off. Even if you start doing this and change your mind or find a better way it won't make the nut harder to remove.
They don't show any in the Body chapter dimensions, see below. If caster is the same then it would have to show in the top strut mount area. Those TC rod bushings are pretty squishy and tend to degrade over time. 1/4" one way on one side and 1/4" the other on the other side and you get 1/2". I think that when you drive the car setback and caster move all over the place. The rear end is suspended in rubber also.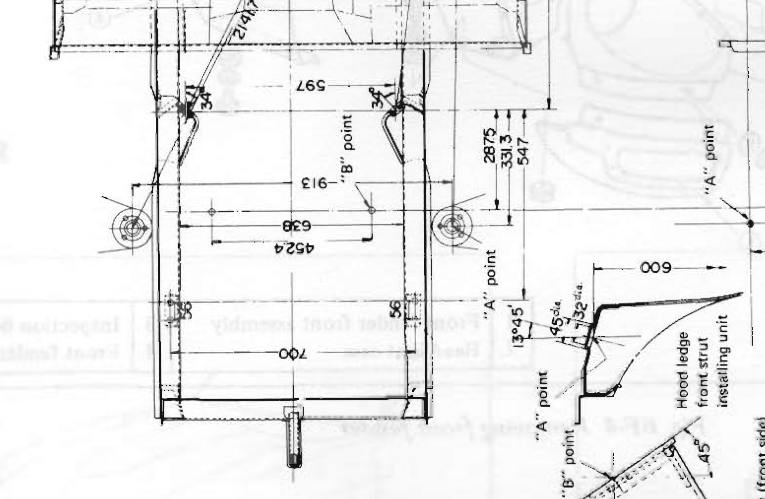
 I sent the guy a message on eBay and he sent back a picture of the VIN from the firewall. Says that he thinks something rubbed on the ID plate and wore the paint away. He doesn't know what happened with the door. I suggested that he join CZCC and discuss but I think he's just a guy who came across a Z and is flipping it. You can kind of hear it in his video. Anyway, it looks legit, I think. The interior looks in great shape for a sun baked part of the country.
Sounds cammy. The guy rolled the camera right over the 260Z but didn't say anything. Maybe it's a stroked L24. https://secureir.ebaystatic.com/cr/v/c1/usvvp-20191119/index.html?video=https%3A%2F%2Fvideo.ebaycdn.net%2Fvideos%2Fv1%2F2d35f92d17b0a4d48d412bb1ffffea3c&thumbnail=https%3A%2F%2Fi.ebayimg.com%2F00%2Fs%2FMTIwMFg2NzU%3D%2Fz%2FUAAAAOSwzHZhEbfM%2F%24_1.JPG%3Fset_id%3D8800005007&title=1971 Datsun 240Z Coupe Orange RWD Manual series 1
I missed that. I can't tell if it's scammy or not. Might just be an old beat up 240Z. No obvious signs of fraud. Looks like somebody screwed up and used a powerful solvent on the ID plate though.
The zcarsource description is wrong on the clutch kit, turbo and 2+2 are the same parts. Can't exclude one and include the other. Edit - actually I see that what they did is to just add irrelevant information and leave out other relevant info. It could be turbo, 2+2, or turbo 2+2. All 240mm. But you might have the right parts. The pictures match. Looks like the 240mm clutch setup. The parts that you said are on the car look like 240mm also. So, odds are you'll be fine. 92mm is the critical measurement. https://zcarsource.com/transmission-service-kit-240z-260z-280z-72-78-new/ https://zcarsource.com/clutch-kit-260z-280z-280zx-300zx-74-83-non-turbo-2-2-81-86-turbo-new/ https://zcarsource.com/flywheel-manual-transmission-260z-280z-280zx-74-83-2-2-and-turbo-new/
I sent the guy a message on eBay and he sent back a picture of the VIN from the firewall. Says that he thinks something rubbed on the ID plate and wore the paint away. He doesn't know what happened with the door. I suggested that he join CZCC and discuss but I think he's just a guy who came across a Z and is flipping it. You can kind of hear it in his video. Anyway, it looks legit, I think. The interior looks in great shape for a sun baked part of the country.
Sounds cammy. The guy rolled the camera right over the 260Z but didn't say anything. Maybe it's a stroked L24. https://secureir.ebaystatic.com/cr/v/c1/usvvp-20191119/index.html?video=https%3A%2F%2Fvideo.ebaycdn.net%2Fvideos%2Fv1%2F2d35f92d17b0a4d48d412bb1ffffea3c&thumbnail=https%3A%2F%2Fi.ebayimg.com%2F00%2Fs%2FMTIwMFg2NzU%3D%2Fz%2FUAAAAOSwzHZhEbfM%2F%24_1.JPG%3Fset_id%3D8800005007&title=1971 Datsun 240Z Coupe Orange RWD Manual series 1
I missed that. I can't tell if it's scammy or not. Might just be an old beat up 240Z. No obvious signs of fraud. Looks like somebody screwed up and used a powerful solvent on the ID plate though.
The zcarsource description is wrong on the clutch kit, turbo and 2+2 are the same parts. Can't exclude one and include the other. Edit - actually I see that what they did is to just add irrelevant information and leave out other relevant info. It could be turbo, 2+2, or turbo 2+2. All 240mm. But you might have the right parts. The pictures match. Looks like the 240mm clutch setup. The parts that you said are on the car look like 240mm also. So, odds are you'll be fine. 92mm is the critical measurement. https://zcarsource.com/transmission-service-kit-240z-260z-280z-72-78-new/ https://zcarsource.com/clutch-kit-260z-280z-280zx-300zx-74-83-non-turbo-2-2-81-86-turbo-new/ https://zcarsource.com/flywheel-manual-transmission-260z-280z-280zx-74-83-2-2-and-turbo-new/


Important Information
By using this site, you agree to our Privacy Policy and Guidelines. We have placed cookies on your device to help make this website better. You can adjust your cookie settings, otherwise we'll assume you're okay to continue.