


Zed Head
Community Member
-
Joined
-
Last visited
Everything posted by Zed Head
-
Don't throw the parts away. They have value to somebody.
-
If you do get the engine running well, replace all of the old fuel lines on the rail and the injectors before too much driving. I smelled gasoline on mine one day while driving and when I opened the hood a tiny stream of gasoline shot by me on to the sidewalk. They dry out and crack lengthwise. The small stuff will eat up a lot of your time but it's worth it once you're done.
-
Here is a way to test the function of the injectors separately from the ECU. With the ECU connector removed from the ECU, turn the key on. Then short the pins in the ECU connector from the injectors to ground with a quick tap. Each tap should produce a click frm the relevant injector. You'll need a quiet garage or a friend in the engine bay to hear them. Or a long wire.

-
How long has it been sitting? What's the back story?
-
The engine can run off puddled fuel in the intake manifold. If the injectors were opening the engine would continue to run. cgcheen's suggestion about testing with a 9 volt battery was a good one. You can run separate jumper wires if you don't have an EV1 connector. With a 9 volt alkaline battery you don't have to worry about melting wires if you accidentally short them. You'll hear a click when you connect the 9 volts, if they're opening. Also, with 9 volts you can leave the voltage connected while you tap them. You'll have the solenoid pulling them open if you can get them to break loose. Pin 1 at the ECU is the ignition signal that the ECU uses to monitor engine RPM. It's connected to the negative terminal of the coil. It should read battery voltage with the key on. But it also needs a certain type of voltage pulse. There are things that can screw it up. You're making great progress.
-
I almost made a comment about AI. It's basically a better Google search. But that's about it.
-
Yarb, the 1980 EFI book is the official Nissan electrical troubleshooting manual. It's basically the FSMs stripped down to the bare essentials and combined in to easy to use charts and instructions.
-
Besides cgsheen1's suggestion, tapping on the injector bodies will often break them free. In your case though it might take a while to get all six free. The engine will run on three cylinders. Sounds like you don't have any injectors working.
-
Are you saying that it still will not continue to run? That you have to do this trick over and over? That would make sense. Each "Start" squirts some fuel in to the intake manifold. The cold start system would be working corectly. Not a problem. Still sounds like your injectors are not opening. Pin 1.
-
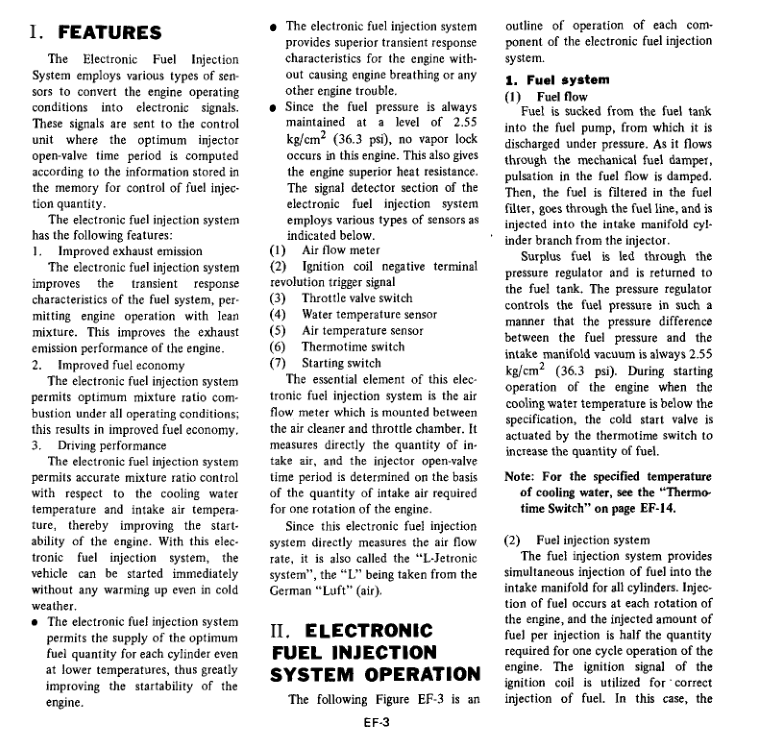
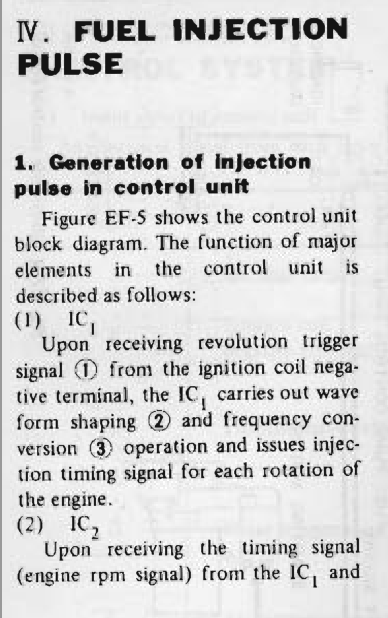
There is no cold start sensor. You're at a good point to read the Engine Fuel chapter.
-
I can still learn! Yay? https://en.wikipedia.org/wiki/Toilet_Duck Toilet Duck is an American brand name of toilet cleaner noted for the duck-shape of its bottle shaped to assist in dispensing the cleaner under the rim. The design was patented in 1980 by Düring AG from Dällikon, Switzerland.[2][3] It is now produced by S. C. Johnson & Son. The Toilet Duck brand can be found in the United States, United Kingdom and other countries around the world. In Germany, it is known as WC-Ente, previously produced by Henkel,[4] and now by S. C. Johnson (Germany).[5] In the Netherlands and Flanders it is called "Wc-eend", in France it is sold as "Canard-WC" and in Italy as "Anitra WC". In Hungary it used to have the name "Toalett Kacsa". Meanwhile, in Spain, it is sold as "Pato WC", in Portugal as "WC Pato", and in Mexico, Brazil, Colombia, Argentina and Chile as "Pato Purific" or simply "Pato". In Indonesia, it is one of the "Bebek" (duck) line of products, such as Bebek Kloset, Bebek Semerbak, Bebek Semerbak Flush, Bebek In Tank, and Bebek Kamar Mandi.
-
Close up any vacuum leaks to the intake system. All air has to pass through the AFM so the computer knows how much fuel to add. And the big screw with the wide washer head on the throttle body is the idle speed screw. It lets air past the throttle blade. You can adjust it by hand to raise idle speed while you troubleshoot.
-
Which clamp? And where is the fuel leak ending up? Maybe it's getting pulled in to the intake system. At least you know that you have spark. Does the tachometer show engine RPM when it is running?
-
Actually (I think) this only true if all of the injectors are disconnected. It's a parallel circuit for the 280Z EFI. Batch fire injectors. CO pointed that out way back when I mentioned getting voltage on both sides. Or it might be if the injectors on the same transistor are all disconnected (there's two, either 3 + 3 or 4 + 2). The later sequential systems wouldn't do this. Anyway, I have seen 12 on both sides, which was confusing. But can't remember the conditions under which I was measuring. There are other tricks to test the injectors and the injector circuits. Like tapping coil negative to ground three times. But, it's best to do the simple stuff first, probably.

-
That's a late one. Never heard it. I was listening to them on vinyl on a cheap record player with a penny taped on the stylus.
-
p.s. did you measure voltage across the injector connector pins or from one injector connector pin to ground. The second way is the correct way. p.s. 2 you're falling in to the "it measured good" trap. We need the numbers.
-
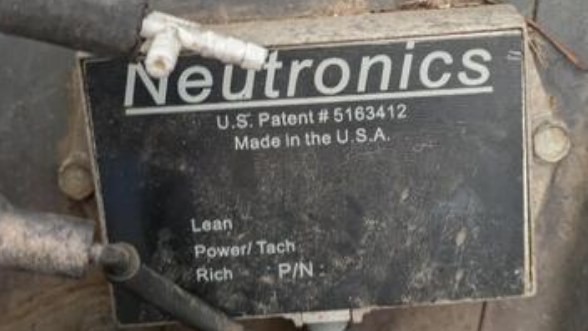
Did you disconnect the Neutronics thing? The EFI computer is sensitive to the tachometer/coil - signal on Pin 1. I see a "Power/Tach" label on the box, implying that it's also connected to Pin 1 or the coil. If the Neutronics box is shorted it could cause a no-start. Plus, there's no guarantee that it ever worked. Does the tachometer needle move when cranking? I also see some open vacuum lines in your picture. https://www.classiczcars.com/forums/topic/69545-1977-280z-ignitionfuel-system-neutronics/#comment-679115
-
p.s. Neutronics Enterprises is still out there. Check out the email addresses here - https://neuracing.us/brushless-motor-engineering-and-manufacturing-based-in-sand-diego-ca/ Phone numbers - https://dieselnet.com/com/85.php Stop by and say hello - https://www.mapquest.com/us/california/neutronics-enterprises-inc-366412161 Here's a book that references the patent - https://link.springer.com/chapter/10.1007/978-981-10-5903-2_124Provide some details about the car. Is it a California car with a converter or is it a Federal car without? There will be a sticker on the door jamb that says Catalyst or No Catalyst. I found the patent describing the concept. If the system follows the patent there will be some hardware attached to the air intake system after the AFM. Attached below. If it was mine I would disconnect it and get the wiring back to factory stock in order to simplify things until you get the engine started. There are numerous reasons that it might not be starting. Start with the basics - power to the coil, spark, tach signal, etc. Download the 1980 EFI book and do the electrical tests. Try starting fluid if you have spark. Make sure the fuel pump is working, etc... I'd also start a separate thread where everything you try is contained. Sometimes people start multiple threads and you can't tell what's been done. It can take a while to get things right after an EFI car has sat. https://patents.google.com/patent/US5163412A/en "Pollution control system for older vehiclesAbstractA pollution or emission control system for retrofitting on older vehicle engines includes a catalytic converter with an in-built oxygen sensor for mounting in the exhaust line, and a supplemental air input line containing a control valve for connection to the engine intake manifold to control the amount of air supplied to the engine. A computer monitors the oxygen sensor output and the engine speed, and controls opening and closing of the control valve according to the detected conditions. The computer also controls the speed at which the valve is opened or closed dependent on the engine speed and optionally the engine temperature, so that the valve can be closed faster at slower engine speeds and opened faster at higher engine speed. The computer is additionally capable of producing diagnostic telemetry, both digital and analog, to assist installation of the invention and test for proper operation once installed."I would. But it will take me 35+ hours to get there. If I leave immediately. And break the speed limit.Here's a similar thread with good advice in it, linked below. Download the EFI Book from 1980 and run the electrical tests. Get actual resistance measurements at the ECU. Write them down and let us know what they are. Don't do the continuity tests and don't report any measurements as "good". If you want to save time. Check the vacuum hose to the fuel pressure regulator for fuel. It should be dry. Welcome to the 280Z EFI problem club. Good luck. https://www.classiczcars.com/files/category/4-manuals/You've probably heard these songs but didn't know the artist. Same guy. He wrote one of them. Wahhh wah wah wah...


Important Information
By using this site, you agree to our Privacy Policy and Guidelines. We have placed cookies on your device to help make this website better. You can adjust your cookie settings, otherwise we'll assume you're okay to continue.