


Zed Head
Community Member
-
Joined
-
Last visited
Everything posted by Zed Head
-
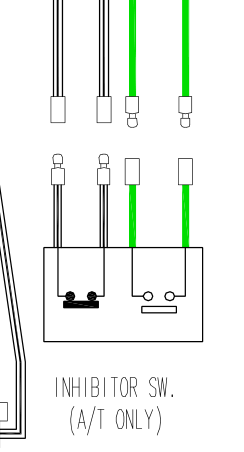
But they do show the belt switch wires as two green wires, which correlate with the two greens at the inhibitor switch. So, if the buzzer works then stops then the inhibitor is probably getting its power too. Your problem is probably in the ignition relay or the starter seat belt relay, if jumping the inhibitor doesn't work.

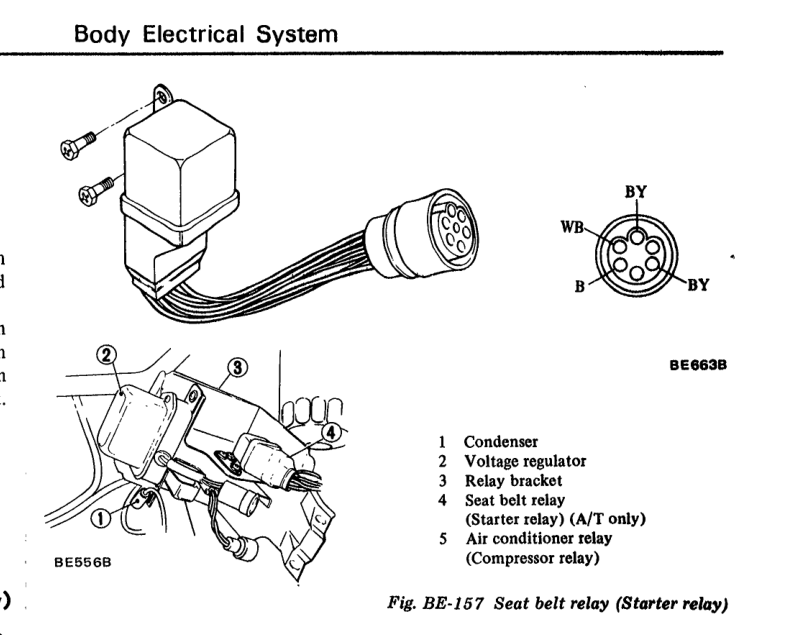
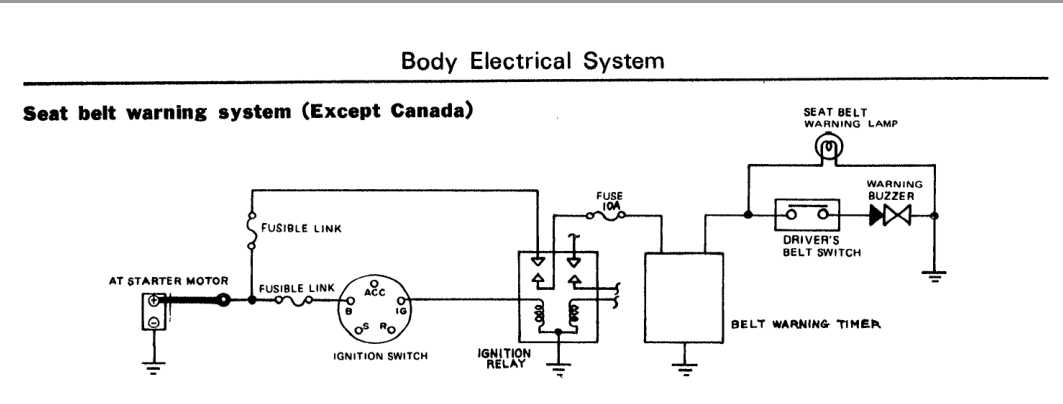
 I don't know why Nissan calls that relay a Seat Belt relay. Hard to tell by the wiring diagrams. Looks like the seat belt buzzer has its own circuit. They show the "driver's belt switch" here but not in the starting diagrams above. Confusing.
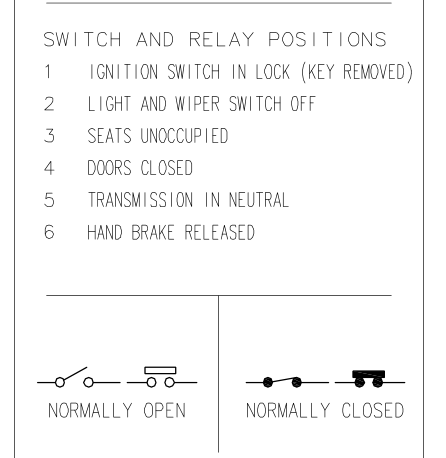
 Something that the electrical guys might be able to explain - does this diagram not show power from a fusible link passing through two normally closed relays to a realu coil then to ground? Can't be right, right?
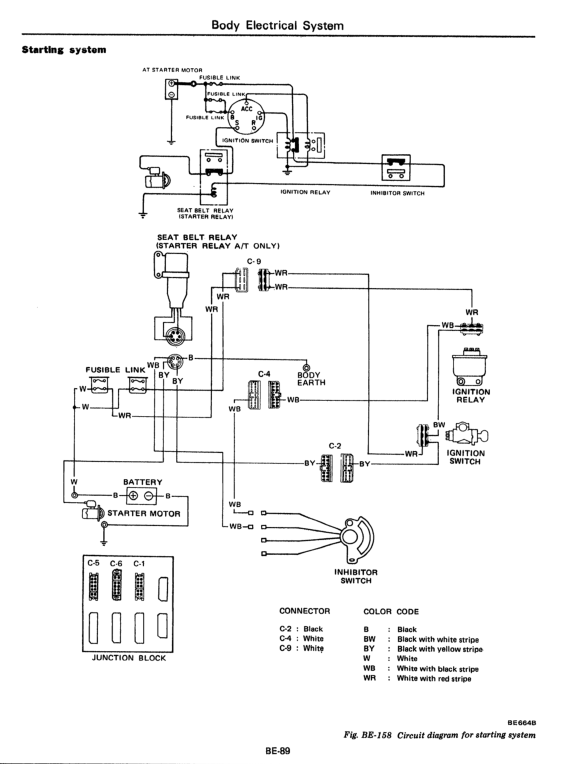
 I had assumed a manual. Didn't notice the A/T in the signature. Shame on me. There's actually a relay and and a switch in the starter circuit. The relay is one of those two function relays, connected to the inhibitor switch. So, there's three possibilities there - a bad relay, a bad inhibitor switch, or a bad inhibitor switch actuation. I don't understand how the Inhibitor Switch works, but I think CO and SteveJ do. Might be that there's a seat belt switch that actuates the Inhibitor Switch which then actuates the Starter Relay allowing the starter to function. So, I think you need to consider all of these or just find that wire from the ignition switch and bypass all of it. Notice the M at the bottom, completely bypassing the A/T safety devices. Funny, because the manuals do not have a clutch or neutral safety switch. You can start them in gear.
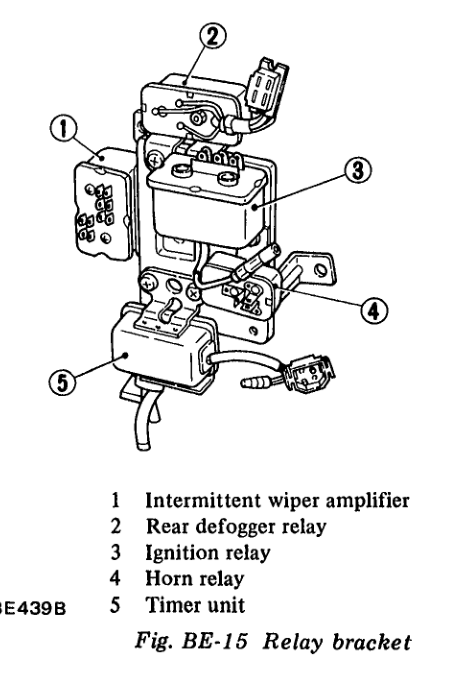
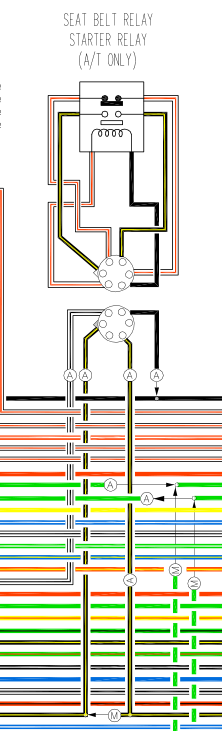 It's in the circuit too. On page EF-25 of the 76 FSM. I've lost the ability to paste an image.I think the accessory ignition relay is over there. And if I recall correctly it's in the leak zone.
 There is another device on the Start circuit - the cold start valve. Maybe it's drawing too much current. You could unplug it and see what happens. It's the one at the thermostat housing with the large hex base. There's another small one with the same injector style connection but it's the coolant temperature sensor. Don't unplug that one. Edit - actually there's the switch, the thermotime switch, and the injector. One has a heater in it and the other has the injector coil. Unpluggng the switch at the housing takes both out.
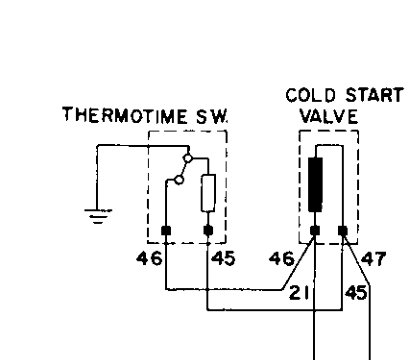 I don't think that that diagram is for a 1978. Pre-78 Nissan did have a water temperature switch for the dual point distributors. But 78 uses the single point distributor. And the EGR system uses a heat activated siwtch. The quickest way to narrow things down is to get the voltage measurements from the coil, both positive and negative posts (the coil circuit could be overheating and going open), and the injectors. If it cranks but doesn't start those two elements are most likely to be the cause. No spark or no fuel. Carry the meter and/or noid lights in the car. Measure voltages then insert a noid light if you have injector power. A bad PCM is still a possibility.But it is the same car and engine, moved from Panama to Spain?@72 Datsun 240z I would start your own thread, rather than adding to other existing threads. It will help people stay focused on your problem instead of getting distracted by the original topic. Also, since you've already asked your question in another thread it makes sense to respond to that thread. Except in this case where you should start your own new thread. Good luck. Click "Start new topic" at the top of the page.
 Maybe @Mike can explain it.This thread seems to have gone awry. Are Jalexquijano and Johnny wick the same person? How did the name get changed? And how did 72 Datsun 240z get inserted in here? Is this our new AI world? ...just took a look around and see that Jalex and Johnny wick are the same. Did not know that a person could erase their screen name from the past and take on a new identity. Weird stuff!!
 This is odd though. Kind of suggests low current to the starter solenoid. There's no relay, power passes through the ignition switch directly to the solenoid terminal. Edit - It's an automatic!!! The path from the battery through the fusible link to the ignition switch and on to the starter solenoid would be worth checking. But it could be that the starter solenoid is too weak for the ignition switch current but the jumper gives it just enough to get over the top. I'm not sure that the parts store test will catch that. Might be worthwhile to just tell them it's bad and get a replacement if it's one of the "lifetime warranty" starters.Have you checked resistance through the ballast resistor? Its purpose is to reduce the current through the coil so that it doesn't get too hot. Disconnect it and measure resistance from one terminal to the other. It should be 1.6 ohms. Maybe somebody shorted the terminals and it's not correct. Buena suerte! (Thank you Google Translate).
 Is it being used with a Pertronix Ignitor? What are the details of the whole ignition system? Coils should not get that hot.That's a good one. Hadn't heard or thought of it. It's actually for a Ford so I'm hoping that I can use the screwdriver through the flywheel hole method. But I have a brain-list of other options, plus one now.You have to do the testing when it's not working.Do you have a meter or test light? Check the coil positive post for power with the key on.Stumbled across this video while looking for ideas on holding a flywheel while removing bolts. It's seven years old and the guy is still active so there's a lot of videos to scroll back through for more entertainment. At 7:10 it looks like he's about to tighten the bolt instead of loosen. Cut!Maybe it's not the fuel system at all. The recent work there might be drawing too much attention. Failing fuel systems usually give a clue since the engine dies due to low pressure. There's usually sputtering and low power before shut-off. Your clues seem electrical . Since you have lots of time while waiting for things to cool down you should be able to get out a meter and/or some noid lights or test lights and check the things that need power and ground. Check for power at the coil, power at the injectors, injector activation when the engine is spinning, and spark. Narrow the possibilities down. If everything checks out then you'll have to consider the dreaded but not unheard of ECU failure. I've mentioned before in long past posts that I had a 78 ECU die on me while I was giving it a test run. Just died instantly, restarted, after a few seconds, let me drive another mile, then died again. I put the old 76 ECU back in and everything was fine. After that adventure I always carried a spare ECU behind the seat. The other common failure point is the ignition module. But you'll get pointed that way if you have no spark.I would find a way to check if the pump has power when the engine won't start. You could check at the relay or check at the pump itself. If there's power, make sure the ground is good. If there's power and ground you have a pump problem. Otherwise you have an electrical problem. Many places to check the circuit. The wiring diagram shows bullet connectors somewhere along the way. And, ZCarDepot has done a great job of building his business. But, like all businesses, he has to try to find the lowest cost parts in order to make a sufficient profit. Could be a bad relay.
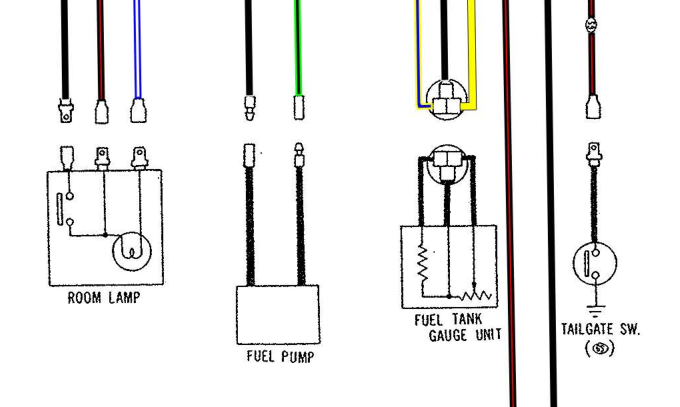


Important Information
By using this site, you agree to our Privacy Policy and Guidelines. We have placed cookies on your device to help make this website better. You can adjust your cookie settings, otherwise we'll assume you're okay to continue.
Account
Navigation
Search
Configure browser push notifications
Chrome (Android)
- Tap the lock icon next to the address bar.
- Tap Permissions → Notifications.
- Adjust your preference.
Chrome (Desktop)
- Click the padlock icon in the address bar.
- Select Site settings.
- Find Notifications and adjust your preference.
Safari (iOS 16.4+)
- Ensure the site is installed via Add to Home Screen.
- Open Settings App → Notifications.
- Find your app name and adjust your preference.
Safari (macOS)
- Go to Safari → Preferences.
- Click the Websites tab.
- Select Notifications in the sidebar.
- Find this website and adjust your preference.
Edge (Android)
- Tap the lock icon next to the address bar.
- Tap Permissions.
- Find Notifications and adjust your preference.
Edge (Desktop)
- Click the padlock icon in the address bar.
- Click Permissions for this site.
- Find Notifications and adjust your preference.
Firefox (Android)
- Go to Settings → Site permissions.
- Tap Notifications.
- Find this site in the list and adjust your preference.
Firefox (Desktop)
- Open Firefox Settings.
- Search for Notifications.
- Find this site in the list and adjust your preference.