Zed Head
Community Member
-
Joined
-
Last visited
Everything posted by Zed Head
-
I think that I have one from an old parts transmission in my garage, if it didn't get damaged. The parts are in a box. If you get in a bind, I could probably get it to you. I'm on the west side of the metro area. It would probably fit in an envelope and be covered by a stamp or two. Let me know. Not a big deal.
-
Does the exhaust get a gassy smell before it dies? Kind of sounds like your coolant temperature sensor is disconnected, causing the ECU to supply fuel for a cold engine. Or that you have a vacuum leak and the mixture is only rich enough to overcome the leak(s) when the ECU is supplying extra fuel when the engine really is cold. The Guidebook shows how to check resistance of the coolant temp. circuit at the ECU connector. That will show you if the ECU is getting good information. Once you run out of the simple checks, the best route is to get a multimeter and run through all of the electrical tests. They don't take as long as you would think and when you're done you'll probably have found a few simple things to make better in addition to maybe finding the big problem. If everything checks out then you can move on to the odd problems, like fuel pumps that are corroded and overheat after a few minutes of running. Two of us have had those.
-
The newer Fuel Injection Guidebook is in the link below, it's for the S130, not S30. It's from 1980 but covers all previous years. 1978 doesn't use the fuel pump contacts, it uses the oil pressure switch or the alternator current, through a relay. You'll need the 1978 FSM, Engine Fuel chapter, to see that. Does it run for an actual few minutes or a measured 15 - 20 seconds? The word is that for 1978 if you disconnect the oil pressure sender that the fuel pump will get power when the key is On. It's a flaw in the design, but could be handy. http://www.xenons130.com/reference.html
-
Rockauto has both the plugs and the wires. I don't know about shipping to Greece though. If you started a new thread about buying parts in Europe, some of the guys from the north would probably have suggestions. You want plugs for a 1980 280ZX. Rockauto lists all of the important numbers too, which is nice. http://www.rockauto.com/
-
I would remove the wires from the parts you want, install the parts individually, then wire them correctly. Don't try to install the whole set of wires and parts at one time. You could even install one part at a time and make sure it works before installing the next. For example, the distributor with Pertronix module should run the coil you have with no changes. Do that, then install the Hi 6 module. Which may actually be a Crane Hi 6. Or it's not a Hi 6 but is an MSD 6AL, or similar. Here's the instructions for one of the Hi 6 models. What's the model number on yours? Found on the web. The MSD instructions are out there also. It won't be that difficult, one component at a time. http://www.cranecams.com/uploads/instructions/9000-6400a_.pdf
-
Got a camera? You haven't shown what you had, or what you bought, or even given the part number and link to what you bought. You might be talking about something entirely different. Blue showed the two Z car styles, with pictures, in the ZX distributor swap writeup on the atlanticz site. Post #2 above. I think that there may be other designs from the L4's used in various Datsuns, and the L24E used in the Maxima's.
-
Check the mounting points for cracks also. The guys that do burn-outs typically like to bang gears too. Be aware though, that the clunk will never go away completely. The clunk was noted on road tests of brand new Z's, I have a compilation book of Road and Track articles that describes it. I've tightened everything up on mine and still get a "thock" sound occasionally. I know it's just noise though. One way to gauge overall looseness is to wind the engine up, a little bit, not much is necessary, in a low gear, then let off the gas quickly. All of the looseness will be used up when the throttle closes and you'll know more. My drivetrain feels nice and tight but the gear lash still makes a noise now and then. Don't go crazy if you try this though, Going up and down at high RPM would put a lot of strain on the parts, especially if loose.
-
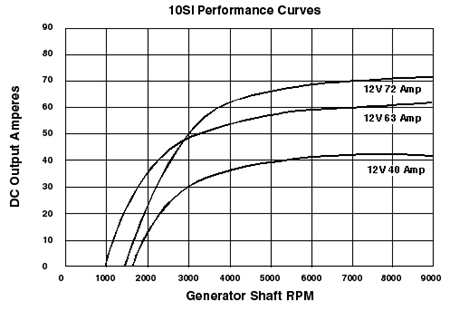
I've found also that the numerous corroded/old/dirty connections each draw a little bit more current than they were designed to. Cleaning them up will help a little bit. Also, as you can see from the chart I attached above, another 50-100 RPM in idle speed can get quite a bit more juice flowing. You might get to a happy spot with just a few tweaks.
-
The tachometer will stop working if you do. But it might work. The module has a plug, all you have to do is pull.
-
Your numbers look normal and don't show any functional problems with the system. Your alternator is just on the weak side. They don't put out their rated current at low RPM, only at high (see attached). Pretty common. A different alternator, same style, might solve the problem. It's kind of a crap shoot unfortunately.

-
74 was the first year of electronic. The blue tach wire runs to the ignition module. It's a branched circuit. Stick your head up by the fuse box and make sure the module is unplugged. Could be your problem.
-
Do you have a link? The site below is typically known as Arizona Z Car. It's one of my most unfavorite web sites to try to get around in. Maybe there's another out there. http://www.arizonazcar.com/
-
I'm down to the odd trim part now, in my searches. For 280Z's. I kind of miss the hunt but the garage is full of spare parts. The first few years I had my car, quite a few Z's went through. Things have gotten sparse lately. I've been to the Tacoma yard and it's not as pleasant as the three Portland PnP's. Plus it's hard to get to. Don't go unless you know they have something you want.
-
Wasn't me. I have all of the flywheels I need. Keep an eye out for a 12 mm Ace Hardware wrench. Lost it a couple of years ago. I am net positive on tools found though...
-
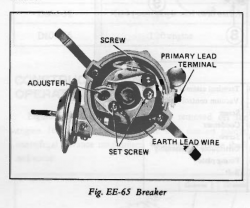
There should be alternating voltage between red and green as you spin the distributor. That's what triggers the module. You won't see much on a meter but you should see some variation. You can also measure resistance of the pickup coil (green to red wires when disconnected) to see if it's in spec. Is the original module still connected under the dash? That might keep current flowing on the coil circuit. Which would keep the coil from sparking. Not sure why it wouldn't do the same with points but maybe you left the blue wire off for the quick points system test. Also see that you didn't mention the rotor. People have been known to forget to install it. I did once. Forgot to say - of course, there's a test procedure in the Factory Service Manual. Engine Electrical chapter, any 280Z FSM.
-
For what it's worth, I bought a junkyard flywheel and pressure plate with the intention of using them eventually. I didn't get the disc, it looked like it had grease on it. And I'm using a used flywheel now, that I sanded clean, from a parts car. With a new pressure plate and disc. If the ZX is a 2+2 it's probably a 240mm clutch and flywheel. The clutch discs will swap from 240 up through 280ZX but need to match the pressure plate and flywheel. Coupes use 225mm, 2+2 and Turbo use 240mm. If you decide to do it, get the throwout bearing collar also. It matches the pressure plate height. That would be a complete set, ready to go.
-
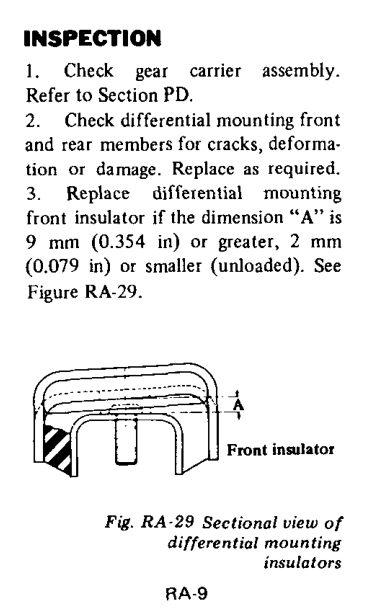
To Blue's point - it's hard to tell if the diff mount is really in good shape, when it's on the car. The loose rubber is not obvious. I think that the "clunk" is actually the sound of the diff dropping back down on to the crossmember and mount after the loose rubber lets it lift. It doesn't have to lift far to make a noise when it drops back down. The strap doesn't really come in to play. I thought mine was fine, but once I replaced it, I stuck it in a vise and could pry the two pieces apart easily with a big screwdriver. And there's actually a measurement you can make, shown in the Rear Suspension chapter, to help determine if the rubber is worn. Also hard to tell if the u-joints are good without sticking a screwdriver in to the joint and reefing ti around while watching the seams of the seal with a strong light. Twisting the half-shaft by hand won't really do it. They see a lot more when in action.

-
It's been posted occasionally that one-wheel burnouts are the death of a diff. The hole for the spider gear pinion shafts wallows out. I've seen pictures where the hole is so worn that you can see the ovality and the looseness of the shafts. You might see something if you pop the cover. Kind of confusing that the deeper you go in the diff, the more "pinions" there are...
-
Does that part show up on the Arizona Z Car web site or do you have to call them? I tried to find it but the AZC site is kind of a mess. There's someone on another forum looking for one.
-
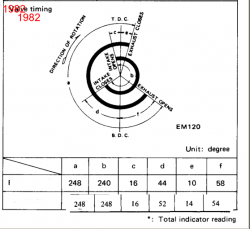
I think that the differences between the two engines might be very small. The change in HP calculation methods really confused any comparisons. But if you look at the specs, it seems like the old style engines should actually have the power edge. The cam specs are a hair better for the N42/N42 engines. The CR is a hair higher for the later ZX engines. 8.8 vs. 83. The intake manifold is smaller on the ZX engines, and so is the throttle body. The cam specs for the old engine should produce more power. Really hard to tell, but it's probably just a few HP either way, with maybe a different shape to the power curves. I have a spare 1981 ZX engine in my garage myself. I bought it because it was in good shape, the price was right, and I thought that it might be a little "better", But after digging in to the details I can't find the better part. Seems a wash. On the other hand, the later ZX's ECU and EFI system could offer potential for a small investment of time. Probably has a more developed fueling algorithm, and it has an O2 sensor feedback for efficiency. Tried to cobble/copy the specs in for 76 v 82. Intake open duration is 8 degrees longer, and stays open 8 degrees later for 1976. Which should allow more charge to enter. But the lifts are the same, I believe, although I can't find the numbers in the 1982 manual. 76 on the bottom. There might be other changes in the F54 block it self that make it more desirable.
-
I can't find the man reference usually used but the one I found says that 19 tooth is the white gear for a 3.9. A lot closer to a 4.38 than a yellow, for a Z. 510's and Z's both use the same size tire, I believe http://community.ratsun.net/topic/26704-matching-speedo-gears-after-rear-end-swap/ Post #7 A similar question came up on another forum and someone posted the link below. It will give you an idea of the difference you'll see between the two. It really depends on how you intend to use the car. Nissan designed the systems to allow starting from a stop easily, including hills, and cruise at freeway speeds. Race cars need to accelerate from corners and go fast on the straights. Drag cars need to accelerate and top out in a gear as they hit the lights. Auto-cross: in the powerband with throttle control. Stuff like that. http://webspace.webring.com/people/cz/z_design_studio/
-
Don't forget tire size. With a bigger tire the diff will spin slower. A big tire and a 4.38 might spin the propeller shaft at the same speed as a small tire and a 3.36. Yellow is way down at the other end though. Count the teeth to be sure what you have. Maybe it's old white.
-
If you do a Google search on the part numbers, you'll get several options here. http://www.carpartsmanual.com/datsuns30/DatsunZIndex/Engine280Z/FuelPumpHose/FromAug-76/tabid/1619/Default.aspx Also look at the post Aug 76 parts, menu on the left. Looks like the same pump but different hose and tube setup. More metal, less rubber. You might also try your local dealer. Surprising what parts they can still get. Also, if you decide to go cheaper and use an aftermarket pump, you can make a loop in the hose to get it to curl around from port to port without kinking.
-
We've had some good discussions about the "vapor lock". The info gathered suggests that the simplest way to cure it is to convert to an aluminum fuel rail. The larger bore of the rail holds enough fuel to cool the injectors via boiling and condensation, with the heat conducted and radiated away by the aluminum. http://www.classiczcars.com/topic/48810-hot-start-issue-with-efi-who-has-it-who-doesnt/ Assuming that you're talking about a 280Z. The 240Z's with carbs and mechanical pump can have a real vapor lock problem.
-
I was replying to what you said in Post #3. If it is a ZX control, then it won't fit the Z distributors is what I was saying. If my memory is right. I have both styles in the garage and remember noticing that they were different. I could be off but I think I'm not. I'm sure I'll check soon, just to be super-sure. Nissan changed a lot on the ZX distributors, from the Z's. Edit - Hey. I had a bad memory. I was positive that there's one vacuum canister that won't fit another type of distributor. But, I did go out and swap the 280Z and 280ZX vacuum canisters and they fit fine. I feel better now, sorry for the confusion. Carry on... Edit 2 - Must have been the points distributors I was thinking of. For those swapping to electronic, they can't swap the vacuum canister. So 240Z distributors would be off the list.