Zed Head
Community Member
-
Joined
-
Last visited
Everything posted by Zed Head
-
I searched around on hybridz.org where a lot of engine work tends to happen and found the thread below. There's a core plug (aka "freeze" plug) behind the timing chain cover that might be the source of your problem. You'll find out when you remove the cover. If it is, check to see if the PO just dinked around with the plug and messed it up or if it's rusted out. If it's rust you'll need to check all of the other core plugs. Clear some space in the garage. Problem: Oil POURING out of the coolant inlet on the block - Nissan L6 Forum - HybridZ Found the thread with this in the Google box - site:hybridz.org coolant leak timing chain cover Here's another, same core plug - http://forums.hybridz.org/topic/82490-coolant-in-the-crankcase/
-
If he has enough current to drive a relay that might effective. Tap the line between the fuse box and the switch and insert a relay. Milliamps to drive the relay, full power to the lights. Assuming the grounding circuit is okay, which a new headlight switch won't fix anyway.
-
That's a lot of stuff in the crankcase. I'm no expert but it seems like a lot of fluid for just a head gasket problem. If you really have no other signs of head gasket damage, the timing cover might be worth examining closely. The oil leak might be a sign that the cover is loose or the gasket isn't sealing. I don't know well enough how it seals so can't say how likely it is that you could have a connection between cooling and lubrication systems. Consider whether or not your head needs work, like a valve job. Maybe the head is worth removing anyway. You have a dilemma.
-
Carrying on with the theme that you will try to fix it alone if nobody offers to help, you should probably drain the oil/water blend and replace it with oil, then spin the engine without starting to push the oil/water blend out of the various places it's ended up. The stuff on the cam indicates that you've blended the water into the oil and spread it through the engine. It might not be that harmful to let it sit in there but it needs to come out anyway and might prevent some rust where you don't want it. The quantity of water in the bottom of the pan will be a clue about how bad things are. I blew a head gasket or cracked a head (never took it apart) on a Ford Escort and quarts of water came out before the oil did. On the timing cover leak - it would be unusual but if your timing cover was damaged it might be possible to connect the oil and water passages. The oil pump and water pump both push their fluids from the cover to the block. I've heard of corrosion through the cover's water passages causing leaks.
-
Well then, I would open up the Engine Mechanical chapter of the Factory Service Manual and start there. The Nissan FSM's are very well written and will get you far. The first part of the chapter is about disassembly. The first thing you need to do is remove the manifolds, or at least disconnect them if you plan to pull everything out at one time. You'll probably break a few studs and bolts but once you get those off the head will be exposed. Then remove the valve cover gasket and start popping head bolts loose. Take the two short bolts holding the timing cover out. Insert the cam tensioner retainer. See if the head will come loose. It will probably be stuck. Worst case, you get halfway and need help. You might be surprised though and it comes right off. Removing stuff is relatively easy. Getting it re-installed right is more work.
-
It looks like you've decided that you have a blown head-gasket, or someone told you that you had one, due to the oil/water emulsion, and you're assuming that replacing the head-gasket will fix your problem. But there are several possible causes for coolant leaking in to the lubrication system. You could also (some would say probably) find that your head is warped. I took a head off of a good running engine, no HG problems, and it's warped .007". It might be cheaper just to replace the engine or the head if you're looking just to get the car running. If it's a hobby and you want to dig in to engine work, then that's a different scene. Just adding something to think about. You'll probably spend a lot more money and time than you plan to, even if the head-gasket is the cause of coolant in your lubrication system. Forgot to say that nobody has even mentioned the manifolds and problems associated with just removing and replacing those. Removing and replacing a head is a pretty big job and can nickel and dime you pretty hard.
-
I would try to break your problems down in to individual, manageable projects. The high idle may or may not be related to the engine acting like it's running out of gas. I don't think that the potentiometer or the BCDD will fix that problem, but that seems like the most important one. When you have several things happening at once it's easy to get distracted or decide to work on the one that seems easiest, but you might find that you're fixing something that doesn't need fixing. If you're not super-comfortable with how your engine works, changing several things at once is almost a guaranteed way to create new problems. Most of these posts are suggestions for things to consider, not calls to action. If you think you have a fuel problem, the most direct way to confirm it is to connect a gauge and drive the car. See where fuel pressure is when the problem happens.
-
You can also remove the small wire from the starter solenoid (it pulls off) and turn the key to Start to run the pump. That works on any of the 280Z's. The starter won't run, but the pump will run. Don't let the end of the wire touch anything since it will have power when the key is at Start. I would not mess with the BCDD yet. You'll just complicate things. There are many other possible causes of a high idle, like sticky throttle plates or sticky throttle linkage. Nissan actually issued a recall in 1977 to fix that type of problem.
-
One good clue would be the tachometer behavior. If the ignition module, or coil, or power to the ignition system, is going bad the tachometer needle will probably jump around or just go to zero. When mine was going bad the engine would still run but poorly and the tachometer needle was jumpy and read about 1.5 times actual engine RPM. You'll need to have a general feel for what RPM should be for your speed and gear. For example, mine showed that I should have been going about 80 mph, when I was only going 50. Mine also would fix it itself if I turned the engine off and restarted. They become more heat sensitive when they're failing and higher RPM generates more heat. If it's a fuel problem the tachometer will probably be fine when you're in gear because car speed will dictate engine speed. Assuming you have a stick shift.
-
The end of the parking brake cable sheath fits in to that slot. Look through the link below and you might find it shown. I browsed but didn't see it. http://www.carpartsmanual.com/datsuns30/DatsunZIndex/Brake/tabid/1549/Default.aspx
-
I remember some of your posts but can't remember the details of your engine. Is it stock? Have you modified anything like the ignition system? When you say it feels like it's running out of gas do you mean a complete loss of power or a sputtering and coughing feeling?
-
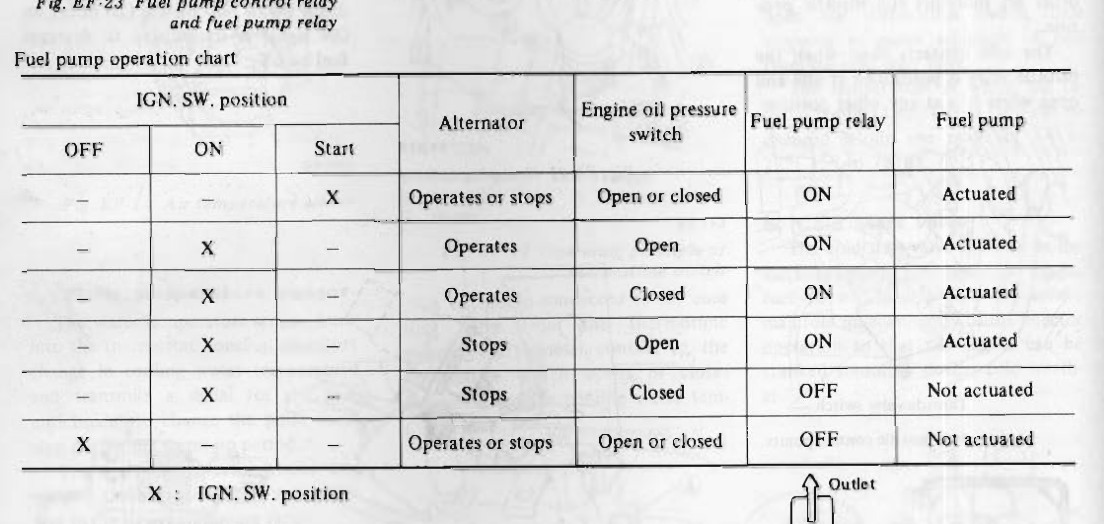
I've seen this pointed out somewhere else on the internet, that there is a flaw in the logic. Maybe a link from atlanticz. Found it - http://atlanticz.ca/zclub/techtips/fuelpump/moreinfo.htm
-
I saw the post three weeks ago but figured the OP and anyone else looking had enough focus on those two items to go look themselves. Who knows, we could all be wrong, the discussion is just a starting point. And I'd like to have written from knowledge acquired having gone through the wiring diagrams and figuring out what all the relays are doing but the reality is I came across the attached chart in the FSM. It takes some study since the oil switch description is kind of counter-intuitive. The oil switch "open" is what actuates the relay and the pump, not closed. Still much easier than the wiring diagram.

-
Now there's some humor. If we were talking about timing, it's just an edgy joke. DB had ill-intent though. He could have made his point without that final paragraph. It's one of those things that you write, then think better of before posting, if you put the time in to thinking. DB's just not thinking things through very well. Now he's always going to be "that guy".
-
Edited - Never mind - I do need to say though, that using the word "retard" in today's world is a sign of true ignorance. David needs to become more aware of the world around him, in general.
-
The Factory Service Manual (FSM) calls it an air pump. The drawing is of high quality.
-
I've looked before for ways to brighten my gauge lights and they ground through the rheostat. If you can get a light socket out you could check the wires for power to see if it's a power supply or grounding issue. A voltmeter would be easiest but you could also put another light bulb in series and ground it. Test light method.
-
Why are you not posting this on a 240SX or Neon site, and why are you posting here? Frankly, these cars are boring, nothing like the reason people buy a Z.
-
Using a Z car site for photo hosting doesn't seem right.
-
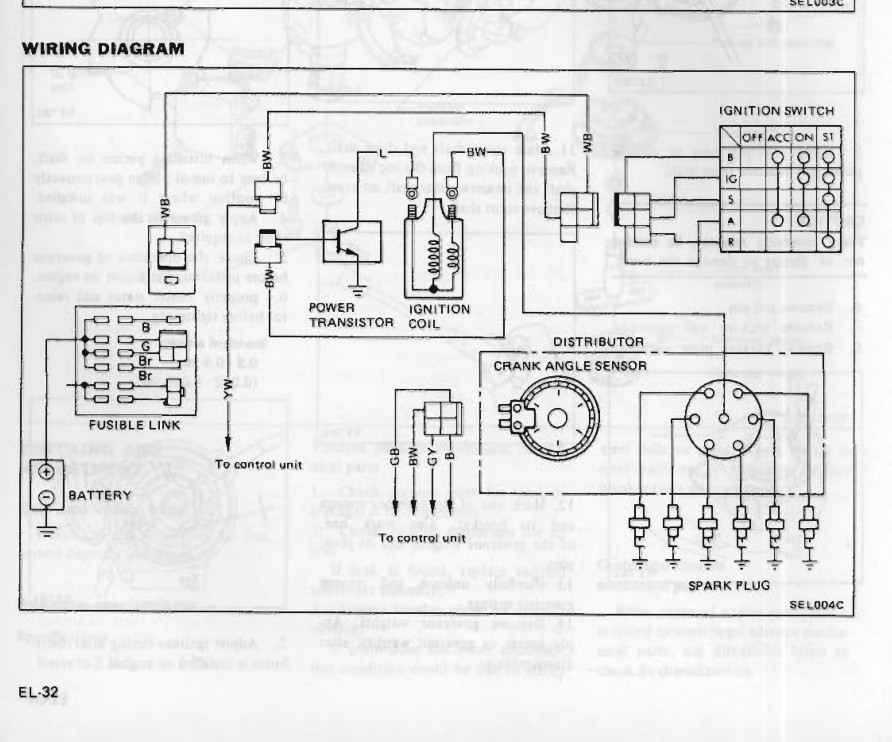
The attached 1983 Electrical diagram suggests that there should only be one blue wire off the coil. Tried to figure out where the tachometer gets its signal but the later FSM's are much worse than the early Z FSM's in describing and illustrating how things work. The turbo motors use a Crank Angle Sensor (CAS) which I would guess also feeds the tachometer. Probably through the ECU.
-
I measured 2.3 kOhms (2,300 ohms, to be clear) on my spare from a 78 280Z. That's on the negative side, between the negative post and the tachometer. In series. I have also used the resistor without the tachometer connected between the negative post and ground, to run an engine on a stand. I think that it might also "condition" the Pin 1 signal to the ECU, since they're all branched off of the same line on a 280Z. Maybe absorbs voltage pulses or something. The ECU seems to need it to work right.
-
The fuel pump is not like the motor on an air compressor. It does not stop running when target pressure is reached, it runs all the time when the engine is running. The fuel pressure regulator (FPR) bleeds off excess pressure to maintain target pressure in the fuel rail (the fuel tank is not pressurized). How long did the car sit before you bought it? Old fuel was mentioned in another thread, and that's something you should consider. Some fuel will last for years, other goes bad in less than a year. Give a short summary of the condition of the car when you bought it, a new clue might show up.
-
I forgot that from the other thread. No vacuum advance. 20 + 17 puts him at 37. He had 30 degrees total in that thread, post #13, but didn't report how it drove. New distributor implies that there's still pinging. Maybe?
-
What you might want to double-check is the timing advance curves. Later engines were designed for high fuel mileage and emissions so have a lot of vacuum advance. I copied some entries from the Excel chart. The numbers are initial, centrifugal, vacuum, total of all three (high PRM cruising), RPM at which centrifugal is complete, total of initial plus centrifugal (full throttle above indicated RPM). D606-52 17 12 11 40 2000 29 M/A 1970 – 1972 D611-54 7 24 14 45 2830 31 M 1973 D6K82-01 8 17 30 55 2800 25 M/A 1983 Non-Turbo p.s. Mike, we need WYSIWYG! I spent 5 minutes making it look right and formatting disappears when posted.
-
I just picked out this one thing because it shows that you might need to spend more time in the FSM. There is a lot of information in there and the Engine Fuel chapter is kind of like a college level EFI course book. The way your engine runs after you read it is your grade (kidding, kind of). Since you've been in to some of the engine and EFI parts it would pay you to go back the Engine Fuel chapter and read from page one. Things will make more sense each time you go through, and you'll realize that there are primitive mechanisms that need to work right. In short though, most of the individual pieces need to work correctly, and they all work together to make the engine run right. There are a few items that are for cold start only, but the rest are important. One other key is that all intake air must have passed through the AFM at one time. And the PCV system is connected to the intake system so any leaks there are essentially intake system leaks. To the question I quoted - no the fuel pump should not run all the time. As you noted, the PO has wired it that way. This is a sign that there was probably some other problem that he was trying to fix. Fuel pressure is key. And once you figure out the Engine Fuel chapter, you can do a lot of testing from the ECU connector without removing parts. What the ECU "sees" is most important.