Zed Head
Member
-
Joined
-
Last visited
Everything posted by Zed Head
-
 Thanks all for the comments. I feel comfortable now with poly front/rubber back, although the steering does feel looser. Replacing the LCA bushings will probably help that, I'm sure. ktm, I'm just telling a little story here, and trying to add to the body of Z Car knowledge, with some pictures and solid facts, for anyone to use as they choose. That's all. No intent to offend or ignore anyone else's hard work.
 -
Good point, thanks for adding. I did notice that my control arm bushings were worn also, with visible cracking, and thought that it may have contributed. Before I took the broken T/C rod off I found that I could grab it like a handle and move the control arm around easily, with play visible in the control arm bushing. The end of the broken rod actually hung about an inch below the bushing mounts because of the worn control arm bushings, so there was probably a side load on the rod also when in use. I didn't want to do the control arm bushings yet so just went with the rubber in the back for a short-term fix. Has anyone replaced the bushings with the arm still in the car? I enjoy laying under my car so might try it...:classic:
-
Changed mind on comment...
-
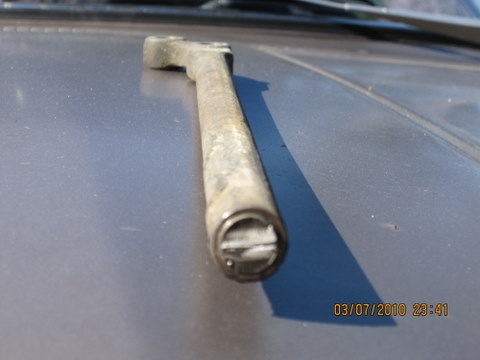
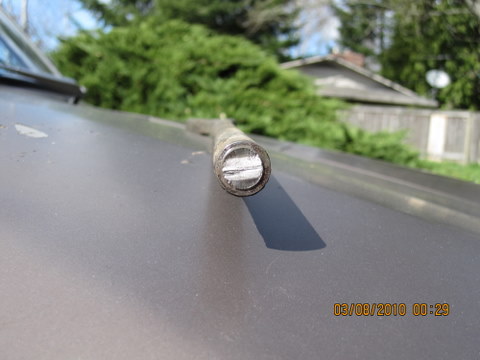
Here is a picture of one more Z car T/C rod gone. I installed MSA polyurethane bushings front and back on the T/C rods of my stock 1976 280Z about 4 months ago and have put about 3,000 fairly easy road miles on since then. I had read the various accounts of broken rods but the evidence still seemed iffy and most of the descriptions seemed to be for the later model cars with front-oriented T/C rods and not the rear-oriented Z cars. So I decided I would do both sides with polyurethane on my car and see what happened. It looks like fatigue cracking started top and bottom and just worked its way through the bar. The coup de grace may have been when I backed the front wheel in to the curb while parallel parking. About ten miles later, that evening, I heard something bumping off the bottom of the car, but had not seen anything in the road. So I took a look under the hood in the morning and saw that the rod end on the passenger side was almost worked out of the bushings, the rod was broken at the base of the turned-down end, and the big washer on the inside was gone. That was the noise. I had a spare rod from a 78 and used the rubber bushings on the back on both sides, in place of the hard polyurethane, as described around the various forums, to take some of the bending pressure off the rod end. For the record, for those still wondering.


-
The fuel pressure regulator (FPR) has a vacuum line attached to regulate fuel pressure according to manifold vacuum. Yours looks like it is probably working correctly. If you want to check the FPR, you can pull the small wire from the starter (it comes off by hand, no tools needed), then turn the key to Start to run the fuel pump. The fuel pump will run (you'll hear it), but the engine will not turn over. Without the vacuum from the motor, the FPR will give a higher pressure. 36.5 psi is normal for 1976 and most years, I believe. A lot of people have the problem with rough idle after starting a warm engine. I have seen one proposal for vapor lock but no followup. Have not seen a good remedy yet.
-
It could be that your front or rear brakes are low on pressure. Either leaking or need bleeding. There is a valve that measures the balance between the front and rear systems and activates the dash brake light if the balance is off. I had the same problem on my 76. Found out that a PO had put the front calipers on the wrong sides, making them impossible to bleed correctly. I could pump the brakes up while driving and make the light go off, but it would always come back. Here is a page from the FSM describing the system. 74 260 Brake Page.doc
-
Hey Jennys280Z, does your car actually run like it used to now, and run well? I'm curious since your AFM resistance readings were the same as mine, which was definitely bad. Just trying to learn something. Thanks.
-
Post #3 in this thread, Chris's writeup with pictures, will help you guys out a lot. The pictures show where the clips are and how to get them out. The clips are on the inside, unlike most American-made cars. They are probably covered in old grease and dirt, hard to see. http://www.classiczcars.com/forums/showthread.php?t=27855&highlight=u-joint
-
I live in Portland Oregon, fairly cold up here, and have been driving my car all winter with the cold start valve fuel supply disconnected. It just takes a 1/2 second longer to start but once it's going it's fine. I will not be reconnecting it. I think that it may have been leaking a little. The left over fuel supply line makes a good spot to install a fuel pressure gauge.
-
this just came up today on hybridz - http://forums.hybridz.org/showthread.php?t=127993&page=7
-
I used the word crude and tried to direct attention to the R/T mount because my fix is rough and has only been on the car for a week. My car is essentially my own little experimental test ground to play with, and a reason to get greasy, tear things up, put them back together then go drive around. The new "diff arrester" is a piece of 1/8 x 1 1/2 inch steel that has been twisted and drilled to use the large arrester strap mounting bolts (the ones with the 22 mm heads) to hold it in place. The snubber is a 1 1/2 inch diameter bump stop from Energy Suspension, mounted in the middle of the metal strap, that has been trimmed down to barely touch the top of the diff. It may be susceptible to metal fatigue though so I really can't recommend it unless you feel comfortable with taking a chance and like to crawl around under your car to check it out regularly. Full acknowledgment - I did read Arne's post about using the R/T mount as a snubber, along with hundreds of other diff mount ideas, and that fed some of my thinking. The two other popular ideas with the tabs and the bolt or the L-shaped bracket are essentially snubbers also. One other odd finding - I tried to preload the snubber a little bit (more is better right?) by adding a thick washer under it and levering the mounting bolts in, and found that it transmitted a loud drumming noise in to the car at takeoff. So I went back to the original tiny air gap (about a metal ruler's thickness) and things have been very tight with no added noise or vibration. I've also noticed that we pay a lot of attention to the diff nose rising but that there is very little space for the diff nose to drop before the mount hits solid metal. The stock setup allows the nose to rise a lot but gives a hard landing on the way back down. One more thing to think about. Sorry for the excess words. I like to write.
-
It pulled away fine if you left quickly, the faster the better. It was the attempts to drive slow and smooth that gave the "chatter." I did not resurface the flywheel (should have pointed that out), so the weak diff mount might have been multiplying the effect. Either way, if someone has a similar "chattering" issue, wherever it's coming from, the diff mount might be part of the problem. That was my basic point. Just trying to add something I haven't seen described before. Anyway, thanks for reading, and the alternative view. I should have taken a video (I recently saw one here or over at Hybridz) to try to nail down what was happening.
-
I fabbed up a crude snubber for the front of my R-200 differential, since I knew that the diff mount was showing signs of end-of-life (visible debonding when pried on with a screwdriver off the car), and found that it eliminated a bad clutch chatter problem that I was having. I assume that the weakening original rubber diff mount was allowing the front of the diff to bounce up and down at low acceleration levels, causing the clutch to stick and slip, ie chatter. Just putting this out there for anyone that may be having a clutch chatter problem. Something to look at. My clutch and pressure plate are brand-new, properly installed and broken in, but still chattered if I tried to leave a light or stop sign slowly. The snubber I made is fairly solid and positions a urethane bump stop about 1/16 inch above the diff at rest. In action, the diff rises up and contacts it, stopping the bouncing (my guess, not actually seen in action). The R/T mount or similar would probably have the same effect.
-
It's not clear if you meant fuel was flowing in your fuel lines, or you just saw that lines were full of gas. Residual pressure remains in the lines after they get pressurized, so the fuel pump may not actually have been energized. Maybe you know this but you could pull the wire to the starter and listen for the fuel pump when you turn the key to Start. It's the small wire with the female connector made to be pulled off and pushed on easily. The electric fuel pumps can usually be heard from inside the car. Pull the wire (make sure it's not touching a ground), turn the key to start, listen for the pump.
-
Shiny. Does it run right yet?
-
I don't think that a longer rod gives you more throw. Piston movement determines throw. A longer rod might actually use up some throw by preloading or setting a short starting position for the slave cylinder piston. Might be that you just need to bleed the system, with the original rod, adjusted to the proper amount of play. Air bubbles in the system would use up throw (piston travel) and cause your symptoms. I think the clutch is very easy to bleed, compared to the brakes. Just some thoughts, as to how I understand the hydraulic clutch system. Anyway, good luck.
-
If you could watch the clutch fork while you press the pedal (a mirror beside the car maybe?), or have someone watch it, or film it, or put an indicator on it - then you could isolate the the hydraulic side of the clutch system from the mechanical side (inside the bell housing). Then you would know if it's the clutch disc or pressure plate vs. the master or slave cylinders. More - if the fork moves but it doesn't release, it's pressure plate or disc. If it doesn't move, cylinders or pedal mechanism More #2 - or you might be able to get under the car, lever the clutch fork with a wrench or some pliers and see if it disengages. A wheel or two would need to be off the ground and the car in gear, while you moved the clutch fork and turned the drive shaft at the same time. Yoga.
-
I did not that realize the 68.7 reading you were worried about was through the fuel pump and the air regulator. There should be resistance there, the air regulator is a heater and the fuel pump is a motor. If the air regulator was bad, it would just affect your idle, either too low when cold or too high when warm. It bypasses the throttle, designed to raise the idle at cold startup. Your car runs so the fuel pump is probably fine. The Deoxit cans have an adjustment on the top. Low, Medium and High. I think they are set on High as-bought. I think that your main problem is in the AFM. As the FSM says, the values should be close to 180 and 100. 226 and 126 is quite a bit off. The ECU determines part-throttle injector open duration based on the AFM signal. Page EF-12 has a pretty good diagram of the AFM innards. EF-51 has a picture of the bottom of the AFM, with the connection point, and more thorough testing that you can do if you remove it.
-
It looks like someone may have already been inside the AFM, I don't think that they came sealed with red sealer. But I could be wrong. But it would not affect your bad resistance readings anyway. The black wire is a ground wire. The best way to clean it would be to take it out. Loosen up all of the hose clamps and hoses. Take out the three big Phillips head screws that hold the metal frame the AFM is mounted on. That's the bottom of the mount you're looking at in the second picture. Work off one of the hoses, I think the front one is easiest, and lift that end of the AFM up clear of the hose. Work it out of the other hose, but not too far, you will need to reach under it and get the wires clear of the mount point on the car. Then you should have room to turn it and see the connector, and be able to disconnect it. I think the connector is a little difficult to get off, it may have a wire clip or something holding it. It's been a while. The black wire you saw connects the AFM to the frame so will come with the assembly. The black cover just comes straight off of the AFM. There's really not much holding it on except the sealer. You might need to cut the sealer with a blade and carefully pry the cover off. Inside you'll see the black contact pad and the sliding contacts and the weight and spring. Rotate the weight or move the valve inside the air path and you'll see how the potentiometer works. No one is talking probably because if yours was working correctly, this would be "Not a good idea." But since you'll have to take it out anyway if you have it replaced, you might as well go for it. Have fun. It is a strange device.
-
Well, now you have the experienced guys on the case. Call the guy in CA. I would like to know if these are fixable without a rebuild too. If the core charge hadn't been so big I might have kept my old one to dink around with (maybe MSA knows that). They seem simple in concept. To be clear, the MSA rebuilts cost $169 and MSA did not give me any problems returning the core charge. As long as the aluminum body is not cracked or broken, the charge will be returned. But it is a risk, with a lot of money. To add to sblake01's suggestion, if you try the Deoxit, make sure you let it dry out before testing it. I tried something similar and tested it while still moist after and the numbers were all over the place. That contact area is really sensitive. After it dried though, they went back to the start values (the bad ones:cry:). But you might have some luck, it's worth a shot. Since you are working at the ECU connector, you should probably clean the connector at the AFM too. And that 68.7 reading could be a corroded connector too. Good luck.
-
Those are almost the exact numbers I had on my bad AFM. I had 227 and 126. The car would idle well, but popped and surged when you tried to drive it at part throttle. If you hit the gas though, it ran fine. Of course, I couldn't drive around at full throttle all the time, in my neighborhood anyway, so I replaced it. I got a rebuilt one from MSA (thezstore.com) and the car ran great after that. Until an injector died, but that took a while and is another story. MSA will either rebuild yours after you send it in, or send you one off the shelf if they have it, but with a $400 core charge. Apparently they are running out of cores to rebuild because people don't send the bad ones in, hence the huge core charge. Someone out there might have a used one if you want to save some money.
-
Hey Jennys280Z, here's a wordy response. I don't know why you don't have #13 - 16 parts. But I do know what they are suppose to do. They control the vacuum advance on the manual transmission 1976 motor. For whatever reason (probably emissions control vs. performance), the 1976 models had an electrical switch on the transmission that puts power to Part #13 to shut off the vacuum advance at all times, unless the transmission is in 4th gear. In other words, if you had those parts and they worked correctly, you would see vacuum advance only while driving in 4th gear. You may have figured this out already from the FSM. It took me a while though, but I did actually confirm it on my running engine (which has all of those parts and is non-CA MT). It looks like your car is set up to run full-time vacuum advance. I changed my transmission to one without the switch so that is how I run now. I think that it runs a little better. I have bumped my timing up a few degrees off initial also, just tuning for smooth-running. Do you have parts 33-36? If not, maybe your car was originally a non-CA automatic and got converted. If this is the case, you may have a different distributor also, EE-27, with a different vacuum advance canister. Love how every model year has something a little different.
-
ChrisA, thanks for the pictures and the write-up. I didn't realize, from the FSM diagrams, that the clips were on the inside until I saw your post, with the annotations. The FSM drawing has them shown on the outside, like a typical American manufacturer's placement. I would add, in my case anyway, that using a torch to heat up the metal around the bearing cups can make the difference in getting them out. I'm pretty sure that mine were the originals, and they would not budge, even with a 3 lb mallet, until I heated them up. Also, for those wondering if loose u-joints could be part of the "clunk", my car went from a significant semi-metallic clunk (a little bit clanky), to a more quiet "thunk" after replacing the four half-shaft u-joints (it sounds more normal now, considering how the suspension is designed). They made a big difference, even though only one bearing cup was dry, and the others were all mostly tight, they barely wiggled at all. The dry one was the only one loose enough that I would have considered it bad, otherwise. Thanks again, that was good information.
-
You can get a big 5 oz. can (much bigger than the tiny Radio Shack package) of Deoxit at Guitar Center, if there is one in your neighborhood, for ~ $15. It is the only canned sprayable liquid I've ever used that actually seems like magic. Quite often you can just spray it in to a corroded connection or switch and let it do its thing, without taking things completely apart. Very useful when working with old plastic. Edit - Re the ECU plug - You have to pull some of the wiring harness down with the top of the plug to pivot at the bottom until the hook-like shape at the bottom of the plug clears the metal pin it is hooked on. It pivots down quite a ways before it comes free. It will feel like you're pulling too much harness out of the dash but that's how you work it out. On a 76 and 78 anyway.
-
I had the same problem with the Air Regulator (what Nissan calls it) on my 76. I pulled the guts out just like you did while trying to get my engine running correctly. Then broke one of the bolts n the manifold when removing it. I spent a lot of time at the oven and freezer figuring out that it didn't work right anyway. Not to be contrary, but actually I think that if you are going to remove it, you need to block the air hoses off, not connect them. Otherwise the high idle never goes away. The regulator is open when cold, allowing extra air past the throttle body to give the high idle. It completely closes when warm, it actually has a small 12v heater and bimetallic strip inside, to warm it up and close it before the motor warms up. It's described on page EF-17 in the 77 manual. From an engineering perspective, I think it's true purpose is to get extra air in to burn off the extra fuel from the cold start valve, the start enrichment and the after start enrichment from the ECU. It does the same thing as holding the throttle open a little bit. It looks like primitive technology but they still used them in to the 90s.